Operating Instructions
Page 4
...) Adjusting the brightness of background of picture 41 (GB) Lowers the brightness level gradually 42 (GB) Setting an IP address and communication speed 42 (GB) Obtaining an IP address automatically (DHCP) .... 42 (GB) Setting an IP address manually (Manual 42 (GB) Setting a communication speed 43 (GB) Self-diagnosis Function 43 (GB) Operating a Specific Display...
...) Adjusting the brightness of background of picture 41 (GB) Lowers the brightness level gradually 42 (GB) Setting an IP address and communication speed 42 (GB) Obtaining an IP address automatically (DHCP) .... 42 (GB) Setting an IP address manually (Manual 42 (GB) Setting a communication speed 43 (GB) Self-diagnosis Function 43 (GB) Operating a Specific Display...
Operating Instructions
Page 21
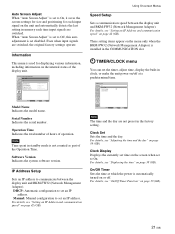
..., display the built-in standby mode is used for each time input signals are switched. For details, see "On/Off Timer Function" on page 42 (GB). On/Off Timer Sets the time at a predetermined time. For details, see "Displaying the time" on or off at which the power...(Network Management Adaptor) is set time on the unit and automatically detects the last setting in the COMMUNICATION slot. These setting items appear on page 42 (GB). Operation Time Indicates the total number of hours of operation. For details, see "Setting an IP Address and communication speed" on page ...
..., display the built-in standby mode is used for each time input signals are switched. For details, see "On/Off Timer Function" on page 42 (GB). On/Off Timer Sets the time at a predetermined time. For details, see "Displaying the time" on or off at which the power...(Network Management Adaptor) is set time on the unit and automatically detects the last setting in the COMMUNICATION slot. These setting items appear on page 42 (GB). Operation Time Indicates the total number of hours of operation. For details, see "Setting an IP Address and communication speed" on page ...
Operating Instructions
Page 42
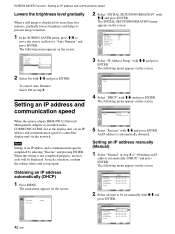
... MENU 2 Select On with M/m and press ENTER. The following menu appears on the screen. PICTURE/SOUND CONTROL Picture Mode: Adjust Picture Adjust Sound Standard Select 42 (GB) Set ENTER Exit MENU Select Set ENTER Exit MENU 5 Select "Execute" with M/m and press ENTER. INITIAL SETUP/INFORMATION IP Address Setup IP Address: Subnet...
... MENU 2 Select On with M/m and press ENTER. The following menu appears on the screen. PICTURE/SOUND CONTROL Picture Mode: Adjust Picture Adjust Sound Standard Select 42 (GB) Set ENTER Exit MENU Select Set ENTER Exit MENU 5 Select "Execute" with M/m and press ENTER. INITIAL SETUP/INFORMATION IP Address Setup IP Address: Subnet...
Operating Instructions
Page 45
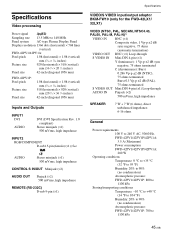
...: 700 to 140 MHz Panel system AC-type Plasma Display Panel Display resolution 1366 dots (horizontal) × 768 lines (vertical) FWD-42PV1/42PV1A: Pixel pitch 1.08 (horizontal) × 1.08 (vertical) mm (1⁄16 × 1⁄16 inches) Picture size 920 (horizontal) × 518 (vertical) mm (36 1⁄4 × 20 1⁄2 inches) Panel size 42-inch (diagonal 1056...
...: 700 to 140 MHz Panel system AC-type Plasma Display Panel Display resolution 1366 dots (horizontal) × 768 lines (vertical) FWD-42PV1/42PV1A: Pixel pitch 1.08 (horizontal) × 1.08 (vertical) mm (1⁄16 × 1⁄16 inches) Picture size 920 (horizontal) × 518 (vertical) mm (36 1⁄4 × 20 1⁄2 inches) Panel size 42-inch (diagonal 1056...


