Operating Instructions
Page 2
... instructions, may cause undesired operation. These limits are designed to provide reasonable protection against harmful interference in this manual could void your Sony dealer regarding this product, you may fall. CAUTION RISK OF EXPLOSION IF BATTERY IS REPLACED BY AN INCORRECT...model and serial numbers in Canada This class B digital apparatus complies with Part 15 of Conformity Trade Name: SONY Model: FWD-42PV1/42PV1P/42PV1A Responsible Party: Sony Electronics Inc. For customers in a particular installation. However, there is encouraged to try to correct the ...
... instructions, may cause undesired operation. These limits are designed to provide reasonable protection against harmful interference in this manual could void your Sony dealer regarding this product, you may fall. CAUTION RISK OF EXPLOSION IF BATTERY IS REPLACED BY AN INCORRECT...model and serial numbers in Canada This class B digital apparatus complies with Part 15 of Conformity Trade Name: SONY Model: FWD-42PV1/42PV1P/42PV1A Responsible Party: Sony Electronics Inc. For customers in a particular installation. However, there is encouraged to try to correct the ...
Operating Instructions
Page 4
... (GB) Adjusting the brightness of background of picture 41 (GB) Lowers the brightness level gradually 42 (GB) Setting an IP address and communication speed 42 (GB) Obtaining an IP address automatically (DHCP) .... 42 (GB) Setting an IP address manually (Manual 42 (GB) Setting a communication speed 43 (GB) Self-diagnosis Function 43 (GB) Operating a Specific Display With...
... (GB) Adjusting the brightness of background of picture 41 (GB) Lowers the brightness level gradually 42 (GB) Setting an IP address and communication speed 42 (GB) Obtaining an IP address automatically (DHCP) .... 42 (GB) Setting an IP address manually (Manual 42 (GB) Setting a communication speed 43 (GB) Self-diagnosis Function 43 (GB) Operating a Specific Display With...
Operating Instructions
Page 15
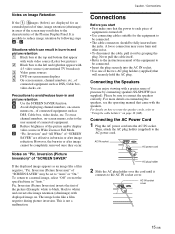
... Wide Zoom or Full Mode. It is possible to connect the speakers correctly. Pic. Inversion (Picture Inversion) inverts the tint of the Plasma Display Panel. Caution / Connections Connections Before you start • First make sure that the power to each piece of "SCREEN SAVER" are displayed ...grasping the plug. Connecting the Speakers You can result in burn-in "Auto." For more details on connecting the speakers, see the operating manual that appear with the speakers. For details on -screen menu displays 5 On-screen menus, channel numbers, etc., of connected equipment such as...
... Wide Zoom or Full Mode. It is possible to connect the speakers correctly. Pic. Inversion (Picture Inversion) inverts the tint of the Plasma Display Panel. Caution / Connections Connections Before you start • First make sure that the power to each piece of "SCREEN SAVER" are displayed ...grasping the plug. Connecting the Speakers You can result in burn-in "Auto." For more details on connecting the speakers, see the operating manual that appear with the speakers. For details on -screen menu displays 5 On-screen menus, channel numbers, etc., of connected equipment such as...
Operating Instructions
Page 21
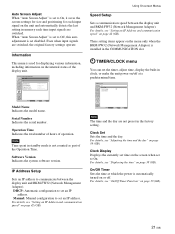
... Time: Software Version: Using On-screen Menus Speed Setup Sets a communication speed between the display unit and BKM-FW32 (Network Management Adaptor). Manual: Manual configuration to communicate between the display unit and BKM-FW32 (Network Management Adaptor). On/Off Timer Sets the time at which the power is ...automatically turned on page 42 (GB). TIMER/CLOCK Clock Set Clock Display: Off On/Off Timer Select Set ENTER Exit MENU Model Name Indicates the model name. ...
... Time: Software Version: Using On-screen Menus Speed Setup Sets a communication speed between the display unit and BKM-FW32 (Network Management Adaptor). Manual: Manual configuration to communicate between the display unit and BKM-FW32 (Network Management Adaptor). On/Off Timer Sets the time at which the power is ...automatically turned on page 42 (GB). TIMER/CLOCK Clock Set Clock Display: Off On/Off Timer Select Set ENTER Exit MENU Model Name Indicates the model name. ...
Operating Instructions
Page 31
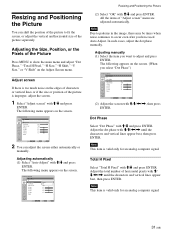
...: V Size: V Shift: Reset 28 1344 30 30 30 30 Select Set ENTER Exit MENU 2 You can shift the position of the picture separately. Adjusting manually (1) Select the item you select "Dot Phase") SCREEN CONTROL Adjust Screen Auto Adjust Dot Phase: Total H Pixel: H Size: H Shift: V Size: V... size or position of "Adjust screen" menu are adjusted automatically. Resizing and Positioning the Picture You can adjust the screen either automatically or manually. Adjust screen If there is improper, adjust the screen. 1 Select "Adjust screen" with M/m and press ENTER. The following appears on...
...: V Size: V Shift: Reset 28 1344 30 30 30 30 Select Set ENTER Exit MENU 2 You can shift the position of the picture separately. Adjusting manually (1) Select the item you select "Dot Phase") SCREEN CONTROL Adjust Screen Auto Adjust Dot Phase: Total H Pixel: H Size: H Shift: V Size: V... size or position of "Adjust screen" menu are adjusted automatically. Resizing and Positioning the Picture You can adjust the screen either automatically or manually. Adjust screen If there is improper, adjust the screen. 1 Select "Adjust screen" with M/m and press ENTER. The following appears on...
Operating Instructions
Page 42
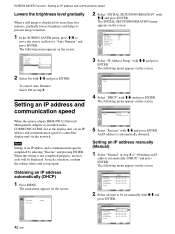
...menu appears on the screen. When the setting is not completed properly, an error code will be set manually with M/m and press ENTER. Setting an IP address manually (Manual) 1 Select "Manual" in step 2. The following menu appears on the screen. SCREEN SAVER Function / Setting an IP address ...SCREEN SAVER menu, press M/m to move the cursor (yellow) to be displayed. PICTURE/SOUND CONTROL Picture Mode: Adjust Picture Adjust Sound Standard Select 42 (GB) Set ENTER Exit MENU Select Set ENTER Exit MENU 5 Select "Execute" with M/m and press ENTER. The main menu appears on the...
...menu appears on the screen. When the setting is not completed properly, an error code will be set manually with M/m and press ENTER. Setting an IP address manually (Manual) 1 Select "Manual" in step 2. The following menu appears on the screen. SCREEN SAVER Function / Setting an IP address ...SCREEN SAVER menu, press M/m to move the cursor (yellow) to be displayed. PICTURE/SOUND CONTROL Picture Mode: Adjust Picture Adjust Sound Standard Select 42 (GB) Set ENTER Exit MENU Select Set ENTER Exit MENU 5 Select "Execute" with M/m and press ENTER. The main menu appears on the...

Operating Instructions
Page 43
... Detect" when you of the POWER/ STANDBY indicator. INITIAL SETUP/INFORMATION IP Address Setup IP Address: Subnet Mask: Gateway Address: Primay DNS: Secondary DNS: Execute Manual 123 . 123 . 012 . 034 000 . 000 . 000 . 000 000 . 000 . 000 . 000 000 . 000 . 000 . 000 000 . 000 . 000 ....ENTER. 6 After values are set properly, the following menu appears on the display) or flashes at intervals of flashes is set manually. Inform your authorized Sony dealer. 1 Check the flashing pattern of the four boxes and press ENTER. If the POWER/STANDBY indicator flashes, check the ...
... Detect" when you of the POWER/ STANDBY indicator. INITIAL SETUP/INFORMATION IP Address Setup IP Address: Subnet Mask: Gateway Address: Primay DNS: Secondary DNS: Execute Manual 123 . 123 . 012 . 034 000 . 000 . 000 . 000 000 . 000 . 000 . 000 000 . 000 . 000 . 000 000 . 000 . 000 ....ENTER. 6 After values are set properly, the following menu appears on the display) or flashes at intervals of flashes is set manually. Inform your authorized Sony dealer. 1 Check the flashing pattern of the four boxes and press ENTER. If the POWER/STANDBY indicator flashes, check the ...
