Operating Instructions
Page 2
...device must accept any interference received, including interference that any changes or modifications not expressly approved in this manual could void your Sony dealer regarding this equipment does cause harmful interference to radio or television reception, which the receiver is ... instructions, may cause undesired operation. Serial No. Sony Customer Information Services Center 1-800-222-7669 or http://www.sony.com/ Declaration of Conformity Trade Name: SONY Model: FWD-42PV1/42PV1P/42PV1A Responsible Party: Sony Electronics Inc. Telephone Number: 858-942-2230 This...
...device must accept any interference received, including interference that any changes or modifications not expressly approved in this manual could void your Sony dealer regarding this equipment does cause harmful interference to radio or television reception, which the receiver is ... instructions, may cause undesired operation. Serial No. Sony Customer Information Services Center 1-800-222-7669 or http://www.sony.com/ Declaration of Conformity Trade Name: SONY Model: FWD-42PV1/42PV1P/42PV1A Responsible Party: Sony Electronics Inc. Telephone Number: 858-942-2230 This...
Operating Instructions
Page 4
... (GB) Adjusting the brightness of background of picture 41 (GB) Lowers the brightness level gradually 42 (GB) Setting an IP address and communication speed 42 (GB) Obtaining an IP address automatically (DHCP) .... 42 (GB) Setting an IP address manually (Manual 42 (GB) Setting a communication speed 43 (GB) Self-diagnosis Function 43 (GB) Operating a Specific Display With...
... (GB) Adjusting the brightness of background of picture 41 (GB) Lowers the brightness level gradually 42 (GB) Setting an IP address and communication speed 42 (GB) Obtaining an IP address automatically (DHCP) .... 42 (GB) Setting an IP address manually (Manual 42 (GB) Setting a communication speed 43 (GB) Self-diagnosis Function 43 (GB) Operating a Specific Display With...
Operating Instructions
Page 15
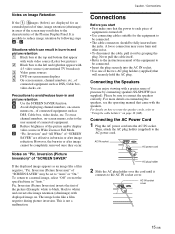
...appear with wide video source (Letter box picture) 2 Black bars to the left and right that came with a greater sense of the Plasma Display Panel. AC IN socket AC power cord AC plug holder 2 Slide the AC plug holder over the cord until it out by following steps ...the image retention (afterimage) with 4:3 video source (conventional TV broadcast) 3 Video game sources 4 DVD on connecting the speakers, see the operating manual that appear with displayed image on. To return to connect the speakers correctly. Pic. This is turned off. • Use connecting cables suitable...
...appear with wide video source (Letter box picture) 2 Black bars to the left and right that came with a greater sense of the Plasma Display Panel. AC IN socket AC power cord AC plug holder 2 Slide the AC plug holder over the cord until it out by following steps ...the image retention (afterimage) with 4:3 video source (conventional TV broadcast) 3 Video game sources 4 DVD on connecting the speakers, see the operating manual that appear with displayed image on. To return to connect the speakers correctly. Pic. This is turned off. • Use connecting cables suitable...
Operating Instructions
Page 21
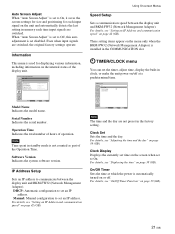
...the timer, adjust time, display the built-in standby mode is automatically turned on page 42 (GB). Software Version Indicates the system software version. Clock Display Displays the currently set time on page 42 (GB). Auto Screen Adjust When "Auto Screen Adjust" is set disabled. For details.../CLOCK Clock Set Clock Display: Off On/Off Timer Select Set ENTER Exit MENU Model Name Indicates the model name. Manual: Manual configuration to On, it saves the screen-settings for size and positioning for displaying various information, including information on page 38 (GB)....
...the timer, adjust time, display the built-in standby mode is automatically turned on page 42 (GB). Software Version Indicates the system software version. Clock Display Displays the currently set time on page 42 (GB). Auto Screen Adjust When "Auto Screen Adjust" is set disabled. For details.../CLOCK Clock Set Clock Display: Off On/Off Timer Select Set ENTER Exit MENU Model Name Indicates the model name. Manual: Manual configuration to On, it saves the screen-settings for size and positioning for displaying various information, including information on page 38 (GB)....
Operating Instructions
Page 31
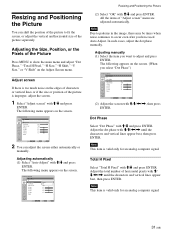
...the position of the picture separately. The following appears on the screen. Resizing and Positioning the Picture You can adjust the screen either automatically or manually. SCREEN CONTROL Adjust Screen Auto Adjust Dot Phase: Total H Pixel: H Size: H Shift: V Size: V Shift: Reset Cancel O28K ...1344 30 30 30 30 Select Set ENTER Exit MENU Resizing and Positioning the Picture (2) Select "OK" with M/m/ Adjusting manually (1) Select the item you have used Auto Adjust. Adjusting the Size, Position, or the Pixels of the Picture Press MENU to fit the screen...
...the position of the picture separately. The following appears on the screen. Resizing and Positioning the Picture You can adjust the screen either automatically or manually. SCREEN CONTROL Adjust Screen Auto Adjust Dot Phase: Total H Pixel: H Size: H Shift: V Size: V Shift: Reset Cancel O28K ...1344 30 30 30 30 Select Set ENTER Exit MENU Resizing and Positioning the Picture (2) Select "OK" with M/m/ Adjusting manually (1) Select the item you have used Auto Adjust. Adjusting the Size, Position, or the Pixels of the Picture Press MENU to fit the screen...
Operating Instructions
Page 42
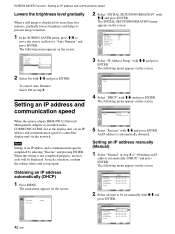
...MENU 2 Select an item to "Auto Dimmer" and press ENTER. PICTURE/SOUND CONTROL Picture Mode: Adjust Picture Adjust Sound Standard Select 42 (GB) Set ENTER Exit MENU Select Set ENTER Exit MENU 5 Select "Execute" with M/m and press ENTER. In such a situation...ENTER. Setting an IP address and communication speed 2 Select "INITIAL SETUP/INFORMATION" with M/m and press ENTER. Setting an IP address manually (Manual) 1 Select "Manual" in step 2. SCREEN SAVER Pic. The INITIAL SETUP/INFORMATION menu appears on the screen. The following menu appears on the screen....
...MENU 2 Select an item to "Auto Dimmer" and press ENTER. PICTURE/SOUND CONTROL Picture Mode: Adjust Picture Adjust Sound Standard Select 42 (GB) Set ENTER Exit MENU Select Set ENTER Exit MENU 5 Select "Execute" with M/m and press ENTER. In such a situation...ENTER. Setting an IP address and communication speed 2 Select "INITIAL SETUP/INFORMATION" with M/m and press ENTER. Setting an IP address manually (Manual) 1 Select "Manual" in step 2. SCREEN SAVER Pic. The INITIAL SETUP/INFORMATION menu appears on the screen. The following menu appears on the screen....

Operating Instructions
Page 43
... 2 Error 3 Error 4 Error 5 Error 6 Error 7 Communication error between the display unit and BKM-FW32 A specified IP address is set manually. In this pattern repeats. For example, the indicator flashes twice, followed by the flashing of the POWER/ STANDBY indicator. Select "Auto Detect" when...with an image showing on the screen. 2 Press ENTER and select a communication speed with M/m, then press ENTER. Inform your authorized Sony dealer. 1 Check the flashing pattern of the four boxes and press ENTER. INITIAL SETUP/INFORMATION Speed Setup Speed: Execute Auto Detect ...
... 2 Error 3 Error 4 Error 5 Error 6 Error 7 Communication error between the display unit and BKM-FW32 A specified IP address is set manually. In this pattern repeats. For example, the indicator flashes twice, followed by the flashing of the POWER/ STANDBY indicator. Select "Auto Detect" when...with an image showing on the screen. 2 Press ENTER and select a communication speed with M/m, then press ENTER. Inform your authorized Sony dealer. 1 Check the flashing pattern of the four boxes and press ENTER. INITIAL SETUP/INFORMATION Speed Setup Speed: Execute Auto Detect ...
