Operating Instructions
Page 3
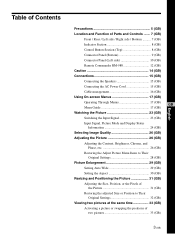
...7 (GB) Front / Rear / Left side / Right side / Bottom .......... 7 (GB) Indicator Section 8 (GB) Control Button Section (Top 8 (GB) Connector Panel (Bottom 9 (GB) Connector Panel (Left side 10 (GB) Remote Commander RM-980 12 (GB) Caution 14 (GB) Connections 15 (GB) Connecting the Speakers 15 (GB) Connecting the AC... Power Cord 15 (GB) Cable management 16 (GB) Using On-screen Menus 17 (GB) Operating Through Menus 17 (GB) ...
...7 (GB) Front / Rear / Left side / Right side / Bottom .......... 7 (GB) Indicator Section 8 (GB) Control Button Section (Top 8 (GB) Connector Panel (Bottom 9 (GB) Connector Panel (Left side 10 (GB) Remote Commander RM-980 12 (GB) Caution 14 (GB) Connections 15 (GB) Connecting the Speakers 15 (GB) Connecting the AC... Power Cord 15 (GB) Cable management 16 (GB) Using On-screen Menus 17 (GB) Operating Through Menus 17 (GB) ...
Operating Instructions
Page 4
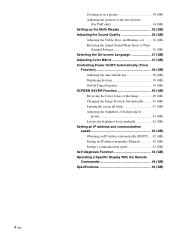
...Adjust Sound Menu Items to Their Original Settings 36 (GB) Selecting the On-screen Language 37 (GB) Adjusting Color Matrix 37 (GB) Controlling Power On/Off Automatically (Timer Function 38 (GB) Adjusting the time and the day 38 (GB) Displaying the time 38 (GB) On/Off...the brightness of background of picture 41 (GB) Lowers the brightness level gradually 42 (GB) Setting an IP address and communication speed 42 (GB) Obtaining an IP address automatically (DHCP) .... 42 (GB) Setting an IP address manually (Manual 42 (GB) Setting a communication speed 43 (GB) Self-diagnosis Function 43 (GB...
...Adjust Sound Menu Items to Their Original Settings 36 (GB) Selecting the On-screen Language 37 (GB) Adjusting Color Matrix 37 (GB) Controlling Power On/Off Automatically (Timer Function 38 (GB) Adjusting the time and the day 38 (GB) Displaying the time 38 (GB) On/Off...the brightness of background of picture 41 (GB) Lowers the brightness level gradually 42 (GB) Setting an IP address and communication speed 42 (GB) Obtaining an IP address automatically (DHCP) .... 42 (GB) Setting an IP address manually (Manual 42 (GB) Setting a communication speed 43 (GB) Self-diagnosis Function 43 (GB...
Operating Instructions
Page 5
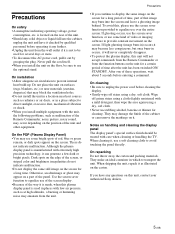
...plug. Do not place the unit on the rear of the unit and other equipment. Although the plasma display panel is used for cleaning. If light ghosting (image burn-in a place subject to unplug the power cord before entering a command. They may emanate from the function buttons on handling and cleaning the display... personnel before operating it any questions on the screen for a certain period of the way it is made, when this unit, contact your authorized Sony dealers. 5 (GB) Precautions On safety • A nameplate indicating operating voltage, power consumption, etc.
...plug. Do not place the unit on the rear of the unit and other equipment. Although the plasma display panel is used for cleaning. If light ghosting (image burn-in a place subject to unplug the power cord before entering a command. They may emanate from the function buttons on handling and cleaning the display... personnel before operating it any questions on the screen for a certain period of the way it is made, when this unit, contact your authorized Sony dealers. 5 (GB) Precautions On safety • A nameplate indicating operating voltage, power consumption, etc.
Operating Instructions
Page 6
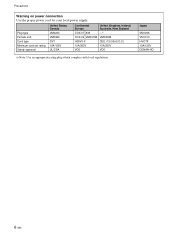
Plug type Female end Cord type Minimum cord set rating Safety approval United States, Canada VM0233 VM0089 SVT 10A/125V UL/CSA Continental Europe United Kingdom, Ireland, Australia, New Zealand COX-07 636 -a) COX-02 VM0310B VM0303B H05VV-F CEE (13) 53rd (O.C) 10A/250V 10A/250V VDE VDE a) Note: Use an appropriate rating plug which complies with local regulations. Japan VM1296 VM1313 HVCTF 10A/125V DENAN-HO 6 (GB) Precautions Warning on power connection Use the proper power cord for your local power supply.
Plug type Female end Cord type Minimum cord set rating Safety approval United States, Canada VM0233 VM0089 SVT 10A/125V UL/CSA Continental Europe United Kingdom, Ireland, Australia, New Zealand COX-07 636 -a) COX-02 VM0310B VM0303B H05VV-F CEE (13) 53rd (O.C) 10A/250V 10A/250V VDE VDE a) Note: Use an appropriate rating plug which complies with local regulations. Japan VM1296 VM1313 HVCTF 10A/125V DENAN-HO 6 (GB) Precautions Warning on power connection Use the proper power cord for your local power supply.

Operating Instructions
Page 7
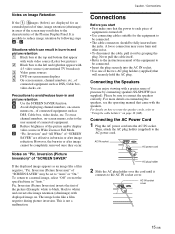
...mode. Once you connect the AC power cord, the POWER/STANDBY indicator lights up an audio/visual system (the power rating: maximum 0.5 A). For more details on the power cord, see "Connecting the AC Power Cord" on page 15 (GB). 7Connector panel For details on the connector panel, see "Control Button Section (Top...(three brade type) You can connect a device consuming small power to a wall outlet. AC IN socket Connect the supplied AC power cord to this socket and to this socket to output the audio matching the signal displayed on the screen. 6- For more details, consult your Sony dealer.
...mode. Once you connect the AC power cord, the POWER/STANDBY indicator lights up an audio/visual system (the power rating: maximum 0.5 A). For more details on the power cord, see "Connecting the AC Power Cord" on page 15 (GB). 7Connector panel For details on the connector panel, see "Control Button Section (Top...(three brade type) You can connect a device consuming small power to a wall outlet. AC IN socket Connect the supplied AC power cord to this socket and to this socket to output the audio matching the signal displayed on the screen. 6- For more details, consult your Sony dealer.
Operating Instructions
Page 8
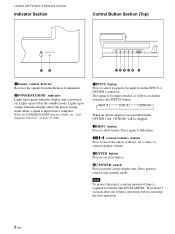
... set a value, or control speaker volume. 5ENTER button Press to set your choice. 61POWER switch Press to power on page 43 (GB). 1INPUT button Press to select a signal to turn the unit ON/STANDBY. Wait about 5 seconds... as follows each time you press the INPUT1 button. Lights up in orange when the display enters the power saving mode while a signal is input from the Remote Commander. 2POWER/STANDBY indicator Lights up in red in...skipped. 2MENU button Press to the standby mode. Note To protect the panel, a certain amount of these operations before executing the next operation. 8 (GB)
... set a value, or control speaker volume. 5ENTER button Press to set your choice. 61POWER switch Press to power on page 43 (GB). 1INPUT button Press to select a signal to turn the unit ON/STANDBY. Wait about 5 seconds... as follows each time you press the INPUT1 button. Lights up in orange when the display enters the power saving mode while a signal is input from the Remote Commander. 2POWER/STANDBY indicator Lights up in red in...skipped. 2MENU button Press to the standby mode. Note To protect the panel, a certain amount of these operations before executing the next operation. 8 (GB)
Operating Instructions
Page 11
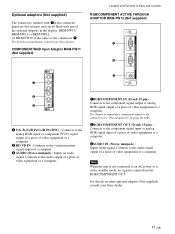
... : Connects to the synchronization signal output of video equipment or a computer. Optional adaptors (Not supplied) The connectors marked with 7on the connector panel are slot-in types and can be fitted with any of video equipment or a computer. BKM-FW10, BKM-FW11 or BKM-FW12. (A BKM... the same as the connectors 7.) For details on other optional adaptors (Not supplied), consult your Sony dealers. Connects to an AC power or is in the display; For details on installation, consult your Sony dealer. 11 (GB) For details on inputting a component signal to the connector, see "Pin...
... : Connects to the synchronization signal output of video equipment or a computer. Optional adaptors (Not supplied) The connectors marked with 7on the connector panel are slot-in types and can be fitted with any of video equipment or a computer. BKM-FW10, BKM-FW11 or BKM-FW12. (A BKM... the same as the connectors 7.) For details on other optional adaptors (Not supplied), consult your Sony dealers. Connects to an AC power or is in the display; For details on installation, consult your Sony dealer. 11 (GB) For details on inputting a component signal to the connector, see "Pin...
Operating Instructions
Page 12
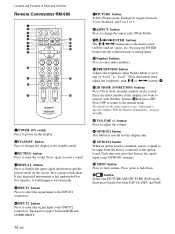
... STBY ON 3 4 5 qf 6 qg 7 qh 8 qj 9 ENTER 123 0 456 789 qa 0 qk qs ON SET qd ql MONITOR RM-980 1POWER ON switch Press to power on the screen. Each press toggles between Vivid, Standard, and User 1 to 3. 8ASPECT button Press to change the display to the standby mode. 3MUTING button...
... STBY ON 3 4 5 qf 6 qg 7 qh 8 qj 9 ENTER 123 0 456 789 qa 0 qk qs ON SET qd ql MONITOR RM-980 1POWER ON switch Press to power on the screen. Each press toggles between Vivid, Standard, and User 1 to 3. 8ASPECT button Press to change the display to the standby mode. 3MUTING button...
Operating Instructions
Page 13
Press this button and adjust the chroma with the M/m or qk CHROMA button Adjusts the chroma when the picture mode is set to any of "User1" to "User3."
Press this button and adjust the chroma with the M/m or qk CHROMA button Adjusts the chroma when the picture mode is set to any of "User1" to "User3."

Operating Instructions
Page 14
This can cause burns. Consult with qualified Sony personnel for proper ventilation. • The ambient temperature must be 0 °C to +35 °C (32 °F to the FWD-42PV1P. When using the stand (not supplied) Front 20 (7 7/8) 10 10 (4) (4) When mounting the display horizontally Front 25 (9 7/8) 10 10 (4) (4) Side...display horizontally, use the display, make sure there is up inside. This will allow for installation. • While the unit is powered on , a certain amount of heat builds up to the authorized local dealers. Avoid touching the top or rear of the unit...
This can cause burns. Consult with qualified Sony personnel for proper ventilation. • The ambient temperature must be 0 °C to +35 °C (32 °F to the FWD-42PV1P. When using the stand (not supplied) Front 20 (7 7/8) 10 10 (4) (4) When mounting the display horizontally Front 25 (9 7/8) 10 10 (4) (4) Side...display horizontally, use the display, make sure there is up inside. This will allow for installation. • While the unit is powered on , a certain amount of heat builds up to the authorized local dealers. Avoid touching the top or rear of the unit...
Operating Instructions
Page 15
... a malfunction. However, the burn-in or after image reduction. For more details on connecting the speakers, see the operating manual that the power to reduce image retention by connecting speakers SS-SP42FW (not supplied). Caution / Connections Connections Before you start • First make sure that ... of "SCREEN SAVER" may result due to the user manual of the Plasma Display Panel. To return to avoid/reduce burn-in and picture retention A Use the SCREEN SAVER function. D "Pic. AC IN socket AC power cord AC plug holder 2 Slide the AC plug holder over the cord ...
... a malfunction. However, the burn-in or after image reduction. For more details on connecting the speakers, see the operating manual that the power to reduce image retention by connecting speakers SS-SP42FW (not supplied). Caution / Connections Connections Before you start • First make sure that ... of "SCREEN SAVER" may result due to the user manual of the Plasma Display Panel. To return to avoid/reduce burn-in and picture retention A Use the SCREEN SAVER function. D "Pic. AC IN socket AC power cord AC plug holder 2 Slide the AC plug holder over the cord ...

Operating Instructions
Page 16
Connections To remove the AC power cord After squeezing the AC plug holder and freeing it, grasp the plug and pull out the AC power cord. Cable management Using the cable holders You can neatly bundle the cables with the cable holders (×4) provided. Rear 1 2 16 (GB) Attach the cable holders as shown in the illustration below.
Connections To remove the AC power cord After squeezing the AC plug holder and freeing it, grasp the plug and pull out the AC power cord. Cable management Using the cable holders You can neatly bundle the cables with the cable holders (×4) provided. Rear 1 2 16 (GB) Attach the cable holders as shown in the illustration below.
Operating Instructions
Page 19
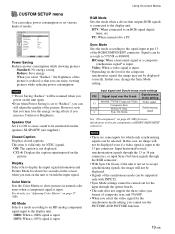
... HD Mode: RGB Mode: Sync Mode: Remote Standard Off Off Off Y/PB/PR 1080i DTV H/Comp Select Set ENTER Exit MENU Power Saving Reduces power consumption while showing pictures. Off: The caption is connected to the display unit. HD Mode Selects a mode according to an HD analog... the brightness of the composite synchronous signal, the image may lose the energy saving effects if you can enjoy viewing pictures while reducing power consumption. Input horizontal/vertical synchronization signals through the 13 or 14 pin connectors, or input Sync On Green signals through the option boards...
... HD Mode: RGB Mode: Sync Mode: Remote Standard Off Off Off Y/PB/PR 1080i DTV H/Comp Select Set ENTER Exit MENU Power Saving Reduces power consumption while showing pictures. Off: The caption is connected to the display unit. HD Mode Selects a mode according to an HD analog... the brightness of the composite synchronous signal, the image may lose the energy saving effects if you can enjoy viewing pictures while reducing power consumption. Input horizontal/vertical synchronization signals through the 13 or 14 pin connectors, or input Sync On Green signals through the option boards...
Operating Instructions
Page 20
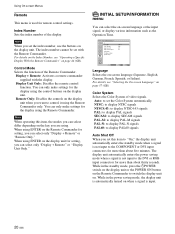
...for setting, you can select only "Display + Remote" or "Display Unit Only." Color System Selects the Color System of the display. While in the power saving mode, the display unit is automatically turned on . For details on the Index Number, see "Selecting the On-screen Language" on the Remote ...Exit MENU Language Selects the on the key you can only make settings for more than about thirty seconds. The display unit automatically enters the power saving mode when a signal is not input to the DVI or RGB input connectors for remote control settings. While in the standby mode, ...
...for setting, you can select only "Display + Remote" or "Display Unit Only." Color System Selects the Color System of the display. While in the power saving mode, the display unit is automatically turned on . For details on the Index Number, see "Selecting the On-screen Language" on the Remote ...Exit MENU Language Selects the on the key you can only make settings for more than about thirty seconds. The display unit automatically enters the power saving mode when a signal is not input to the DVI or RGB input connectors for remote control settings. While in the standby mode, ...
Operating Instructions
Page 21
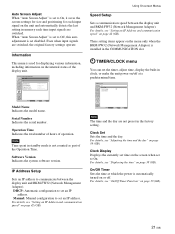
... factory settings operate. On/Off Timer Sets the time at a predetermined time. For details, see "Setting an IP Address and communication speed" on page 42 (GB). Software Version Indicates the system software version. For details, see "Adjusting the time and the day" on page 38 (GB). For details, ...This menu is used for each input signal on the unit and automatically detects the last setting in clock, or make the unit power on/off at which the power is automatically turned on or off. For details, see "Displaying the time" on page 38 (GB). TIMER/CLOCK menu You...
... factory settings operate. On/Off Timer Sets the time at a predetermined time. For details, see "Setting an IP Address and communication speed" on page 42 (GB). Software Version Indicates the system software version. For details, see "Adjusting the time and the day" on page 38 (GB). For details, ...This menu is used for each input signal on the unit and automatically detects the last setting in clock, or make the unit power on/off at which the power is automatically turned on or off. For details, see "Displaying the time" on page 38 (GB). TIMER/CLOCK menu You...
Operating Instructions
Page 23
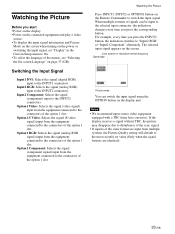
...the Input Signal Input1 DVI: Selects the signal (digital RGB) input to the INPUT2 connectors. Watching the Picture Before you start • Power on the display. • Power on the connected equipment and play a video source. • To display the input signal information and Picture Mode on the screen when... turning on the power or switching the input signal, set value (Only when the signal formats are input from the equipment connected to the connectors of the same...
...the Input Signal Input1 DVI: Selects the signal (digital RGB) input to the INPUT2 connectors. Watching the Picture Before you start • Power on the display. • Power on the connected equipment and play a video source. • To display the input signal information and Picture Mode on the screen when... turning on the power or switching the input signal, set value (Only when the signal formats are input from the equipment connected to the connectors of the same...
Operating Instructions
Page 24
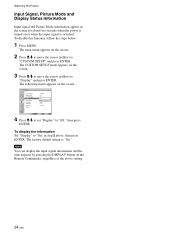
... setting is switched. Note You can display the input signal information and the time anytime by pressing the DISPLAY button on the screen. CUSTOM SETUP Power Saving: Speaker Out: Closed Caption: Display: Color Matrix: HD Mode: RGB Mode: Sync Mode: Remote Standard Off Off Off OY/nPB/PR 1080i DTV... Picture Input Signal, Picture Mode and Display Status Information Input signal and Picture Mode information appear on the screen for about five seconds when the power is turned on the screen. 2 Press M/m to move the cursor (yellow) to "Off," then press ENTER. The main menu appears on or when ...
... setting is switched. Note You can display the input signal information and the time anytime by pressing the DISPLAY button on the screen. CUSTOM SETUP Power Saving: Speaker Out: Closed Caption: Display: Color Matrix: HD Mode: RGB Mode: Sync Mode: Remote Standard Off Off Off OY/nPB/PR 1080i DTV... Picture Input Signal, Picture Mode and Display Status Information Input signal and Picture Mode information appear on the screen for about five seconds when the power is turned on the screen. 2 Press M/m to move the cursor (yellow) to "Off," then press ENTER. The main menu appears on or when ...
Operating Instructions
Page 37
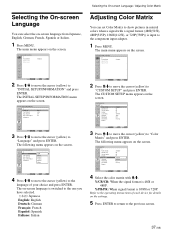
... the signal format is 1080I or 720P. The INITIAL SETUP/INFORMATION menu appears on the screen. The following menu appears on the screen. CUSTOM SETUP Power Saving: Speaker Out: Closed Caption: Display: Color Matrix: HD Mode: RGB Mode: Sync Mode: Remote Standard Off Off Off Y/PB/PR 1080i DTV...when a signal with M/m. The main menu appears on -screen language is input to "CUSTOM SETUP" and press ENTER. The on the screen. CUSTOM SETUP Power Saving: Speaker Out: Closed Caption: Display: Color Matrix: HD Mode: RGB Mode: Sync Mode: Remote Standard Off Off Off Y/CPB/PCR Y10/P8B0i/...
... the signal format is 1080I or 720P. The INITIAL SETUP/INFORMATION menu appears on the screen. The following menu appears on the screen. CUSTOM SETUP Power Saving: Speaker Out: Closed Caption: Display: Color Matrix: HD Mode: RGB Mode: Sync Mode: Remote Standard Off Off Off Y/PB/PR 1080i DTV...when a signal with M/m. The main menu appears on -screen language is input to "CUSTOM SETUP" and press ENTER. The on the screen. CUSTOM SETUP Power Saving: Speaker Out: Closed Caption: Display: Color Matrix: HD Mode: RGB Mode: Sync Mode: Remote Standard Off Off Off Y/CPB/PCR Y10/P8B0i/...
Operating Instructions
Page 38
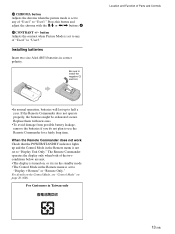
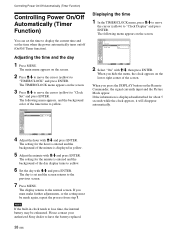
...2 Select "On" with M/m and press ENTER. The TIMER/CLOCK menu appears on /off (On/Off Timer function). Controlling Power On/Off Automatically (Timer Function) Controlling Power On/Off Automatically (Timer Function) You can set the time to have the battery replaced. 38 (GB) Adjusting the time ...and the day 1 Press MENU. Please contact your authorized Sony dealer to display the current time and set the time when the power automatically turns on the screen. 3 Press M/m to move the cursor (yellow) to the previous screen. 7 ...
...2 Select "On" with M/m and press ENTER. The TIMER/CLOCK menu appears on /off (On/Off Timer function). Controlling Power On/Off Automatically (Timer Function) Controlling Power On/Off Automatically (Timer Function) You can set the time to have the battery replaced. 38 (GB) Adjusting the time ...and the day 1 Press MENU. Please contact your authorized Sony dealer to display the current time and set the time when the power automatically turns on the screen. 3 Press M/m to move the cursor (yellow) to the previous screen. 7 ...

Operating Instructions
Page 39
... cursor (yellow) to set the On Time and press ENTER. TIMER/CLOCK On/Off Timer Repeat Every Day [On Time] [Off Time] 0 : 00 0 : 00 Controlling Power On/Off Automatically (Timer Function) 5 To set the On Time, change to with M/m and press ENTER. The following menu appears on the screen.
... cursor (yellow) to set the On Time and press ENTER. TIMER/CLOCK On/Off Timer Repeat Every Day [On Time] [Off Time] 0 : 00 0 : 00 Controlling Power On/Off Automatically (Timer Function) 5 To set the On Time, change to with M/m and press ENTER. The following menu appears on the screen.


