Operating Instructions
Page 3
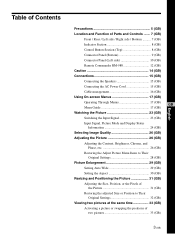
... Rear / Left side / Right side / Bottom .......... 7 (GB) Indicator Section 8 (GB) Control Button Section (Top 8 (GB) Connector Panel (Bottom 9 (GB) Connector Panel (Left side 10 (GB) Remote Commander RM-980 12 (GB) Caution 14 (GB) Connections 15 (GB) Connecting the Speakers 15 (GB) ...Connecting the AC Power Cord 15 (GB) Cable management 16 (GB) Using On-screen Menus 17 (GB) Operating Through Menus 17 (GB) GB Menu Guide 17 (GB) Watching the Picture...
... Rear / Left side / Right side / Bottom .......... 7 (GB) Indicator Section 8 (GB) Control Button Section (Top 8 (GB) Connector Panel (Bottom 9 (GB) Connector Panel (Left side 10 (GB) Remote Commander RM-980 12 (GB) Caution 14 (GB) Connections 15 (GB) Connecting the Speakers 15 (GB) ...Connecting the AC Power Cord 15 (GB) Cable management 16 (GB) Using On-screen Menus 17 (GB) Operating Through Menus 17 (GB) GB Menu Guide 17 (GB) Watching the Picture...
Operating Instructions
Page 4
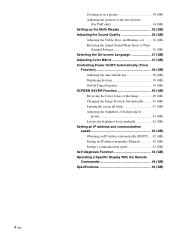
... (GB) Adjusting the position of the inset picture (For PinP only 34 (GB) Setting up the Multi Display 35 (GB) Adjusting the Sound Quality 36 (GB) Adjusting the Treble, Bass, and Balance, etc. ....... ... screen all white 41 (GB) Adjusting the brightness of background of picture 41 (GB) Lowers the brightness level gradually 42 (GB) Setting an IP address and communication speed 42 (GB) Obtaining an IP address automatically (DHCP) .... 42 (GB) Setting an IP address manually (Manual 42 (GB) Setting a communication speed 43 (GB) Self-diagnosis Function 43...
... (GB) Adjusting the position of the inset picture (For PinP only 34 (GB) Setting up the Multi Display 35 (GB) Adjusting the Sound Quality 36 (GB) Adjusting the Treble, Bass, and Balance, etc. ....... ... screen all white 41 (GB) Adjusting the brightness of background of picture 41 (GB) Lowers the brightness level gradually 42 (GB) Setting an IP address and communication speed 42 (GB) Obtaining an IP address automatically (DHCP) .... 42 (GB) Setting an IP address manually (Manual 42 (GB) Setting a communication speed 43 (GB) Self-diagnosis Function 43...
Operating Instructions
Page 5
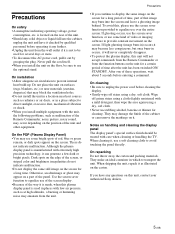
...the AC power cord, pull it will never completely disappear. • To protect the plasma display, this unit, contact your authorized Sony dealers. 5 (GB) They may emanate from the unit. To avoid this plasma display panel is not to be sure to direct sunlight, excessive dust, mechanical vibration or shock. ... it is made, when this , please use the screen saver function provided to equalize use some bright spots of the Remote Commander, noisy picture, noisy sound, may burn into the cabinet, unplug the unit and have any further. • Unplug the unit from the function buttons ...
...the AC power cord, pull it will never completely disappear. • To protect the plasma display, this unit, contact your authorized Sony dealers. 5 (GB) They may emanate from the unit. To avoid this plasma display panel is not to be sure to direct sunlight, excessive dust, mechanical vibration or shock. ... it is made, when this , please use the screen saver function provided to equalize use some bright spots of the Remote Commander, noisy picture, noisy sound, may burn into the cabinet, unplug the unit and have any further. • Unplug the unit from the function buttons ...
Operating Instructions
Page 9
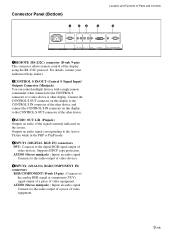
...audio output of a piece of video equipment. Outputs an audio signal corresponding to the Active Picture while in the P&P or PinP mode. 4INPUT1 (DIGITAL RGB IN) connectors DVI : ... of the display using the RS-232C protocol. AUDIO (Stereo minijack) : Inputs an audio signal. Connector Panel (Bottom) 1 23 4 Location and Function of Parts and Controls 5 AC IN REMOTE IN OUT R ...This connector allows remote control of a video device or other display. For details, contact your authorized Sony dealers. 2CONTROL S IN/OUT (Control S Signal Input/ Output) Connector (Minijack) You can control ...
...audio output of a piece of video equipment. Outputs an audio signal corresponding to the Active Picture while in the P&P or PinP mode. 4INPUT1 (DIGITAL RGB IN) connectors DVI : ... of the display using the RS-232C protocol. AUDIO (Stereo minijack) : Inputs an audio signal. Connector Panel (Bottom) 1 23 4 Location and Function of Parts and Controls 5 AC IN REMOTE IN OUT R ...This connector allows remote control of a video device or other display. For details, contact your authorized Sony dealers. 2CONTROL S IN/OUT (Control S Signal Input/ Output) Connector (Minijack) You can control ...
Operating Instructions
Page 12
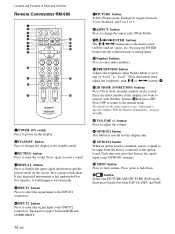
... 1POWER ON switch Press to power on the screen. Press again to restore sound. 4DISPLAY button Press to display the input signal information and the picture mode on the display. 2STANDBY button Press to change the aspect ratio (Wide Mode). 9M/m/ Each press toggles between RGB and COMPONENT. 7PICTURE button Selects...
... 1POWER ON switch Press to power on the screen. Press again to restore sound. 4DISPLAY button Press to display the input signal information and the picture mode on the display. 2STANDBY button Press to change the aspect ratio (Wide Mode). 9M/m/ Each press toggles between RGB and COMPONENT. 7PICTURE button Selects...
Operating Instructions
Page 13
qk CHROMA button Adjusts the chroma when the picture mode is set to any of "User1" to "User3." Press this button and adjust the chroma with the M/m or
qk CHROMA button Adjusts the chroma when the picture mode is set to any of "User1" to "User3." Press this button and adjust the chroma with the M/m or
Operating Instructions
Page 15
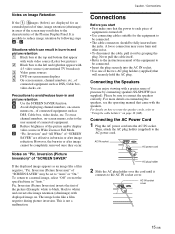
...effective in burn-in "Auto." It is not a malfunction. Precautions to reduce image retention by following steps A - Inversion (Picture Inversion)" of the Plasma Display Panel. A loose connection may be sure to the AC IN socket cover. For details on connecting the speakers, see the operating manual... and right that appear with 4:3 video source (conventional TV broadcast) 3 Video game sources 4 DVD on page 16 (GB). Inversion (Picture Inversion)" of equipment is turned off. • Use connecting cables suitable for an extended period of time, image retention (afterimage) in ...
...effective in burn-in "Auto." It is not a malfunction. Precautions to reduce image retention by following steps A - Inversion (Picture Inversion)" of the Plasma Display Panel. A loose connection may be sure to the AC IN socket cover. For details on connecting the speakers, see the operating manual... and right that appear with 4:3 video source (conventional TV broadcast) 3 Video game sources 4 DVD on page 16 (GB). Inversion (Picture Inversion)" of equipment is turned off. • Use connecting cables suitable for an extended period of time, image retention (afterimage) in ...
Operating Instructions
Page 17
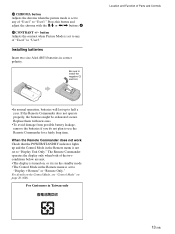
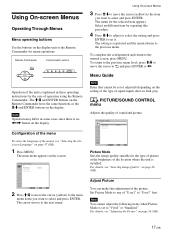
The M/m and ENTER buttons on the Remote Commander have the same functions as the M/m and ENTER buttons on the display unit or the Remote Commander for the case of the unit is no Remote Commander MENU Control button section ENTER Operation of operation using the Remote Commander. Note Operation may differ in some cases since there is explained in these operating instructions for menu operations. Using On-screen Menus Operating Through Menus Menu operating buttons Use the buttons on the display.
The M/m and ENTER buttons on the Remote Commander have the same functions as the M/m and ENTER buttons on the display unit or the Remote Commander for the case of the unit is no Remote Commander MENU Control button section ENTER Operation of operation using the Remote Commander. Note Operation may differ in some cases since there is explained in these operating instructions for menu operations. Using On-screen Menus Operating Through Menus Menu operating buttons Use the buttons on the display.
Operating Instructions
Page 18
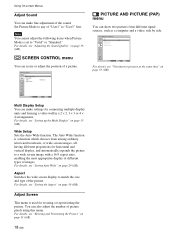
...Multi Display" on page 31 (GB). 18 (GB) Using On-screen Menus Adjust Sound You can make settings for resizing or repositioning the picture. Set Picture Mode to match the size and type of images. Select Set ENTER Exit MENU Multi Display Setup You can also adjust the number of "...User1" to "Vivid" or "Standard." For details, see "Resizing and Positioning the Picture" on page 35 (GB). For details, see "Setting the Aspect" on page 29 (GB). For details, see "Setting Auto Wide" on page 30 (...
...Multi Display" on page 31 (GB). 18 (GB) Using On-screen Menus Adjust Sound You can make settings for resizing or repositioning the picture. Set Picture Mode to match the size and type of images. Select Set ENTER Exit MENU Multi Display Setup You can also adjust the number of "...User1" to "Vivid" or "Standard." For details, see "Resizing and Positioning the Picture" on page 35 (GB). For details, see "Setting the Aspect" on page 29 (GB). For details, see "Setting Auto Wide" on page 30 (...
Operating Instructions
Page 19
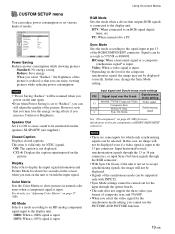
... sync and 576/60P. • When you select the video signal for the synchronous mode setting, you select "Reduce," the brightness of the picture is connected to the 13 pin connector. H/Comp: When a horizontal signal or a composite synchronous signal* is input Video: When a video signal...that you can be supported only with INPUT2. • Sync Mode settings cannot be displayed correctly. CUSTOM SETUP menu You can enjoy viewing pictures while reducing power consumption. However, note that case, change the Sync Mode setting. Notes • There are some inputs for NTSC signals....
... sync and 576/60P. • When you select the video signal for the synchronous mode setting, you select "Reduce," the brightness of the picture is connected to the 13 pin connector. H/Comp: When a horizontal signal or a composite synchronous signal* is input Video: When a video signal...that you can be supported only with INPUT2. • Sync Mode settings cannot be displayed correctly. CUSTOM SETUP menu You can enjoy viewing pictures while reducing power consumption. However, note that case, change the Sync Mode setting. Notes • There are some inputs for NTSC signals....

Operating Instructions
Page 22
... irregularities caused by burn-in that may result from ghosting or burn-in . Inversion Iinverts the image hue. Orbit Changes the position of a picture after a predetermined amount of a picture (aspect ratio 4:3). Inversion: Off Pic. Pic. Using On-screen Menus SCREEN SAVER menu Corrects or reduces damage from the same image being displayed...
... irregularities caused by burn-in that may result from ghosting or burn-in . Inversion Iinverts the image hue. Orbit Changes the position of a picture after a predetermined amount of a picture (aspect ratio 4:3). Inversion: Off Pic. Pic. Using On-screen Menus SCREEN SAVER menu Corrects or reduces damage from the same image being displayed...
Operating Instructions
Page 23
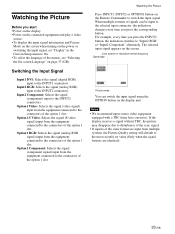
...example, every time you press the corresponding button. Color system or resolution/vertical frequency Signal type Input1 DVI 640x480/60 Vivid 15 : 07 Picture mode You can be input to the selected input connector, the indication changes every time you press the INPUT2 button, the indication switches ... Option1 RGB: Selects the signal (analog RGB signal) input from the equipment connected to the connectors of the option 1 slot. Watching the Picture Press INPUT1, INPUT2 or OPTION1 button on the display unit. The selected input signal appears on page 37 (GB). Notes • We ...
...example, every time you press the corresponding button. Color system or resolution/vertical frequency Signal type Input1 DVI 640x480/60 Vivid 15 : 07 Picture mode You can be input to the selected input connector, the indication changes every time you press the INPUT2 button, the indication switches ... Option1 RGB: Selects the signal (analog RGB signal) input from the equipment connected to the connectors of the option 1 slot. Watching the Picture Press INPUT1, INPUT2 or OPTION1 button on the display unit. The selected input signal appears on page 37 (GB). Notes • We ...
Operating Instructions
Page 24
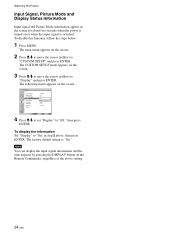
... on or when the input signal is switched. To disable this function, follow the steps below. 1 Press MENU. Watching the Picture Input Signal, Picture Mode and Display Status Information Input signal and Picture Mode information appear on the screen for about five seconds when the power is turned on the screen. 2 Press M/m to...
... on or when the input signal is switched. To disable this function, follow the steps below. 1 Press MENU. Watching the Picture Input Signal, Picture Mode and Display Status Information Input signal and Picture Mode information appear on the screen for about five seconds when the power is turned on the screen. 2 Press M/m to...

Operating Instructions
Page 25
.../50i 1080/50I 12 576/50p 576/50P 13 480/60p 480/60P 14 1080/60i 1080/60I 15 720/60p 720/60P Watching the Picture a) VGA is a registered trademark of RGB/COMPONENT (D-sub 15 pin) on -screen display of the unit's status On-screen display 640×480 / 60 (e.g.) 480... or the BKM-FW12. • If colors appear too light after inputting a DVD signal to the display unit, adjust the "Chroma" setting in the Adjust Picture menu. • When the phase is readjusted, the resolution will be reduced. • You cannot input the signal indicated with * to DVI IN. • You...
.../50i 1080/50I 12 576/50p 576/50P 13 480/60p 480/60P 14 1080/60i 1080/60I 15 720/60p 720/60P Watching the Picture a) VGA is a registered trademark of RGB/COMPONENT (D-sub 15 pin) on -screen display of the unit's status On-screen display 640×480 / 60 (e.g.) 480... or the BKM-FW12. • If colors appear too light after inputting a DVD signal to the display unit, adjust the "Chroma" setting in the Adjust Picture menu. • When the phase is readjusted, the resolution will be reduced. • You cannot input the signal indicated with * to DVI IN. • You...
Operating Instructions
Page 26
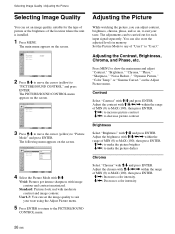
...Press MENU. The adjustments can also store the adjusted levels in memory. The main menu appears on the screen. PICTURE/SOUND CONTROL Picture Mode: Adjust Picture Adjust Sound Standard Select Set ENTER Exit MENU 3 Press M/m to move the cursor (yellow) to show the...," "Brightness," "Chroma," "Phase," "Sharpness," "Noise Reduct.," "Dynamic Picture," "Color Temp." PICTURE/SOUND CONTROL Picture Mode: Adjust Picture Adjust Sound Vivid Standard User1 User2 User3 Select Set ENTER Exit MENU 4 Select the Picture Mode with M/m. Adjusting the Contrast, Brightness, Chroma, and Phase, etc....
...Press MENU. The adjustments can also store the adjusted levels in memory. The main menu appears on the screen. PICTURE/SOUND CONTROL Picture Mode: Adjust Picture Adjust Sound Standard Select Set ENTER Exit MENU 3 Press M/m to move the cursor (yellow) to show the...," "Brightness," "Chroma," "Phase," "Sharpness," "Noise Reduct.," "Dynamic Picture," "Color Temp." PICTURE/SOUND CONTROL Picture Mode: Adjust Picture Adjust Sound Vivid Standard User1 User2 User3 Select Set ENTER Exit MENU 4 Select the Picture Mode with M/m. Adjusting the Contrast, Brightness, Chroma, and Phase, etc....
Operating Instructions
Page 27
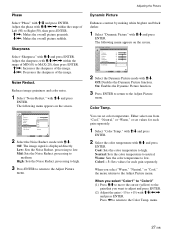
Adjust the phase with M/m and press ENTER. Phase Select "Phase" with M/m/
Adjust the phase with M/m and press ENTER. Phase Select "Phase" with M/m/

Operating Instructions
Page 28
... press ENTER. with a PAL, PAL-M, PAL-N, PAL60, or SECAM color system. • You cannot adjust Phase when a black-and-white signal is input. The Adjust Picture menu items are restored to high. Balances the light and dark portions of Color Temp. to their factory presettings. High: Sets the Gamma Correct. To...
... press ENTER. with a PAL, PAL-M, PAL-N, PAL60, or SECAM color system. • You cannot adjust Phase when a black-and-white signal is input. The Adjust Picture menu items are restored to high. Balances the light and dark portions of Color Temp. to their factory presettings. High: Sets the Gamma Correct. To...
Operating Instructions
Page 29
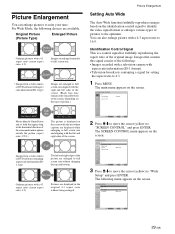
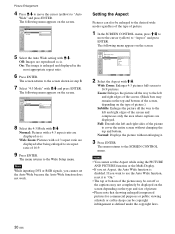
... DVD software with aspect ratio information (ID-1 type) Images are enlarged naturally to "SCREEN CONTROL" and press ENTER. You can enlarge pictures to full screen size aligned with the left and right sides of the following menu appears on the identification control signal to 4:3. 1 ...control signal for setting the aspect ratio to identify the video signal format or enlarges various types of the original image. PICTURE/SOUND CONTROL Picture Mode: Adjust Picture Adjust Sound Standard Select Set ENTER Exit MENU 2 Press M/m to move the cursor (yellow) to full screen size ...
... DVD software with aspect ratio information (ID-1 type) Images are enlarged naturally to "SCREEN CONTROL" and press ENTER. You can enlarge pictures to full screen size aligned with the left and right sides of the following menu appears on the identification control signal to 4:3. 1 ...control signal for setting the aspect ratio to identify the video signal format or enlarges various types of the original image. PICTURE/SOUND CONTROL Picture Mode: Adjust Picture Adjust Sound Standard Select Set ENTER Exit MENU 2 Press M/m to move the cursor (yellow) to full screen size ...
Operating Instructions
Page 30
...Zoom Zoom Subtitle Full Normal Select Set ENTER Exit MENU 2 Select the Aspect with M/m. Notes • You cannot set the Aspect while using the PICTURE AND PICTURE function or the Multi Display. • If you set the Auto Wide because the Auto Wide function does not work. On: The image is ... screen returns to the screen shown in the most appropriate aspect ratio. 6 Press ENTER. The following menu appears on the type of picture.) Subtitle: Enlarges the picture all the way to the left and right edges of the screen. (Black bars may not completely be enlarged to the desired wide ...
...Zoom Zoom Subtitle Full Normal Select Set ENTER Exit MENU 2 Select the Aspect with M/m. Notes • You cannot set the Aspect while using the PICTURE AND PICTURE function or the Multi Display. • If you set the Auto Wide because the Auto Wide function does not work. On: The image is ... screen returns to the screen shown in the most appropriate aspect ratio. 6 Press ENTER. The following menu appears on the type of picture.) Subtitle: Enlarges the picture all the way to the left and right edges of the screen. (Black bars may not completely be enlarged to the desired wide ...
Operating Instructions
Page 31
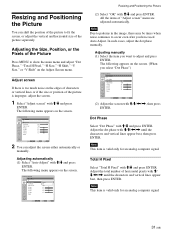
...the screen with M/m and press ENTER. The following appears on the edges of characters or vertical lines or if the size or position of the picture separately. In such cases, adjust the dot phase manually. SCREEN CONTROL Adjust Screen Auto Adjust Dot Phase: Total H Pixel: H Size: H ...Shift: V Size: V Shift: Reset Cancel O28K 1344 30 30 30 30 Select Set ENTER Exit MENU Resizing and Positioning the Picture (2) Select "OK" with M/m/ Adjusting automatically (1) Select "Auto Adjust" with M/m and press ENTER. Note Due to patterns in the image, there may be...
...the screen with M/m and press ENTER. The following appears on the edges of characters or vertical lines or if the size or position of the picture separately. In such cases, adjust the dot phase manually. SCREEN CONTROL Adjust Screen Auto Adjust Dot Phase: Total H Pixel: H Size: H ...Shift: V Size: V Shift: Reset Cancel O28K 1344 30 30 30 30 Select Set ENTER Exit MENU Resizing and Positioning the Picture (2) Select "OK" with M/m/ Adjusting automatically (1) Select "Auto Adjust" with M/m and press ENTER. Note Due to patterns in the image, there may be...


