Operating Instructions
Page 4
...(For PinP only 34 (GB) Setting up the Multi Display 35 (GB) Adjusting the Sound Quality 36 (GB) Adjusting the Treble, Bass, and Balance, etc. ....... 36 (GB) Restoring the Adjust Sound Menu Items to Their Original Settings 36 (GB) Selecting the On-screen Language 37 (GB...the brightness of background of picture 41 (GB) Lowers the brightness level gradually 42 (GB) Setting an IP address and communication speed 42 (GB) Obtaining an IP address automatically (DHCP) .... 42 (GB) Setting an IP address manually (Manual 42 (GB) Setting a communication speed 43 (GB) Self-diagnosis Function 43 (...
...(For PinP only 34 (GB) Setting up the Multi Display 35 (GB) Adjusting the Sound Quality 36 (GB) Adjusting the Treble, Bass, and Balance, etc. ....... 36 (GB) Restoring the Adjust Sound Menu Items to Their Original Settings 36 (GB) Selecting the On-screen Language 37 (GB...the brightness of background of picture 41 (GB) Lowers the brightness level gradually 42 (GB) Setting an IP address and communication speed 42 (GB) Obtaining an IP address automatically (DHCP) .... 42 (GB) Setting an IP address manually (Manual 42 (GB) Setting a communication speed 43 (GB) Self-diagnosis Function 43 (...
Operating Instructions
Page 5
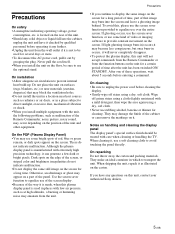
...or near heat sources such as malfunction of the Remote Commander, noisy picture, noisy sound, may damage the finish of the screen, or striped color and brightness irregularities do... using a dry, soft cloth. • Never use the optional stand. Although the plasma display panel is manufactured with a mild detergent, then wipe the area again using a cloth slightly moistened... with extremely high precision technology, it is made, when this unit, contact your authorized Sony ...
...or near heat sources such as malfunction of the Remote Commander, noisy picture, noisy sound, may damage the finish of the screen, or striped color and brightness irregularities do... using a dry, soft cloth. • Never use the optional stand. Although the plasma display panel is manufactured with a mild detergent, then wipe the area again using a cloth slightly moistened... with extremely high precision technology, it is made, when this unit, contact your authorized Sony ...
Operating Instructions
Page 12
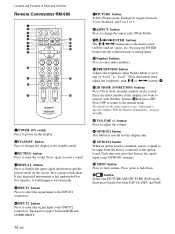
... connectors. 6INPUT2 button Press to select the signal input to hide them. Press again to the INPUT2 connectors. Press again to restore sound. 4DISPLAY button Press to mute the sound. Each press toggles between Vivid, Standard, and User 1 to 3. 8ASPECT button Press to change the display to the standby mode. 3MUTING button...
... connectors. 6INPUT2 button Press to select the signal input to hide them. Press again to the INPUT2 connectors. Press again to restore sound. 4DISPLAY button Press to mute the sound. Each press toggles between Vivid, Standard, and User 1 to 3. 8ASPECT button Press to change the display to the standby mode. 3MUTING button...
Operating Instructions
Page 17
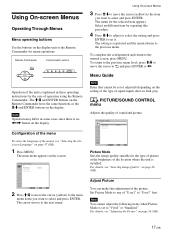
Using On-screen Menus Operating Through Menus Menu operating buttons Use the buttons on the display. Remote Commander MENU Control button section ENTER Operation of the unit is no Note Operation may differ in some cases since there is explained in these operating instructions for menu operations. The M/m and ENTER buttons on the Remote Commander have the same functions as the M/m and ENTER buttons on the display unit or the Remote Commander for the case of operation using the Remote Commander.
Using On-screen Menus Operating Through Menus Menu operating buttons Use the buttons on the display. Remote Commander MENU Control button section ENTER Operation of the unit is no Note Operation may differ in some cases since there is explained in these operating instructions for menu operations. The M/m and ENTER buttons on the Remote Commander have the same functions as the M/m and ENTER buttons on the display unit or the Remote Commander for the case of operation using the Remote Commander.
Operating Instructions
Page 18
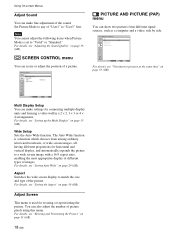
...of a picture. PICTURE AND PICTURE(PAP) PAP: Off Active Picture Picture Size Picture Position Select Set ENTER Exit MENU For details, see "Adjusting the Sound Quality" on page 33 (GB). Adjust Screen This menu is used for connecting multiple display units and forming a video wall in a 2 × ...2, 3 × 3 or 4 × 4 arrangement. You can resize or adjust the position of the sound. Using On-screen Menus Adjust Sound You can make settings for resizing or repositioning the picture. For details, see "Viewing two pictures at the same time" on page ...
...of a picture. PICTURE AND PICTURE(PAP) PAP: Off Active Picture Picture Size Picture Position Select Set ENTER Exit MENU For details, see "Adjusting the Sound Quality" on page 33 (GB). Adjust Screen This menu is used for connecting multiple display units and forming a video wall in a 2 × ...2, 3 × 3 or 4 × 4 arrangement. You can resize or adjust the position of the sound. Using On-screen Menus Adjust Sound You can make settings for resizing or repositioning the picture. For details, see "Viewing two pictures at the same time" on page ...
Operating Instructions
Page 19
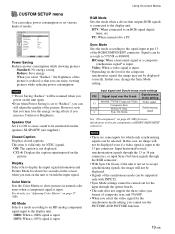
Speaker Out Set it to ON to cause sound to be displayed correctly. For details, see "Adjusting Color Matrix" on the picture. DTV: When connected to a PC. PC: When connected to an RGB signal ...
Speaker Out Set it to ON to cause sound to be displayed correctly. For details, see "Adjusting Color Matrix" on the picture. DTV: When connected to a PC. PC: When connected to an RGB signal ...
Operating Instructions
Page 26
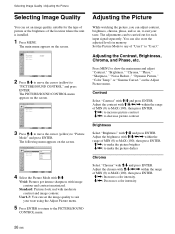
... Image Quality / Adjusting the Picture Selecting Image Quality You can set the image quality to suit your taste. PICTURE/SOUND CONTROL Picture Mode: Adjust Picture Adjust Sound Vivid Standard User1 User2 User3 Select Set ENTER Exit MENU 4 Select the Picture Mode with image contour and contrast maximized... location where the unit is installed. 1 Press MENU. on the screen. The PICTURE/SOUND CONTROL menu appears on the Adjust Picture menu. Set the Picture Mode to the PICTURE/SOUND CONTROL menu. Adjusting the Picture While watching the picture, you can set an image quality...
... Image Quality / Adjusting the Picture Selecting Image Quality You can set the image quality to suit your taste. PICTURE/SOUND CONTROL Picture Mode: Adjust Picture Adjust Sound Vivid Standard User1 User2 User3 Select Set ENTER Exit MENU 4 Select the Picture Mode with image contour and contrast maximized... location where the unit is installed. 1 Press MENU. on the screen. The PICTURE/SOUND CONTROL menu appears on the Adjust Picture menu. Set the Picture Mode to the PICTURE/SOUND CONTROL menu. Adjusting the Picture While watching the picture, you can set an image quality...
Operating Instructions
Page 27
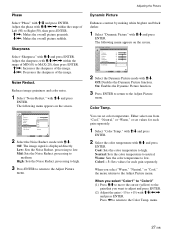
Adjust the phase with M/m and press ENTER. Phase Select "Phase" with M/m/
Adjust the phase with M/m and press ENTER. Phase Select "Phase" with M/m/

Operating Instructions
Page 28
PICTURE/SOUND CONTROL Adjust Picture Gamma Correct.: High Reset Mid Low Select Set ENTER Exit MENU 2 Select the Gamma Correct. to medium. Note The values set for .... The following menu appears on the screen. To cancel the reset function Press MENU before pressing ENTER. The following menu appears on the screen. PICTURE/SOUND CONTROL Adjust Picture Gamma Correct.: Reset Mid Cancel OK Select Set ENTER Exit MENU 2 Press M/m to move the cursor (yellow) to "OK" and press ENTER...
PICTURE/SOUND CONTROL Adjust Picture Gamma Correct.: High Reset Mid Low Select Set ENTER Exit MENU 2 Select the Gamma Correct. to medium. Note The values set for .... The following menu appears on the screen. To cancel the reset function Press MENU before pressing ENTER. The following menu appears on the screen. PICTURE/SOUND CONTROL Adjust Picture Gamma Correct.: Reset Mid Cancel OK Select Set ENTER Exit MENU 2 Press M/m to move the cursor (yellow) to "OK" and press ENTER...
Operating Instructions
Page 29
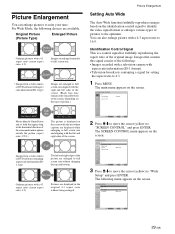
... to identify the video signal format or enlarges various types of pictures to 16:9. The main menu appears on the screen. PICTURE/SOUND CONTROL Picture Mode: Adjust Picture Adjust Sound Standard Select Set ENTER Exit MENU 2 Press M/m to move the cursor (yellow) to suite your taste. The following : • Images recorded with...
... to identify the video signal format or enlarges various types of pictures to 16:9. The main menu appears on the screen. PICTURE/SOUND CONTROL Picture Mode: Adjust Picture Adjust Sound Standard Select Set ENTER Exit MENU 2 Press M/m to move the cursor (yellow) to suite your taste. The following : • Images recorded with...
Operating Instructions
Page 33
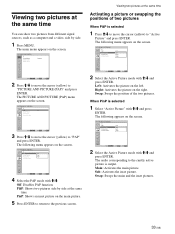
... Picture Mode: Adjust Picture Adjust Sound Standard Viewing two pictures at the same time. The following menu appears on the right. When PinP is selected 1 Press M/m to move the cursor (yellow) ...
... Picture Mode: Adjust Picture Adjust Sound Standard Viewing two pictures at the same time. The following menu appears on the right. When PinP is selected 1 Press M/m to move the cursor (yellow) ...
Operating Instructions
Page 35
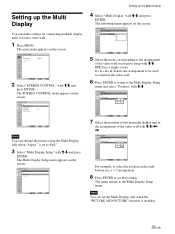
... unit in the arrangement of the video wall you want to the arrangement of the video wall with M/m and press ENTER. PICTURE/SOUND CONTROL Picture Mode: Adjust Picture Adjust Sound Standard Select Set ENTER Exit MENU 2 Select "SCREEN CONTROL" with M/m/ Off: Uses a single screen. 2 × 2 - 4 × 4: Selects the arrangement to be used...
... unit in the arrangement of the video wall you want to the arrangement of the video wall with M/m and press ENTER. PICTURE/SOUND CONTROL Picture Mode: Adjust Picture Adjust Sound Standard Select Set ENTER Exit MENU 2 Select "SCREEN CONTROL" with M/m/ Off: Uses a single screen. 2 × 2 - 4 × 4: Selects the arrangement to be used...
Operating Instructions
Page 36
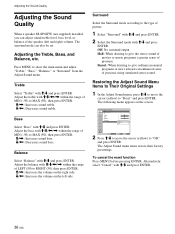
Treble Select "Treble" with M/m/ Adjust the treble with M/m and press ENTER. Adjusting the Treble, Bass, and Balance, etc. Press MENU to show the main menu and adjust "Treble," "Bass," "Balance," or "Surround" from the Adjust Sound menu. The surround mode can adjust sound treble level, bass level, or balance of the speaker (left and right) volume. Adjusting the Sound Quality Adjusting the Sound Quality When a speaker SS-SP42FW (not supplied) installed, you can also be set.
Treble Select "Treble" with M/m/ Adjust the treble with M/m and press ENTER. Adjusting the Treble, Bass, and Balance, etc. Press MENU to show the main menu and adjust "Treble," "Bass," "Balance," or "Surround" from the Adjust Sound menu. The surround mode can adjust sound treble level, bass level, or balance of the speaker (left and right) volume. Adjusting the Sound Quality Adjusting the Sound Quality When a speaker SS-SP42FW (not supplied) installed, you can also be set.
Operating Instructions
Page 37
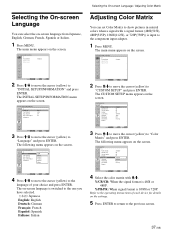
... Picture Mode: Adjust Picture Adjust Sound Standard Adjusting Color Matrix You can select the on the settings. 5 Press ENTER to return to the previous screen. 37 (GB) INITIAL SETUP/INFORMATION Language: ... Y/PB/PR 1080i DTV H/Comp Select Set ENTER Exit MENU 3 Press M/m to move the cursor (yellow) to "Language" and press ENTER. PICTURE/SOUND CONTROL Picture Mode: Adjust Picture Adjust Sound Standard Select Set ENTER Exit MENU 2 Press M/m to move the cursor (yellow) to the language of each device for details on -screen...
... Picture Mode: Adjust Picture Adjust Sound Standard Adjusting Color Matrix You can select the on the settings. 5 Press ENTER to return to the previous screen. 37 (GB) INITIAL SETUP/INFORMATION Language: ... Y/PB/PR 1080i DTV H/Comp Select Set ENTER Exit MENU 3 Press M/m to move the cursor (yellow) to "Language" and press ENTER. PICTURE/SOUND CONTROL Picture Mode: Adjust Picture Adjust Sound Standard Select Set ENTER Exit MENU 2 Press M/m to move the cursor (yellow) to the language of each device for details on -screen...
Operating Instructions
Page 40
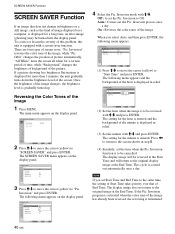
... gradually turned up. There are four types of the Image 1 Press MENU. Reversing the Color Tones of screen saver. PICTURE/SOUND CONTROL Picture Mode: Adjust Picture Adjust Sound Standard Select Set ENTER Exit MENU 2 Press M/m to move the cursor (yellow) to "SCREEN SAVER" and press ENTER. ... Once the brightness of the hour is displayed in brightness or a still image, such as the kind of image displayed on the display panel. The setting for a certain period of time, while "Background" changes the brightness of background of the picture. Note If you select Auto...
... gradually turned up. There are four types of the Image 1 Press MENU. Reversing the Color Tones of screen saver. PICTURE/SOUND CONTROL Picture Mode: Adjust Picture Adjust Sound Standard Select Set ENTER Exit MENU 2 Press M/m to move the cursor (yellow) to "SCREEN SAVER" and press ENTER. ... Once the brightness of the hour is displayed in brightness or a still image, such as the kind of image displayed on the display panel. The setting for a certain period of time, while "Background" changes the brightness of background of the picture. Note If you select Auto...
Operating Instructions
Page 42
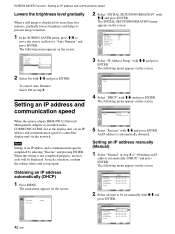
... . 000 . 000 . 000 000 . 000 . 000 . 000 000 . 000 . 000 . 000 000 . 000 . 000 . 000 Select Set ENTER Exit MENU PICTURE/SOUND CONTROL Picture Mode: Adjust Picture Adjust Sound Standard Select 42 (GB) Set ENTER Exit MENU Select Set ENTER Exit MENU 5 Select "Execute" with M/m and press ENTER. INITIAL SETUP/INFORMATION IP Address...
... . 000 . 000 . 000 000 . 000 . 000 . 000 000 . 000 . 000 . 000 000 . 000 . 000 . 000 Select Set ENTER Exit MENU PICTURE/SOUND CONTROL Picture Mode: Adjust Picture Adjust Sound Standard Select 42 (GB) Set ENTER Exit MENU Select Set ENTER Exit MENU 5 Select "Execute" with M/m and press ENTER. INITIAL SETUP/INFORMATION IP Address...
Operating Instructions
Page 44
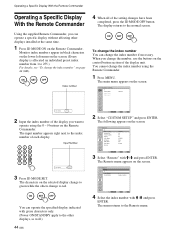
... 4 Select the index number with M /m and press ENTER. The main menu appears on the control button section of the display unit. PICTURE/SOUND CONTROL Picture Mode: Adjust Picture Adjust Sound Standard Index Number 117 . . . 2 Input the index number of the display you can operate the specified display indicated with green characters only...
... 4 Select the index number with M /m and press ENTER. The main menu appears on the control button section of the display unit. PICTURE/SOUND CONTROL Picture Mode: Adjust Picture Adjust Sound Standard Index Number 117 . . . 2 Input the index number of the display you can operate the specified display indicated with green characters only...


