Operating Instructions (primary manual)
Page 7
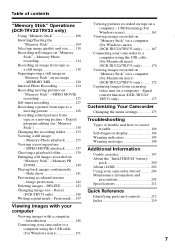
...Digital program editing (on a computer - Print mark ... 147 Viewing pictures recorded on tape on "Memory Stick 130 Changing the recording folder .......... 133 Viewing a still image - Slide show 141 Preventing accidental erasure - Signal convert function (DCR-TRV22/ TRV33 only 173 Customizing Your Camcorder...Viewing images with your camcorder to a computer using the USB cable (For Windows users 151 7 DELETE 143 Changing image size - USB Streaming (For Windows users 161 Viewing images recorded on "Memory Stick" on a computer (For Windows users) (DCR-TRV22/TRV33 only) ............
...Digital program editing (on a computer - Print mark ... 147 Viewing pictures recorded on tape on "Memory Stick 130 Changing the recording folder .......... 133 Viewing a still image - Slide show 141 Preventing accidental erasure - Signal convert function (DCR-TRV22/ TRV33 only 173 Customizing Your Camcorder...Viewing images with your camcorder to a computer using the USB cable (For Windows users 151 7 DELETE 143 Changing image size - USB Streaming (For Windows users 161 Viewing images recorded on "Memory Stick" on a computer (For Windows users) (DCR-TRV22/TRV33 only) ............

Operating Instructions (primary manual)
Page 8
...compartment opens completely in the direction of the arrow and open the lid. 2 Push the center of the cassette back to hold your camcorder outdoors (p. 16). Note Do not press the cassette compartment down completely, close the lid until it clicks. Open the DC IN jack ...insert the cassette. AC Adaptor (supplied) 2 3 1 Connect the plug with the window facing up. 3 Close the cassette compartment by pressing on tape Connecting the power cord (p. 17) Use the battery pack when using your camcorder Fastening the grip belt Fasten the grip belt firmly. 2 1 8 43 Doing so ...
...compartment opens completely in the direction of the arrow and open the lid. 2 Push the center of the cassette back to hold your camcorder outdoors (p. 16). Note Do not press the cassette compartment down completely, close the lid until it clicks. Open the DC IN jack ...insert the cassette. AC Adaptor (supplied) 2 3 1 Connect the plug with the window facing up. 3 Close the cassette compartment by pressing on tape Connecting the power cord (p. 17) Use the battery pack when using your camcorder Fastening the grip belt Fasten the grip belt firmly. 2 1 8 43 Doing so ...

Operating Instructions (primary manual)
Page 14
... in any way. •Do not let your camcorder to direct sunlight for effective use. Letting your camcorder get wet may cause your camcorder get wet. Exposing the LCD screen, the finder or the lens to malfunction. Keep your camcorder exposed to malfunction. Using this malfunction cannot be some... such as in a car parked in the sun or under direct sunlight [b]. •Be careful when placing the camera near a window or outdoors. Sometimes this manual Precautions on camcorder care Lens and LCD screen/finder (on the LCD screen and the finder. Doing so might cause your...
... in any way. •Do not let your camcorder to direct sunlight for effective use. Letting your camcorder get wet may cause your camcorder get wet. Exposing the LCD screen, the finder or the lens to malfunction. Keep your camcorder exposed to malfunction. Using this malfunction cannot be some... such as in a car parked in the sun or under direct sunlight [b]. •Be careful when placing the camera near a window or outdoors. Sometimes this manual Precautions on camcorder care Lens and LCD screen/finder (on the LCD screen and the finder. Doing so might cause your...

Operating Instructions (primary manual)
Page 62
...PROGRAM AE SPOTLIGHT* This mode prevents people's faces, for example, from focusing on glass or metal mesh in windows when you record a subject behind glass or a screen. * Your camcorder focuses only on fast-moving subjects such as people or flowers. BEACH&SKI* This mode prevents people's faces ...at a beach in the theater. SPORTS (sports lesson)* This mode minimizes shake on subjects in tennis or golf. Also it prevents your camcorder from appearing excessively white when shooting subjects lit by strong light in midsummer or on a ski slope. PORTRAIT (soft portrait) This mode ...
...PROGRAM AE SPOTLIGHT* This mode prevents people's faces, for example, from focusing on glass or metal mesh in windows when you record a subject behind glass or a screen. * Your camcorder focuses only on fast-moving subjects such as people or flowers. BEACH&SKI* This mode prevents people's faces ...at a beach in the theater. SPORTS (sports lesson)* This mode minimizes shake on subjects in tennis or golf. Also it prevents your camcorder from appearing excessively white when shooting subjects lit by strong light in midsummer or on a ski slope. PORTRAIT (soft portrait) This mode ...
Operating Instructions (primary manual)
Page 107
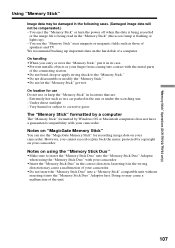
...in the wrong direction may cause a malfunction of your camcorder. •Insert the "Memory Stick Duo" in its case. •Prevent metallic objects or your camcorder. Inserting it in the correct direction. "Memory Stick" Operations (DCR-TRV22/TRV33 only) Using "Memory Stick" Image data may cause...lamp is flashing or lights up important data on your camcorder. On handling •When you cannot record or play back the music protected by Windows OS or Macintosh computers does not have a guaranteed compatibility with your camcorder. •Do not insert the "Memory Stick Duo"...
...in the wrong direction may cause a malfunction of your camcorder. •Insert the "Memory Stick Duo" in its case. •Prevent metallic objects or your camcorder. Inserting it in the correct direction. "Memory Stick" Operations (DCR-TRV22/TRV33 only) Using "Memory Stick" Image data may cause...lamp is flashing or lights up important data on your camcorder. On handling •When you cannot record or play back the music protected by Windows OS or Macintosh computers does not have a guaranteed compatibility with your camcorder. •Do not insert the "Memory Stick Duo"...
Operating Instructions (primary manual)
Page 148
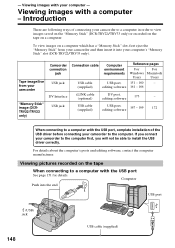
...a computer which has a "Memory Stick" slot, first eject the "Memory Stick" from your camcorder to a computer in order to view images saved on the "Memory Stick" (DCR-TRV22/TRV33 only) or recorded on the tape on the tape When connecting to a computer with your... port, complete installation of connecting your camcorder "Memory Stick" image (DCRTRV22/TRV33 only) Camcorder connection jack USB jack DV Interface USB jack Connection cable USB cable (supplied) Computer environment requirements USB port, editing software Reference pages For For Windows Macintosh Users Users 151 - 160 -...
...a computer which has a "Memory Stick" slot, first eject the "Memory Stick" from your camcorder to a computer in order to view images saved on the "Memory Stick" (DCR-TRV22/TRV33 only) or recorded on the tape on the tape When connecting to a computer with your... port, complete installation of connecting your camcorder "Memory Stick" image (DCRTRV22/TRV33 only) Camcorder connection jack USB jack DV Interface USB jack Connection cable USB cable (supplied) Computer environment requirements USB port, editing software Reference pages For For Windows Macintosh Users Users 151 - 160 -...
Operating Instructions (primary manual)
Page 149
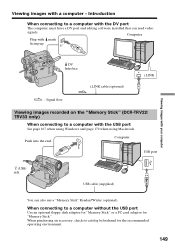
When connecting to a computer with the USB port See page 167 when using Windows and page 170 when using Macintosh. Computer Plug with the DV port The computer must have a DV port and editing software installed that can also ...) You can read video signals. Viewing images with your computer DV Interface i.LINK cable (optional) i.LINK : Signal flow Viewing images recorded on the "Memory Stick" (DCR-TRV22/ TRV33 only) When connecting to a computer without the USB port Use an optional floppy disk adaptor for "Memory Stick" or a PC card adaptor for the...
When connecting to a computer with the USB port See page 167 when using Windows and page 170 when using Macintosh. Computer Plug with the DV port The computer must have a DV port and editing software installed that can also ...) You can read video signals. Viewing images with your computer DV Interface i.LINK cable (optional) i.LINK : Signal flow Viewing images recorded on the "Memory Stick" (DCR-TRV22/ TRV33 only) When connecting to a computer without the USB port Use an optional floppy disk adaptor for "Memory Stick" or a PC card adaptor for the...
Operating Instructions (primary manual)
Page 151
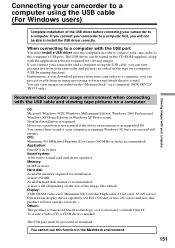
... the USB driver before connecting your camcorder to a computer first, you will not operate correctly.) Others: This product is based on a computer OS: Microsoft Windows 98SE, Windows Millennium Edition, Windows 2000 Professional, Windows XP Home Edition or Windows XP Professional Standard installation is required....DCR-TRV22/ TRV33 only). If you can view pictures live from your camcorder to install DirectX. You can be provided as standard. To create a Video CD, a CD-R drive is necessary to a computer, you connect your camcorder and a computer using the USB cable (For Windows...
... the USB driver before connecting your camcorder to a computer first, you will not operate correctly.) Others: This product is based on a computer OS: Microsoft Windows 98SE, Windows Millennium Edition, Windows 2000 Professional, Windows XP Home Edition or Windows XP Professional Standard installation is required....DCR-TRV22/ TRV33 only). If you can view pictures live from your camcorder to install DirectX. You can be provided as standard. To create a Video CD, a CD-R drive is necessary to a computer, you connect your camcorder and a computer using the USB cable (For Windows...
Operating Instructions (primary manual)
Page 152
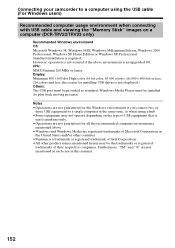
...other product names mentioned herein may not operate depending on a computer (DCR-TRV22/TRV33 only) Recommended Windows environment OS: Microsoft Windows 98, Windows 98SE, Windows Millennium Edition, Windows 2000 Professional, Windows XP Home Edition or Windows XP Professional Standard installation is not displayed.) Others: The USB port must...above environment is not assured if the above . •Windows and Windows Media are not mentioned in each case in this manual. 152 However, operation is an upgraded OS. Connecting your camcorder to a computer using a hub. •Some equipment may...
...other product names mentioned herein may not operate depending on a computer (DCR-TRV22/TRV33 only) Recommended Windows environment OS: Microsoft Windows 98, Windows 98SE, Windows Millennium Edition, Windows 2000 Professional, Windows XP Home Edition or Windows XP Professional Standard installation is not displayed.) Others: The USB port must...above environment is not assured if the above . •Windows and Windows Media are not mentioned in each case in this manual. 152 However, operation is an upgraded OS. Connecting your camcorder to a computer using a hub. •Some equipment may...
Operating Instructions (primary manual)
Page 153
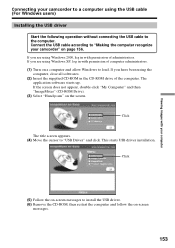
... and then "ImageMixer" (CD-ROM Drive). (3) Select "Handycam" on the screen. This starts USB driver installation. If you are using Windows XP, log in with permission of computer administrators. (1) Turn on a computer and allow Windows to load. Connect the USB cable according to the computer...(2) Insert the supplied CD-ROM in with permission of administrators. Viewing images with your computer Connecting your camcorder to a computer using the USB cable (For Windows users) Installing the USB driver Start the following operation without connecting the USB cable to "Making the ...
... and then "ImageMixer" (CD-ROM Drive). (3) Select "Handycam" on the screen. This starts USB driver installation. If you are using Windows XP, log in with permission of computer administrators. (1) Turn on a computer and allow Windows to load. Connect the USB cable according to the computer...(2) Insert the supplied CD-ROM in with permission of administrators. Viewing images with your computer Connecting your camcorder to a computer using the USB cable (For Windows users) Installing the USB driver Start the following operation without connecting the USB cable to "Making the ...
Operating Instructions (primary manual)
Page 154
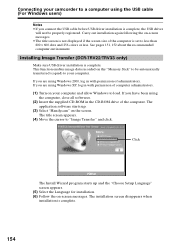
...camcorder to a computer using the computer, close all softwares. (2) Insert the supplied CD-ROM in the CD-ROM drive of administrators. See pages 151, 152 about the recommended computer environment. If you are using Windows... XP, log in with permission of the computer is set to be properly registered. Click The Install Wizard program starts up . (3) Select "Handycam" on...Windows users) Notes •If you are using Windows 2000, log in with permission of the computer. The title screen appears. (4) Move the cursor to load. Installing Image Transfer (DCR-TRV22...
...camcorder to a computer using the computer, close all softwares. (2) Insert the supplied CD-ROM in the CD-ROM drive of administrators. See pages 151, 152 about the recommended computer environment. If you are using Windows... XP, log in with permission of the computer is set to be properly registered. Click The Install Wizard program starts up . (3) Select "Handycam" on...Windows users) Notes •If you are using Windows 2000, log in with permission of the computer. The title screen appears. (4) Move the cursor to load. Installing Image Transfer (DCR-TRV22...
Operating Instructions (primary manual)
Page 155
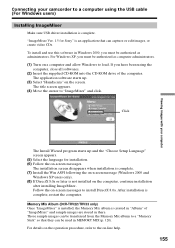
... "Handycam" on -screen messages. After installation is complete. The application software starts up and the "Choose Setup Language" screen appears. (5) Select the language for Sony" is created in Windows 2000, you must be used in there. Follow the on -line help. 155 Memory Mix Album (DCR-TRV22/TRV33...capture or edit images, or create video CDs. Viewing images with your computer Connecting your camcorder to load. For Windows XP, you have been using the USB cable (For Windows users) Installing ImageMixer Make sure USB driver installation is complete, restart the computer. If...
... "Handycam" on -screen messages. After installation is complete. The application software starts up and the "Choose Setup Language" screen appears. (5) Select the language for Sony" is created in Windows 2000, you must be used in there. Follow the on -line help. 155 Memory Mix Album (DCR-TRV22/TRV33...capture or edit images, or create video CDs. Viewing images with your computer Connecting your camcorder to load. For Windows XP, you have been using the USB cable (For Windows users) Installing ImageMixer Make sure USB driver installation is complete, restart the computer. If...

Operating Instructions (primary manual)
Page 156
... USB port (USB) jack USB cable (supplied) (8) Follow the on your camcorder If you are using Windows XP, log in with permission of administrators. Be sure to allow the installation to confirm the digital signature, select "Yes" (Windows 2000) or "Continue Anyway" (Windows XP). 156 If a different writing application has been already installed, its writing...
... USB port (USB) jack USB cable (supplied) (8) Follow the on your camcorder If you are using Windows XP, log in with permission of administrators. Be sure to allow the installation to confirm the digital signature, select "Yes" (Windows 2000) or "Continue Anyway" (Windows XP). 156 If a different writing application has been already installed, its writing...
Operating Instructions (primary manual)
Page 157
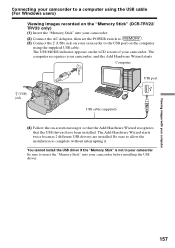
...MODE indicator appears on the LCD screen of your camcorder before installing the USB driver. Be sure to allow the installation to the USB port on the computer using the USB cable (For Windows users) Viewing images recorded on the "Memory Stick" (DCR-TRV22/ TRV33 only) (1) Insert the "Memory Stick"... into your camcorder. You cannot install the USB driver if the "Memory Stick" is not in your...
...MODE indicator appears on the LCD screen of your camcorder before installing the USB driver. Be sure to allow the installation to the USB port on the computer using the USB cable (For Windows users) Viewing images recorded on the "Memory Stick" (DCR-TRV22/ TRV33 only) (1) Insert the "Memory Stick"... into your camcorder. You cannot install the USB driver if the "Memory Stick" is not in your...
Operating Instructions (primary manual)
Page 158
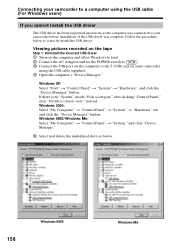
... set the POWER switch to . 3 Connect the USB port on the computer to your camcorder before installation of the USB driver was connected to the (USB) jack on your camcorder to a computer using the USB cable (For Windows users) If you cannot install the USB driver The USB driver has been registered incorrectly...
... set the POWER switch to . 3 Connect the USB port on the computer to your camcorder before installation of the USB driver was connected to the (USB) jack on your camcorder to a computer using the USB cable (For Windows users) If you cannot install the USB driver The USB driver has been registered incorrectly...
Operating Instructions (primary manual)
Page 159
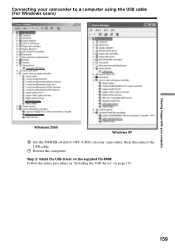
Connecting your camcorder to OFF (CHG) on page 153. 159 Step 2: Install the USB driver on the supplied CD-ROM Follow the entire procedure in "Installing the USB driver" on your computer Windows 2000 Windows XP 6 Set the POWER switch to a computer using the USB cable (For Windows users) Viewing images with your camcorder, then disconnect the USB cable. 7 Restart the computer.
Connecting your camcorder to OFF (CHG) on page 153. 159 Step 2: Install the USB driver on the supplied CD-ROM Follow the entire procedure in "Installing the USB driver" on your computer Windows 2000 Windows XP 6 Set the POWER switch to a computer using the USB cable (For Windows users) Viewing images with your camcorder, then disconnect the USB cable. 7 Restart the computer.
Operating Instructions (primary manual)
Page 160
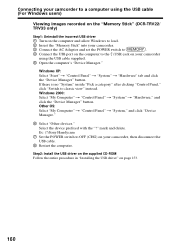
..." t "Control Panel" t "System" t "Hardware," and click the "Device Manager" button. mark and delete. Ex: (?)Sony Handycam 7 Set the POWER switch to OFF (CHG) on your camcorder using the USB cable (For Windows users) Viewing images recorded on the "Memory Stick" (DCR-TRV22/ TRV33 only) Step1: Uninstall the incorrect USB driver 1 Turn on the computer and allow...
..." t "Control Panel" t "System" t "Hardware," and click the "Device Manager" button. mark and delete. Ex: (?)Sony Handycam 7 Set the POWER switch to OFF (CHG) on your camcorder using the USB cable (For Windows users) Viewing images recorded on the "Memory Stick" (DCR-TRV22/ TRV33 only) Step1: Uninstall the incorrect USB driver 1 Turn on the computer and allow...
Operating Instructions (primary manual)
Page 161
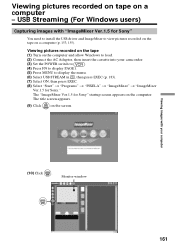
... with "ImageMixer Ver.1.5 for Sony." Viewing pictures recorded on the tape (1) Turn on a computer - Viewing pictures recorded on tape on the computer and allow Windows to load. (2) Connect the AC Adaptor, then insert the cassette into your computer (10) Click . USB Streaming (For Windows users) Capturing images with your camcorder. (3) Set the POWER switch...
... with "ImageMixer Ver.1.5 for Sony." Viewing pictures recorded on the tape (1) Turn on a computer - Viewing pictures recorded on tape on the computer and allow Windows to load. (2) Connect the AC Adaptor, then insert the cassette into your computer (10) Click . USB Streaming (For Windows users) Capturing images with your camcorder. (3) Set the POWER switch...

Operating Instructions (primary manual)
Page 162
You can control video operations with the buttons on a computer - The picture from the tape appears on the monitor window on the computer. 162 Viewing pictures recorded on tape on the screen. Computer USB port (USB) jack USB cable (supplied) (12)...supplied USB cable. The picture from your camcorder appears on the monitor window on the computer. Monitor window Video control buttons Viewing pictures live from your camcorder to the USB port on pages 161, 162. USB Streaming (For Windows users) (11) Connect the (USB) jack on your camcorder (1) Follow the step 1 and 2...
You can control video operations with the buttons on a computer - The picture from the tape appears on the monitor window on the computer. 162 Viewing pictures recorded on tape on the screen. Computer USB port (USB) jack USB cable (supplied) (12)...supplied USB cable. The picture from your camcorder appears on the monitor window on the computer. Monitor window Video control buttons Viewing pictures live from your camcorder to the USB port on pages 161, 162. USB Streaming (For Windows users) (11) Connect the (USB) jack on your camcorder (1) Follow the step 1 and 2...
Operating Instructions (primary manual)
Page 163
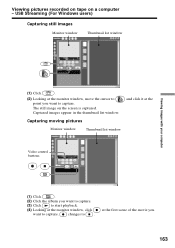
and click it at the Capturing moving pictures Monitor window Thumbnail list window Video control buttons (1) Click . (2) Click the album you want to capture. (3) Click to start playback. (4) Looking at the first scene of ...Viewing pictures recorded on tape on the screen is captured. at the monitor window, click want to capture. Captured images appear in the thumbnail list window. changes to point you 163 USB Streaming (For Windows users) Capturing still images Monitor window Thumbnail list window Viewing images with your computer (1) Click . (2) Looking at the monitor...
and click it at the Capturing moving pictures Monitor window Thumbnail list window Video control buttons (1) Click . (2) Click the album you want to capture. (3) Click to start playback. (4) Looking at the first scene of ...Viewing pictures recorded on tape on the screen is captured. at the monitor window, click want to capture. Captured images appear in the thumbnail list window. changes to point you 163 USB Streaming (For Windows users) Capturing still images Monitor window Thumbnail list window Viewing images with your computer (1) Click . (2) Looking at the monitor...


