Operating Instructions (primary manual)
Page 2
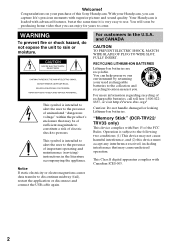
... FULLY INSERT. For more information regarding recycling of electric shock to persons. This Class B digital apparatus complies with superior picture and sound quality. Your Handycam is loaded with Part 15 of important operating and maintenance (servicing) instructions in the U.S.A. This...not cause harmful interference, and (2) this Sony Handycam. You can help preserve our environment by returning your used rechargeable batteries to use. RECYCLING LITHIUM-ION BATTERIES Lithium-Ion batteries are recyclable. "Memory Stick" (DCR-TRV22/ TRV33 only) This device complies with ...
... FULLY INSERT. For more information regarding recycling of electric shock to persons. This Class B digital apparatus complies with superior picture and sound quality. Your Handycam is loaded with Part 15 of important operating and maintenance (servicing) instructions in the U.S.A. This...not cause harmful interference, and (2) this Sony Handycam. You can help preserve our environment by returning your used rechargeable batteries to use. RECYCLING LITHIUM-ION BATTERIES Lithium-Ion batteries are recyclable. "Memory Stick" (DCR-TRV22/ TRV33 only) This device complies with ...
Operating Instructions (primary manual)
Page 4
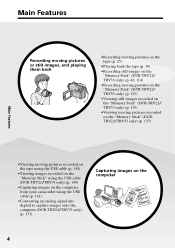
... moving pictures recorded on the tape using the USB cable (p. 148) •Viewing images recorded on the "Memory Stick" using the USB cable (DCR-TRV22/TRV33 only) (p. 149) •Capturing images on the computer from your camcorder using the USB cable (p. 161) •Converting an analog signal into digital to capture images onto the computer (DCR-TRV22...
... moving pictures recorded on the tape using the USB cable (p. 148) •Viewing images recorded on the "Memory Stick" using the USB cable (DCR-TRV22/TRV33 only) (p. 149) •Capturing images on the computer from your camcorder using the USB cable (p. 161) •Converting an analog signal into digital to capture images onto the computer (DCR-TRV22...
Operating Instructions (primary manual)
Page 5
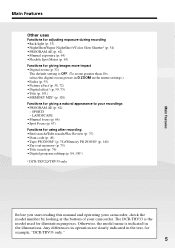
...Zero set memory (p. 75) •Title search (p. 76) •Digital program editing (p. 84, 130*) * DCR-TRV22/TRV33 only Before you start reading this manual and operating your camcorder, check the model number by looking at the bottom of your recordings ...Digital zoom (p. 32) The default setting is OFF. (To zoom greater than 10×, select the digital zoom power in D ZOOM in the menu settings.) •Fader (p. 55) •Picture effect (p. 58, 72) •Digital effect* (p. 59, 73) •Title (p. 101) •MEMORY MIX* (p. 120) Functions for giving a natural appearance to your camcorder...
...Zero set memory (p. 75) •Title search (p. 76) •Digital program editing (p. 84, 130*) * DCR-TRV22/TRV33 only Before you start reading this manual and operating your camcorder, check the model number by looking at the bottom of your recordings ...Digital zoom (p. 32) The default setting is OFF. (To zoom greater than 10×, select the digital zoom power in D ZOOM in the menu settings.) •Fader (p. 55) •Picture effect (p. 58, 72) •Digital effect* (p. 59, 73) •Title (p. 101) •MEMORY MIX* (p. 120) Functions for giving a natural appearance to your camcorder...
Operating Instructions (primary manual)
Page 6
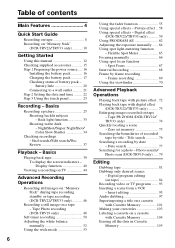
... Shooting backlit subjects - Basics Playing back tape 39 To display the screen indicators - Picture effect .. 58 Using special effects - Digital effect (DCR-TRV22/TRV33 only 59 Using PROGRAM AE 62 Adjusting the exposure manually ...... 64 Using spot light-metering ...function - Frame recording 69 Using the viewfinder 70 Advanced Playback Operations Playing back tape with picture effect . 72 Playing back tape with digital effect (DCR-TRV22/TRV33 only 73 Enlarging images recorded on tape 84 Recording video or TV programs ....... 93 Inserting a scene from...
... Shooting backlit subjects - Basics Playing back tape 39 To display the screen indicators - Picture effect .. 58 Using special effects - Digital effect (DCR-TRV22/TRV33 only 59 Using PROGRAM AE 62 Adjusting the exposure manually ...... 64 Using spot light-metering ...function - Frame recording 69 Using the viewfinder 70 Advanced Playback Operations Playing back tape with picture effect . 72 Playing back tape with digital effect (DCR-TRV22/TRV33 only 73 Enlarging images recorded on tape 84 Recording video or TV programs ....... 93 Inserting a scene from...
Operating Instructions (primary manual)
Page 7
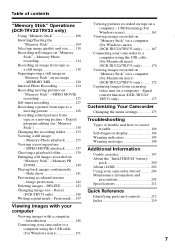
... - Print mark ... 147 Viewing pictures recorded on tape on "Memory Stick" - Signal convert function (DCR-TRV22/ TRV33 only 173 Customizing Your Camcorder Changing the menu settings 175 Troubleshooting Types of contents Getting Started "Memory Stick" Operations (DCR-TRV22/TRV33 only) Using "Memory Stick ... the USB cable (For Windows users 151 7 MPEG MOVIE recording 125 Self-timer recording 127 Recording a picture from tape as a moving pictures on a computer - Digital program editing (on "Memory Stick" - Image protection 142 Deleting images - USB Streaming (For Windows users...
... - Print mark ... 147 Viewing pictures recorded on tape on "Memory Stick" - Signal convert function (DCR-TRV22/ TRV33 only 173 Customizing Your Camcorder Changing the menu settings 175 Troubleshooting Types of contents Getting Started "Memory Stick" Operations (DCR-TRV22/TRV33 only) Using "Memory Stick ... the USB cable (For Windows users 151 7 MPEG MOVIE recording 125 Self-timer recording 127 Recording a picture from tape as a moving pictures on a computer - Digital program editing (on "Memory Stick" - Image protection 142 Deleting images - USB Streaming (For Windows users...
Operating Instructions (primary manual)
Page 9
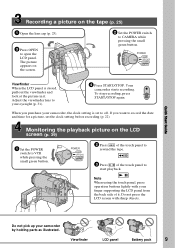
... 3 Press of it . Adjust the viewfinder lens to your camcorder by holding parts as illustrated. When you want to record the date and time for a picture, set to off. Do not press the LCD screen with your camcorder, the clock setting is closed, pull out the viewfinder and look... at the picture in it . Your camcorder starts recording. Quick Start Guide Recording a picture on the LCD screen (p. 39) 1 Set...
... 3 Press of it . Adjust the viewfinder lens to your camcorder by holding parts as illustrated. When you want to record the date and time for a picture, set to off. Do not press the LCD screen with your camcorder, the clock setting is closed, pull out the viewfinder and look... at the picture in it . Your camcorder starts recording. Quick Start Guide Recording a picture on the LCD screen (p. 39) 1 Set...
Operating Instructions (primary manual)
Page 11
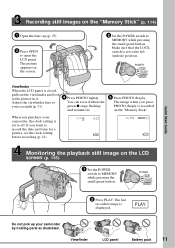
Adjust the viewfinder lens to your camcorder, the clock setting is set to off. If you press PHOTO deeply is closed, pull out the viewfinder and look at the picture in it. 4 Press PHOTO lightly. Viewfinder LCD panel Battery pack 11 When you purchase your eyesight (p. 31). Make sure ...that the LOCK switch is displayed. POWER VCR OFF(CHG) CAMERA MEMORY 2 Press PLAY. PLAY Do not pick up your camcorder by holding parts as...
Adjust the viewfinder lens to your camcorder, the clock setting is set to off. If you press PHOTO deeply is closed, pull out the viewfinder and look at the picture in it. 4 Press PHOTO lightly. Viewfinder LCD panel Battery pack 11 When you purchase your eyesight (p. 31). Make sure ...that the LOCK switch is displayed. POWER VCR OFF(CHG) CAMERA MEMORY 2 Press PLAY. PLAY Do not pick up your camcorder by holding parts as...

Operating Instructions (primary manual)
Page 14
... light conditions such as in a car parked in any way. •Do not let your camcorder to temperatures above 60°C (140°F), such as dusk [d]. [a] [b] [c] [d] 14 Take pictures of the pixels are normal in the manufacturing process and do not affect the recording in the... sun or under direct sunlight [b]. •Be careful when placing the camera near a window or outdoors. Doing so might cause your camcorder get wet may cause your camcorder away from rain...
... light conditions such as in a car parked in any way. •Do not let your camcorder to temperatures above 60°C (140°F), such as dusk [d]. [a] [b] [c] [d] 14 Take pictures of the pixels are normal in the manufacturing process and do not affect the recording in the... sun or under direct sunlight [b]. •Be careful when placing the camera near a window or outdoors. Doing so might cause your camcorder get wet may cause your camcorder away from rain...
Operating Instructions (primary manual)
Page 25
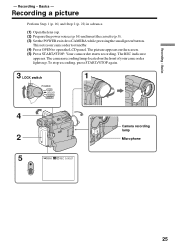
...2 Microphone 5 50min REC 0:00:01 25 Basics - The camera recording lamp located on the screen. (5) Press START/STOP. Recording a picture Perform Step 1 (p. 16) and Step 2 (p. 22) in advance. (1) Openthelenscap. (2) Preparethepowersource(p.16)andinsertthecassette(p.8). (3) Set the POWER switch... to open the LCD panel. Recording - Recording - This sets your camcorder lights up. Basics - The picture appears on the front of your camcorder to standby. (4) Press OPEN to CAMERA while pressing the small green button. Your camcorder starts recording.
...2 Microphone 5 50min REC 0:00:01 25 Basics - The camera recording lamp located on the screen. (5) Press START/STOP. Recording a picture Perform Step 1 (p. 16) and Step 2 (p. 22) in advance. (1) Openthelenscap. (2) Preparethepowersource(p.16)andinsertthecassette(p.8). (3) Set the POWER switch... to open the LCD panel. Recording - Recording - This sets your camcorder lights up. Basics - The picture appears on the front of your camcorder to standby. (4) Press OPEN to CAMERA while pressing the small green button. Your camcorder starts recording.
Operating Instructions (primary manual)
Page 26
... record in the SP and LP modes on your camcorder. Recording a picture Notes •Position the lens cap so as you do not eject the cassette even if you turn off automatically while the cassette is not inserted. Note on the LOCK switch (DCR-TRV22/TRV33 only) When you slide the LOCK switch to...
... record in the SP and LP modes on your camcorder. Recording a picture Notes •Position the lens cap so as you do not eject the cassette even if you turn off automatically while the cassette is not inserted. Note on the LOCK switch (DCR-TRV22/TRV33 only) When you slide the LOCK switch to...

Operating Instructions (primary manual)
Page 27
... screen. Date The date appears about 5 seconds after the power is turned on the tape. You cannot rewrite only the time code later. Basics Recording a picture Indicators displayed during recording Indicators are not displayed during recording. Recording data The recording data (date/time or various settings when recorded) are not recorded...
... screen. Date The date appears about 5 seconds after the power is turned on the tape. You cannot rewrite only the time code later. Basics Recording a picture Indicators displayed during recording Indicators are not displayed during recording. Recording data The recording data (date/time or various settings when recorded) are not recorded...

Operating Instructions (primary manual)
Page 28
Recording a picture After recording (1) Close the lens cap. (2) Set the POWER switch to your camcorder body when recording or recording standby, LCD B.L. (panel brightness) is opened up to "BRT NORMAL." 28 When monitoring on the LCD screen You can turn ... 90 degrees. Adjusting the LCD screen 180° 90° 90° When you turn the LCD panel over and move it back to your camcorder body with the LCD screen facing out.
Recording a picture After recording (1) Close the lens cap. (2) Set the POWER switch to your camcorder body when recording or recording standby, LCD B.L. (panel brightness) is opened up to "BRT NORMAL." 28 When monitoring on the LCD screen You can turn ... 90 degrees. Adjusting the LCD screen 180° 90° 90° When you turn the LCD panel over and move it back to your camcorder body with the LCD screen facing out.

Operating Instructions (primary manual)
Page 29
or herself on the LCD screen is a mirror-image. The subject uses this feature to view him- However, the picture will be normal when recorded. 29 Basics Recording a picture Shooting with the mirror mode This feature allows the camera subject to check his or her own image on the LCD screen while you look at the subject in the viewfinder. (1) Extendtheviewfinder. (2) RotatetheLCDpanel180degrees. 1 2 Picture in the mirror mode The picture on the LCD screen. Recording -
or herself on the LCD screen is a mirror-image. The subject uses this feature to view him- However, the picture will be normal when recorded. 29 Basics Recording a picture Shooting with the mirror mode This feature allows the camera subject to check his or her own image on the LCD screen while you look at the subject in the viewfinder. (1) Extendtheviewfinder. (2) RotatetheLCDpanel180degrees. 1 2 Picture in the mirror mode The picture on the LCD screen. Recording -

Operating Instructions (primary manual)
Page 30
Select LCD B.L. in in Step 1. 2,3 LCD BRT OK LCD BRT The bar indicator To return to MEMORY (DCR-TRV22/TRV33 only), press FN and select PAGE3. (2) Press LCD BRT. The screen to adjust the brightness of the LCD screen appears. (3) Adjust the brightness of ... change the brightness of the backlight when using the viewfinder is set to CAMERA, press FN and select PAGE2. The recorded picture will not be affected. Shooting using the battery pack. Recording a picture Adjusting the brightness of the LCD screen (1) When the POWER switch is recommended when: •You cannot see the...
Select LCD B.L. in in Step 1. 2,3 LCD BRT OK LCD BRT The bar indicator To return to MEMORY (DCR-TRV22/TRV33 only), press FN and select PAGE3. (2) Press LCD BRT. The screen to adjust the brightness of the LCD screen appears. (3) Adjust the brightness of ... change the brightness of the backlight when using the viewfinder is set to CAMERA, press FN and select PAGE2. The recorded picture will not be affected. Shooting using the battery pack. Recording a picture Adjusting the brightness of the LCD screen (1) When the POWER switch is recommended when: •You cannot see the...

Operating Instructions (primary manual)
Page 31
...31 The camera recording lamp (DCR-TRV19 only) The camera recording lamp lights up in the menu settings (p. 178). Basics Recording a picture Adjusting the viewfinder If you adjust VF B.L. Even if you record pictures with the LCD panel closed, check the picture with the viewfinder. Recording ...- Extend the viewfinder and move the viewfinder lens adjustment lever. Select VF B.L. The recorded picture will not be affected. Adjust the viewfinder lens...
...31 The camera recording lamp (DCR-TRV19 only) The camera recording lamp lights up in the menu settings (p. 178). Basics Recording a picture Adjusting the viewfinder If you adjust VF B.L. Even if you record pictures with the LCD panel closed, check the picture with the viewfinder. Recording ...- Extend the viewfinder and move the viewfinder lens adjustment lever. Select VF B.L. The recorded picture will not be affected. Adjust the viewfinder lens...
Operating Instructions (primary manual)
Page 32
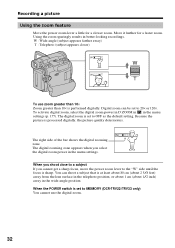
...you select the digital zoom power in the wide-angle position. Digital zoom can shoot a subject that is sharp. The digital zoom is set to MEMORY (DCR-TRV22/TRV33 only) You cannot use zoom greater than 10× Zoom greater than 10× is processed digitally, the picture quality deteriorates. W... T The right side of the bar shows the digital zooming zone. You can ...
...you select the digital zoom power in the wide-angle position. Digital zoom can shoot a subject that is sharp. The digital zoom is set to MEMORY (DCR-TRV22/TRV33 only) You cannot use zoom greater than 10× Zoom greater than 10× is processed digitally, the picture quality deteriorates. W... T The right side of the bar shows the digital zooming zone. You can ...
Operating Instructions (primary manual)
Page 33
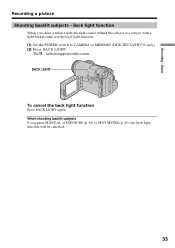
The . Back light function When you press MANUAL of EXPOSURE (p. 64) or SPOT METER (p. 65), the back light function will be canceled. 33 When shooting backlit subjects If you shoot a subject with the light source behind the subject or a subject with a light background, use the back light function. (1) Set the POWER switch to CAMERA or MEMORY (DCR-TRV22/TRV33 only). (2) Press BACK LIGHT. indicator appears on the screen. Basics Recording a picture Shooting backlit subjects - BACK LIGHT To cancel the back light function Press BACK LIGHT again. Recording -
The . Back light function When you press MANUAL of EXPOSURE (p. 64) or SPOT METER (p. 65), the back light function will be canceled. 33 When shooting backlit subjects If you shoot a subject with the light source behind the subject or a subject with a light background, use the back light function. (1) Set the POWER switch to CAMERA or MEMORY (DCR-TRV22/TRV33 only). (2) Press BACK LIGHT. indicator appears on the screen. Basics Recording a picture Shooting backlit subjects - BACK LIGHT To cancel the back light function Press BACK LIGHT again. Recording -

Operating Instructions (primary manual)
Page 34
...NightShot Slide NIGHTSHOT to ON in to OFF. To enable the NightShot Light, set N.S. Recording a picture Shooting in incorrect or unnatural colors. (1) Set the POWER switch to CAMERA or MEMORY (DCR-TRV22/TRV33 only). (2) Slide NIGHTSHOT to ON. The indicator lights up on the screen. (3) Press FN...shoot a subject in the night or in NightShot. (1) Set the POWER switch to CAMERA. (2) Slide NIGHTSHOT to ON. Using Super NightShot (DCR-TRV22/TRV33 only) Super NightShot makes subjects more than 16 times brighter than those recorded in a dark place. The and "NIGHTSHOT" indicators flash on...
...NightShot Slide NIGHTSHOT to ON in to OFF. To enable the NightShot Light, set N.S. Recording a picture Shooting in incorrect or unnatural colors. (1) Set the POWER switch to CAMERA or MEMORY (DCR-TRV22/TRV33 only). (2) Slide NIGHTSHOT to ON. The indicator lights up on the screen. (3) Press FN...shoot a subject in the night or in NightShot. (1) Set the POWER switch to CAMERA. (2) Slide NIGHTSHOT to ON. Using Super NightShot (DCR-TRV22/TRV33 only) Super NightShot makes subjects more than 16 times brighter than those recorded in a dark place. The and "NIGHTSHOT" indicators flash on...

Operating Instructions (primary manual)
Page 35
.... (4) Press COLOR SLW S. PROGRAM AE - Basics Recording a picture Using Color Slow Shutter (DCR-TRV22/TRV33 only) Color Slow Shutter enables you cannot use the following functions (DCR-TRV22/ TRV33 only): - Fader - Digital effect - Manual exposure - Flexible Spot Meter While using Super NightShot... or Color Slow Shutter (DCR-TRV22/TRV33 only) The shutter speed is difficult during recording with...
.... (4) Press COLOR SLW S. PROGRAM AE - Basics Recording a picture Using Color Slow Shutter (DCR-TRV22/TRV33 only) Color Slow Shutter enables you cannot use the following functions (DCR-TRV22/ TRV33 only): - Fader - Digital effect - Manual exposure - Flexible Spot Meter While using Super NightShot... or Color Slow Shutter (DCR-TRV22/TRV33 only) The shutter speed is difficult during recording with...
Operating Instructions (primary manual)
Page 36
Color Slow Shutter NightShot Light NightShot Light rays are infrared and so are invisible. Fader - Manual exposure - Super NightShot - Flexible Spot Meter In total darkness (DCR-TRV22/TRV33 only) Color Slow Shutter may not work normally. 36 PROGRAM AE - While using the NightShot Light is set to MEMORY (DCR-TRV22/TRV33 only) You cannot use the following functions: - The maximum shooting distance using Color Slow Shutter, you cannot use the following functions (DCRTRV22/TRV33 only): - Digital effect - Recording a picture When the POWER switch is about 3 m (10 feet).
Color Slow Shutter NightShot Light NightShot Light rays are infrared and so are invisible. Fader - Manual exposure - Super NightShot - Flexible Spot Meter In total darkness (DCR-TRV22/TRV33 only) Color Slow Shutter may not work normally. 36 PROGRAM AE - While using the NightShot Light is set to MEMORY (DCR-TRV22/TRV33 only) You cannot use the following functions: - The maximum shooting distance using Color Slow Shutter, you cannot use the following functions (DCRTRV22/TRV33 only): - Digital effect - Recording a picture When the POWER switch is about 3 m (10 feet).
