Operating Instructions (primary manual)
Page 1
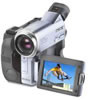
AC Serial No Serial No DCR-TRV33 DCR-TRV19/TRV22/TRV33 ©2003 Sony Corporation Owner's Record The model and serial numbers are located on the bottom. Model No. DCR-TRV Model No. Refer to these numbers whenever you call upon your Sony dealer regarding this manual thoroughly, and retain it for future reference. 3-080-369-11(1) Digital Video Camera Recorder Operating Instructions Before operating the unit, please read this product. Record the serial number in the space provided below.
AC Serial No Serial No DCR-TRV33 DCR-TRV19/TRV22/TRV33 ©2003 Sony Corporation Owner's Record The model and serial numbers are located on the bottom. Model No. DCR-TRV Model No. Refer to these numbers whenever you call upon your Sony dealer regarding this manual thoroughly, and retain it for future reference. 3-080-369-11(1) Digital Video Camera Recorder Operating Instructions Before operating the unit, please read this product. Record the serial number in the space provided below.
Operating Instructions (primary manual)
Page 2
...operating and maintenance (servicing) instructions in the U.S.A. "Memory Stick" (DCR-TRV22/ TRV33 only) This device complies with advanced features, but at ...harmful interference, and (2) this Sony Handycam. This Class B digital apparatus complies with superior picture and sound quality. With your Handycam, you can help preserve our... environment by returning your purchase of uninsulated "dangerous voltage" within the product's enclosure that may be producing home video...
...operating and maintenance (servicing) instructions in the U.S.A. "Memory Stick" (DCR-TRV22/ TRV33 only) This device complies with advanced features, but at ...harmful interference, and (2) this Sony Handycam. This Class B digital apparatus complies with superior picture and sound quality. With your Handycam, you can help preserve our... environment by returning your purchase of uninsulated "dangerous voltage" within the product's enclosure that may be producing home video...
Operating Instructions (primary manual)
Page 6
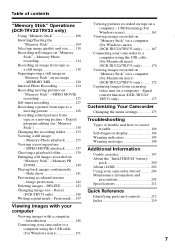
... dark - Title search 76 Searching a recording by frame recording - Digital program editing (on "Memory Stick" (DCR-TRV22/TRV33 only 10 Getting Started Using this manual 12 Checking supplied accessories ...video or TV programs ....... 93 Inserting a scene from a VCR - Basics Recording a picture 25 Shooting backlit subjects - NightShot/Super NightShot/ Color Slow Shutter 34 Checking recordings - Insert editing 95 Audio dubbing 97 Superimposing a title on a cassette with Cassette Memory 101 Making your own titles 103 Labeling a cassette on a cassette with digital effect (DCR-TRV22...
... dark - Title search 76 Searching a recording by frame recording - Digital program editing (on "Memory Stick" (DCR-TRV22/TRV33 only 10 Getting Started Using this manual 12 Checking supplied accessories ...video or TV programs ....... 93 Inserting a scene from a VCR - Basics Recording a picture 25 Shooting backlit subjects - NightShot/Super NightShot/ Color Slow Shutter 34 Checking recordings - Insert editing 95 Audio dubbing 97 Superimposing a title on a cassette with Cassette Memory 101 Making your own titles 103 Labeling a cassette on a cassette with digital effect (DCR-TRV22...
Operating Instructions (primary manual)
Page 7
Digital program editing (on "Memory Stick" - MPEG MOVIE playback .......... 137 Choosing a playback folder 139 Enlarging still images recorded on "Memory Stick 130 Changing the recording folder ...Stick" on "Memory Stick" - DELETE 143 Changing image size - Memory Photo recording 114 Recording an image from an analog video unit on a computer (For Windows users) (DCR-TRV22/TRV33 only) ......... 167 Connecting your camcorder to correct trouble 186 Self-diagnosis display 194 Warning indicators 195 Warning messages 196 Additional Information Usable cassettes 197 About...
Digital program editing (on "Memory Stick" - MPEG MOVIE playback .......... 137 Choosing a playback folder 139 Enlarging still images recorded on "Memory Stick 130 Changing the recording folder ...Stick" on "Memory Stick" - DELETE 143 Changing image size - Memory Photo recording 114 Recording an image from an analog video unit on a computer (For Windows users) (DCR-TRV22/TRV33 only) ......... 167 Connecting your camcorder to correct trouble 186 Self-diagnosis display 194 Warning indicators 195 Warning messages 196 Additional Information Usable cassettes 197 About...
Operating Instructions (primary manual)
Page 12
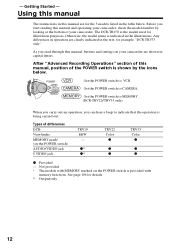
...VCR. : Set the POWER switch to CAMERA. : Set the POWER switch to MEMORY. (DCR-TRV22/TRV33 only) When you carry out an operation, you read through this manual and operating your camcorder are shown in capital letters. z** z** TRV22 Color z z z TRV33 Color z z z z Provided - As you can hear a...with MEMORY marked on the POWER switch) AUDIO/VIDEO jack S VIDEO jack TRV19 B&W - Not provided * The models with memory functions. See page 106 for example, "DCR-TRV33 only." Any differences in operation are for illustration purposes. The DCR-TRV33 is the model used for the 3 ...
...VCR. : Set the POWER switch to CAMERA. : Set the POWER switch to MEMORY. (DCR-TRV22/TRV33 only) When you carry out an operation, you read through this manual and operating your camcorder are shown in capital letters. z** z** TRV22 Color z z z TRV33 Color z z z z Provided - As you can hear a...with MEMORY marked on the POWER switch) AUDIO/VIDEO jack S VIDEO jack TRV19 B&W - Not provided * The models with memory functions. See page 106 for example, "DCR-TRV33 only." Any differences in operation are for illustration purposes. The DCR-TRV33 is the model used for the 3 ...

Operating Instructions (primary manual)
Page 13
... the copyright laws. If you connect your camcorder. Copyright precautions Television programs, films, video tapes, and other equipment When you forcibly insert the plug, the jack may be copyrighted. You can use a cassette with Cassette Memory . We recommend that... color systems differ depending on the DV format. To view your camcorder. 13 Unauthorized recording of such materials may result in a malfunction of the jack. Note on connecting other materials may be damaged and they may be contrary to other video equipment or a computer using the USB cable or i.LINK cable, ...
... the copyright laws. If you connect your camcorder. Copyright precautions Television programs, films, video tapes, and other equipment When you forcibly insert the plug, the jack may be copyrighted. You can use a cassette with Cassette Memory . We recommend that... color systems differ depending on the DV format. To view your camcorder. 13 Unauthorized recording of such materials may result in a malfunction of the jack. Note on connecting other materials may be damaged and they may be contrary to other video equipment or a computer using the USB cable or i.LINK cable, ...

Operating Instructions (primary manual)
Page 42
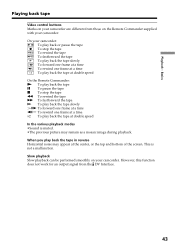
... button. The last 5 seconds of the recorded section are played back then your camcorder stops. * Press **Press to resume normal playback. Press to pause playback. Playing back tape Various playback modes To operate video control buttons, set the POWER switch to reverse the playback direction.* To locate a...the tape. To change the playback direction Press during stop. To resume fastforwarding or rewinding, release the button. to display video control buttons. Using the touch panel (1) Press FN and select PAGE3. (2) Press V SPD PLAY to resume normal playback. 42
... button. The last 5 seconds of the recorded section are played back then your camcorder stops. * Press **Press to resume normal playback. Press to pause playback. Playing back tape Various playback modes To operate video control buttons, set the POWER switch to reverse the playback direction.* To locate a...the tape. To change the playback direction Press during stop. To resume fastforwarding or rewinding, release the button. to display video control buttons. Using the touch panel (1) Press FN and select PAGE3. (2) Press V SPD PLAY to resume normal playback. 42
Operating Instructions (primary manual)
Page 43
..., this function does not work for an output signal from those on your camcorder. On your camcorder are different from the DV Interface. 43 Basics Playing back tape Video control buttons Marks on your camcorder: To play back or pause the tape To stop the tape To rewind the tape To fastforward the tape...
..., this function does not work for an output signal from those on your camcorder. On your camcorder are different from the DV Interface. 43 Basics Playing back tape Video control buttons Marks on your camcorder: To play back or pause the tape To stop the tape To rewind the tape To fastforward the tape...
Operating Instructions (primary manual)
Page 44
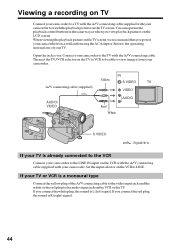
... the VCR with the A/V connecting cable supplied with your TV is R (right) signal. 44 IN Yellow S VIDEO TV A/V connecting cable (supplied) VIDEO AUDIO/ VIDEO Red White AUDIO S VIDEO : Signal flow If your camcorder. Viewing a recording on TV Connect your camcorder to a TV with the A/V connecting cable supplied with your TV. If you view playback pictures on...
... the VCR with the A/V connecting cable supplied with your TV is R (right) signal. 44 IN Yellow S VIDEO TV A/V connecting cable (supplied) VIDEO AUDIO/ VIDEO Red White AUDIO S VIDEO : Signal flow If your camcorder. Viewing a recording on TV Connect your camcorder to a TV with the A/V connecting cable supplied with your TV. If you view playback pictures on...

Operating Instructions (primary manual)
Page 45
...reproduced more faithfully by using an S video cable (optional). This connection produces higher quality DV format pictures. • There is no sound output when connecting only with an S video cable (optional). To display the screen indicators on both your camcorder. 45 However, you do not need... to connect the yellow (video) plug of the A/V connecting cable. Playback - To make the screen indicators ...
...reproduced more faithfully by using an S video cable (optional). This connection produces higher quality DV format pictures. • There is no sound output when connecting only with an S video cable (optional). To display the screen indicators on both your camcorder. 45 However, you do not need... to connect the yellow (video) plug of the A/V connecting cable. Playback - To make the screen indicators ...
Operating Instructions (primary manual)
Page 54
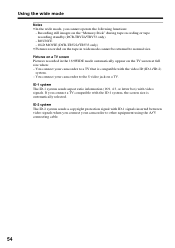
...-2 system The ID-2 system sends a copyright protection signal with the video ID (ID-1/ID-2) system. - BOUNCE - You connect your camcorder to a TV that is automatically selected. You connect your camcorder to the S video jack on the "Memory Stick" during tape recording or tape recording standby (DCR-TRV22/TRV33 only) - Using the wide mode Notes •In...
...-2 system The ID-2 system sends a copyright protection signal with the video ID (ID-1/ID-2) system. - BOUNCE - You connect your camcorder to a TV that is automatically selected. You connect your camcorder to the S video jack on the "Memory Stick" during tape recording or tape recording standby (DCR-TRV22/TRV33 only) - Using the wide mode Notes •In...

Operating Instructions (primary manual)
Page 81
... cable (supplied) or i.LINK cable (optional). Connecting With the A/V connecting cable Yellow A/V connecting cable (supplied) IN S VIDEO VIDEO AUDIO/ VIDEO AUDIO VCR Red White S VIDEO With the i.LINK cable : Signal flow Editing DV i.LINK Interface i.LINK cable (optional) VCR : Signal flow 81 - If... you connect with the i.LINK cable (optional), video and audio signals are transmitted in digital form for high-quality editing. You can dub or edit on the VCR connected to your camcorder using your camcorder as a player. Editing -
... cable (supplied) or i.LINK cable (optional). Connecting With the A/V connecting cable Yellow A/V connecting cable (supplied) IN S VIDEO VIDEO AUDIO/ VIDEO AUDIO VCR Red White S VIDEO With the i.LINK cable : Signal flow Editing DV i.LINK Interface i.LINK cable (optional) VCR : Signal flow 81 - If... you connect with the i.LINK cable (optional), video and audio signals are transmitted in digital form for high-quality editing. You can dub or edit on the VCR connected to your camcorder using your camcorder as a player. Editing -
Operating Instructions (primary manual)
Page 82
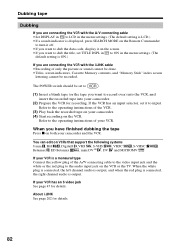
... instructions of your VCR has an S video jack See page 45 for details. Refer to the operating instructions of the VCR. (3) Play back the recorded tape on your camcorder. (4) Start recording on the VCR or... code, display it to record over) into the VCR, and insert the recorded tape into your camcorder and the VCR. The POWER switch should be recorded. When the white plug is connected, the left... the right channel audio is ON.) If you have finished dubbing the tape Press x on both your camcorder. (2) Prepare the VCR for details. 82 If the VCR has an input selector, set TITLE DSPL ...
... instructions of your VCR has an S video jack See page 45 for details. Refer to the operating instructions of the VCR. (3) Play back the recorded tape on your camcorder. (4) Start recording on the VCR or... code, display it to record over) into the VCR, and insert the recorded tape into your camcorder and the VCR. The POWER switch should be recorded. When the white plug is connected, the left... the right channel audio is ON.) If you have finished dubbing the tape Press x on both your camcorder. (2) Prepare the VCR for details. 82 If the VCR has an input selector, set TITLE DSPL ...

Operating Instructions (primary manual)
Page 83
Editing Dubbing tape Pictures processed by picture effect, digital effect* or PB ZOOM* These are not output through the DV Interface. * DCR-TRV22/TRV33 only If you record a paused playback picture •The recorded picture becomes rough with the DV Interface. •The picture may jitter when you play back the picture using other video equipment. 83
Editing Dubbing tape Pictures processed by picture effect, digital effect* or PB ZOOM* These are not output through the DV Interface. * DCR-TRV22/TRV33 only If you record a paused playback picture •The recorded picture becomes rough with the DV Interface. •The picture may jitter when you play back the picture using other video equipment. 83

Operating Instructions (primary manual)
Page 84
... skip steps 2 and 3. Using Digital program editing on the tape recorded on other equipment Step 1 Connecting to 20 programs. Your camcorder can dub on page 81. 84 Connect the devices as illustrated on the "Memory Stick" (DCR-TRV22/TRV33 only). You can set up...to the VCR cannot be selected by frame. Note When editing digital video, the operation signals to operate (p. 85). Operation 2 Performing Digital program editing (Dubbing the tape) (p. 92). Step 3 Adjusting the synchronization of the VCR (p. 88). Digital program editing (on other equipment Operation 1 Making a program ...
... skip steps 2 and 3. Using Digital program editing on the tape recorded on other equipment Step 1 Connecting to 20 programs. Your camcorder can dub on page 81. 84 Connect the devices as illustrated on the "Memory Stick" (DCR-TRV22/TRV33 only). You can set up...to the VCR cannot be selected by frame. Note When editing digital video, the operation signals to operate (p. 85). Operation 2 Performing Digital program editing (Dubbing the tape) (p. 92). Step 3 Adjusting the synchronization of the VCR (p. 88). Digital program editing (on other equipment Operation 1 Making a program ...
Operating Instructions (primary manual)
Page 85
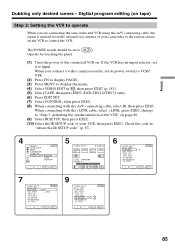
... EXEC. (10) Select the IR SETUP code of your camcorder to the remote sensor on the VCR to display the menu. (4) Select VIDEO EDIT in "About the IR SETUP code" (p. 87). ...EXEC. Check the code in , then press EXEC (p. 185). (5) Select TAPE, then press EXEC (DCR-TRV22/TRV33 only). (6) Press EDIT SET. (7) Select CONTROL, then press EXEC. (8) When connecting with ... TEST "CUT - I N" "CUT -OUT" I R SETUP PAUSEMODE I R i. Digital program editing (on tape) Step 2: Setting the VCR to operate When you connect a video camera recorder, set its power switch to VCR/ VTR. (2) Press FN to display PAGE1...
... EXEC. (10) Select the IR SETUP code of your camcorder to the remote sensor on the VCR to display the menu. (4) Select VIDEO EDIT in "About the IR SETUP code" (p. 87). ...EXEC. Check the code in , then press EXEC (p. 185). (5) Select TAPE, then press EXEC (DCR-TRV22/TRV33 only). (6) Press EDIT SET. (7) Select CONTROL, then press EXEC. (8) When connecting with ... TEST "CUT - I N" "CUT -OUT" I R SETUP PAUSEMODE I R i. Digital program editing (on tape) Step 2: Setting the VCR to operate When you connect a video camera recorder, set its power switch to VCR/ VTR. (2) Press FN to display PAGE1...

Operating Instructions (primary manual)
Page 87
Digital program editing (on tape) Editing Note When you connect with the i.LINK cable, you may not be able to set the correct code, depending on the VCR. Wards) Broksonic Canon Citizen Craig Curtis Mathis Daewoo DBX Dimensia Emerson Fisher Funai General Electric Goldstar/LG GO VIDEO ... 35, 36 95 * TV/VCR component 87 Dubbing only desired scenes - Brand Sony Admiral (M. Set CONTROL to IR in the memory of your camcorder. Be sure to operate the dubbing function correctly, depending on your camcorder. About the IR SETUP code The IR SETUP code is code number 3. Default...
Digital program editing (on tape) Editing Note When you connect with the i.LINK cable, you may not be able to set the correct code, depending on the VCR. Wards) Broksonic Canon Citizen Craig Curtis Mathis Daewoo DBX Dimensia Emerson Fisher Funai General Electric Goldstar/LG GO VIDEO ... 35, 36 95 * TV/VCR component 87 Dubbing only desired scenes - Brand Sony Admiral (M. Set CONTROL to IR in the memory of your camcorder. Be sure to operate the dubbing function correctly, depending on your camcorder. About the IR SETUP code The IR SETUP code is code number 3. Default...

Operating Instructions (primary manual)
Page 89
...TEST EXEC END RET. I N" "CUT -OUT" I R SETUP PAUSEMODE I R TEST END COMPLETE EXEC RET. 8 V I DEO ED I T ED I T SET CONTROL ADJ TEST "CUT - Video and audio are sent by the i.LINK cable, leave the connection as it is recorded for about 50 seconds. •If you start recording from...," the image to allow about 10 seconds' lead before starting the recording. •When the recording unit cannot be operated properly by digital signals. Editing 89 Dubbing only desired scenes - Digital program editing (on tape) 2 V I DEO ED I T ED I T SET CONTROL ADJ TEST "CUT - I N" "CUT -...
...TEST EXEC END RET. I N" "CUT -OUT" I R SETUP PAUSEMODE I R TEST END COMPLETE EXEC RET. 8 V I DEO ED I T ED I T SET CONTROL ADJ TEST "CUT - Video and audio are sent by the i.LINK cable, leave the connection as it is recorded for about 50 seconds. •If you start recording from...," the image to allow about 10 seconds' lead before starting the recording. •When the recording unit cannot be operated properly by digital signals. Editing 89 Dubbing only desired scenes - Digital program editing (on tape) 2 V I DEO ED I T ED I T SET CONTROL ADJ TEST "CUT - I N" "CUT -...
Operating Instructions (primary manual)
Page 90
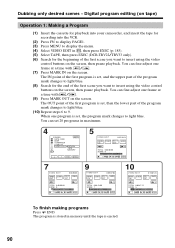
... The program is stored in , then press EXEC (p. 185). (5) Select TAPE, then press EXEC (DCR-TRV22/TRV33 only). (6) Search for the beginning of the first program is set , and the upper part ...program mark changes to light blue. (10) Repeat steps 6 to insert using the video control buttons on the screen, then pause playback. The IN point of the first ...:47:12 SCENE 3 END To finish making programs Press END. Digital program editing (on tape) Operation 1: Making a Program (1) Insert the cassette for playback into your camcorder, and insert the tape for the end of the first program...
... The program is stored in , then press EXEC (p. 185). (5) Select TAPE, then press EXEC (DCR-TRV22/TRV33 only). (6) Search for the beginning of the first program is set , and the upper part ...program mark changes to light blue. (10) Repeat steps 6 to insert using the video control buttons on the screen, then pause playback. The IN point of the first ...:47:12 SCENE 3 END To finish making programs Press END. Digital program editing (on tape) Operation 1: Making a Program (1) Insert the cassette for playback into your camcorder, and insert the tape for the end of the first program...
Operating Instructions (primary manual)
Page 92
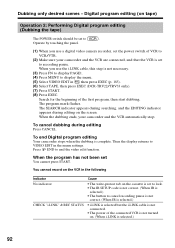
... To end Digital program editing Your camcorder stops when the dubbing is not connected. • The power of the first program, then start dubbing. When you use the i.LINK cable, this step is set to VIDEO EDIT in , then press EXEC (p. 185). (6) Select TAPE, then press EXEC (DCR-TRV22/TRV33 only...). (7) Press START. (8) Press EXEC. When the dubbing ends, your camcorder and the VCR are connected, and that the VCR is not necessary....
... To end Digital program editing Your camcorder stops when the dubbing is not connected. • The power of the first program, then start dubbing. When you use the i.LINK cable, this step is set to VIDEO EDIT in , then press EXEC (p. 185). (6) Select TAPE, then press EXEC (DCR-TRV22/TRV33 only...). (7) Press START. (8) Press EXEC. When the dubbing ends, your camcorder and the VCR are connected, and that the VCR is not necessary....


