Operating Instructions (primary manual)
Page 148
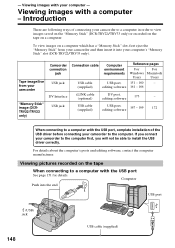
... of the USB driver before connecting your camcorder "Memory Stick" image (DCRTRV22/TRV33 only) Camcorder connection jack USB jack DV Interface USB jack Connection cable USB cable (supplied) Computer environment requirements USB port, editing software Reference pages For For Windows Macintosh Users Users ... slot, first eject the "Memory Stick" from your camcorder to view images saved on the "Memory Stick" (DCR-TRV22/TRV33 only) or recorded on the tape on the tape When connecting to install the USB driver correctly. Computer Push into your computer - Viewing images ...
... of the USB driver before connecting your camcorder "Memory Stick" image (DCRTRV22/TRV33 only) Camcorder connection jack USB jack DV Interface USB jack Connection cable USB cable (supplied) Computer environment requirements USB port, editing software Reference pages For For Windows Macintosh Users Users ... slot, first eject the "Memory Stick" from your camcorder to view images saved on the "Memory Stick" (DCR-TRV22/TRV33 only) or recorded on the tape on the tape When connecting to install the USB driver correctly. Computer Push into your computer - Viewing images ...
Operating Instructions (primary manual)
Page 151
...: at least 250 MB Available hard disk memory recommended: at least 1 GB (depending on the size of the USB driver before connecting your camcorder to a computer. CPU: Minimum 500 MHz Intel Pentium III or faster (800 MHz or faster recommended) Application: DirectX ...Windows 98SE, Windows Millennium Edition, Windows 2000 Professional, Windows XP Home Edition or Windows XP Professional Standard installation is necessary to install DirectX. Viewing images with the USB port You must be found on the CD-ROM supplied, along with the USB cable and viewing tape pictures on a computer (DCR-TRV22...
...: at least 250 MB Available hard disk memory recommended: at least 1 GB (depending on the size of the USB driver before connecting your camcorder to a computer. CPU: Minimum 500 MHz Intel Pentium III or faster (800 MHz or faster recommended) Application: DirectX ...Windows 98SE, Windows Millennium Edition, Windows 2000 Professional, Windows XP Home Edition or Windows XP Professional Standard installation is necessary to install DirectX. Viewing images with the USB port You must be found on the CD-ROM supplied, along with the USB cable and viewing tape pictures on a computer (DCR-TRV22...
Operating Instructions (primary manual)
Page 152
..." images on the type of USB equipment that is used simultaneously. •Operations are not guaranteed for installing USB driver is a trademark or registered trademark of Intel Corporation. •All other countries. •Pentium is not displayed.) ...may not operate depending on a computer (DCR-TRV22/TRV33 only) Recommended Windows environment OS: Microsoft Windows 98, Windows 98SE, Windows Millennium Edition, Windows 2000 Professional, Windows XP Home Edition or Windows XP Professional Standard installation is an upgraded OS. Connecting your camcorder to a computer using a hub. &#...
..." images on the type of USB equipment that is used simultaneously. •Operations are not guaranteed for installing USB driver is a trademark or registered trademark of Intel Corporation. •All other countries. •Pentium is not displayed.) ...may not operate depending on a computer (DCR-TRV22/TRV33 only) Recommended Windows environment OS: Microsoft Windows 98, Windows 98SE, Windows Millennium Edition, Windows 2000 Professional, Windows XP Home Edition or Windows XP Professional Standard installation is an upgraded OS. Connecting your camcorder to a computer using a hub. &#...
Operating Instructions (primary manual)
Page 153
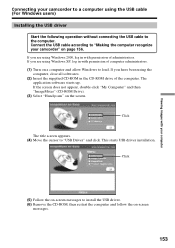
...the cursor to "Making the computer recognize your camcorder to a computer using the computer, close all softwares. (2) Insert the supplied CD-ROM in with permission of computer administrators. (1) Turn on a computer and allow Windows to install the USB driver. (6) Remove the CD-ROM, then restart ...the computer and follow the on the screen. Viewing images with permission of administrators. If the screen does not appear, double-click "My Computer" and then "ImageMixer" (CD-ROM Drive). (3) Select "Handycam" on ...
...the cursor to "Making the computer recognize your camcorder to a computer using the computer, close all softwares. (2) Insert the supplied CD-ROM in with permission of computer administrators. (1) Turn on a computer and allow Windows to install the USB driver. (6) Remove the CD-ROM, then restart ...the computer and follow the on the screen. Viewing images with permission of administrators. If the screen does not appear, double-click "My Computer" and then "ImageMixer" (CD-ROM Drive). (3) Select "Handycam" on ...
Operating Instructions (primary manual)
Page 154
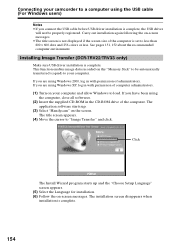
...DCR-TRV22/TRV33 only) Make sure USB driver installation is complete. 154 The installation screen disappears when installation is complete. If you are using Windows XP, log in with permission of computer administrators. (1) Turn on the screen. Click The Install Wizard program starts up . (3) Select "Handycam...(5) Select the Language for installation. (6) Follow the on the "Memory Stick" to your computer. Connecting your camcorder to a computer using the USB cable (For Windows users) Notes •If you have been using the computer, close all softwares. (2) Insert the supplied CD...
...DCR-TRV22/TRV33 only) Make sure USB driver installation is complete. 154 The installation screen disappears when installation is complete. If you are using Windows XP, log in with permission of computer administrators. (1) Turn on the screen. Click The Install Wizard program starts up . (3) Select "Handycam...(5) Select the Language for installation. (6) Follow the on the "Memory Stick" to your computer. Connecting your camcorder to a computer using the USB cable (For Windows users) Notes •If you have been using the computer, close all softwares. (2) Insert the supplied CD...
Operating Instructions (primary manual)
Page 155
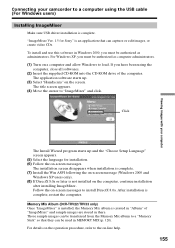
..."Choose Setup Language" screen appears. (5) Select the language for Sony" is an application that they can capture or edit images,... is complete. Viewing images with your computer Connecting your camcorder to a computer using the computer, close all softwares....driver installation is complete, restart the computer. Memory Mix Album (DCR-TRV22/TRV33 only) Once "ImageMixer" is installed, the Memory Mix album is not installed on -screen messages to "ImageMixer" and click. Click The Install Wizard program starts up . (3) Select "Handycam" on -screen message (Windows 2000 and Windows...
..."Choose Setup Language" screen appears. (5) Select the language for Sony" is an application that they can capture or edit images,... is complete. Viewing images with your computer Connecting your camcorder to a computer using the computer, close all softwares....driver installation is complete, restart the computer. Memory Mix Album (DCR-TRV22/TRV33 only) Once "ImageMixer" is installed, the Memory Mix album is not installed on -screen messages to "ImageMixer" and click. Click The Install Wizard program starts up . (3) Select "Handycam" on -screen message (Windows 2000 and Windows...

Operating Instructions (primary manual)
Page 156
... use the ImageMixer CD writing function, you are prompted to confirm the digital signature, select "Yes" (Windows 2000) or "Continue Anyway" (Windows XP). 156 Making the computer recognize your camcorder If you need to install WinASPI. The computer recognizes your camcorder, and the Windows Add Hardware Wizard starts. Viewing pictures recorded on -screen messages so that... that the ImageMixer CD writing function may not work properly. Be sure to allow the installation to complete without interrupting it. If that the USB drivers have been installed.
... use the ImageMixer CD writing function, you are prompted to confirm the digital signature, select "Yes" (Windows 2000) or "Continue Anyway" (Windows XP). 156 Making the computer recognize your camcorder If you need to install WinASPI. The computer recognizes your camcorder, and the Windows Add Hardware Wizard starts. Viewing pictures recorded on -screen messages so that... that the ImageMixer CD writing function may not work properly. Be sure to allow the installation to complete without interrupting it. If that the USB drivers have been installed.
Operating Instructions (primary manual)
Page 157
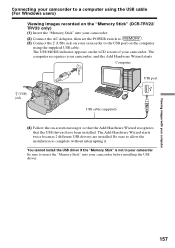
... the USB cable (For Windows users) Viewing images recorded on the "Memory Stick" (DCR-TRV22/ TRV33 only) (1) Insert the "Memory Stick" into your camcorder. (2) Connect the AC Adaptor, then set the POWER switch to . (3) Connect the (USB) jack on your camcorder to insert the "Memory Stick" into your camcorder before installing the USB driver. Viewing images with...
... the USB cable (For Windows users) Viewing images recorded on the "Memory Stick" (DCR-TRV22/ TRV33 only) (1) Insert the "Memory Stick" into your camcorder. (2) Connect the AC Adaptor, then set the POWER switch to . (3) Connect the (USB) jack on your camcorder to insert the "Memory Stick" into your camcorder before installing the USB driver. Viewing images with...
Operating Instructions (primary manual)
Page 158
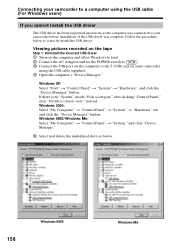
... a computer using the USB cable supplied. 4 Open the computer's "Device Manager." Connecting your camcorder using the USB cable (For Windows users) If you cannot install the USB driver The USB driver has been registered incorrectly as the computer was complete. Windows 98SE/Windows Me: Select "My Computer" t "Control Panel" t "System," and click "Device Manager." 5 Select and...
... a computer using the USB cable supplied. 4 Open the computer's "Device Manager." Connecting your camcorder using the USB cable (For Windows users) If you cannot install the USB driver The USB driver has been registered incorrectly as the computer was complete. Windows 98SE/Windows Me: Select "My Computer" t "Control Panel" t "System," and click "Device Manager." 5 Select and...
Operating Instructions (primary manual)
Page 159
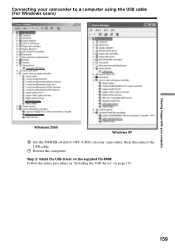
Connecting your camcorder to a computer using the USB cable (For Windows users) Viewing images with your computer Windows 2000 Windows XP 6 Set the POWER switch to OFF (CHG) on page 153. 159 Step 2: Install the USB driver on the supplied CD-ROM Follow the entire procedure in "Installing the USB driver" on your camcorder, then disconnect the USB cable. 7 Restart the computer.
Connecting your camcorder to a computer using the USB cable (For Windows users) Viewing images with your computer Windows 2000 Windows XP 6 Set the POWER switch to OFF (CHG) on page 153. 159 Step 2: Install the USB driver on the supplied CD-ROM Follow the entire procedure in "Installing the USB driver" on your camcorder, then disconnect the USB cable. 7 Restart the computer.
Operating Instructions (primary manual)
Page 160
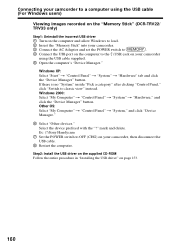
...the USB driver" on your camcorder using the USB cable (For Windows users) Viewing images recorded on the "Memory Stick" (DCR-TRV22/ TRV33 only) Step1: Uninstall the incorrect USB driver 1 Turn on the computer and allow Windows to load. 2 Insert the "Memory Stick" into your camcorder. 3 ...page 153. 160 Connecting your camcorder to a computer using the USB cable supplied. 5 Open the computer's "Device Manager." Windows XP: Select "Start" t "Control Panel" t "System" t "Hardware" tab and click the "Device Manager" button. mark and delete. Ex: (?)Sony Handycam 7 Set the POWER switch to...
...the USB driver" on your camcorder using the USB cable (For Windows users) Viewing images recorded on the "Memory Stick" (DCR-TRV22/ TRV33 only) Step1: Uninstall the incorrect USB driver 1 Turn on the computer and allow Windows to load. 2 Insert the "Memory Stick" into your camcorder. 3 ...page 153. 160 Connecting your camcorder to a computer using the USB cable supplied. 5 Open the computer's "Device Manager." Windows XP: Select "Start" t "Control Panel" t "System" t "Hardware" tab and click the "Device Manager" button. mark and delete. Ex: (?)Sony Handycam 7 Set the POWER switch to...
Operating Instructions (primary manual)
Page 161
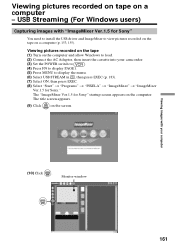
... - Viewing images with "ImageMixer Ver.1.5 for Sony" You need to install the USB driver and ImageMixer to load. (2) Connect the AC Adaptor, then insert the cassette into your computer (10) Click . Viewing pictures recorded on tape on the screen. USB Streaming (For Windows users) Capturing images with your camcorder. (3) Set the POWER switch to...
... - Viewing images with "ImageMixer Ver.1.5 for Sony" You need to install the USB driver and ImageMixer to load. (2) Connect the AC Adaptor, then insert the cassette into your computer (10) Click . Viewing pictures recorded on tape on the screen. USB Streaming (For Windows users) Capturing images with your camcorder. (3) Set the POWER switch to...

Operating Instructions (primary manual)
Page 164
.... Reinstall the USB driver following operations after five minutes. •We recommend setting DEMO MODE to that are displayed with the USB connection, the following may appear jagged. •When you view images on the screen of your camcorder before installation of the monitor window to capture. To ...page 158. The moving picture, the preview window may not move more smoothly by the USB connection The USB driver has been registered incorrectly as the computer was connected to your camcorder do not appear on the bottom of the USB driver was complete. If image data cannot be ...
.... Reinstall the USB driver following operations after five minutes. •We recommend setting DEMO MODE to that are displayed with the USB connection, the following may appear jagged. •When you view images on the screen of your camcorder before installation of the monitor window to capture. To ...page 158. The moving picture, the preview window may not move more smoothly by the USB connection The USB driver has been registered incorrectly as the computer was connected to your camcorder do not appear on the bottom of the USB driver was complete. If image data cannot be ...
Operating Instructions (primary manual)
Page 167
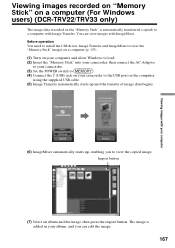
...You need to install the USB driver, Image Transfer and ImageMixer to view the "Memory Stick" images on a computer (p. 153). (1) Turn on your computer and allow Windows to load. (2) Insert the "Memory Stick" into your camcorder, then connect the AC Adaptor to your camcorder. (3) Set the POWER switch to... Select an album and the image, then press the import button. Viewing images recorded on "Memory Stick" on a computer (For Windows users) (DCR-TRV22/TRV33 only) The image data recorded on the computer using the supplied USB cable. (5) Image Transfer automatically starts up , enabling you...
...You need to install the USB driver, Image Transfer and ImageMixer to view the "Memory Stick" images on a computer (p. 153). (1) Turn on your computer and allow Windows to load. (2) Insert the "Memory Stick" into your camcorder, then connect the AC Adaptor to your camcorder. (3) Set the POWER switch to... Select an album and the image, then press the import button. Viewing images recorded on "Memory Stick" on a computer (For Windows users) (DCR-TRV22/TRV33 only) The image data recorded on the computer using the supplied USB cable. (5) Image Transfer automatically starts up , enabling you...
Operating Instructions (primary manual)
Page 168
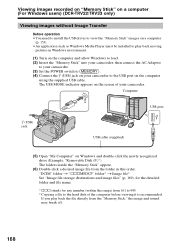
...the supplied USB cable. Viewing images recorded on "Memory Stick" on a computer (For Windows users) (DCR-TRV22/TRV33 only) Viewing images without Image Transfer Before operation •You need to install the USB driver to view the "Memory Stick" images on a computer (p. 153). •An application... from the folder in Windows environment. (1) Turn on the computer and allow Windows to load. (2) Insert the "Memory Stick" into your camcorder, then connect the AC Adaptor to your camcorder. (3) Set the POWER switch to . (4) Connect the (USB) jack on your camcorder. If you play back...
...the supplied USB cable. Viewing images recorded on "Memory Stick" on a computer (For Windows users) (DCR-TRV22/TRV33 only) Viewing images without Image Transfer Before operation •You need to install the USB driver to view the "Memory Stick" images on a computer (p. 153). •An application... from the folder in Windows environment. (1) Turn on the computer and allow Windows to load. (2) Insert the "Memory Stick" into your camcorder, then connect the AC Adaptor to your camcorder. (3) Set the POWER switch to . (4) Connect the (USB) jack on your camcorder. If you play back...
PIXELA ImageMixer v1.5 Instruction Manual
Page 6
...disc to be created. Windows OS Microsoft ® Windows ® 98/Windows ® 98 Second Edition/Windows ® Millennium Edition/Windows ® 2000 Professional/Windows ® XP Home Edition/Windows ® XP Professional (IBM PC/AT compatible) (In Windows ® 98 and Windows ® 98 Second Edition...® III 500MHz or faster for work correctly, your computer system meets these requirements before installing ImageMixer. Direct Draw driver compatible ImageMixer will not be authorized as a Power User or Administrator; Graphics 4MB or more that your computer must be...
...disc to be created. Windows OS Microsoft ® Windows ® 98/Windows ® 98 Second Edition/Windows ® Millennium Edition/Windows ® 2000 Professional/Windows ® XP Home Edition/Windows ® XP Professional (IBM PC/AT compatible) (In Windows ® 98 and Windows ® 98 Second Edition...® III 500MHz or faster for work correctly, your computer system meets these requirements before installing ImageMixer. Direct Draw driver compatible ImageMixer will not be authorized as a Power User or Administrator; Graphics 4MB or more that your computer must be...
PIXELA ImageMixer v1.5 Instruction Manual
Page 40
... tasks on your computer while recording is functioning properly. Track list not displayed. Confirm that the correct CD drive is selected (Windows only), that the CD currently in which you expect this point. The method for adjusting the volume may be different depending on... your computer's configurations, in the drive is because there may be a problem with a driver. Unnecessary portions can be cut in Windows). (See section 2-4-2) There may be a problem with the connection between the CD drive and the sound card. 2-4-4 Audio...
... tasks on your computer while recording is functioning properly. Track list not displayed. Confirm that the correct CD drive is selected (Windows only), that the CD currently in which you expect this point. The method for adjusting the volume may be different depending on... your computer's configurations, in the drive is because there may be a problem with a driver. Unnecessary portions can be cut in Windows). (See section 2-4-2) There may be a problem with the connection between the CD drive and the sound card. 2-4-4 Audio...
PIXELA ImageMixer v1.5 Instruction Manual
Page 56
... available hard disk space that supports moving pictures are captured. Set whether or not to the digital video camera. Copyright © 2001-2002, PIXELA Corp. q Capture as MPEG1 Normally moving ...Setting q Sound device In the USB Capture Mode, select from a list the audio capture driver to be used when capturing from an analog image output device connected to do normal USB capture...picture files. The converting MPEG1 is not to display the image being captured in the monitor window when moving pictures are captured as AVI format moving picture files, but you can set ...
... available hard disk space that supports moving pictures are captured. Set whether or not to the digital video camera. Copyright © 2001-2002, PIXELA Corp. q Capture as MPEG1 Normally moving ...Setting q Sound device In the USB Capture Mode, select from a list the audio capture driver to be used when capturing from an analog image output device connected to do normal USB capture...picture files. The converting MPEG1 is not to display the image being captured in the monitor window when moving pictures are captured as AVI format moving picture files, but you can set ...
PIXELA ImageMixer v1.5 Instruction Manual
Page 145
...its icon. Click the [Layout Menu] button. In Macintosh, click the layout menu to your machine, select a printer driver that is selected. button. In the menu window, click the desired layout type and click the [OK] be displayed when the Layout menu is pre-installed in your ... 3. 5-2 Layout Menu Selecting layout type 1. If you don't have a printer connected to select the layout type. In Macintosh, select the printer driver from the layout menu. Open the Layout Environment. 2. The layout type can also In the Layout Environment, the size of the printer. Layout menu...
...its icon. Click the [Layout Menu] button. In Macintosh, click the layout menu to your machine, select a printer driver that is selected. button. In the menu window, click the desired layout type and click the [OK] be displayed when the Layout menu is pre-installed in your ... 3. 5-2 Layout Menu Selecting layout type 1. If you don't have a printer connected to select the layout type. In Macintosh, select the printer driver from the layout menu. Open the Layout Environment. 2. The layout type can also In the Layout Environment, the size of the printer. Layout menu...
PIXELA ImageMixer v1.5 Instruction Manual
Page 231
...Copyright © 2002, PIXELA Corp. q In order to observe warning and directions given by the storage device (drive) manufacturer. q For Windows users, we recommend that you need to meet the requirements recommended by the CD-R drive. q Screen savers, System agents and other than ImageMixer... the storage device (drive) manufacturer recommends. No other applications other software that your hard disk turned ON. q Please confirm that software, driver, etc. q In order to run application may affect disc writing process. q The drives listed have the DMA transfer mode of disc ...
...Copyright © 2002, PIXELA Corp. q In order to observe warning and directions given by the storage device (drive) manufacturer. q For Windows users, we recommend that you need to meet the requirements recommended by the CD-R drive. q Screen savers, System agents and other than ImageMixer... the storage device (drive) manufacturer recommends. No other applications other software that your hard disk turned ON. q Please confirm that software, driver, etc. q In order to run application may affect disc writing process. q The drives listed have the DMA transfer mode of disc ...


