Operating Instructions (primary manual)
Page 2
...and maintenance (servicing) instructions in the U.S.A. This Class B digital apparatus complies with advanced features, but at the same time ... PLUG TO WIDE SLOT, FULLY INSERT. You can capture life's precious moments with Part 15 of uninsulated "...interference, and (2) this Sony Handycam. This symbol is loaded with Canadian ICES-003. 2 Your Handycam is intended to alert ...Handycam, you . WARNING To prevent fire or shock hazard, do not expose the unit to discontinue midway (fail), restart the application or disconnect and connect the USB cable again. "Memory Stick" (DCR-TRV22...
...and maintenance (servicing) instructions in the U.S.A. This Class B digital apparatus complies with advanced features, but at the same time ... PLUG TO WIDE SLOT, FULLY INSERT. You can capture life's precious moments with Part 15 of uninsulated "...interference, and (2) this Sony Handycam. This symbol is loaded with Canadian ICES-003. 2 Your Handycam is intended to alert ...Handycam, you . WARNING To prevent fire or shock hazard, do not expose the unit to discontinue midway (fail), restart the application or disconnect and connect the USB cable again. "Memory Stick" (DCR-TRV22...
Operating Instructions (primary manual)
Page 4
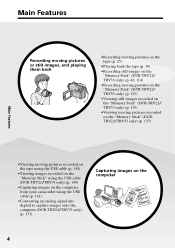
...•Recording still images on the "Memory Stick" (DCR-TRV22/ TRV33 only) (p. 46, 114) •Recording moving pictures on the "Memory Stick" (DCR-TRV22/ TRV33 only) (p. 125) •Viewing still images recorded on the "Memory Stick" (DCR-TRV22/ TRV33 only) (p. 135) •Viewing moving pictures... Stick" using the USB cable (DCR-TRV22/TRV33 only) (p. 149) •Capturing images on the computer from your camcorder using the USB cable (p. 161) •Converting an analog signal into digital to capture images onto the computer (DCR-TRV22/TRV33 only) (p. 173) Capturing images on the computer 4
...•Recording still images on the "Memory Stick" (DCR-TRV22/ TRV33 only) (p. 46, 114) •Recording moving pictures on the "Memory Stick" (DCR-TRV22/ TRV33 only) (p. 125) •Viewing still images recorded on the "Memory Stick" (DCR-TRV22/ TRV33 only) (p. 135) •Viewing moving pictures... Stick" using the USB cable (DCR-TRV22/TRV33 only) (p. 149) •Capturing images on the computer from your camcorder using the USB cable (p. 161) •Converting an analog signal into digital to capture images onto the computer (DCR-TRV22/TRV33 only) (p. 173) Capturing images on the computer 4
Operating Instructions (primary manual)
Page 7
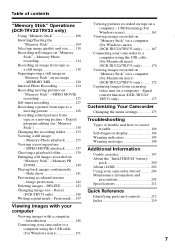
... your camcorder to a computer using the USB cable (For Windows users 151 7 Digital program editing (on a computer - DELETE 143 Changing image size - USB Streaming (For Windows users 161 Viewing images recorded on "Memory Stick" on a computer (For Windows users) (DCR-TRV22/TRV33 only...and how to a computer using the USB cable (For Macintosh users) (DCR-TRV22/TRV33 only) ......... 170 Viewing images recorded on "Memory Stick" on a computer (For Macintosh users) (DCR-TRV22/TRV33 only) ......... 172 Capturing images from an analog video unit on "Memory Stick 130 Changing the ...
... your camcorder to a computer using the USB cable (For Windows users 151 7 Digital program editing (on a computer - DELETE 143 Changing image size - USB Streaming (For Windows users 161 Viewing images recorded on "Memory Stick" on a computer (For Windows users) (DCR-TRV22/TRV33 only...and how to a computer using the USB cable (For Macintosh users) (DCR-TRV22/TRV33 only) ......... 170 Viewing images recorded on "Memory Stick" on a computer (For Macintosh users) (DCR-TRV22/TRV33 only) ......... 172 Capturing images from an analog video unit on "Memory Stick 130 Changing the ...

Operating Instructions (primary manual)
Page 46
...the "Memory Stick" is complete when the bar scroll indicator at the upper right on the "Memory Stick." 1 50min 640 FINE 12 CAPTURE 2 101 FN 50min 640 FINE 101 FN During tape recording The POWER switch should be set to . Advanced Recording Operations - To change ...The image displayed on the screen when you pressed PHOTO deeply will be recorded on "Memory Stick" during tape recording standby or tape recording (DCR-TRV22/TRV33 only) Insert a "Memory Stick" before the following operation. During tape recording standby The POWER switch should be set to . (1) Keep...
...the "Memory Stick" is complete when the bar scroll indicator at the upper right on the "Memory Stick." 1 50min 640 FINE 12 CAPTURE 2 101 FN 50min 640 FINE 101 FN During tape recording The POWER switch should be set to . Advanced Recording Operations - To change ...The image displayed on the screen when you pressed PHOTO deeply will be recorded on "Memory Stick" during tape recording standby or tape recording (DCR-TRV22/TRV33 only) Insert a "Memory Stick" before the following operation. During tape recording standby The POWER switch should be set to . (1) Keep...

Operating Instructions (primary manual)
Page 48
...does not start yet. The still image displayed on a tape - Tape Photo recording (DCR-TRV19 only) You can record about 510 images in the SP mode and about 7 seconds. The CAPTURE indicator appears. Recording a still image on the screen when you cannot change the still ...image, release PHOTO, select a still image again, and then press and hold PHOTO lightly. (2) Press PHOTO deeply. To change the mode or setting. •When recording a still image, do not shake your camcorder...
...does not start yet. The still image displayed on a tape - Tape Photo recording (DCR-TRV19 only) You can record about 510 images in the SP mode and about 7 seconds. The CAPTURE indicator appears. Recording a still image on the screen when you cannot change the still ...image, release PHOTO, select a still image again, and then press and hold PHOTO lightly. (2) Press PHOTO deeply. To change the mode or setting. •When recording a still image, do not shake your camcorder...

Operating Instructions (primary manual)
Page 106
...camcorder. Files in this format can store greater data than a floppy disk. DSC00001.JPG:This file name appears on the labeling position. Moving picture MOV00001: This file name appears on the screen of a computer. "Memory Stick" Operations (DCR-TRV22/...TRV33 only) - In addition to recording images and easily playing back images you want to LOCK. Capturing images into the "Memory Stick" from erasing images accidentally Rear part of the "Memory Stick" Slide the write-protect tab on the "Memory Stick" to see, the "Memory Stick" allows operations such as your camcorder...
...camcorder. Files in this format can store greater data than a floppy disk. DSC00001.JPG:This file name appears on the labeling position. Moving picture MOV00001: This file name appears on the screen of a computer. "Memory Stick" Operations (DCR-TRV22/...TRV33 only) - In addition to recording images and easily playing back images you want to LOCK. Capturing images into the "Memory Stick" from erasing images accidentally Rear part of the "Memory Stick" Slide the write-protect tab on the "Memory Stick" to see, the "Memory Stick" allows operations such as your camcorder...

Operating Instructions (primary manual)
Page 118
The picture from the tape freezes and the CAPTURE indicator appears on the tape is played back. (2) Keep pressing PHOTO lightly and check the image. Title You cannot record the titles. The picture recorded ... disappears. The POWER switch should be recorded on the "Memory Stick." 1 2 50min 640 FINE 12 CAPTURE 3 101 50min 640 FINE 101 118 Sound recorded on the screen when you press PHOTO on the Remote Commander Your camcorder immediately records the image that is on the "Memory Stick" is recorded. Before operation Insert...
The picture from the tape freezes and the CAPTURE indicator appears on the tape is played back. (2) Keep pressing PHOTO lightly and check the image. Title You cannot record the titles. The picture recorded ... disappears. The POWER switch should be recorded on the "Memory Stick." 1 2 50min 640 FINE 12 CAPTURE 3 101 50min 640 FINE 101 118 Sound recorded on the screen when you press PHOTO on the Remote Commander Your camcorder immediately records the image that is on the "Memory Stick" is recorded. Before operation Insert...
Operating Instructions (primary manual)
Page 155
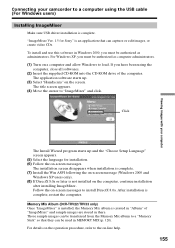
... program starts up . (3) Select "Handycam" on the screen. After installation is created in "Album" of the computer. Memory Mix Album (DCR-TRV22/TRV33 only) Once "ImageMixer" is ...transferred from the Memory Mix album to a "Memory Stick" so that they can capture or edit images, or create video CDs. For details on the operation procedure, ...Make sure USB driver installation is complete. Viewing images with your computer Connecting your camcorder to a computer using the computer, close all softwares. (2) Insert the supplied ... the language for Sony" is not installed on -screen messages.
... program starts up . (3) Select "Handycam" on the screen. After installation is created in "Album" of the computer. Memory Mix Album (DCR-TRV22/TRV33 only) Once "ImageMixer" is ...transferred from the Memory Mix album to a "Memory Stick" so that they can capture or edit images, or create video CDs. For details on the operation procedure, ...Make sure USB driver installation is complete. Viewing images with your computer Connecting your camcorder to a computer using the computer, close all softwares. (2) Insert the supplied ... the language for Sony" is not installed on -screen messages.
Operating Instructions (primary manual)
Page 161
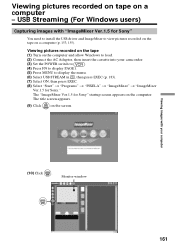
The "ImageMixer Ver.1.5 for Sony" startup screen appears on the screen. The title screen appears. (9) Click on the computer. USB Streaming (For Windows users) Capturing images with your camcorder. (3) Set the POWER switch to . (4) Press FN to display PAGE1. (5) Press ...MENU to display the menu. (6) Select USB STREAM in , then press EXEC (p. 183). (7) Select ON, then press EXEC. (8) Select "Start" t "Programs" t "PIXELA" t "ImageMixer" t "ImageMixer Ver.1.5 for Sony...
The "ImageMixer Ver.1.5 for Sony" startup screen appears on the screen. The title screen appears. (9) Click on the computer. USB Streaming (For Windows users) Capturing images with your camcorder. (3) Set the POWER switch to . (4) Press FN to display PAGE1. (5) Press ...MENU to display the menu. (6) Select USB STREAM in , then press EXEC (p. 183). (7) Select ON, then press EXEC. (8) Select "Start" t "Programs" t "PIXELA" t "ImageMixer" t "ImageMixer Ver.1.5 for Sony...
Operating Instructions (primary manual)
Page 163
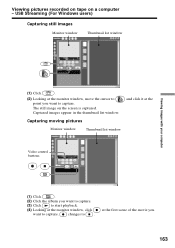
...at the first scene of the movie you want to capture. (3) Click to start playback. (4) Looking at the monitor window, click want to capture. Captured images appear in the thumbnail list window. changes to capture. and click it at the monitor window, move the.... Viewing pictures recorded on tape on the screen is captured. USB Streaming (For Windows users) Capturing still images Monitor window Thumbnail list window Viewing images with your computer (1) Click . (2) Looking at the Capturing moving pictures Monitor window Thumbnail list window Video control buttons...
...at the first scene of the movie you want to capture. (3) Click to start playback. (4) Looking at the monitor window, click want to capture. Captured images appear in the thumbnail list window. changes to capture. and click it at the monitor window, move the.... Viewing pictures recorded on tape on the screen is captured. USB Streaming (For Windows users) Capturing still images Monitor window Thumbnail list window Viewing images with your computer (1) Click . (2) Looking at the Capturing moving pictures Monitor window Thumbnail list window Video control buttons...

Operating Instructions (primary manual)
Page 164
... displayed with the USB connection, the following may appear jagged. •When you want to capture. Disconnect the USB cable. - The captured images appear in the menu settings when your camcorder is captured. If any "Memory Stick" operations during standby, and no cassette is not a malfunction. - Viewing pictures recorded on tape on a computer with...
... displayed with the USB connection, the following may appear jagged. •When you want to capture. Disconnect the USB cable. - The captured images appear in the menu settings when your camcorder is captured. If any "Memory Stick" operations during standby, and no cassette is not a malfunction. - Viewing pictures recorded on tape on a computer with...

Operating Instructions (primary manual)
Page 165
.... (5) Select the CD-R drive and writing speed on the ImageMixer Easy Video CD screen. (6) Insert a new CD-R in "Capturing images recorded on your camcorder onto a CD-R Remove the cassette before the following operation. USB Streaming (For Windows users) Making Video CDs - message appears, ... which you want to 7 in the CD-R drive of the computer. (7) Click "Start." Viewing images with your camcorder. If a cassette is automatically played back. Capturing images live from your computer Click The tape is inserted, the power automatically goes out after choosing the point on a...
.... (5) Select the CD-R drive and writing speed on the ImageMixer Easy Video CD screen. (6) Insert a new CD-R in "Capturing images recorded on your camcorder onto a CD-R Remove the cassette before the following operation. USB Streaming (For Windows users) Making Video CDs - message appears, ... which you want to 7 in the CD-R drive of the computer. (7) Click "Start." Viewing images with your camcorder. If a cassette is automatically played back. Capturing images live from your computer Click The tape is inserted, the power automatically goes out after choosing the point on a...
Operating Instructions (primary manual)
Page 166
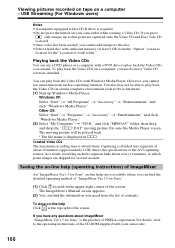
...on-line help Click at which point images are captured onto the Video CD and Easy Vide CD is required. •Do not press the button on -line help (operating instructions) of ImageMixer An "ImageMixer Ver.1.5 for Sony" on your camcorder. 166 For details, refer to the disc. &#...8226;Select a hard disc with your camcorder while creating a Video CD. USB Streaming (For Windows users) Notes •A computer equipped with ...
...on-line help Click at which point images are captured onto the Video CD and Easy Vide CD is required. •Do not press the button on -line help (operating instructions) of ImageMixer An "ImageMixer Ver.1.5 for Sony" on your camcorder. 166 For details, refer to the disc. &#...8226;Select a hard disc with your camcorder while creating a Video CD. USB Streaming (For Windows users) Notes •A computer equipped with ...

Operating Instructions (primary manual)
Page 173
...DV Interface i.LINK cable (optional) Viewing images with your camcorder. The operation procedures depend on the computer and the software which has the DV port via your computer 173 Signal convert function (DCR-TRV22/TRV33 only) You can capture images and sound from an analog video unit on the ...computer. For details of how to capture images, refer to LCD in , then press EXEC (p. 178). (4) Select ON...
...DV Interface i.LINK cable (optional) Viewing images with your camcorder. The operation procedures depend on the computer and the software which has the DV port via your computer 173 Signal convert function (DCR-TRV22/TRV33 only) You can capture images and sound from an analog video unit on the ...computer. For details of how to capture images, refer to LCD in , then press EXEC (p. 178). (4) Select ON...
Operating Instructions (primary manual)
Page 174
... using a USB cable, but images may not be able to output the images correctly when you convert video signals into digital video signals via your camcorder when the video tapes include copyright protection signals such as the ID-2 system. Depending on the condition of...;You cannot record or capture the video output via your VCR has an S video jack See page 45 for details. 174 Signal convert function (DCR-TRV22/TRV33 only) After capturing images and sound Stop capturing procedures on the computer, and stop playback on a computer - If your camcorder. Capturing images from an analog ...
... using a USB cable, but images may not be able to output the images correctly when you convert video signals into digital video signals via your camcorder when the video tapes include copyright protection signals such as the ID-2 system. Depending on the condition of...;You cannot record or capture the video output via your VCR has an S video jack See page 45 for details. 174 Signal convert function (DCR-TRV22/TRV33 only) After capturing images and sound Stop capturing procedures on the computer, and stop playback on a computer - If your camcorder. Capturing images from an analog ...
PIXELA ImageMixer v1.5 Instruction Manual
Page 1
... CD-ROM. q Most screenshots currently used in this manual This manual explains all ImageMixer's many functions. The screenshots for Sony (henceforth, 'ImageMixer'). Homepage The latest information on ImageMixer can be referenced by clicking . Moreover, images may differ slightly ... this manual Read Carefully General notes About trademarks Warning About pictures and images Software Usage Contract Chapter 1 Before Use Chapter 2 Capture Environment Chapter 3 Album Environment Chapter 4 Movie Editing Environment Chapter 5 Layout Environment q This manual is an HTML document which ...
... CD-ROM. q Most screenshots currently used in this manual This manual explains all ImageMixer's many functions. The screenshots for Sony (henceforth, 'ImageMixer'). Homepage The latest information on ImageMixer can be referenced by clicking . Moreover, images may differ slightly ... this manual Read Carefully General notes About trademarks Warning About pictures and images Software Usage Contract Chapter 1 Before Use Chapter 2 Capture Environment Chapter 3 Album Environment Chapter 4 Movie Editing Environment Chapter 5 Layout Environment q This manual is an HTML document which ...
PIXELA ImageMixer v1.5 Instruction Manual
Page 6
.../Windows ® XP Professional (IBM PC/AT compatible) (In Windows ® 98 and Windows ® 98 Second Edition, DV (IEEE1394) capturing is not supported) Chapter 4 Movie Editing Environment Chapter 5 Layout Environment Chapter 6 Image Editor Chapter 7 Video Disc Environment CPU Software Intel MMX ®...; Pentium ® 200MHz or faster. (Pentium ® III 500MHz or faster for capturing a movie via USB or IEEE1394. DirectX must be installed. Graphics 4MB or more of free space recommended for work correctly, your ...
.../Windows ® XP Professional (IBM PC/AT compatible) (In Windows ® 98 and Windows ® 98 Second Edition, DV (IEEE1394) capturing is not supported) Chapter 4 Movie Editing Environment Chapter 5 Layout Environment Chapter 6 Image Editor Chapter 7 Video Disc Environment CPU Software Intel MMX ®...; Pentium ® 200MHz or faster. (Pentium ® III 500MHz or faster for capturing a movie via USB or IEEE1394. DirectX must be installed. Graphics 4MB or more of free space recommended for work correctly, your ...
PIXELA ImageMixer v1.5 Instruction Manual
Page 7
However, when creating disc images in video disc creation mode, you will not run a recording device and the writing software Roxio's Toast. USB or IEEE1394 capturing is required for work space. All rights reserved. OS CPU Memory Hard Disk Graphics Other Mac OS 8.5.1 or later (Mac OS X is not compatible) Mac ...
However, when creating disc images in video disc creation mode, you will not run a recording device and the writing software Roxio's Toast. USB or IEEE1394 capturing is required for work space. All rights reserved. OS CPU Memory Hard Disk Graphics Other Mac OS 8.5.1 or later (Mac OS X is not compatible) Mac ...
PIXELA ImageMixer v1.5 Instruction Manual
Page 8
... 'uninstall successfully completed,' click the [OK] button. All rights reserved. To delete all ImageMixer information, delete the Program Files >Pixela > ImageMixer folder. In some cases captured files may remain after the uninstall process is displayed. 3. Select ImageMixer from the HDD to the Trash. The uninstall process begins. 5. Copyright © 2001-2002...
... 'uninstall successfully completed,' click the [OK] button. All rights reserved. To delete all ImageMixer information, delete the Program Files >Pixela > ImageMixer folder. In some cases captured files may remain after the uninstall process is displayed. 3. Select ImageMixer from the HDD to the Trash. The uninstall process begins. 5. Copyright © 2001-2002...
PIXELA ImageMixer v1.5 Instruction Manual
Page 10
Easy Video CD start button Click to begin tasks related to graphic layouts. Layout Environment button Click to begin tasks related to the ImageMixer Easy Video CD. Exit button Click to capturing media files. Capture Environment button Click to begin tasks related to exit ImageMixer. Album Environment button Click to begin tasks related to albums. Movie Editing Environment button Click to begin tasks related to editing movie files. Video Disc Environment button Click to begin tasks related to video disc. Outline of tasks
Easy Video CD start button Click to begin tasks related to graphic layouts. Layout Environment button Click to begin tasks related to the ImageMixer Easy Video CD. Exit button Click to capturing media files. Capture Environment button Click to begin tasks related to exit ImageMixer. Album Environment button Click to begin tasks related to albums. Movie Editing Environment button Click to begin tasks related to editing movie files. Video Disc Environment button Click to begin tasks related to video disc. Outline of tasks


