
Operating Instructions (primary manual)
Page 8
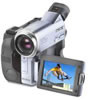
.... How to insert the cassette. Open the DC IN jack cover. AC Adaptor (supplied) 2 3 1 Connect the plug with the window facing up. 3 Close the cassette compartment by pressing on tape Connecting the power cord (p. 17) Use the battery pack when using your camcorder Fastening the grip belt Fasten the grip belt firmly. 2 1 8 43... the cassette compartment opens completely in the direction of the arrow and open the lid. 2 Push the center of the cassette back to hold your camcorder outdoors (p. 16). Recording on the cassette compartment.
.... How to insert the cassette. Open the DC IN jack cover. AC Adaptor (supplied) 2 3 1 Connect the plug with the window facing up. 3 Close the cassette compartment by pressing on tape Connecting the power cord (p. 17) Use the battery pack when using your camcorder Fastening the grip belt Fasten the grip belt firmly. 2 1 8 43... the cassette compartment opens completely in the direction of the arrow and open the lid. 2 Push the center of the cassette back to hold your camcorder outdoors (p. 16). Recording on the cassette compartment.
Operating Instructions (primary manual)
Page 10
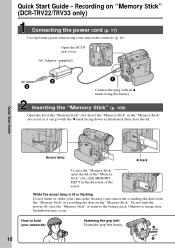
...lid. While the access lamp is lit or flashing Do not shake or strike your camcorder because your camcorder is reading the data from the "Memory Stick" or recording the data on "Memory Stick" (DCR-TRV22/TRV33 only) Connecting the power cord (p. 17) Use the battery pack when using... your camcorder Fastening the grip belt Fasten the grip belt firmly. 2 1 10 43 Do not turn the power off, eject the "Memory Stick" or remove the battery pack. Recording on the "Memory Stick." AC Adaptor (supplied) ...
...lid. While the access lamp is lit or flashing Do not shake or strike your camcorder because your camcorder is reading the data from the "Memory Stick" or recording the data on "Memory Stick" (DCR-TRV22/TRV33 only) Connecting the power cord (p. 17) Use the battery pack when using... your camcorder Fastening the grip belt Fasten the grip belt firmly. 2 1 10 43 Do not turn the power off, eject the "Memory Stick" or remove the battery pack. Recording on the "Memory Stick." AC Adaptor (supplied) ...
Operating Instructions (primary manual)
Page 15
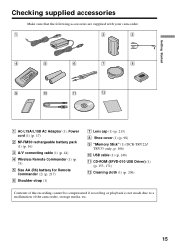
... AC-L15A/L15B AC Adaptor (1), Power cord (1) (p. 17) 2 NP-FM30 rechargeable battery pack (1) (p. 16) 3 A/V connecting cable (1) (p. 44) 4 Wireless Remote Commander (1) (p. 75) 5 Size AA (R6) battery for Remote Commander (2) (p. 217) 6 Shoulder strap (1) 7 Lens cap (1) (p. 213) 8 Shoe cover (1) (p. 98) 9 "Memory Stick" (1) (DCR-TRV22/... TRV33 only, p. 106) 0 USB cable (1) (p. 148) qa CD-ROM (SPVD-010 USB Driver) (1) (p. 153, 171) qs Cleaning cloth (1) (p. 206) Contents of the recording cannot be compensated if recording or playback is not made due to a malfunction of the camcorder, ...
... AC-L15A/L15B AC Adaptor (1), Power cord (1) (p. 17) 2 NP-FM30 rechargeable battery pack (1) (p. 16) 3 A/V connecting cable (1) (p. 44) 4 Wireless Remote Commander (1) (p. 75) 5 Size AA (R6) battery for Remote Commander (2) (p. 217) 6 Shoulder strap (1) 7 Lens cap (1) (p. 213) 8 Shoe cover (1) (p. 98) 9 "Memory Stick" (1) (DCR-TRV22/... TRV33 only, p. 106) 0 USB cable (1) (p. 148) qa CD-ROM (SPVD-010 USB Driver) (1) (p. 153, 171) qs Cleaning cloth (1) (p. 206) Contents of the recording cannot be compensated if recording or playback is not made due to a malfunction of the camcorder, ...
Operating Instructions (primary manual)
Page 17
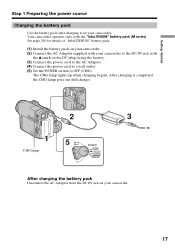
... battery pack after charging it for details of "InfoLITHIUM" battery pack. (1) Install the battery pack on your camcorder. (2) Connect the AC Adaptor supplied with your camcorder to OFF (CHG). Your camcorder operates only with the v mark on your camcorder. The CHG lamp lights up when charging begins. After charging is completed, the CHG lamp goes out...
... battery pack after charging it for details of "InfoLITHIUM" battery pack. (1) Install the battery pack on your camcorder. (2) Connect the AC Adaptor supplied with your camcorder to OFF (CHG). Your camcorder operates only with the v mark on your camcorder. The CHG lamp lights up when charging begins. After charging is completed, the CHG lamp goes out...

Operating Instructions (primary manual)
Page 18
This may increase if the battery's temperature is extremely high or low because of the AC Adaptor. When you use the AC Adaptor Place the AC Adaptor near a wall outlet. While using the AC Adaptor, if any trouble occurs with this unit, disconnect the plug from coming into contact with the battery pack. Step 1 Preparing the ...260 360 Approximate minutes at 25°C (77°F) to cut off the power. The charging time may cause a short-circuit, damaging the AC Adaptor. Something is not properly installed. - Note on the CHG lamp The CHG lamp flashes in the following cases: -
This may increase if the battery's temperature is extremely high or low because of the AC Adaptor. When you use the AC Adaptor Place the AC Adaptor near a wall outlet. While using the AC Adaptor, if any trouble occurs with this unit, disconnect the plug from coming into contact with the battery pack. Step 1 Preparing the ...260 360 Approximate minutes at 25°C (77°F) to cut off the power. The charging time may cause a short-circuit, damaging the AC Adaptor. Something is not properly installed. - Note on the CHG lamp The CHG lamp flashes in the following cases: -

Operating Instructions (primary manual)
Page 21
...exhausted. • The BATTERY INFO indicator will not appear when you press DISPLAY on the viewfinder for about the power shortage. Connect the AC Adaptor in the following cases: - While the remaining battery time is set itself has been turned off. Connecting to the DC IN jack, ...a wall outlet even if the battery pack is connected to the wall outlet, even if the set to your camcorder without worrying about 7 seconds. Notes • The AC Adaptor can use your camcorder. • The DC IN jack has "source priority." If you press DSPL/BATT INFO with the battery pack....
...exhausted. • The BATTERY INFO indicator will not appear when you press DISPLAY on the viewfinder for about the power shortage. Connect the AC Adaptor in the following cases: - While the remaining battery time is set itself has been turned off. Connecting to the DC IN jack, ...a wall outlet even if the battery pack is connected to the wall outlet, even if the set to your camcorder without worrying about 7 seconds. Notes • The AC Adaptor can use your camcorder. • The DC IN jack has "source priority." If you press DSPL/BATT INFO with the battery pack....
Operating Instructions (primary manual)
Page 44
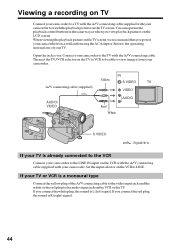
...input jack and the white or the red plug to view images from a wall outlet using the AC Adaptor. If you connect the white plug, the sound is already connected to the VCR Connect your camcorder to the LINE IN input on the VCR with the A/V connecting cable supplied with the A/V ... type Connect the yellow plug of your TV. If your TV or VCR is R (right) signal. 44 Connect your camcorder to watch the playback pictures on the TV screen. If you power your camcorder from your camcorder. When viewing the playback picture on the LCD screen. Viewing a recording on TV Connect your...
...input jack and the white or the red plug to view images from a wall outlet using the AC Adaptor. If you connect the white plug, the sound is already connected to the VCR Connect your camcorder to the LINE IN input on the VCR with the A/V connecting cable supplied with the A/V ... type Connect the yellow plug of your TV. If your TV or VCR is R (right) signal. 44 Connect your camcorder to watch the playback pictures on the TV screen. If you power your camcorder from your camcorder. When viewing the playback picture on the LCD screen. Viewing a recording on TV Connect your...

Operating Instructions (primary manual)
Page 156
... EXEC (p. 183). (6) Select ON, then press EXEC. (7) Connect the (USB) jack on your camcorder to confirm the digital signature, select "Yes" (Windows 2000) or "Continue Anyway" (Windows XP). 156 Viewing pictures recorded on the tape (1) Connect the AC Adaptor to your camcorder. (2) Set the POWER switch to . (3) Press FN to display PAGE1. (4) Press MENU to...
... EXEC (p. 183). (6) Select ON, then press EXEC. (7) Connect the (USB) jack on your camcorder to confirm the digital signature, select "Yes" (Windows 2000) or "Continue Anyway" (Windows XP). 156 Viewing pictures recorded on the tape (1) Connect the AC Adaptor to your camcorder. (2) Set the POWER switch to . (3) Press FN to display PAGE1. (4) Press MENU to...
Operating Instructions (primary manual)
Page 157
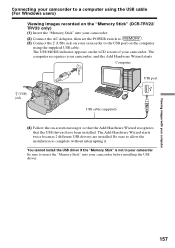
... port (USB) jack USB cable (supplied) (4) Follow the on the "Memory Stick" (DCR-TRV22/ TRV33 only) (1) Insert the "Memory Stick" into your camcorder before installing the USB driver. Viewing images with your camcorder. The USB MODE indicator appears on the LCD screen of your computer 157 The Add Hardware ...the USB driver if the "Memory Stick" is not in your camcorder Be sure to insert the "Memory Stick" into your camcorder. (2) Connect the AC Adaptor, then set the POWER switch to . (3) Connect the (USB) jack on your camcorder to the USB port on the computer using the USB cable (...
... port (USB) jack USB cable (supplied) (4) Follow the on the "Memory Stick" (DCR-TRV22/ TRV33 only) (1) Insert the "Memory Stick" into your camcorder before installing the USB driver. Viewing images with your camcorder. The USB MODE indicator appears on the LCD screen of your computer 157 The Add Hardware ...the USB driver if the "Memory Stick" is not in your camcorder Be sure to insert the "Memory Stick" into your camcorder. (2) Connect the AC Adaptor, then set the POWER switch to . (3) Connect the (USB) jack on your camcorder to the USB port on the computer using the USB cable (...
Operating Instructions (primary manual)
Page 158
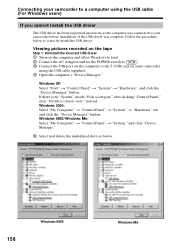
...Device Manager" button. Connecting your camcorder to a computer using the USB cable supplied. 4 Open the computer's "Device Manager." Viewing pictures recorded on the tape Step 1: Uninstall the incorrect USB driver 1 Turn on the computer and allow Windows to load. 2 Connect the AC Adaptor and set the POWER switch ...to . 3 Connect the USB port on the computer to the (USB) jack on your camcorder before installation of the USB driver was connected to your camcorder using the USB cable (For Windows users)...
...Device Manager" button. Connecting your camcorder to a computer using the USB cable supplied. 4 Open the computer's "Device Manager." Viewing pictures recorded on the tape Step 1: Uninstall the incorrect USB driver 1 Turn on the computer and allow Windows to load. 2 Connect the AC Adaptor and set the POWER switch ...to . 3 Connect the USB port on the computer to the (USB) jack on your camcorder before installation of the USB driver was connected to your camcorder using the USB cable (For Windows users)...
Operating Instructions (primary manual)
Page 160
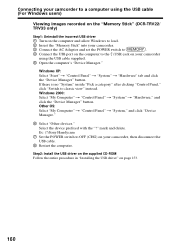
... on the "Memory Stick" (DCR-TRV22/ TRV33 only) Step1: Uninstall the incorrect USB driver 1 Turn on the computer and allow Windows to load. 2 Insert the "Memory Stick" into your camcorder. 3 Connect the AC Adaptor and set the POWER switch to... . 4 Connect the USB port on the computer to the (USB) jack on your camcorder, then disconnect the USB cable. 8 Restart the computer. Other OS: Select "My Computer" t "Control Panel" t "System," and click "Device Manager." 6 Select "Other devices." Select the device prefixed with the "?" Ex: (?)Sony Handycam...
... on the "Memory Stick" (DCR-TRV22/ TRV33 only) Step1: Uninstall the incorrect USB driver 1 Turn on the computer and allow Windows to load. 2 Insert the "Memory Stick" into your camcorder. 3 Connect the AC Adaptor and set the POWER switch to... . 4 Connect the USB port on the computer to the (USB) jack on your camcorder, then disconnect the USB cable. 8 Restart the computer. Other OS: Select "My Computer" t "Control Panel" t "System," and click "Device Manager." 6 Select "Other devices." Select the device prefixed with the "?" Ex: (?)Sony Handycam...
Operating Instructions (primary manual)
Page 161
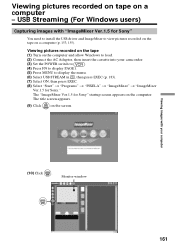
... recorded on tape on the screen. The title screen appears. (9) Click on a computer - USB Streaming (For Windows users) Capturing images with your camcorder. (3) Set the POWER switch to . (4) Press FN to display PAGE1. (5) Press MENU to display the menu. (6) Select USB STREAM in ,...allow Windows to view pictures recorded on the tape on the computer. The "ImageMixer Ver.1.5 for Sony" You need to install the USB driver and ImageMixer to load. (2) Connect the AC Adaptor, then insert the cassette into your computer (10) Click . Viewing images with "ImageMixer Ver...
... recorded on tape on the screen. The title screen appears. (9) Click on a computer - USB Streaming (For Windows users) Capturing images with your camcorder. (3) Set the POWER switch to . (4) Press FN to display PAGE1. (5) Press MENU to display the menu. (6) Select USB STREAM in ,...allow Windows to view pictures recorded on the tape on the computer. The "ImageMixer Ver.1.5 for Sony" You need to install the USB driver and ImageMixer to load. (2) Connect the AC Adaptor, then insert the cassette into your computer (10) Click . Viewing images with "ImageMixer Ver...
Operating Instructions (primary manual)
Page 167
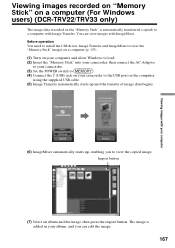
... the "Memory Stick" images on a computer (p. 153). (1) Turn on your computer and allow Windows to load. (2) Insert the "Memory Stick" into your camcorder, then connect the AC Adaptor to your camcorder. (3) Set the POWER switch to . (4) Connect the (USB) jack on the "Memory Stick" is added in your album, and you to the USB... USB cable. (5) Image Transfer automatically starts up and the transfer of image data begins. Viewing images recorded on "Memory Stick" on a computer (For Windows users) (DCR-TRV22/TRV33 only) The image data recorded on your camcorder to view the copied image.
... the "Memory Stick" images on a computer (p. 153). (1) Turn on your computer and allow Windows to load. (2) Insert the "Memory Stick" into your camcorder, then connect the AC Adaptor to your camcorder. (3) Set the POWER switch to . (4) Connect the (USB) jack on the "Memory Stick" is added in your album, and you to the USB... USB cable. (5) Image Transfer automatically starts up and the transfer of image data begins. Viewing images recorded on "Memory Stick" on a computer (For Windows users) (DCR-TRV22/TRV33 only) The image data recorded on your camcorder to view the copied image.
Operating Instructions (primary manual)
Page 168
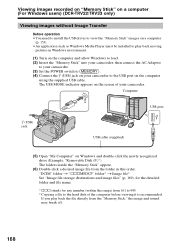
... the computer and allow Windows to load. (2) Insert the "Memory Stick" into your camcorder, then connect the AC Adaptor to your camcorder. (3) Set the POWER switch to . (4) Connect the (USB) jack on your camcorder. If you play back moving pictures in this order. The folders inside the "Memory ... camcorder to the USB port on the computer using the supplied USB cable. The USB MODE indicator appears on Windows and double-click the newly recognized drive (Example: "Removable Disk (F:)"). Viewing images recorded on "Memory Stick" on a computer (For Windows users) (DCR-TRV22/...
... the computer and allow Windows to load. (2) Insert the "Memory Stick" into your camcorder, then connect the AC Adaptor to your camcorder. (3) Set the POWER switch to . (4) Connect the (USB) jack on your camcorder. If you play back moving pictures in this order. The folders inside the "Memory ... camcorder to the USB port on the computer using the supplied USB cable. The USB MODE indicator appears on Windows and double-click the newly recognized drive (Example: "Removable Disk (F:)"). Viewing images recorded on "Memory Stick" on a computer (For Windows users) (DCR-TRV22/...
Operating Instructions (primary manual)
Page 172
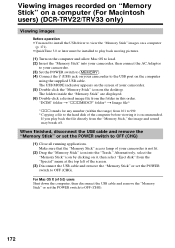
... recorded on "Memory Stick" on a computer (For Macintosh users) (DCR-TRV22/TRV33 only) Viewing images Before operation •You need to install the... 1) sss stands for any number (within the range) from the "Special" menu at the top left of your camcorder is recommended. For Mac OS X (v10.0) users Shut down the computer, then disconnect the USB cable and remove ... icon by clicking on it is not lit. (2) Drag the "Memory Stick" icon into your camcorder, then connect the AC Adaptor to your camcorder. (3) Set the POWER switch to . (4) Connect the (USB) jack on the screen of the...
... recorded on "Memory Stick" on a computer (For Macintosh users) (DCR-TRV22/TRV33 only) Viewing images Before operation •You need to install the... 1) sss stands for any number (within the range) from the "Special" menu at the top left of your camcorder is recommended. For Mac OS X (v10.0) users Shut down the computer, then disconnect the USB cable and remove ... icon by clicking on it is not lit. (2) Drag the "Memory Stick" icon into your camcorder, then connect the AC Adaptor to your camcorder. (3) Set the POWER switch to . (4) Connect the (USB) jack on the screen of the...

Operating Instructions (primary manual)
Page 189
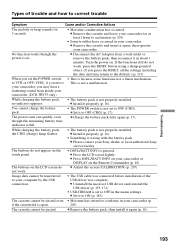
...power goes off although the remaining battery time indicator indicates that the indication on the new cassette yet (p. 37). c Remove the cassette and leave your camcorder for a long time. • The battery pack is dead or nearly dead. c Set it firmly (p. 8, 17). • The battery pack ...remaining tape indicator is not • q REMAIN is not connected to a wall outlet. c Install a charged battery pack (p. 16, 17). • The AC Adaptor is set to AUTO in the beginning or middle (p. 37). c Replace with a new battery pack (p. 200). c Charge the battery pack fully again so ...
...power goes off although the remaining battery time indicator indicates that the indication on the new cassette yet (p. 37). c Remove the cassette and leave your camcorder for a long time. • The battery pack is dead or nearly dead. c Set it firmly (p. 8, 17). • The battery pack ...remaining tape indicator is not • q REMAIN is not connected to a wall outlet. c Install a charged battery pack (p. 16, 17). • The AC Adaptor is set to AUTO in the beginning or middle (p. 37). c Replace with a new battery pack (p. 200). c Charge the battery pack fully again so ...
Operating Instructions (primary manual)
Page 193
c Disconnect the AC Adaptor from inside your camcorder (p. While charging the battery pack, the CHG (charge) lamp flashes. • The ... • Moisture has started to VCR or OFF (CHG), if you move your camcorder, you set the POWER switch to condense in your camcorder. (DCR-TRV33 only) • This is set to ON (p. 183). c Remove the ...for at least 1 hour to OFF in about 1 minute. c Please contact your camcorder. c Set it again, then operate your Sony dealer or local authorized Sony service facility. The cassette cannot be transferred to OFF (CHG) (p. 17). c...
c Disconnect the AC Adaptor from inside your camcorder (p. While charging the battery pack, the CHG (charge) lamp flashes. • The ... • Moisture has started to VCR or OFF (CHG), if you move your camcorder, you set the POWER switch to condense in your camcorder. (DCR-TRV33 only) • This is set to ON (p. 183). c Remove the ...for at least 1 hour to OFF in about 1 minute. c Please contact your camcorder. c Set it again, then operate your Sony dealer or local authorized Sony service facility. The cassette cannot be transferred to OFF (CHG) (p. 17). c...
Operating Instructions (primary manual)
Page 194
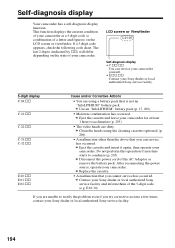
...service has occurred. c Eject the cassette and leave your camcorder as a 5-digit code (a combination of the 5-digit code. (e.g. c Eject the cassette and insert it again, then operate your Sony dealer or local authorized Sony service facility. 5-digit display C:04:ss C:21:ss C:22:ss C:31...your camcorder yourself. • E:ss:ss Contact your camcorder. c Disconnect the power cord of your camcorder for at least 1 hour to condense (p. 205). Self-diagnosis display Your camcorder has a self-diagnosis display function. This function displays the current condition of the AC Adaptor ...
...service has occurred. c Eject the cassette and leave your camcorder as a 5-digit code (a combination of the 5-digit code. (e.g. c Eject the cassette and insert it again, then operate your Sony dealer or local authorized Sony service facility. 5-digit display C:04:ss C:21:ss C:22:ss C:31...your camcorder yourself. • E:ss:ss Contact your camcorder. c Disconnect the power cord of your camcorder for at least 1 hour to condense (p. 205). Self-diagnosis display Your camcorder has a self-diagnosis display function. This function displays the current condition of the AC Adaptor ...

Operating Instructions (primary manual)
Page 200
... battery time in an ambient temperature of this temperature range, you start taking shots or playing back on your camcorder and an optional AC adaptor/charger. The battery pack is also consumed when your camcorder is compatible with the "InfoLITHIUM" battery pack. About the "InfoLITHIUM" battery pack This unit is during tape recording standby...
... battery time in an ambient temperature of this temperature range, you start taking shots or playing back on your camcorder and an optional AC adaptor/charger. The battery pack is also consumed when your camcorder is compatible with the "InfoLITHIUM" battery pack. About the "InfoLITHIUM" battery pack This unit is during tape recording standby...

Operating Instructions (primary manual)
Page 204
...set the clock to 240 V AC, 50/60 Hz. Select WORLD TIME in any country or area with the AC Adaptor supplied with the AUDIO/VIDEO input jack. AC-L15A/L15B [a] [b] Your camcorder is an NTSC system based camcorder. Use a commercially available AC plug adaptor [a], if necessary, depending on ...a TV, it must be an NTSC system based TV with your camcorder in the menu ...
...set the clock to 240 V AC, 50/60 Hz. Select WORLD TIME in any country or area with the AC Adaptor supplied with the AUDIO/VIDEO input jack. AC-L15A/L15B [a] [b] Your camcorder is an NTSC system based camcorder. Use a commercially available AC plug adaptor [a], if necessary, depending on ...a TV, it must be an NTSC system based TV with your camcorder in the menu ...


