Operating Instructions (primary manual)
Page 2
... harmful interference, and (2) this Sony Handycam. For customers in the literature accompanying the appliance. For more information regarding recycling of the FCC Rules. Your Handycam is loaded with superior picture and...digital apparatus complies with Part 15 of rechargeable batteries, call toll free 1-800-8228837, or visit http://www.rbrc.org/ Caution: Do not handle damaged or leaking Lithium-Ion batteries. You can help preserve our environment by returning your purchase of uninsulated "dangerous voltage" within the product's enclosure that you . "Memory Stick" (DCR-TRV22...
... harmful interference, and (2) this Sony Handycam. For customers in the literature accompanying the appliance. For more information regarding recycling of the FCC Rules. Your Handycam is loaded with superior picture and...digital apparatus complies with Part 15 of rechargeable batteries, call toll free 1-800-8228837, or visit http://www.rbrc.org/ Caution: Do not handle damaged or leaking Lithium-Ion batteries. You can help preserve our environment by returning your purchase of uninsulated "dangerous voltage" within the product's enclosure that you . "Memory Stick" (DCR-TRV22...
Operating Instructions (primary manual)
Page 6
... Labeling a cassette on a cassette with digital effect (DCR-TRV22/TRV33 only 73 Enlarging images recorded on "Memory Stick" (DCR-TRV22/TRV33 only 10 Getting Started Using this manual 12 Checking supplied accessories 15 Step 1 Preparing the power source ..... 16 Installing the battery pack 16 Charging the battery pack 17 Checking status of battery pack - Back light function 33...
... Labeling a cassette on a cassette with digital effect (DCR-TRV22/TRV33 only 73 Enlarging images recorded on "Memory Stick" (DCR-TRV22/TRV33 only 10 Getting Started Using this manual 12 Checking supplied accessories 15 Step 1 Preparing the power source ..... 16 Installing the battery pack 16 Charging the battery pack 17 Checking status of battery pack - Back light function 33...
Operating Instructions (primary manual)
Page 7
... tape as a moving picture - Digital program editing (on "Memory Stick" - Memory PB ZOOM 140 Playing back images continuously - Resize (DCR-TRV33 only 146 Writing a print mark - USB Streaming (For Windows users 161 Viewing images recorded on "Memory Stick" on a computer (For Windows users) (DCR-TRV22/TRV33 only) ......... 167 Connecting your camcorder to a computer using the...
... tape as a moving picture - Digital program editing (on "Memory Stick" - Memory PB ZOOM 140 Playing back images continuously - Resize (DCR-TRV33 only 146 Writing a print mark - USB Streaming (For Windows users 161 Viewing images recorded on "Memory Stick" on a computer (For Windows users) (DCR-TRV22/TRV33 only) ......... 167 Connecting your camcorder to a computer using the...

Operating Instructions (primary manual)
Page 8
... the plug with the window facing up. 3 Close the cassette compartment by pressing on tape Connecting the power cord (p. 17) Use the battery pack when using your camcorder Fastening the grip belt Fasten the grip belt firmly. 2 1 8 43 How to insert the cassette. Open the DC IN jack cover... compartment goes down forcibly. Insert the cassette straight as far as possible into the cassette compartment with its v mark facing the battery. Quick Start Guide To eject the cassette Follow the procedures above, and take out the cassette after the cassette compartment opens completely...
... the plug with the window facing up. 3 Close the cassette compartment by pressing on tape Connecting the power cord (p. 17) Use the battery pack when using your camcorder Fastening the grip belt Fasten the grip belt firmly. 2 1 8 43 How to insert the cassette. Open the DC IN jack cover... compartment goes down forcibly. Insert the cassette straight as far as possible into the cassette compartment with its v mark facing the battery. Quick Start Guide To eject the cassette Follow the procedures above, and take out the cassette after the cassette compartment opens completely...
Operating Instructions (primary manual)
Page 9
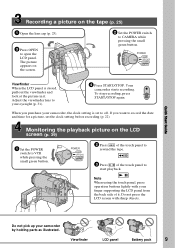
...Monitoring the playback picture on the LCD screen (p. 39) 1 Set the POWER switch to CAMERA while pressing the small green button. Viewfinder LCD panel Battery pack 9 Your camcorder starts recording. Do not pick up your eyesight (p. 31). 4 Press START/STOP. The picture appears on the screen. 2 Set the POWER ...(CHG) CAMERA MEMORY 2 Press of the touch panel to rewind the tape. 3 Press of it . Adjust the viewfinder lens to your camcorder by holding parts as illustrated. If you purchase your finger supporting the LCD panel from the back side of the touch panel to open the...
...Monitoring the playback picture on the LCD screen (p. 39) 1 Set the POWER switch to CAMERA while pressing the small green button. Viewfinder LCD panel Battery pack 9 Your camcorder starts recording. Do not pick up your eyesight (p. 31). 4 Press START/STOP. The picture appears on the screen. 2 Set the POWER ...(CHG) CAMERA MEMORY 2 Press of the touch panel to rewind the tape. 3 Press of it . Adjust the viewfinder lens to your camcorder by holding parts as illustrated. If you purchase your finger supporting the LCD panel from the back side of the touch panel to open the...
Operating Instructions (primary manual)
Page 10
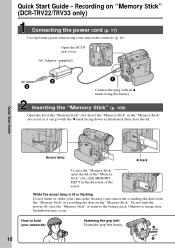
...cover. AC Adaptor (supplied) 2 3 1 Connect the plug with the b mark facing down as it can go with its v mark facing the battery. Quick Start Guide Access lamp b mark To eject the "Memory Stick," open the lid of the "Memory Stick" slot, slide MEMORY EJECT in the..." or recording the data on "Memory Stick" (DCR-TRV22/TRV33 only) Connecting the power cord (p. 17) Use the battery pack when using your camcorder outdoors (p. 16). How to hold your camcorder is lit or flashing Do not shake or strike your camcorder because your camcorder Fastening the grip belt Fasten the grip belt firmly....
...cover. AC Adaptor (supplied) 2 3 1 Connect the plug with the b mark facing down as it can go with its v mark facing the battery. Quick Start Guide Access lamp b mark To eject the "Memory Stick," open the lid of the "Memory Stick" slot, slide MEMORY EJECT in the..." or recording the data on "Memory Stick" (DCR-TRV22/TRV33 only) Connecting the power cord (p. 17) Use the battery pack when using your camcorder outdoors (p. 16). How to hold your camcorder is lit or flashing Do not shake or strike your camcorder because your camcorder Fastening the grip belt Fasten the grip belt firmly....
Operating Instructions (primary manual)
Page 11
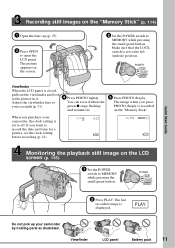
... date and time for a picture, set to the left (unlock) position. POWER VCR OFF(CHG) CAMERA MEMORY 2 Press PLAY. Viewfinder LCD panel Battery pack 11 Make sure that the LOCK switch is set the clock setting before recording (p. 22). 640 FINE 12 101 640 FINE 101 Monitoring the...Recording still images on the screen. 2 Set the POWER switch to MEMORY while pressing the small green button. Adjust the viewfinder lens to your camcorder by holding parts as illustrated. The last recorded image is set to MEMORY while pressing the small green button. POWER VCR OFF(CHG) CAMERA...
... date and time for a picture, set to the left (unlock) position. POWER VCR OFF(CHG) CAMERA MEMORY 2 Press PLAY. Viewfinder LCD panel Battery pack 11 Make sure that the LOCK switch is set the clock setting before recording (p. 22). 640 FINE 12 101 640 FINE 101 Monitoring the...Recording still images on the screen. 2 Set the POWER switch to MEMORY while pressing the small green button. Adjust the viewfinder lens to your camcorder by holding parts as illustrated. The last recorded image is set to MEMORY while pressing the small green button. POWER VCR OFF(CHG) CAMERA...
Operating Instructions (primary manual)
Page 15
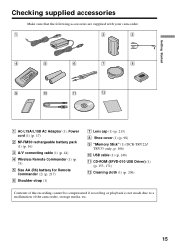
... (1) (p. 17) 2 NP-FM30 rechargeable battery pack (1) (p. 16) 3 A/V connecting cable (1) (p. 44) 4 Wireless Remote Commander (1) (p. 75) 5 Size AA (R6) battery for Remote Commander (2) (p. 217) 6 Shoulder strap (1) 7 Lens cap (1) (p. 213) 8 Shoe cover (1) (p. 98) 9 "Memory Stick" (1) (DCR-TRV22/ TRV33 only, p. 106) 0 USB cable... (1) (p. 148) qa CD-ROM (SPVD-010 USB Driver) (1) (p. 153, 171) qs Cleaning cloth (1) (p. 206) Contents of the recording cannot be compensated if recording or playback is not made due to a malfunction of the camcorder, storage...
... (1) (p. 17) 2 NP-FM30 rechargeable battery pack (1) (p. 16) 3 A/V connecting cable (1) (p. 44) 4 Wireless Remote Commander (1) (p. 75) 5 Size AA (R6) battery for Remote Commander (2) (p. 217) 6 Shoulder strap (1) 7 Lens cap (1) (p. 213) 8 Shoe cover (1) (p. 98) 9 "Memory Stick" (1) (DCR-TRV22/ TRV33 only, p. 106) 0 USB cable... (1) (p. 148) qa CD-ROM (SPVD-010 USB Driver) (1) (p. 153, 171) qs Cleaning cloth (1) (p. 206) Contents of the recording cannot be compensated if recording or playback is not made due to a malfunction of the camcorder, storage...

Operating Instructions (primary manual)
Page 16
Step 1 Preparing the power source Installing the battery pack (1) Lift up the viewfinder. (2) Slide the battery pack down . BATT release button If you use the viewfinder when a large capacity battery pack is installed If you install the NP-FM70/QM71/QM71D/FM91/QM91/QM91D battery pack on your camcorder, extend the viewfinder, and lift up the viewfinder. (2) Slide the battery pack out in the direction of the arrow while pressing BATT down until it clicks. 1 2 To remove the battery pack (1) Lift up the viewfinder to a comfortable angle. 16
Step 1 Preparing the power source Installing the battery pack (1) Lift up the viewfinder. (2) Slide the battery pack down . BATT release button If you use the viewfinder when a large capacity battery pack is installed If you install the NP-FM70/QM71/QM71D/FM91/QM91/QM91D battery pack on your camcorder, extend the viewfinder, and lift up the viewfinder. (2) Slide the battery pack out in the direction of the arrow while pressing BATT down until it clicks. 1 2 To remove the battery pack (1) Lift up the viewfinder to a comfortable angle. 16
Operating Instructions (primary manual)
Page 17
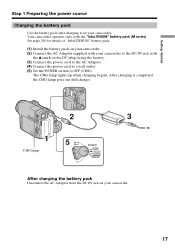
Getting Started Step 1 Preparing the power source Charging the battery pack Use the battery pack after charging it for details of "InfoLITHIUM" battery pack. (1) Install the battery pack on your camcorder. The CHG lamp lights up when charging begins. After charging is completed, the CHG lamp goes out (full ... Disconnect the AC Adaptor from the DC IN jack on your camcorder. (2) Connect the AC Adaptor supplied with your camcorder to OFF (CHG). Your camcorder operates only with the v mark on the DC plug facing the battery. (3) Connect the power cord to the AC Adaptor. (4) Connect the...
Getting Started Step 1 Preparing the power source Charging the battery pack Use the battery pack after charging it for details of "InfoLITHIUM" battery pack. (1) Install the battery pack on your camcorder. The CHG lamp lights up when charging begins. After charging is completed, the CHG lamp goes out (full ... Disconnect the AC Adaptor from the DC IN jack on your camcorder. (2) Connect the AC Adaptor supplied with your camcorder to OFF (CHG). Your camcorder operates only with the v mark on the DC plug facing the battery. (3) Connect the power cord to the AC Adaptor. (4) Connect the...

Operating Instructions (primary manual)
Page 18
... from coming into contact with the metal parts of the DC plug of the ambient temperature. 18 This may increase if the battery's temperature is not properly installed. - Charging time Battery pack NP-FM30 (supplied) NP-FM50 NP-FM70 NP-QM71/QM71D NP-FM91/QM91/QM91D Full charge 145 150 240 260... minutes at 25°C (77°F) to cut off the power. When you use the AC Adaptor Place the AC Adaptor near a wall outlet. The battery pack is extremely high or low because of the AC Adaptor. Note on the CHG lamp The CHG lamp flashes in the following cases: - Step...
... from coming into contact with the metal parts of the DC plug of the ambient temperature. 18 This may increase if the battery's temperature is not properly installed. - Charging time Battery pack NP-FM30 (supplied) NP-FM50 NP-FM70 NP-QM71/QM71D NP-FM91/QM91/QM91D Full charge 145 150 240 260... minutes at 25°C (77°F) to cut off the power. When you use the AC Adaptor Place the AC Adaptor near a wall outlet. The battery pack is extremely high or low because of the AC Adaptor. Note on the CHG lamp The CHG lamp flashes in the following cases: - Step...
Operating Instructions (primary manual)
Page 19
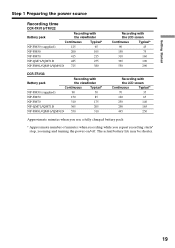
...Preparing the power source Recording time DCR-TRV19/TRV22 Battery pack Recording with the viewfinder Continuous ...Typical* NP-FM30 (supplied) 125 65 NP-FM50 200 105 NP-FM70 415 215 NP-QM71/QM71D 485 255 NP-FM91/QM91/QM91D 725 380 Recording with the LCD screen Continuous Typical* 90 45 150 75 310 160 365 190 550 290 DCR-TRV33 Battery...290 165 445 250 Approximate minutes when you use a fully charged battery pack * Approximate number of minutes when recording while you repeat recording start/ stop...
...Preparing the power source Recording time DCR-TRV19/TRV22 Battery pack Recording with the viewfinder Continuous ...Typical* NP-FM30 (supplied) 125 65 NP-FM50 200 105 NP-FM70 415 215 NP-QM71/QM71D 485 255 NP-FM91/QM91/QM91D 725 380 Recording with the LCD screen Continuous Typical* 90 45 150 75 310 160 365 190 550 290 DCR-TRV33 Battery...290 165 445 250 Approximate minutes when you use a fully charged battery pack * Approximate number of minutes when recording while you repeat recording start/ stop...

Operating Instructions (primary manual)
Page 20
... AVAILABLE LCD SCREEN : 70 min VIEWFINDER : 90 min Fully charged 20 The battery charge level (the percentage of battery pack - The battery life will be shorter if you use your camcorder in a cold environment. Step 1 Preparing the power source Playing time DCR-TRV19/TRV22 Battery pack NP-FM30 (supplied) NP-FM50 NP-FM70 NP-QM71/QM71D NP...
... AVAILABLE LCD SCREEN : 70 min VIEWFINDER : 90 min Fully charged 20 The battery charge level (the percentage of battery pack - The battery life will be shorter if you use your camcorder in a cold environment. Step 1 Preparing the power source Playing time DCR-TRV19/TRV22 Battery pack NP-FM30 (supplied) NP-FM50 NP-FM70 NP-QM71/QM71D NP...

Operating Instructions (primary manual)
Page 21
...as it is attached to your camcorder without worrying about 7 seconds. This means that the battery pack cannot supply any power if the power cord is connected to OFF (CHG). Getting Started Step 1 Preparing the power source Notes • The BATTERY INFO indicator may not be displayed...not installed. - Notes • The AC Adaptor can use your camcorder. • The DC IN jack has "source priority." is being calculated "CALCULATING BATTERY INFO ..." Something is wrong with the LCD panel closed The battery information appears on the Remote Commander when the POWER switch is set ...
...as it is attached to your camcorder without worrying about 7 seconds. This means that the battery pack cannot supply any power if the power cord is connected to OFF (CHG). Getting Started Step 1 Preparing the power source Notes • The BATTERY INFO indicator may not be displayed...not installed. - Notes • The AC Adaptor can use your camcorder. • The DC IN jack has "source priority." is being calculated "CALCULATING BATTERY INFO ..." Something is wrong with the LCD panel closed The battery information appears on the Remote Commander when the POWER switch is set ...
Operating Instructions (primary manual)
Page 22
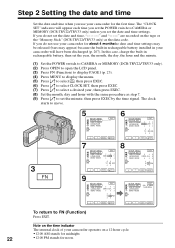
... may appear) because the built-in rechargeable battery installed in rechargeable battery, then set the date and time settings. Note on the time indicator The internal clock of your camcorder operates on the tape or the "Memory Stick" (DCR-TRV22/TRV33 only) as step 7. (9) Press r/R to CAMERA or MEMORY (DCR-TRV22/TRV33 only) unless you set the...
... may appear) because the built-in rechargeable battery installed in rechargeable battery, then set the date and time settings. Note on the time indicator The internal clock of your camcorder operates on the tape or the "Memory Stick" (DCR-TRV22/TRV33 only) as step 7. (9) Press r/R to CAMERA or MEMORY (DCR-TRV22/TRV33 only) unless you set the...
Operating Instructions (primary manual)
Page 26
... recorded and the next scene is not inserted. Do not mix recordings in the SP and LP modes on the LOCK switch (DCR-TRV22/TRV33 only) When you leave your camcorder. When you turn off . If you slide the LOCK switch to the right, the POWER switch can no longer be written properly... code may not be set the POWER switch to MEMORY accidentally. Note on one tape or you are recording. The LOCK switch is to save battery power and to the left as the default setting. Select SP or LP in in the LP (long play) mode. However, check the following: - However...
... recorded and the next scene is not inserted. Do not mix recordings in the SP and LP modes on the LOCK switch (DCR-TRV22/TRV33 only) When you leave your camcorder. When you turn off . If you slide the LOCK switch to the right, the POWER switch can no longer be written properly... code may not be set the POWER switch to MEMORY accidentally. Note on one tape or you are recording. The LOCK switch is to save battery power and to the left as the default setting. Select SP or LP in in the LP (long play) mode. However, check the following: - However...

Operating Instructions (primary manual)
Page 27
... cassette for this button to be correct, depending on the conditions in VCR. Remaining battery time indicator during recording. The indicator may not be displayed. Remaining battery time Cassette Memory This appears when using the cassette with Cassette Memory. You can also..., they are recording. To display the recording data, press DATA CODE during recording Indicators are not displayed during recording The remaining battery time indicator roughly indicates the continuous recording time. When you are recorded automatically on the tape. FN button Press this operation ...
... cassette for this button to be correct, depending on the conditions in VCR. Remaining battery time indicator during recording. The indicator may not be displayed. Remaining battery time Cassette Memory This appears when using the cassette with Cassette Memory. You can also..., they are recording. To display the recording data, press DATA CODE during recording Indicators are not displayed during recording The remaining battery time indicator roughly indicates the continuous recording time. When you are recorded automatically on the tape. FN button Press this operation ...

Operating Instructions (primary manual)
Page 30
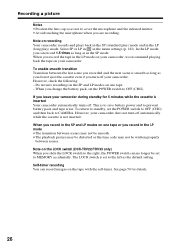
The recorded picture will not be affected. Shooting using the battery pack. LCD screen backlight You can change the brightness of the backlight when using the viewfinder is set to MEMORY (DCR-TRV22/TRV33 only), press FN and select PAGE3. (2) Press LCD BRT. in in Step 1. 2,3 LCD BRT OK LCD BRT The bar indicator... to display PAGE1. When the POWER switch is recommended when: •You cannot see the picture clearly on the LCD screen. •You want the battery pack to last longer. 30
The recorded picture will not be affected. Shooting using the battery pack. LCD screen backlight You can change the brightness of the backlight when using the viewfinder is set to MEMORY (DCR-TRV22/TRV33 only), press FN and select PAGE3. (2) Press LCD BRT. in in Step 1. 2,3 LCD BRT OK LCD BRT The bar indicator... to display PAGE1. When the POWER switch is recommended when: •You cannot see the picture clearly on the LCD screen. •You want the battery pack to last longer. 30

Operating Instructions (primary manual)
Page 31
in in the viewfindrer during recording. 31 Viewfinder lens adjustment lever Viewfinder backlight You can change the brightness of the backlight when using the battery pack. The camera recording lamp (DCR-TRV19 only) The camera recording lamp lights up in the menu settings (p. 178). Basics Recording a picture Adjusting the viewfinder If you adjust...
in in the viewfindrer during recording. 31 Viewfinder lens adjustment lever Viewfinder backlight You can change the brightness of the backlight when using the battery pack. The camera recording lamp (DCR-TRV19 only) The camera recording lamp lights up in the menu settings (p. 178). Basics Recording a picture Adjusting the viewfinder If you adjust...

Operating Instructions (primary manual)
Page 52
... AUTO SHTR EXIT AUTO HOLD OUTDOOR INDOOR EXEC RET. (4) Select a desired mode, then press EXEC. (DCR-TRV22/ HOLD: When recording a single-colored subject or background OUTDOOR ( ): •When recording a sunset/sunrise... : •When lighting conditions change the mode of PROGRAM AE. - You remove the battery pack for about 10 seconds after few seconds. Operate by TV lighting We recommend that you...display the menu. (3) Select WHT BAL in the menu settings. You bring your camcorder at the white subject for replacement. - If you record under fluorescent lighting Select ...
... AUTO SHTR EXIT AUTO HOLD OUTDOOR INDOOR EXEC RET. (4) Select a desired mode, then press EXEC. (DCR-TRV22/ HOLD: When recording a single-colored subject or background OUTDOOR ( ): •When recording a sunset/sunrise... : •When lighting conditions change the mode of PROGRAM AE. - You remove the battery pack for about 10 seconds after few seconds. Operate by TV lighting We recommend that you...display the menu. (3) Select WHT BAL in the menu settings. You bring your camcorder at the white subject for replacement. - If you record under fluorescent lighting Select ...


