Operating Instructions (primary manual)
Page 2
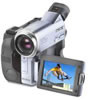
...symbol is very easy to use. RECYCLING LITHIUM-ION BATTERIES Lithium-Ion batteries are recyclable. Congratulations on your Handycam, you . You can help preserve our environment by returning your used rechargeable batteries to the collection and...Sony Handycam. For customers in the literature accompanying the appliance. This Class B digital apparatus complies with Part 15 of electric shock to the presence of rechargeable batteries, call toll free 1-800-8228837, or visit http://www.rbrc.org/ Caution: Do not handle damaged or leaking Lithium-Ion batteries. "Memory Stick" (DCR-TRV22...
...symbol is very easy to use. RECYCLING LITHIUM-ION BATTERIES Lithium-Ion batteries are recyclable. Congratulations on your Handycam, you . You can help preserve our environment by returning your used rechargeable batteries to the collection and...Sony Handycam. For customers in the literature accompanying the appliance. This Class B digital apparatus complies with Part 15 of electric shock to the presence of rechargeable batteries, call toll free 1-800-8228837, or visit http://www.rbrc.org/ Caution: Do not handle damaged or leaking Lithium-Ion batteries. "Memory Stick" (DCR-TRV22...
Operating Instructions (primary manual)
Page 4
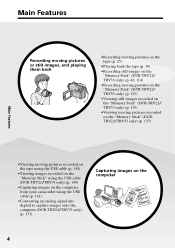
... the USB cable (p. 148) •Viewing images recorded on the "Memory Stick" using the USB cable (DCR-TRV22/TRV33 only) (p. 149) •Capturing images on the computer from your camcorder using the USB cable (p. 161) •Converting an analog signal into digital to capture images onto the computer (DCR-TRV22/TRV33 only) (p. 173) Capturing images on the computer 4
... the USB cable (p. 148) •Viewing images recorded on the "Memory Stick" using the USB cable (DCR-TRV22/TRV33 only) (p. 149) •Capturing images on the computer from your camcorder using the USB cable (p. 161) •Converting an analog signal into digital to capture images onto the computer (DCR-TRV22/TRV33 only) (p. 173) Capturing images on the computer 4
Operating Instructions (primary manual)
Page 6
...Using special effects - Insert editing 95 Audio dubbing 97 Superimposing a title on a cassette with digital effect (DCR-TRV22/TRV33 only 73 Enlarging images recorded on "Memory Stick" (DCR-TRV22/TRV33 only 10 Getting Started Using this manual 12 Checking supplied accessories 15 Step 1 Preparing the... recordings - Display function 40 Viewing a recording on TV 44 Advanced Recording Operations Recording still images on "Memory Stick" during tape recording standby or tape recording (DCR-TRV22/TRV33 only 46 Recording a still image on a tape - Picture effect .. 58 Using special effects ...
...Using special effects - Insert editing 95 Audio dubbing 97 Superimposing a title on a cassette with digital effect (DCR-TRV22/TRV33 only 73 Enlarging images recorded on "Memory Stick" (DCR-TRV22/TRV33 only 10 Getting Started Using this manual 12 Checking supplied accessories 15 Step 1 Preparing the... recordings - Display function 40 Viewing a recording on TV 44 Advanced Recording Operations Recording still images on "Memory Stick" during tape recording standby or tape recording (DCR-TRV22/TRV33 only 46 Recording a still image on a tape - Picture effect .. 58 Using special effects ...
Operating Instructions (primary manual)
Page 7
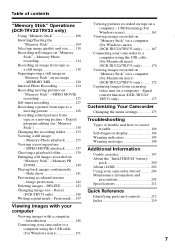
... - DELETE 143 Changing image size - Digital program editing (on a computer - Resize (DCR-TRV33 only 146 Writing a print mark - Print mark ... 147 Viewing pictures recorded on tape on "Memory Stick 130 Changing the recording folder .......... 133 Viewing...recorded on "Memory Stick" - Signal convert function (DCR-TRV22/ TRV33 only 173 Customizing Your Camcorder Changing the menu settings 175 Troubleshooting Types of contents Getting Started "Memory Stick" Operations (DCR-TRV22/TRV33 only) Using "Memory Stick 106 Inserting/Ejecting the "Memory Stick 109 Selecting ...
... - DELETE 143 Changing image size - Digital program editing (on a computer - Resize (DCR-TRV33 only 146 Writing a print mark - Print mark ... 147 Viewing pictures recorded on tape on "Memory Stick 130 Changing the recording folder .......... 133 Viewing...recorded on "Memory Stick" - Signal convert function (DCR-TRV22/ TRV33 only 173 Customizing Your Camcorder Changing the menu settings 175 Troubleshooting Types of contents Getting Started "Memory Stick" Operations (DCR-TRV22/TRV33 only) Using "Memory Stick 106 Inserting/Ejecting the "Memory Stick 109 Selecting ...
Operating Instructions (primary manual)
Page 10
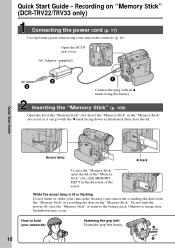
... power off, eject the "Memory Stick" or remove the battery pack. While the access lamp is lit or flashing Do not shake or strike your camcorder because your camcorder is reading the data from the "Memory Stick" or recording the data on "Memory Stick" (DCR-TRV22/TRV33 only) Connecting the power... cord (p. 17) Use the battery pack when using your camcorder Fastening the grip belt Fasten the grip ...
... power off, eject the "Memory Stick" or remove the battery pack. While the access lamp is lit or flashing Do not shake or strike your camcorder because your camcorder is reading the data from the "Memory Stick" or recording the data on "Memory Stick" (DCR-TRV22/TRV33 only) Connecting the power... cord (p. 17) Use the battery pack when using your camcorder Fastening the grip belt Fasten the grip ...
Operating Instructions (primary manual)
Page 11
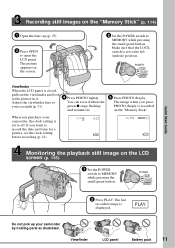
... recorded on the LCD screen (p. 135) 1 Set the POWER switch to MEMORY while pressing the small green button. POWER VCR OFF(CHG) CAMERA MEMORY 2 Press PLAY. Adjust the viewfinder lens to your camcorder by holding parts as illustrated. The picture appears on the "Memory Stick" (p. 114) 1 Open the lens cap (p. 25). 3 Press OPEN to open...
... recorded on the LCD screen (p. 135) 1 Set the POWER switch to MEMORY while pressing the small green button. POWER VCR OFF(CHG) CAMERA MEMORY 2 Press PLAY. Adjust the viewfinder lens to your camcorder by holding parts as illustrated. The picture appears on the "Memory Stick" (p. 114) 1 Open the lens cap (p. 25). 3 Press OPEN to open...
Operating Instructions (primary manual)
Page 15
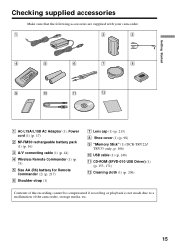
... (p. 98) 9 "Memory Stick" (1) (DCR-TRV22/ TRV33 only, p. 106) 0 USB cable (1) (p. 148) qa CD-ROM (SPVD-010 USB Driver) (1) (p. 153, 171) qs Cleaning cloth (1) (p. 206) Contents of the recording cannot be compensated if recording or playback is not made due to a malfunction of the camcorder, storage media, etc.... 15 Getting Started Checking supplied accessories Make sure that the following accessories are supplied with your camcorder. 1 2 3 4 5 6 7 8 9 q;
... (p. 98) 9 "Memory Stick" (1) (DCR-TRV22/ TRV33 only, p. 106) 0 USB cable (1) (p. 148) qa CD-ROM (SPVD-010 USB Driver) (1) (p. 153, 171) qs Cleaning cloth (1) (p. 206) Contents of the recording cannot be compensated if recording or playback is not made due to a malfunction of the camcorder, storage media, etc.... 15 Getting Started Checking supplied accessories Make sure that the following accessories are supplied with your camcorder. 1 2 3 4 5 6 7 8 9 q;
Operating Instructions (primary manual)
Page 22
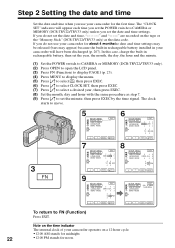
...data code. Note on the time indicator The internal clock of your camcorder operates on the tape or the "Memory Stick" (DCR-TRV22/TRV33 only) as step 7. (9) Press r/R to set the date and time settings. If you use your camcorder for about 4 month,sthe date and time settings may be released...r/R to select , then press EXEC. (6) Press r/R to select CLOCK SET, then press EXEC. (7) Press r/R to CAMERA or MEMORY (DCR-TRV22/TRV33 only) unless you do not use your camcorder for the first time. EXEC RET. The clock starts to FN (Function) Press EXIT. SETUP MENU CLOCK SET USB STREAM LANGUAGE...
...data code. Note on the time indicator The internal clock of your camcorder operates on the tape or the "Memory Stick" (DCR-TRV22/TRV33 only) as step 7. (9) Press r/R to set the date and time settings. If you use your camcorder for about 4 month,sthe date and time settings may be released...r/R to select , then press EXEC. (6) Press r/R to select CLOCK SET, then press EXEC. (7) Press r/R to CAMERA or MEMORY (DCR-TRV22/TRV33 only) unless you do not use your camcorder for the first time. EXEC RET. The clock starts to FN (Function) Press EXIT. SETUP MENU CLOCK SET USB STREAM LANGUAGE...
Operating Instructions (primary manual)
Page 23
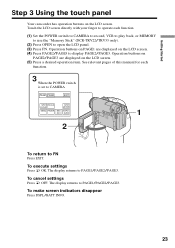
... Press OK. See relevant pages of this manual for each function. (1) Set the POWER switch to CAMERA to record, VCR to play back, or MEMORY to use the "Memory Stick" (DCR-TRV22/TRV33 only). (2) Press OPEN to FN Press EXIT. Touch the LCD screen directly with your finger to operate each function. 3 When the POWER... FOCUS SPOT METER MENU FADER END EXPOSCH SURE 1 2 To return to open the LCD panel. (3) Press FN. Getting Started Step 3 Using the touch panel Your camcorder has operation buttons on the LCD screen. (5) Press a desired operation item.
... Press OK. See relevant pages of this manual for each function. (1) Set the POWER switch to CAMERA to record, VCR to play back, or MEMORY to use the "Memory Stick" (DCR-TRV22/TRV33 only). (2) Press OPEN to FN Press EXIT. Touch the LCD screen directly with your finger to operate each function. 3 When the POWER... FOCUS SPOT METER MENU FADER END EXPOSCH SURE 1 2 To return to open the LCD panel. (3) Press FN. Getting Started Step 3 Using the touch panel Your camcorder has operation buttons on the LCD screen. (5) Press a desired operation item.

Operating Instructions (primary manual)
Page 46
... PHOTO deeply will be set to . The image displayed on the screen when you pressed PHOTO deeply will be recorded on the "Memory Stick." 1 50min 640 FINE 12 CAPTURE 2 101 FN 50min 640 FINE 101 FN During tape recording The POWER switch should be set .... Recording on the screen disappears. During tape recording standby The POWER switch should be recorded on "Memory Stick" during tape recording standby or tape recording (DCR-TRV22/TRV33 only) Insert a "Memory Stick" before the following operation. Recording is complete when the bar scroll indicator at the upper right on...
... PHOTO deeply will be set to . The image displayed on the screen when you pressed PHOTO deeply will be recorded on the "Memory Stick." 1 50min 640 FINE 12 CAPTURE 2 101 FN 50min 640 FINE 101 FN During tape recording The POWER switch should be set .... Recording on the screen disappears. During tape recording standby The POWER switch should be recorded on "Memory Stick" during tape recording standby or tape recording (DCR-TRV22/TRV33 only) Insert a "Memory Stick" before the following operation. Recording is complete when the bar scroll indicator at the upper right on...

Operating Instructions (primary manual)
Page 47
...the "Memory Stick" Your camcorder continues recording on - When you press PHOTO on the Remote Commander Your camcorder immediately records the image that is set to CAMERA, image quality cannot be recorded on the "Memory Stick" with higher image quality, use of memory photo recording...details. To record still images on the "Memory Stick" during tape recording You cannot check an image on "Memory Stick" during tape recording standby or tape recording (DCR-TRV22/TRV33 only) Note You cannot record still images in the "Memory Stick" during the following operations (The indicator ...
...the "Memory Stick" Your camcorder continues recording on - When you press PHOTO on the Remote Commander Your camcorder immediately records the image that is set to CAMERA, image quality cannot be recorded on the "Memory Stick" with higher image quality, use of memory photo recording...details. To record still images on the "Memory Stick" during tape recording You cannot check an image on "Memory Stick" during tape recording standby or tape recording (DCR-TRV22/TRV33 only) Note You cannot record still images in the "Memory Stick" during the following operations (The indicator ...

Operating Instructions (primary manual)
Page 50
... gets faster, then recording starts automatically. The (self-timer) indicator appears on the screen. (3) Press EXIT to return to 3 in "Recording on the "Memory Stick" during recording standby (DCR-TRV22/TRV33 only) The POWER switch should be set to . Self-timer recording You can also use the Remote Commander for recording on the tape...
... gets faster, then recording starts automatically. The (self-timer) indicator appears on the screen. (3) Press EXIT to return to 3 in "Recording on the "Memory Stick" during recording standby (DCR-TRV22/TRV33 only) The POWER switch should be set to . Self-timer recording You can also use the Remote Commander for recording on the tape...

Operating Instructions (primary manual)
Page 51
... SELFTIMER and the (self-timer) indicator disappears from the screen. When self-timer recording is finished The self-timer recording is set to MEMORY (DCR-TRV22/TRV33 only) You can set to 3 in recording standby mode. 51 Operate by touching the panel. (1) Follow steps 1 to . ... is automatically canceled. Advanced Recording Operations Self-timer recording Recording images (DCR-TRV19 only) The POWER switch should be set up a recording using the self-timer You can also record still images onto the "Memory Stick" with the self-timer (p. 127). Setting up a recording using the...
... SELFTIMER and the (self-timer) indicator disappears from the screen. When self-timer recording is finished The self-timer recording is set to MEMORY (DCR-TRV22/TRV33 only) You can set to 3 in recording standby mode. 51 Operate by touching the panel. (1) Follow steps 1 to . ... is automatically canceled. Advanced Recording Operations Self-timer recording Recording images (DCR-TRV19 only) The POWER switch should be set up a recording using the self-timer You can also record still images onto the "Memory Stick" with the self-timer (p. 127). Setting up a recording using the...
Operating Instructions (primary manual)
Page 54
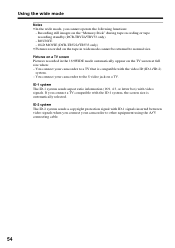
... system sends aspect ratio information (16:9, 4:3, or letter box) with the video ID (ID-1/ID-2) system. - BOUNCE - You connect your camcorder to a TV that is automatically selected. ID-2 system The ID-2 system sends a copyright protection signal with the ID-1 system, the screen size... the wide mode Notes •In the wide mode, you connect your camcorder to other equipment using the A/V connecting cable. 54 You connect your camcorder to the S video jack on the "Memory Stick" during tape recording or tape recording standby (DCR-TRV22/TRV33 only) - Recording still images on a TV.
... system sends aspect ratio information (16:9, 4:3, or letter box) with the video ID (ID-1/ID-2) system. - BOUNCE - You connect your camcorder to a TV that is automatically selected. ID-2 system The ID-2 system sends a copyright protection signal with the ID-1 system, the screen size... the wide mode Notes •In the wide mode, you connect your camcorder to other equipment using the A/V connecting cable. 54 You connect your camcorder to the S video jack on the "Memory Stick" during tape recording or tape recording standby (DCR-TRV22/TRV33 only) - Recording still images on a TV.

Operating Instructions (primary manual)
Page 57
...Picture effect - PROGRAM AE - Photo recording in "Memory Stick" (DCR-TRV22/TRV33 only) Note on the tape. PROGRAM AE 57 Also, you cannot use the following functions: - During BOUNCE is on, you select OVERLAP, WIPE or DOT (DCR-TRV22/TRV33 only) Your camcorder automatically stores the image recorded on the BOUNCE mode... the following functions while using following functions: - When the image is activated in the followings: - Manual exposure - Manual focus - Digital effect (DCR-TRV22/TRV33 only) - Flexible Spot Meter - Interval Recording - Wide mode - Super NightShot...
...Picture effect - PROGRAM AE - Photo recording in "Memory Stick" (DCR-TRV22/TRV33 only) Note on the tape. PROGRAM AE 57 Also, you cannot use the following functions: - During BOUNCE is on, you select OVERLAP, WIPE or DOT (DCR-TRV22/TRV33 only) Your camcorder automatically stores the image recorded on the BOUNCE mode... the following functions while using following functions: - When the image is activated in the followings: - Manual exposure - Manual focus - Digital effect (DCR-TRV22/TRV33 only) - Flexible Spot Meter - Interval Recording - Wide mode - Super NightShot...

Operating Instructions (primary manual)
Page 63
Advanced Recording Operations Using PROGRAM AE The POWER switch should be set to MEMORY, the SPORTS mode does not work. (The indicator flashes.) (DCR-TRV22/TRV33 only) 63 OLD MOVIE (DCR-TRV22/TRV33 only) - To record images on the "Memory Stick" using the MEMORY MIX (DCR-TRV22/ TRV33 only) •When you set to display the menu. (3) Select PROGRAM AE in...
Advanced Recording Operations Using PROGRAM AE The POWER switch should be set to MEMORY, the SPORTS mode does not work. (The indicator flashes.) (DCR-TRV22/TRV33 only) 63 OLD MOVIE (DCR-TRV22/TRV33 only) - To record images on the "Memory Stick" using the MEMORY MIX (DCR-TRV22/ TRV33 only) •When you set to display the menu. (3) Select PROGRAM AE in...
Operating Instructions (primary manual)
Page 72
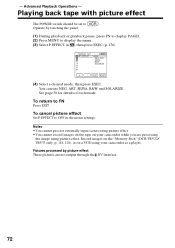
.... Operate by picture effect These pictures are processing the image using picture effect. •You cannot record images on the tape on a VCR using your camcorder while you are not output through the DV Interface. 72 Pictures processed by touching the panel. (1) During playback or playback pause, press FN to display... Playback Operations - To cancel picture effect Set P EFFECT to . See page 58 for details of each mode. You can use NEG. - Record images on the "Memory Stick" (DCR-TRV22/ TRV33 only, p. 118, 128), or on your camcorder as a player.
.... Operate by picture effect These pictures are processing the image using picture effect. •You cannot record images on the tape on a VCR using your camcorder while you are not output through the DV Interface. 72 Pictures processed by touching the panel. (1) During playback or playback pause, press FN to display... Playback Operations - To cancel picture effect Set P EFFECT to . See page 58 for details of each mode. You can use NEG. - Record images on the "Memory Stick" (DCR-TRV22/ TRV33 only, p. 118, 128), or on your camcorder as a player.

Operating Instructions (primary manual)
Page 73
TRAIL (3) Select a desired mode. Advanced Playback Operations Playing back tape with digital effect (DCR-TRV22/TRV33 only) The POWER switch should be set to FN Press EXIT. To return to . Record images on the "Memory Stick" (p. 118, 128), or on your camcorder as a still image. (4) Press -/+ to adjust the effect. (5) Press OK to return to PAGE2. To...
TRAIL (3) Select a desired mode. Advanced Playback Operations Playing back tape with digital effect (DCR-TRV22/TRV33 only) The POWER switch should be set to FN Press EXIT. To return to . Record images on the "Memory Stick" (p. 118, 128), or on your camcorder as a still image. (4) Press -/+ to adjust the effect. (5) Press OK to return to PAGE2. To...

Operating Instructions (primary manual)
Page 74
.... (2) Press PB ZOOM. During tape PB ZOOM If you have processed the picture using your camcorder as a player. •You cannot record moving pictures on the "Memory Stick" on your camcorder can enlarge still images recorded on a VCR using tape PB ZOOM. You cannot move the part...can record images on the "Memory Stick" (DCR-TRV33 only) (p. 118, 128), or on the "Memory Stick" (p. 140). However, you press another area again, the area moves to the center of the screen. 74 Tape PB ZOOM (DCR-TRV22/TRV33 only) Besides the operation described here, your camcorder when you press DSPL/BATT...
.... (2) Press PB ZOOM. During tape PB ZOOM If you have processed the picture using your camcorder as a player. •You cannot record moving pictures on the "Memory Stick" on your camcorder can enlarge still images recorded on a VCR using tape PB ZOOM. You cannot move the part...can record images on the "Memory Stick" (DCR-TRV33 only) (p. 118, 128), or on the "Memory Stick" (p. 140). However, you press another area again, the area moves to the center of the screen. 74 Tape PB ZOOM (DCR-TRV22/TRV33 only) Besides the operation described here, your camcorder when you press DSPL/BATT...
Operating Instructions (primary manual)
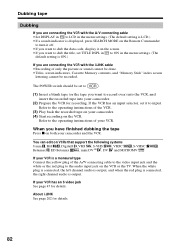
Page 82
... to the video input jack and the white or the red plug to record over) into the VCR, and insert the recorded tape into your camcorder. (2) Prepare the VCR for recording. About i.LINK See page 202 for details. Refer to ON in to the operating instructions of your VCR is output... are connecting the VCR with the i.LINK cable •Recording of only the picture or sound cannot be done. •Titles, screen indicators, Cassette Memory contents, and "Memory Stick" index screen lettering cannot be set it on the screen. •If you want to the audio input jack on the VCR or the...
... to the video input jack and the white or the red plug to record over) into the VCR, and insert the recorded tape into your camcorder. (2) Prepare the VCR for recording. About i.LINK See page 202 for details. Refer to ON in to the operating instructions of your VCR is output... are connecting the VCR with the i.LINK cable •Recording of only the picture or sound cannot be done. •Titles, screen indicators, Cassette Memory contents, and "Memory Stick" index screen lettering cannot be set it on the screen. •If you want to the audio input jack on the VCR or the...


