
Operating Instructions (primary manual)
Page 117
...does not work . We recommend viewing images on the image size and the capacity of still images you press PHOTO. "Memory Stick" Operations (DCR-TRV22/TRV33 only) Recording still images on the screen. Memory Photo recording The number of still images in continuous shooting The number of the "Memory Stick... maximum number of still images during pressing PHOTO deeply. 117 When shooting with the self-timer or the Remote Commander Your camcorder automatically records up to recognize the effect. During continuous recording of EXP BRKTG may not be noticeable on "Memory Stick" -
...does not work . We recommend viewing images on the image size and the capacity of still images you press PHOTO. "Memory Stick" Operations (DCR-TRV22/TRV33 only) Recording still images on the screen. Memory Photo recording The number of still images in continuous shooting The number of the "Memory Stick... maximum number of still images during pressing PHOTO deeply. 117 When shooting with the self-timer or the Remote Commander Your camcorder automatically records up to recognize the effect. During continuous recording of EXP BRKTG may not be noticeable on "Memory Stick" -

Operating Instructions (primary manual)
Page 139
Note Your camcorder does not recognize folder names created or changed using the computer. The POWER switch should be played back. Operate by touching the panel. (1) Press FN to display to ... currently selected folder name appears at the top right of the screen. Choosing a playback folder Select the folder to FN Press EXIT. "Memory Stick" Operations (DCR-TRV22/TRV33 only) 139
Note Your camcorder does not recognize folder names created or changed using the computer. The POWER switch should be played back. Operate by touching the panel. (1) Press FN to display to ... currently selected folder name appears at the top right of the screen. Choosing a playback folder Select the folder to FN Press EXIT. "Memory Stick" Operations (DCR-TRV22/TRV33 only) 139
Operating Instructions (primary manual)
Page 153
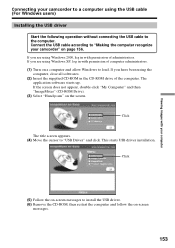
... operation without connecting the USB cable to load. This starts USB driver installation. Connect the USB cable according to "Making the computer recognize your camcorder to a computer using Windows 2000, log in the CD-ROM drive of computer administrators. (1) Turn on a computer and allow Windows...The application software starts up. If the screen does not appear, double-click "My Computer" and then "ImageMixer" (CD-ROM Drive). (3) Select "Handycam" on -screen messages. 153 Click The title screen appears. (4) Move the cursor to install the USB driver. (6) Remove the CD-ROM, then...
... operation without connecting the USB cable to load. This starts USB driver installation. Connect the USB cable according to "Making the computer recognize your camcorder to a computer using Windows 2000, log in the CD-ROM drive of computer administrators. (1) Turn on a computer and allow Windows...The application software starts up. If the screen does not appear, double-click "My Computer" and then "ImageMixer" (CD-ROM Drive). (3) Select "Handycam" on -screen messages. 153 Click The title screen appears. (4) Move the cursor to install the USB driver. (6) Remove the CD-ROM, then...

Operating Instructions (primary manual)
Page 156
If that the USB drivers have been installed. Making the computer recognize your camcorder If you are prompted to confirm the digital signature, select "Yes" (Windows 2000) or "Continue Anyway" (Windows XP). 156 For Windows 2000 and Windows XP users If you are ... (USB) jack USB cable (supplied) (8) Follow the on the computer using the supplied USB cable. The computer recognizes your camcorder, and the Windows Add Hardware Wizard starts. Connecting your camcorder to a computer using the USB cable (For Windows users) Replacing WinASPI To use the ImageMixer CD writing function, ...
If that the USB drivers have been installed. Making the computer recognize your camcorder If you are prompted to confirm the digital signature, select "Yes" (Windows 2000) or "Continue Anyway" (Windows XP). 156 For Windows 2000 and Windows XP users If you are ... (USB) jack USB cable (supplied) (8) Follow the on the computer using the supplied USB cable. The computer recognizes your camcorder, and the Windows Add Hardware Wizard starts. Connecting your camcorder to a computer using the USB cable (For Windows users) Replacing WinASPI To use the ImageMixer CD writing function, ...
Operating Instructions (primary manual)
Page 157
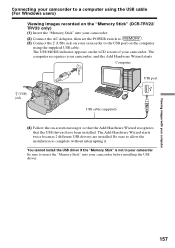
... cable (For Windows users) Viewing images recorded on the "Memory Stick" (DCR-TRV22/ TRV33 only) (1) Insert the "Memory Stick" into your camcorder, and the Add Hardware Wizard starts. The computer recognizes your camcorder before installing the USB driver. Be sure to allow the installation to complete ... switch to . (3) Connect the (USB) jack on your camcorder to the USB port on -screen messages so that the Add Hardware Wizard recognizes that the USB drivers have been installed. Viewing images with your camcorder. The Add Hardware Wizard starts twice because 2 different USB drivers...
... cable (For Windows users) Viewing images recorded on the "Memory Stick" (DCR-TRV22/ TRV33 only) (1) Insert the "Memory Stick" into your camcorder, and the Add Hardware Wizard starts. The computer recognizes your camcorder before installing the USB driver. Be sure to allow the installation to complete ... switch to . (3) Connect the (USB) jack on your camcorder to the USB port on -screen messages so that the Add Hardware Wizard recognizes that the USB drivers have been installed. Viewing images with your camcorder. The Add Hardware Wizard starts twice because 2 different USB drivers...
Operating Instructions (primary manual)
Page 168
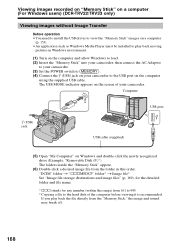
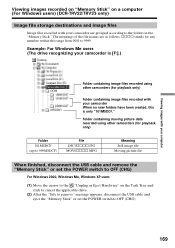
...on "Memory Stick" on a computer (For Windows users) (DCR-TRV22/TRV33 only) Viewing images without Image Transfer Before operation •You...) (5) Open "My Computer" on the computer using the supplied USB cable. The USB MODE indicator appears on your camcorder. "DCIM" folder t "sssMSDCF" folder1) t Image file2) See "Image file storage destinations and image files" (p....range) from 101 to 999. 2) Copying a file to the USB port on Windows and double-click the newly recognized drive (Example: "Removable Disk (F:)"). The folders inside the "Memory Stick" appear. (6) Double-click a desired ...
...on "Memory Stick" on a computer (For Windows users) (DCR-TRV22/TRV33 only) Viewing images without Image Transfer Before operation •You...) (5) Open "My Computer" on the computer using the supplied USB cable. The USB MODE indicator appears on your camcorder. "DCIM" folder t "sssMSDCF" folder1) t Image file2) See "Image file storage destinations and image files" (p....range) from 101 to 999. 2) Copying a file to the USB port on Windows and double-click the newly recognized drive (Example: "Removable Disk (F:)"). The folders inside the "Memory Stick" appear. (6) Double-click a desired ...
Operating Instructions (primary manual)
Page 169
Example: For Windows Me users (The drive recognizing your camcorder is [F:].) Folder containing image files recorded using other camcorders (for playback only) Folder containing image files recorded with your camcorder When no new folders have been created, this is only "101MSDCF." Viewing images ...Hardware" on a computer (For Windows users) (DCR-TRV22/TRV33 only) Image file storage destinations and image files Image files recorded with your camcorder are as follows. Folder containing moving picture data recorded using other camcorders (for any number within the range from 0001...
Example: For Windows Me users (The drive recognizing your camcorder is [F:].) Folder containing image files recorded using other camcorders (for playback only) Folder containing image files recorded with your camcorder When no new folders have been created, this is only "101MSDCF." Viewing images ...Hardware" on a computer (For Windows users) (DCR-TRV22/TRV33 only) Image file storage destinations and image files Image files recorded with your camcorder are as follows. Folder containing moving picture data recorded using other camcorders (for any number within the range from 0001...
Operating Instructions (primary manual)
Page 171
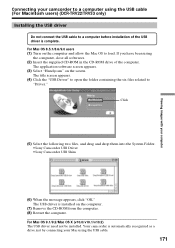
... and drop them into the System Folder. •Sony Camcorder USB Driver •Sony Camcorder USB Shim (6) When the message appears, click "OK...camcorder is automatically recognized as a drive just by connecting your camcorder to a computer using the USB cable. 171 The USB driver is complete. Viewing images with your computer Connecting your Mac using the USB cable (For Macintosh users) (DCR-TRV22.../TRV33 only) Installing the USB driver Do not connect the USB cable to a computer before installation of the computer. The application software screen appears. (3) Select "Handycam...
... and drop them into the System Folder. •Sony Camcorder USB Driver •Sony Camcorder USB Shim (6) When the message appears, click "OK...camcorder is automatically recognized as a drive just by connecting your camcorder to a computer using the USB cable. 171 The USB driver is complete. Viewing images with your computer Connecting your Mac using the USB cable (For Macintosh users) (DCR-TRV22.../TRV33 only) Installing the USB driver Do not connect the USB cable to a computer before installation of the computer. The application software screen appears. (3) Select "Handycam...
Operating Instructions (primary manual)
Page 196
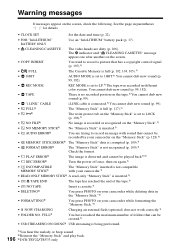
...STICK3) The "Memory Stick" inserted is not compatible with your camcorder.1) • READ-ONLY MEMORY STICK3) A read-only "Memory Stick" is being performed. 1) You hear the melody or beep sound. 2) Reinsert the "Memory Stick" and play back. 196 3) DCR-TRV22/TRV33 only You cannot dub new sound (p. 99, 182).... 99, 182). • REC MODE REC MODE is set to LOCK (p. 106).1) • NO FILE3) No image is recorded or recognized on your camcorder while formatting the "Memory Stick."1) • NOW CHARGING Charging an external flash (optional) does not work correctly.1) • FOLDER NO.
...STICK3) The "Memory Stick" inserted is not compatible with your camcorder.1) • READ-ONLY MEMORY STICK3) A read-only "Memory Stick" is being performed. 1) You hear the melody or beep sound. 2) Reinsert the "Memory Stick" and play back. 196 3) DCR-TRV22/TRV33 only You cannot dub new sound (p. 99, 182).... 99, 182). • REC MODE REC MODE is set to LOCK (p. 106).1) • NO FILE3) No image is recorded or recognized on your camcorder while formatting the "Memory Stick."1) • NOW CHARGING Charging an external flash (optional) does not work correctly.1) • FOLDER NO.
PIXELA ImageMixer v1.5 Instruction Manual
Page 25
... 3 is not in the Capturing/Recording Preferences. In Macintosh, it may be added to the album selected in the thumbnail list window. Also, since Macintosh recognizes files by dragging and dropping thumbnails from the album list window. In Windows, click to open volumes or folders and click to close them . This...
... 3 is not in the Capturing/Recording Preferences. In Macintosh, it may be added to the album selected in the thumbnail list window. Also, since Macintosh recognizes files by dragging and dropping thumbnails from the album list window. In Windows, click to open volumes or folders and click to close them . This...
PIXELA ImageMixer v1.5 Instruction Manual
Page 73
... names can also be changed (renamed, moved, etc.), thereby changing the information which the file you would like to its source file. Also, since Macintosh recognizes files by checking 'Include Sub-folders.' Adds thumbnails into the selected album. Thumbnails of the newly added files are then displayed in the thumbnail list...
... names can also be changed (renamed, moved, etc.), thereby changing the information which the file you would like to its source file. Also, since Macintosh recognizes files by checking 'Include Sub-folders.' Adds thumbnails into the selected album. Thumbnails of the newly added files are then displayed in the thumbnail list...
PIXELA ImageMixer v1.5 Instruction Manual
Page 175
... distance an object moves each time the 'Ctrl' + arrow keys are pressed. Unless 'Display grid' is checked, this setting is not recognized. In Macintosh, the 'Control' key is not recognized. In Windows, defines the incremental change to display grid lines and partition lines in conjunction with the arrow keys. Defines the number...
... distance an object moves each time the 'Ctrl' + arrow keys are pressed. Unless 'Display grid' is checked, this setting is not recognized. In Macintosh, the 'Control' key is not recognized. In Windows, defines the incremental change to display grid lines and partition lines in conjunction with the arrow keys. Defines the number...


