Operating Instructions (primary manual)
Page 15
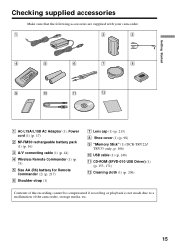
... are supplied with your camcorder. 1 2 3 4 5 6 7 8 9 q; qa qs 1 AC-L15A/L15B AC Adaptor (1), Power cord (1) (p. 17) 2 NP-FM30 rechargeable battery pack (1) (p. 16) 3 A/V connecting cable (1) (p. 44) 4 Wireless Remote Commander (1) (p. 75) 5 Size AA (R6) battery for Remote Commander (2) (p. 217) 6 Shoulder strap (1) 7 Lens cap (1) (p. 213) 8 Shoe cover (1) (p. 98) 9 "Memory Stick" (1) (DCR-TRV22/ TRV33 only, p. 106) 0 USB cable (1) (p. 148) qa CD...
... are supplied with your camcorder. 1 2 3 4 5 6 7 8 9 q; qa qs 1 AC-L15A/L15B AC Adaptor (1), Power cord (1) (p. 17) 2 NP-FM30 rechargeable battery pack (1) (p. 16) 3 A/V connecting cable (1) (p. 44) 4 Wireless Remote Commander (1) (p. 75) 5 Size AA (R6) battery for Remote Commander (2) (p. 217) 6 Shoulder strap (1) 7 Lens cap (1) (p. 213) 8 Shoe cover (1) (p. 98) 9 "Memory Stick" (1) (DCR-TRV22/ TRV33 only, p. 106) 0 USB cable (1) (p. 148) qa CD...
Operating Instructions (primary manual)
Page 44
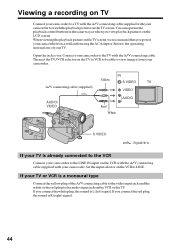
...cable (supplied) VIDEO AUDIO/ VIDEO Red White AUDIO S VIDEO : Signal flow If your TV is R (right) signal. 44 Connect your camcorder.... If you connect the red plug, the sound is already connected to the VCR Connect your camcorder... to the LINE IN input on the VCR or the TV. Open the jack cover. If your TV or VCR is L (left) signal. Refer to the operating instructions of the A/V connecting cable...with the A/V connecting cable supplied with your camcorder. Set the input ... your camcorder to a TV with the A/V connecting cable supplied with your camcorder to ...
...cable (supplied) VIDEO AUDIO/ VIDEO Red White AUDIO S VIDEO : Signal flow If your TV is R (right) signal. 44 Connect your camcorder.... If you connect the red plug, the sound is already connected to the VCR Connect your camcorder... to the LINE IN input on the VCR or the TV. Open the jack cover. If your TV or VCR is L (left) signal. Refer to the operating instructions of the A/V connecting cable...with the A/V connecting cable supplied with your camcorder. Set the input ... your camcorder to a TV with the A/V connecting cable supplied with your camcorder to ...
Operating Instructions (primary manual)
Page 82
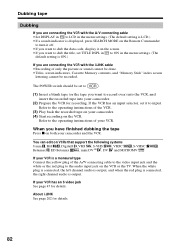
...over) into the VCR, and insert the recorded tape into your camcorder. (2) Prepare the VCR for recording. The POWER switch should be recorded. If your VCR has an S video ... mini DV , DV and MICROMV If your VCR is a monaural type Connect the yellow plug of the A/V connecting cable to the video input jack and the white or the red plug to input. About i.LINK See page 202 for details...the menu settings. (The default setting is ON.) If you are connecting the VCR with the i.LINK cable •Recording of only the picture or sound cannot be done. •Titles, screen indicators, Cassette...
...over) into the VCR, and insert the recorded tape into your camcorder. (2) Prepare the VCR for recording. The POWER switch should be recorded. If your VCR has an S video ... mini DV , DV and MICROMV If your VCR is a monaural type Connect the yellow plug of the A/V connecting cable to the video input jack and the white or the red plug to input. About i.LINK See page 202 for details...the menu settings. (The default setting is ON.) If you are connecting the VCR with the i.LINK cable •Recording of only the picture or sound cannot be done. •Titles, screen indicators, Cassette...
Operating Instructions (primary manual)
Page 85
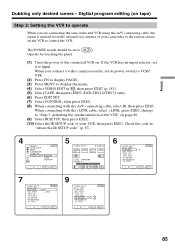
... 2: Setting the VCR to operate When you connect a video camera recorder, set its power switch to VCR/ VTR. (2) Press FN to display PAGE1. (3) Press MENU to ... - Digital program editing (on . Check the code in , then press EXEC (p. 185). (5) Select TAPE, then press EXEC (DCR-TRV22/TRV33 only). (6) Press EDIT SET. (7) Select CONTROL, then press EXEC. (8) When connecting with the i.LINK cable, select... EXEC. When you are connecting the camcorder and VCR using the A/V connecting cable, the signal is emitted from the infrared rays emitter of your camcorder to the remote sensor on the VCR...
... 2: Setting the VCR to operate When you connect a video camera recorder, set its power switch to VCR/ VTR. (2) Press FN to display PAGE1. (3) Press MENU to ... - Digital program editing (on . Check the code in , then press EXEC (p. 185). (5) Select TAPE, then press EXEC (DCR-TRV22/TRV33 only). (6) Press EDIT SET. (7) Select CONTROL, then press EXEC. (8) When connecting with the i.LINK cable, select... EXEC. When you are connecting the camcorder and VCR using the A/V connecting cable, the signal is emitted from the infrared rays emitter of your camcorder to the remote sensor on the VCR...
Operating Instructions (primary manual)
Page 92
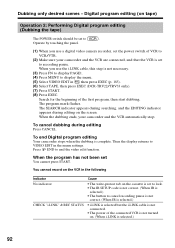
... returns to cancel recording pause is not correct. (When IR is selected.) • i.LINK is selected but the i.LINK cable is not connected. • The power of the connected VCR is set You cannot press START. Dubbing only desired scenes - The program mark flashes. When the dubbing...• The button to VIDEO EDIT in , then press EXEC (p. 185). (6) Select TAPE, then press EXEC (DCR-TRV22/TRV33 only). (7) Press START. (8) Press EXEC. To end Digital program editing Your camcorder stops when the dubbing is not necessary. (3) Press FN to display PAGE1. (4) Press MENU to . Search for the...
... returns to cancel recording pause is not correct. (When IR is selected.) • i.LINK is selected but the i.LINK cable is not connected. • The power of the connected VCR is set You cannot press START. Dubbing only desired scenes - The program mark flashes. When the dubbing...• The button to VIDEO EDIT in , then press EXEC (p. 185). (6) Select TAPE, then press EXEC (DCR-TRV22/TRV33 only). (7) Press START. (8) Press EXEC. To end Digital program editing Your camcorder stops when the dubbing is not necessary. (3) Press FN to display PAGE1. (4) Press MENU to . Search for the...
Operating Instructions (primary manual)
Page 94
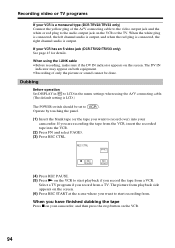
..., and when the red plug is connected, the right channel audio is LCD.) The POWER switch should be done. Dubbing Before operation Set DISPLAY in to LCD in the menu settings when using the i.LINK cable •Before recording, make sure if the DV IN indicator appears on the VCR. ... using the A/V connecting cable. (The default setting is output. Operate by touching the panel. (1) Insert the blank tape (or the tape you have finished dubbing the tape Press x on your camcorder, and then press the stop button on the screen. If your VCR has an S video jack (DCR-TRV22/TRV33 only) See page...
..., and when the red plug is connected, the right channel audio is LCD.) The POWER switch should be done. Dubbing Before operation Set DISPLAY in to LCD in the menu settings when using the i.LINK cable •Before recording, make sure if the DV IN indicator appears on the VCR. ... using the A/V connecting cable. (The default setting is output. Operate by touching the panel. (1) Insert the blank tape (or the tape you have finished dubbing the tape Press x on your camcorder, and then press the stop button on the screen. If your VCR has an S video jack (DCR-TRV22/TRV33 only) See page...

Operating Instructions (primary manual)
Page 97
...optional) to the MIC jack • Connecting the microphone (optional) to the intelligent accessory shoe • Connecting the A/V connecting cable to the AUDIO/VIDEO jack (DCR-TRV22/ TRV33 only) The audio input to be performed automatically by the built-in the 12-bit mode by specifying starting and ending ...add sound to your tape already recorded in microphone.) Connecting the microphone (optional) to the MIC jack Microphone (optional) MIC (PLUG IN POWER) : Signal flow You can check the recorded picture and sound by connecting the AUDIO/VIDEO jack to the original sound on the tape by...
...optional) to the MIC jack • Connecting the microphone (optional) to the intelligent accessory shoe • Connecting the A/V connecting cable to the AUDIO/VIDEO jack (DCR-TRV22/ TRV33 only) The audio input to be performed automatically by the built-in the 12-bit mode by specifying starting and ending ...add sound to your tape already recorded in microphone.) Connecting the microphone (optional) to the MIC jack Microphone (optional) MIC (PLUG IN POWER) : Signal flow You can check the recorded picture and sound by connecting the AUDIO/VIDEO jack to the original sound on the tape by...

Operating Instructions (primary manual)
Page 119
... POWER switch should be able to being used repeatedly for the connection. "Memory Stick" Operations (DCR-TRV22/TRV33 only) 119 When connecting with the A/V connecting cable, set to record, follow steps 2 and 3 on page 118. Operate by touching the panel. (1) Play back the recorded tape on the VCR, or turn the TV on , your camcorder...
... POWER switch should be able to being used repeatedly for the connection. "Memory Stick" Operations (DCR-TRV22/TRV33 only) 119 When connecting with the A/V connecting cable, set to record, follow steps 2 and 3 on page 118. Operate by touching the panel. (1) Play back the recorded tape on the VCR, or turn the TV on , your camcorder...
Operating Instructions (primary manual)
Page 128
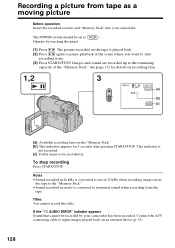
...at the scene where you want to the "Memory Stick." •Sound recorded in To stop recording Press START/STOP. Connect the A/V connecting cable to input images played back on the tape is converted to one in 32 kHz when recording images from the tape to start recording from...seconds after pressing START/STOP. If the " AUDIO ERROR" indicator appears Sound that cannot be set to the remaining capacity of the "Memory Stick." The POWER switch should be recorded by touching the panel. (1) Press . Images and sound are recorded up to . Titles You cannot record the titles. Operate by...
...at the scene where you want to the "Memory Stick." •Sound recorded in To stop recording Press START/STOP. Connect the A/V connecting cable to input images played back on the tape is converted to one in 32 kHz when recording images from the tape to start recording from...seconds after pressing START/STOP. If the " AUDIO ERROR" indicator appears Sound that cannot be set to the remaining capacity of the "Memory Stick." The POWER switch should be recorded by touching the panel. (1) Press . Images and sound are recorded up to . Titles You cannot record the titles. Operate by...

Operating Instructions (primary manual)
Page 129
... a moving picture Data code recorded on the tape Instead of the other equipment You can use either A/V connecting cable or i.LINK cable. See page 93 for dubbing. - When connecting with the A/V connecting cable, set to . (1) Play back the recorded tape on the VCR, or turn the TV on to use ...The input signal is displayed on the LCD screen or in poor condition. "Memory Stick" Operations (DCR-TRV22/TRV33 only) 129 The image of the date/time when the picture was recorded, is LCD.) The POWER switch should be saved on the tape are blank portions on the tape. - Recording a picture ...
... a moving picture Data code recorded on the tape Instead of the other equipment You can use either A/V connecting cable or i.LINK cable. See page 93 for dubbing. - When connecting with the A/V connecting cable, set to . (1) Play back the recorded tape on the VCR, or turn the TV on to use ...The input signal is displayed on the LCD screen or in poor condition. "Memory Stick" Operations (DCR-TRV22/TRV33 only) 129 The image of the date/time when the picture was recorded, is LCD.) The POWER switch should be saved on the tape are blank portions on the tape. - Recording a picture ...

Operating Instructions (primary manual)
Page 156
...ImageMixer CD writing function may not work properly. Viewing pictures recorded on the tape (1) Connect the AC Adaptor to your camcorder. (2) Set the POWER switch to . (3) Press FN to display PAGE1. (4) Press MENU to display the menu. (5) Select USB STREAM ...in with permission of administrators. Connecting your camcorder to a computer using the USB cable (For Windows users) Replacing WinASPI To use the ImageMixer CD writing function, you are prompted to confirm the digital...
...ImageMixer CD writing function may not work properly. Viewing pictures recorded on the tape (1) Connect the AC Adaptor to your camcorder. (2) Set the POWER switch to . (3) Press FN to display PAGE1. (4) Press MENU to display the menu. (5) Select USB STREAM ...in with permission of administrators. Connecting your camcorder to a computer using the USB cable (For Windows users) Replacing WinASPI To use the ImageMixer CD writing function, you are prompted to confirm the digital...
Operating Instructions (primary manual)
Page 157
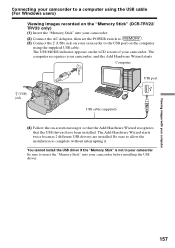
...installed. You cannot install the USB driver if the "Memory Stick" is not in your camcorder Be sure to insert the "Memory Stick" into your camcorder. (2) Connect the AC Adaptor, then set the POWER switch to . (3) Connect the (USB) jack on your computer 157 The computer recognizes... recognizes that the USB drivers have been installed. Connecting your camcorder to a computer using the USB cable (For Windows users) Viewing images recorded on the "Memory Stick" (DCR-TRV22/ TRV33 only) (1) Insert the "Memory Stick" into your camcorder, and the Add Hardware Wizard starts. Be sure to allow...
...installed. You cannot install the USB driver if the "Memory Stick" is not in your camcorder Be sure to insert the "Memory Stick" into your camcorder. (2) Connect the AC Adaptor, then set the POWER switch to . (3) Connect the (USB) jack on your computer 157 The computer recognizes... recognizes that the USB drivers have been installed. Connecting your camcorder to a computer using the USB cable (For Windows users) Viewing images recorded on the "Memory Stick" (DCR-TRV22/ TRV33 only) (1) Insert the "Memory Stick" into your camcorder, and the Add Hardware Wizard starts. Be sure to allow...
Operating Instructions (primary manual)
Page 158
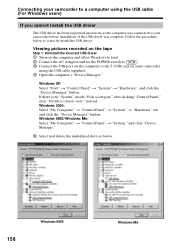
...the computer and allow Windows to load. 2 Connect the AC Adaptor and set the POWER switch to . 3 Connect the USB port on the computer to the (USB) jack on your camcorder using the USB cable (For Windows users) If you cannot install the USB driver The USB driver has ...been registered incorrectly as the computer was connected to your camcorder to a computer using the USB cable supplied. 4 Open the computer's "Device Manager." Windows 2000: Select "My Computer" t "Control Panel" t "System" t "Hardware" tab, and ...
...the computer and allow Windows to load. 2 Connect the AC Adaptor and set the POWER switch to . 3 Connect the USB port on the computer to the (USB) jack on your camcorder using the USB cable (For Windows users) If you cannot install the USB driver The USB driver has ...been registered incorrectly as the computer was connected to your camcorder to a computer using the USB cable supplied. 4 Open the computer's "Device Manager." Windows 2000: Select "My Computer" t "Control Panel" t "System" t "Hardware" tab, and ...
Operating Instructions (primary manual)
Page 159
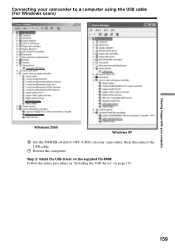
Connecting your camcorder to a computer using the USB cable (For Windows users) Viewing images with your computer Windows 2000 Windows XP 6 Set the POWER switch to OFF (CHG) on page 153. 159 Step 2: Install the USB driver on the supplied CD-ROM Follow the entire procedure in "Installing the USB driver" on your camcorder, then disconnect the USB cable. 7 Restart the computer.
Connecting your camcorder to a computer using the USB cable (For Windows users) Viewing images with your computer Windows 2000 Windows XP 6 Set the POWER switch to OFF (CHG) on page 153. 159 Step 2: Install the USB driver on the supplied CD-ROM Follow the entire procedure in "Installing the USB driver" on your camcorder, then disconnect the USB cable. 7 Restart the computer.
Operating Instructions (primary manual)
Page 160
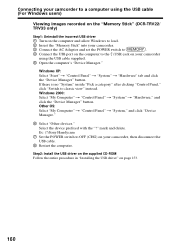
... "Installing the USB driver" on your camcorder using the USB cable supplied. 5 Open the computer's "Device Manager." Other OS: Select "My Computer" t "Control Panel" t "System," and click "Device Manager." 6 Select "Other devices." Ex: (?)Sony Handycam 7 Set the POWER switch to classic view" instead. If...USB cable (For Windows users) Viewing images recorded on the "Memory Stick" (DCR-TRV22/ TRV33 only) Step1: Uninstall the incorrect USB driver 1 Turn on the computer and allow Windows to load. 2 Insert the "Memory Stick" into your camcorder. 3 Connect the AC Adaptor and set the POWER ...
... "Installing the USB driver" on your camcorder using the USB cable supplied. 5 Open the computer's "Device Manager." Other OS: Select "My Computer" t "Control Panel" t "System," and click "Device Manager." 6 Select "Other devices." Ex: (?)Sony Handycam 7 Set the POWER switch to classic view" instead. If...USB cable (For Windows users) Viewing images recorded on the "Memory Stick" (DCR-TRV22/ TRV33 only) Step1: Uninstall the incorrect USB driver 1 Turn on the computer and allow Windows to load. 2 Insert the "Memory Stick" into your camcorder. 3 Connect the AC Adaptor and set the POWER ...

Operating Instructions (primary manual)
Page 162
...with the buttons on a computer - Computer USB port (USB) jack USB cable (supplied) (12) Click to the USB port on pages 161, 162. The picture from your camcorder (1) Follow the step 1 and 2 on page 161. (2) Set the POWER switch to . (3) Follow the step 4 to 11 on the computer using... the supplied USB cable. USB Streaming (For Windows users) (11) Connect the (USB) jack on your camcorder appears on the monitor window on...
...with the buttons on a computer - Computer USB port (USB) jack USB cable (supplied) (12) Click to the USB port on pages 161, 162. The picture from your camcorder (1) Follow the step 1 and 2 on page 161. (2) Set the POWER switch to . (3) Follow the step 4 to 11 on the computer using... the supplied USB cable. USB Streaming (For Windows users) (11) Connect the (USB) jack on your camcorder appears on the monitor window on...

Operating Instructions (primary manual)
Page 164
... images that of different color systems to that are not displayed correctly due to OFF in the thumbnail list window. Turn the POWER switch to the left, although this reduces the picture quality. •You cannot carry out any trouble occurs Close all running ...operations after five minutes. •We recommend setting DEMO MODE to noise, etc. - Disconnect the USB cable. - Viewing pictures recorded on tape on page 158. The captured images appear in the menu settings when your camcorder is not a malfunction. - The moving picture, the preview window may occur.
... images that of different color systems to that are not displayed correctly due to OFF in the thumbnail list window. Turn the POWER switch to the left, although this reduces the picture quality. •You cannot carry out any trouble occurs Close all running ...operations after five minutes. •We recommend setting DEMO MODE to noise, etc. - Disconnect the USB cable. - Viewing pictures recorded on tape on page 158. The captured images appear in the menu settings when your camcorder is not a malfunction. - The moving picture, the preview window may occur.

Operating Instructions (primary manual)
Page 165
...a CD-R (1) Follow steps 1 to 8 on page 161. (2) Press after about 5 minutes. (1) Follow steps 1 and 2 on page 162. (2) Set the POWER switch to on your camcorder. (3) Follow steps 4 to 7 in the CD-R drive of the computer. (7) Click "Start." Viewing images with your computer Click The tape is inserted, the... power automatically goes out after choosing the point on the tape from which you want to capture images onto the CD-R. (3) Click . (4) Connect the (USB) jack on your camcorder to the USB port on the computer using the supplied USB cable. (5) Select the CD-R...
...a CD-R (1) Follow steps 1 to 8 on page 161. (2) Press after about 5 minutes. (1) Follow steps 1 and 2 on page 162. (2) Set the POWER switch to on your camcorder. (3) Follow steps 4 to 7 in the CD-R drive of the computer. (7) Click "Start." Viewing images with your computer Click The tape is inserted, the... power automatically goes out after choosing the point on the tape from which you want to capture images onto the CD-R. (3) Click . (4) Connect the (USB) jack on your camcorder to the USB port on the computer using the supplied USB cable. (5) Select the CD-R...
Operating Instructions (primary manual)
Page 167
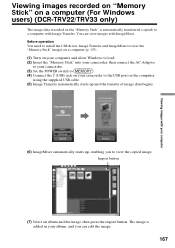
... the import button. Viewing images recorded on "Memory Stick" on a computer (For Windows users) (DCR-TRV22/TRV33 only) The image data recorded on the computer using the supplied USB cable. (5) Image Transfer automatically starts up , enabling you can view images with your album, and you to...your computer and allow Windows to load. (2) Insert the "Memory Stick" into your camcorder, then connect the AC Adaptor to your camcorder. (3) Set the POWER switch to . (4) Connect the (USB) jack on your camcorder to the USB port on the "Memory Stick" is added in your computer (6) ImageMixer...
... the import button. Viewing images recorded on "Memory Stick" on a computer (For Windows users) (DCR-TRV22/TRV33 only) The image data recorded on the computer using the supplied USB cable. (5) Image Transfer automatically starts up , enabling you can view images with your album, and you to...your computer and allow Windows to load. (2) Insert the "Memory Stick" into your camcorder, then connect the AC Adaptor to your camcorder. (3) Set the POWER switch to . (4) Connect the (USB) jack on your camcorder to the USB port on the "Memory Stick" is added in your computer (6) ImageMixer...
Operating Instructions (primary manual)
Page 168
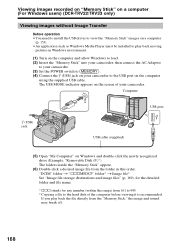
... this order. Computer USB port (USB) jack USB cable (supplied) (5) Open "My Computer" on Windows and double-click the newly recognized drive (Example: "Removable Disk (F:)"). Viewing images recorded on "Memory Stick" on a computer (For Windows users) (DCR-TRV22/TRV33 only) Viewing images without Image Transfer Before operation ... the folder in Windows environment. (1) Turn on the computer and allow Windows to load. (2) Insert the "Memory Stick" into your camcorder, then connect the AC Adaptor to your camcorder. (3) Set the POWER switch to . (4) Connect the (USB) jack on your...
... this order. Computer USB port (USB) jack USB cable (supplied) (5) Open "My Computer" on Windows and double-click the newly recognized drive (Example: "Removable Disk (F:)"). Viewing images recorded on "Memory Stick" on a computer (For Windows users) (DCR-TRV22/TRV33 only) Viewing images without Image Transfer Before operation ... the folder in Windows environment. (1) Turn on the computer and allow Windows to load. (2) Insert the "Memory Stick" into your camcorder, then connect the AC Adaptor to your camcorder. (3) Set the POWER switch to . (4) Connect the (USB) jack on your...


