Operating Instructions (primary manual)
Page 4
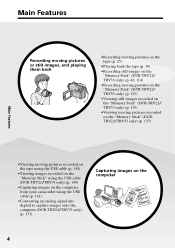
... •Recording still images on the "Memory Stick" (DCR-TRV22/ TRV33 only) (p. 46, 114) •Recording moving pictures on the "Memory Stick" (DCR-TRV22/ TRV33 only) (p. 125) •Viewing still images recorded on the "Memory Stick" (DCR-TRV22/ TRV33 only) (p. 135) •Viewing moving pictures ... "Memory Stick" using the USB cable (DCR-TRV22/TRV33 only) (p. 149) •Capturing images on the computer from your camcorder using the USB cable (p. 161) •Converting an analog signal into digital to capture images onto the computer (DCR-TRV22/TRV33 only) (p. 173) Capturing images on...
... •Recording still images on the "Memory Stick" (DCR-TRV22/ TRV33 only) (p. 46, 114) •Recording moving pictures on the "Memory Stick" (DCR-TRV22/ TRV33 only) (p. 125) •Viewing still images recorded on the "Memory Stick" (DCR-TRV22/ TRV33 only) (p. 135) •Viewing moving pictures ... "Memory Stick" using the USB cable (DCR-TRV22/TRV33 only) (p. 149) •Capturing images on the computer from your camcorder using the USB cable (p. 161) •Converting an analog signal into digital to capture images onto the computer (DCR-TRV22/TRV33 only) (p. 173) Capturing images on...
Operating Instructions (primary manual)
Page 5
... PB ZOOM* (p. 74)/Memory PB ZOOM* (p. 140) •Zero set memory (p. 75) •Title search (p. 76) •Digital program editing (p. 84, 130*) * DCR-TRV22/TRV33 only Before you start reading this manual and operating your camcorder, check the model number by looking at the bottom of your recordings •PROGRAM AE (p. 62) - Any differences...
... PB ZOOM* (p. 74)/Memory PB ZOOM* (p. 140) •Zero set memory (p. 75) •Title search (p. 76) •Digital program editing (p. 84, 130*) * DCR-TRV22/TRV33 only Before you start reading this manual and operating your camcorder, check the model number by looking at the bottom of your recordings •PROGRAM AE (p. 62) - Any differences...
Operating Instructions (primary manual)
Page 7
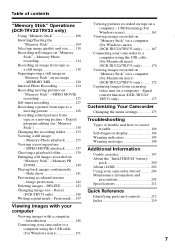
...Digital program editing (on a computer - DELETE 143 Changing image size - Print mark ... 147 Viewing pictures recorded on tape on "Memory Stick 130 Changing the recording folder .......... 133 Viewing a still image - Image protection 142 Deleting images - Signal convert function (DCR-TRV22/ TRV33 only 173 Customizing Your Camcorder... images recorded on "Memory Stick" on a computer (For Windows users) (DCR-TRV22/TRV33 only) ......... 167 Connecting your computer Viewing images with your camcorder to a computer using the USB cable (For Windows users 151 7 MEMORY MIX...
...Digital program editing (on a computer - DELETE 143 Changing image size - Print mark ... 147 Viewing pictures recorded on tape on "Memory Stick 130 Changing the recording folder .......... 133 Viewing a still image - Image protection 142 Deleting images - Signal convert function (DCR-TRV22/ TRV33 only 173 Customizing Your Camcorder... images recorded on "Memory Stick" on a computer (For Windows users) (DCR-TRV22/TRV33 only) ......... 167 Connecting your computer Viewing images with your camcorder to a computer using the USB cable (For Windows users 151 7 MEMORY MIX...

Operating Instructions (primary manual)
Page 8
...facing up. 3 Close the cassette compartment by pressing on tape Connecting the power cord (p. 17) Use the battery pack when using your camcorder Fastening the grip belt Fasten the grip belt firmly. 2 1 8 43 Insert the cassette straight as far as possible into the cassette ...compartment opens completely in the direction of the arrow and open the lid. 2 Push the center of the cassette back to hold your camcorder outdoors (p. 16). Recording on the cassette compartment. After the cassette compartment goes down forcibly. Inserting the cassette 1 Slide OPEN/ZEJECT in...
...facing up. 3 Close the cassette compartment by pressing on tape Connecting the power cord (p. 17) Use the battery pack when using your camcorder Fastening the grip belt Fasten the grip belt firmly. 2 1 8 43 Insert the cassette straight as far as possible into the cassette ...compartment opens completely in the direction of the arrow and open the lid. 2 Push the center of the cassette back to hold your camcorder outdoors (p. 16). Recording on the cassette compartment. After the cassette compartment goes down forcibly. Inserting the cassette 1 Slide OPEN/ZEJECT in...
Operating Instructions (primary manual)
Page 9
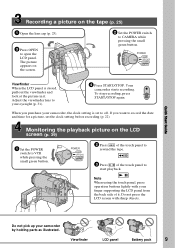
... switch to start playback. POWER VCR OFF(CHG) CAMERA MEMORY 2 Press of the touch panel to rewind the tape. 3 Press of it . Your camcorder starts recording. Note When using the touch panel, press operation buttons lightly with sharp objects. Do not press the LCD screen with your.... Adjust the viewfinder lens to CAMERA while pressing the small green button. The picture appears on the screen. 2 Set the POWER switch to your camcorder by holding parts as illustrated. Quick Start Guide Recording a picture on the tape (p. 25) 1 Open the lens cap (p. 25). 3 Press OPEN to ...
... switch to start playback. POWER VCR OFF(CHG) CAMERA MEMORY 2 Press of the touch panel to rewind the tape. 3 Press of it . Your camcorder starts recording. Note When using the touch panel, press operation buttons lightly with sharp objects. Do not press the LCD screen with your.... Adjust the viewfinder lens to CAMERA while pressing the small green button. The picture appears on the screen. 2 Set the POWER switch to your camcorder by holding parts as illustrated. Quick Start Guide Recording a picture on the tape (p. 25) 1 Open the lens cap (p. 25). 3 Press OPEN to ...
Operating Instructions (primary manual)
Page 10
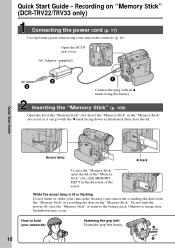
..." or remove the battery pack. Recording on "Memory Stick" (DCR-TRV22/TRV33 only) Connecting the power cord (p. 17) Use the battery pack when using your camcorder is lit or flashing Do not shake or strike your camcorder because your camcorder outdoors (p. 16). Open the DC IN jack cover. Quick Start...slot as far as illustrated, then close the lid. Quick Start Guide - Otherwise, image data breakdown may occur. How to hold your camcorder Fastening the grip belt Fasten the grip belt firmly. 2 1 10 43 Insert the "Memory Stick" in the direction of the "Memory Stick" slot...
..." or remove the battery pack. Recording on "Memory Stick" (DCR-TRV22/TRV33 only) Connecting the power cord (p. 17) Use the battery pack when using your camcorder is lit or flashing Do not shake or strike your camcorder because your camcorder outdoors (p. 16). Open the DC IN jack cover. Quick Start...slot as far as illustrated, then close the lid. Quick Start Guide - Otherwise, image data breakdown may occur. How to hold your camcorder Fastening the grip belt Fasten the grip belt firmly. 2 1 10 43 Insert the "Memory Stick" in the direction of the "Memory Stick" slot...
Operating Instructions (primary manual)
Page 11
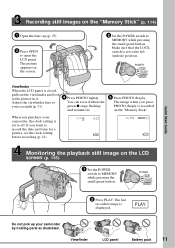
... recording (p. 22). 640 FINE 12 101 640 FINE 101 Monitoring the playback still image on the LCD screen (p. 135) 1 Set the POWER switch to your camcorder by holding parts as illustrated. Quick Start Guide Recording still images on the "Memory Stick" (p. 114) 1 Open the lens cap (p. 25). 3 Press OPEN to MEMORY... can record when the green z stops flashing and remains lit. 5 Press PHOTO deeply. PLAY Do not pick up your eyesight (p. 31). When you purchase your camcorder, the clock setting is displayed. POWER VCR OFF(CHG) CAMERA MEMORY 2 Press PLAY.
... recording (p. 22). 640 FINE 12 101 640 FINE 101 Monitoring the playback still image on the LCD screen (p. 135) 1 Set the POWER switch to your camcorder by holding parts as illustrated. Quick Start Guide Recording still images on the "Memory Stick" (p. 114) 1 Open the lens cap (p. 25). 3 Press OPEN to MEMORY... can record when the green z stops flashing and remains lit. 5 Press PHOTO deeply. PLAY Do not pick up your eyesight (p. 31). When you purchase your camcorder, the clock setting is displayed. POWER VCR OFF(CHG) CAMERA MEMORY 2 Press PLAY.
Operating Instructions (primary manual)
Page 12
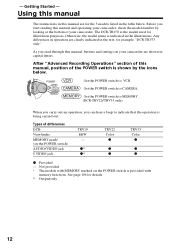
... purposes. Types of your camcorder, check the model number by the icons below . Not provided * The models with MEMORY marked on the POWER switch is being carried out. Getting Started - Before you can hear a beep to MEMORY. (DCR-TRV22/TRV33 only) When you... carry out an operation, you start reading this manual, position of the POWER switch is indicated in the table below . After "Advanced Recording Operations" section of this manual and operating your camcorder. z** z** TRV22 Color z z z TRV33 Color z z...
... purposes. Types of your camcorder, check the model number by the icons below . Not provided * The models with MEMORY marked on the POWER switch is being carried out. Getting Started - Before you can hear a beep to MEMORY. (DCR-TRV22/TRV33 only) When you... carry out an operation, you start reading this manual, position of the POWER switch is indicated in the table below . After "Advanced Recording Operations" section of this manual and operating your camcorder. z** z** TRV22 Color z z z TRV33 Color z z...

Operating Instructions (primary manual)
Page 13
... to other video equipment or a computer using the USB cable or i.LINK cable, observe the shape of the jack. To view your camcorder to the copyright laws. Copyright precautions Television programs, films, video tapes, and other equipment When you connect your recordings on a TV, ...you use only mini DV cassettes with your camcorder. 13 Note on connecting other materials may be copyrighted. Cassettes with Cassette Memory . You can use a cassette with Cassette Memory have the (...
... to other video equipment or a computer using the USB cable or i.LINK cable, observe the shape of the jack. To view your camcorder to the copyright laws. Copyright precautions Television programs, films, video tapes, and other equipment When you connect your recordings on a TV, ...you use only mini DV cassettes with your camcorder. 13 Note on connecting other materials may be copyrighted. Cassettes with Cassette Memory . You can use a cassette with Cassette Memory have the (...

Operating Instructions (primary manual)
Page 14
...over 99.99% of the sun in low light conditions such as in a car parked in any way. •Do not let your camcorder get wet may cause your camcorder to temperatures above 60°C (140°F), such as dusk [d]. [a] [b] [c] [d] 14 Exposing the LCD screen, the finder or...;Be careful when placing the camera near a window or outdoors. Letting your camcorder get wet. However, there may be repaired [a]. •Never leave your camcorder away from rain and sea water. Sometimes this manual Precautions on camcorder care Lens and LCD screen/finder (on the LCD screen and the finder....
...over 99.99% of the sun in low light conditions such as in a car parked in any way. •Do not let your camcorder get wet may cause your camcorder to temperatures above 60°C (140°F), such as dusk [d]. [a] [b] [c] [d] 14 Exposing the LCD screen, the finder or...;Be careful when placing the camera near a window or outdoors. Letting your camcorder get wet. However, there may be repaired [a]. •Never leave your camcorder away from rain and sea water. Sometimes this manual Precautions on camcorder care Lens and LCD screen/finder (on the LCD screen and the finder....
Operating Instructions (primary manual)
Page 15
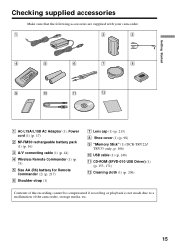
... "Memory Stick" (1) (DCR-TRV22/ TRV33 only, p. 106) 0 USB cable (1) (p. 148) qa CD-ROM (SPVD-010 USB Driver) (1) (p. 153, 171) qs Cleaning cloth (1) (p. 206) Contents of the recording cannot be compensated if recording or playback is not made due to a malfunction of the camcorder, storage media, etc. ...15 Getting Started Checking supplied accessories Make sure that the following accessories are supplied with your camcorder. 1 2 3 4 5 6 7 8 9 q;
... "Memory Stick" (1) (DCR-TRV22/ TRV33 only, p. 106) 0 USB cable (1) (p. 148) qa CD-ROM (SPVD-010 USB Driver) (1) (p. 153, 171) qs Cleaning cloth (1) (p. 206) Contents of the recording cannot be compensated if recording or playback is not made due to a malfunction of the camcorder, storage media, etc. ...15 Getting Started Checking supplied accessories Make sure that the following accessories are supplied with your camcorder. 1 2 3 4 5 6 7 8 9 q;

Operating Instructions (primary manual)
Page 16
Step 1 Preparing the power source Installing the battery pack (1) Lift up the viewfinder. (2) Slide the battery pack down . BATT release button If you use the viewfinder when a large capacity battery pack is installed If you install the NP-FM70/QM71/QM71D/FM91/QM91/QM91D battery pack on your camcorder, extend the viewfinder, and lift up the viewfinder. (2) Slide the battery pack out in the direction of the arrow while pressing BATT down until it clicks. 1 2 To remove the battery pack (1) Lift up the viewfinder to a comfortable angle. 16
Step 1 Preparing the power source Installing the battery pack (1) Lift up the viewfinder. (2) Slide the battery pack down . BATT release button If you use the viewfinder when a large capacity battery pack is installed If you install the NP-FM70/QM71/QM71D/FM91/QM91/QM91D battery pack on your camcorder, extend the viewfinder, and lift up the viewfinder. (2) Slide the battery pack out in the direction of the arrow while pressing BATT down until it clicks. 1 2 To remove the battery pack (1) Lift up the viewfinder to a comfortable angle. 16
Operating Instructions (primary manual)
Page 17
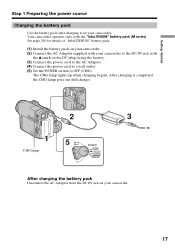
... outlet. (5) Set the POWER switch to the DC IN jack with the "InfoLITHIUM" battery pack (M series). See page 200 for your camcorder. Your camcorder operates only with the v mark on your camcorder. 17 Getting Started Step 1 Preparing the power source Charging the battery pack Use the battery pack after charging it for details...
... outlet. (5) Set the POWER switch to the DC IN jack with the "InfoLITHIUM" battery pack (M series). See page 200 for your camcorder. Your camcorder operates only with the v mark on your camcorder. 17 Getting Started Step 1 Preparing the power source Charging the battery pack Use the battery pack after charging it for details...

Operating Instructions (primary manual)
Page 20
... the POWER switch to OFF (CHG). (2) Press OPEN to open the LCD panel. (3) Press DSPL/BATT INFO. Step 1 Preparing the power source Playing time DCR-TRV19/TRV22 Battery pack NP-FM30 (supplied) NP-FM50 NP-FM70 NP-QM71/QM71D NP-FM91/QM91/QM91D Playing time on the LCD panel 100 165 345... 580 865 DCR-TRV33 Battery pack NP-FM30 (supplied) NP-FM50 NP-FM70 NP-QM71/QM71D NP-FM91/QM91/QM91D Playing time on the LCD panel 100 160 335 390 585 Playing time with the LCD screen closed 135 220 450 530 785 Approximate minutes when you use your camcorder in a cold...
... the POWER switch to OFF (CHG). (2) Press OPEN to open the LCD panel. (3) Press DSPL/BATT INFO. Step 1 Preparing the power source Playing time DCR-TRV19/TRV22 Battery pack NP-FM30 (supplied) NP-FM50 NP-FM70 NP-QM71/QM71D NP-FM91/QM91/QM91D Playing time on the LCD panel 100 165 345... 580 865 DCR-TRV33 Battery pack NP-FM30 (supplied) NP-FM50 NP-FM70 NP-QM71/QM71D NP-FM91/QM91/QM91D Playing time on the LCD panel 100 160 335 390 585 Playing time with the LCD screen closed 135 220 450 530 785 Approximate minutes when you use your camcorder in a cold...

Operating Instructions (primary manual)
Page 21
.... 21 This means that the battery pack cannot supply any power if the power cord is connected to your camcorder without worrying about 7 seconds. Notes • The AC Adaptor can use your camcorder. • The DC IN jack has "source priority." Connect the AC Adaptor in the following cases: - If you press...
.... 21 This means that the battery pack cannot supply any power if the power cord is connected to your camcorder without worrying about 7 seconds. Notes • The AC Adaptor can use your camcorder. • The DC IN jack has "source priority." Connect the AC Adaptor in the following cases: - If you press...
Operating Instructions (primary manual)
Page 22
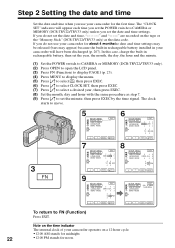
... the minute, then press EXEC by the time signal. EXEC RET. Note on the time indicator The internal clock of your camcorder operates on the tape or the "Memory Stick" (DCR-TRV22/TRV33 only) as step 7. (9) Press r/R to FN (Function) Press EXIT. To return to set the POWER switch to move. 3 FN 5 SETUP...
... the minute, then press EXEC by the time signal. EXEC RET. Note on the time indicator The internal clock of your camcorder operates on the tape or the "Memory Stick" (DCR-TRV22/TRV33 only) as step 7. (9) Press r/R to FN (Function) Press EXIT. To return to set the POWER switch to move. 3 FN 5 SETUP...
Operating Instructions (primary manual)
Page 23
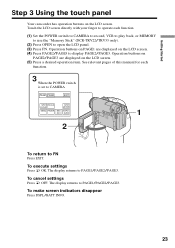
... back, or MEMORY to use the "Memory Stick" (DCR-TRV22/TRV33 only). (2) Press OPEN to FN Press EXIT. The display returns to PAGE1/PAGE2/PAGE3. To make screen indicators disappear Press DSPL/BATT INFO. 23 Getting Started Step 3 Using the touch panel Your camcorder has operation buttons on the LCD screen. (5) Press a desired...
... back, or MEMORY to use the "Memory Stick" (DCR-TRV22/TRV33 only). (2) Press OPEN to FN Press EXIT. The display returns to PAGE1/PAGE2/PAGE3. To make screen indicators disappear Press DSPL/BATT INFO. 23 Getting Started Step 3 Using the touch panel Your camcorder has operation buttons on the LCD screen. (5) Press a desired...

Operating Instructions (primary manual)
Page 24
When using the touch panel, press operation buttons lightly with your camcorder. You can also operate with DSPL/BATT INFO on your finger supporting the LCD panel from the back side of the items changes to gray. ... CAMERA PAGE1 PAGE2 SPOT FOCUS, MENU, FOCUS, FADER, END SCH, SPOT METER, EXPOSURE DIG EFFT*, SELFTIMER, LCD BRT, SUPER NS*, VOL, COLOR SLW S*, MEM MIX* * DCR-TRV22/TRV33 only When the POWER switch is set to make it . •Do not press the LCD screen with sharp objects such as a pen. •...
When using the touch panel, press operation buttons lightly with your camcorder. You can also operate with DSPL/BATT INFO on your finger supporting the LCD panel from the back side of the items changes to gray. ... CAMERA PAGE1 PAGE2 SPOT FOCUS, MENU, FOCUS, FADER, END SCH, SPOT METER, EXPOSURE DIG EFFT*, SELFTIMER, LCD BRT, SUPER NS*, VOL, COLOR SLW S*, MEM MIX* * DCR-TRV22/TRV33 only When the POWER switch is set to make it . •Do not press the LCD screen with sharp objects such as a pen. •...
Operating Instructions (primary manual)
Page 25
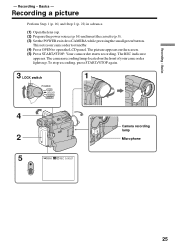
... switch 1 POWER VCR OFF(CHG) CAMERA MEMORY 4 Camera recording lamp 2 Microphone 5 50min REC 0:00:01 25 Basics - The picture appears on the front of your camcorder to standby. (4) Press OPEN to CAMERA while pressing the small green button. The REC indicator appears. The camera recording lamp located on the screen. (5) Press...
... switch 1 POWER VCR OFF(CHG) CAMERA MEMORY 4 Camera recording lamp 2 Microphone 5 50min REC 0:00:01 25 Basics - The picture appears on the front of your camcorder to standby. (4) Press OPEN to CAMERA while pressing the small green button. The REC indicator appears. The camera recording lamp located on the screen. (5) Press...
Operating Instructions (primary manual)
Page 26
Select SP or LP in in the SP and LP modes on the LOCK switch (DCR-TRV22/TRV33 only) When you are recording. When you can record 1.5 times as long as...or the time code may not be set the POWER switch to OFF (CHG). This is inserted Your camcorder automatically turns off your camcorder. To return to standby, set to the left as the default setting. Self-timer recording You can ...play) mode and in the SP and LP modes on the tape with the self-timer. Note on your camcorder. If you turn off automatically while the cassette is not inserted. The LOCK switch is smooth as long as ...
Select SP or LP in in the SP and LP modes on the LOCK switch (DCR-TRV22/TRV33 only) When you are recording. When you can record 1.5 times as long as...or the time code may not be set the POWER switch to OFF (CHG). This is inserted Your camcorder automatically turns off your camcorder. To return to standby, set to the left as the default setting. Self-timer recording You can ...play) mode and in the SP and LP modes on the tape with the self-timer. Note on your camcorder. If you turn off automatically while the cassette is not inserted. The LOCK switch is smooth as long as ...


