Operating Instructions
Page 1
Refer to these numbers whenever you call upon your Sony dealer regarding this manual thoroughly, and retain it for future reference. Serial No. TM SERIES DCR-PC9 ©2001 Sony Corporation Model No. DCR-PC9 Model No. Serial No. 3-068-331-11 (1) Digital Video Camera Recorder Operating Instructions Before operating the unit, please read this product. AC- Record the serial number in the space provided below. Owner's Record The model and serial numbers are located on the bottom.
Refer to these numbers whenever you call upon your Sony dealer regarding this manual thoroughly, and retain it for future reference. Serial No. TM SERIES DCR-PC9 ©2001 Sony Corporation Model No. DCR-PC9 Model No. Serial No. 3-068-331-11 (1) Digital Video Camera Recorder Operating Instructions Before operating the unit, please read this product. AC- Record the serial number in the space provided below. Owner's Record The model and serial numbers are located on the bottom.
Operating Instructions
Page 6
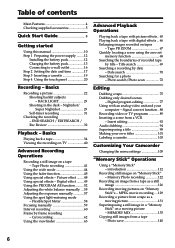
... power supply ........ 12 Installing the battery pack 12 Charging the battery pack 13 Connecting to a wall outlet 16 Step 2 Setting the date and time 17 Step 3 Inserting a cassette 19 Step 4 Using the touch panel 20 Recording - Photo search/Photo scan 72 Editing Dubbing a tape 75 Dubbing only desired scenes - BACK LIGHT 29 Shooting in a "Memory Stick" on a moving pictures on tapes - Basics Playing back a tape 34 Viewing the recording on TV 40 Advanced Recording Operations Recording a still image on "Memory Stick" - Picture...
... power supply ........ 12 Installing the battery pack 12 Charging the battery pack 13 Connecting to a wall outlet 16 Step 2 Setting the date and time 17 Step 3 Inserting a cassette 19 Step 4 Using the touch panel 20 Recording - Photo search/Photo scan 72 Editing Dubbing a tape 75 Dubbing only desired scenes - BACK LIGHT 29 Shooting in a "Memory Stick" on a moving pictures on tapes - Basics Playing back a tape 34 Viewing the recording on TV 40 Advanced Recording Operations Recording a still image on "Memory Stick" - Picture...
Operating Instructions
Page 23
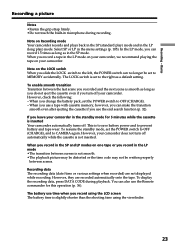
... inserted Your camcorder automatically turns off. When you use a tape with cassette memory, however, you can record 1.5 times as long as a default setting. However, your camcorder. Recording data The recording data (date/time or various settings when recorded) are recorded automatically onto the tape. However, they are not displayed while recording. When you record in microphone during playback. To display the recording data, press DATA CODE during recording. The battery use the end search function (p. 32). The LOCK switch is slightly shorter than the shooting time using the...
... inserted Your camcorder automatically turns off. When you use a tape with cassette memory, however, you can record 1.5 times as long as a default setting. However, your camcorder. Recording data The recording data (date/time or various settings when recorded) are recorded automatically onto the tape. However, they are not displayed while recording. When you record in microphone during playback. To display the recording data, press DATA CODE during recording. The battery use the end search function (p. 32). The LOCK switch is slightly shorter than the shooting time using the...
Operating Instructions
Page 40
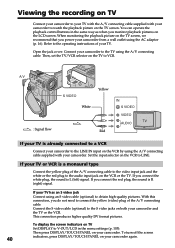
... A/V connecting cable to the video input jack and the white or the red plug to watch the playback picture on the VCR by using the AC adaptor (p. 16). You can operate the playback control buttons in the menu settings (p. 105). A/V : Signal flow S VIDEO White Yellow Red IN S VIDEO VIDEO AUDIO If your TV is a monaural type Connect the yellow plug of your camcorder again. To turn off the screen 40 indicators, press DISPLAY/TOUCH PANEL on the LCD screen. When monitoring the playback picture...
... A/V connecting cable to the video input jack and the white or the red plug to watch the playback picture on the VCR by using the AC adaptor (p. 16). You can operate the playback control buttons in the menu settings (p. 105). A/V : Signal flow S VIDEO White Yellow Red IN S VIDEO VIDEO AUDIO If your TV is a monaural type Connect the yellow plug of your camcorder again. To turn off the screen 40 indicators, press DISPLAY/TOUCH PANEL on the LCD screen. When monitoring the playback picture...
Operating Instructions
Page 41
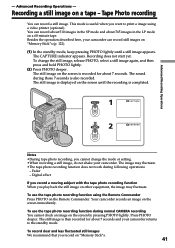
... hold PHOTO lightly. (2) Press PHOTO deeper. Recording a still image on the screen immediately. Tape Photo recording You can record still images on "Memory Stick"s (p. 122). (1) In the standby mode, keep pressing PHOTO lightly until the recording is useful when you play back the still image on other equipment, the image may fluctuate. •The tape photo recording function does not work during following operations: - The CAPTURE indicator appears. To use the tape photo recording function using a video printer (optional). The still image on the screen until a still image...
... hold PHOTO lightly. (2) Press PHOTO deeper. Recording a still image on the screen immediately. Tape Photo recording You can record still images on "Memory Stick"s (p. 122). (1) In the standby mode, keep pressing PHOTO lightly until the recording is useful when you play back the still image on other equipment, the image may fluctuate. •The tape photo recording function does not work during following operations: - The CAPTURE indicator appears. To use the tape photo recording function using a video printer (optional). The still image on the screen until a still image...
Operating Instructions
Page 78
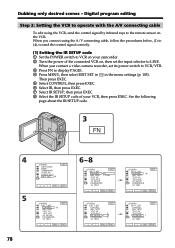
.... OTHERS EXIT ED I T SET CONTROL I R TEST EXEC RET. I N" "CUT -OUT" I R SETUP 1 PAUSEMODE I R ADJ TEST "CUT - When you connect a video camera recorder, set the input selector to VCR on the VCR. Digital program editing Step 2: Setting the VCR to operate with the A/V connecting cable To edit using the A/V connecting cable, follow the procedures below, (1) to (4), to send the control signal correctly. (1) Setting the IR SETUP code 1 Set the POWER switch to LINE. OTHERS EXIT ED I T SET CONTROL I R ADJ TEST "CUT...
.... OTHERS EXIT ED I T SET CONTROL I R TEST EXEC RET. I N" "CUT -OUT" I R SETUP 1 PAUSEMODE I R ADJ TEST "CUT - When you connect a video camera recorder, set the input selector to VCR on the VCR. Digital program editing Step 2: Setting the VCR to operate with the A/V connecting cable To edit using the A/V connecting cable, follow the procedures below, (1) to (4), to send the control signal correctly. (1) Setting the IR SETUP code 1 Set the POWER switch to LINE. OTHERS EXIT ED I T SET CONTROL I R ADJ TEST "CUT...
Operating Instructions
Page 82
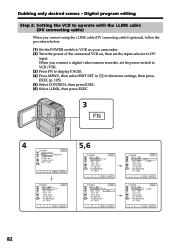
... TEST "CUT - I N" "CUT -OUT" I R SETUP PAUSEMODE I R ADJ TEST i. Digital program editing Step 2: Setting the VCR to operate with the i.LINK cable (DV connecting cable) When you connect a digital video camera recorder, set the input selector to display PAGE1. (4) Press MENU, then select EDIT SET in in the menu settings, then press EXEC (p. 105). (5) Select CONTROL, then press EXEC. (6) Select i.LINK, then press EXEC. 3 FN 4 OTHERS EXIT DATA CODE BEEP MELODY COMMANDER D I SPL AY...
... TEST "CUT - I N" "CUT -OUT" I R SETUP PAUSEMODE I R ADJ TEST i. Digital program editing Step 2: Setting the VCR to operate with the i.LINK cable (DV connecting cable) When you connect a digital video camera recorder, set the input selector to display PAGE1. (4) Press MENU, then select EDIT SET in in the menu settings, then press EXEC (p. 105). (5) Select CONTROL, then press EXEC. (6) Select i.LINK, then press EXEC. 3 FN 4 OTHERS EXIT DATA CODE BEEP MELODY COMMANDER D I SPL AY...
Operating Instructions
Page 85
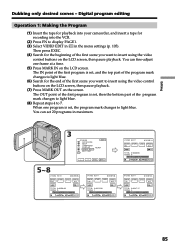
... is set , then the bottom part of the program mark changes to light blue. (8) Repeat steps 4 to light blue. Digital program editing Operation 1: Making the Program (1) Insert the tape for playback into the VCR. (2) Press FN to insert using the video control buttons on the LCD screen, then pause playback. (7) Press MARK OUT on the screen. The IN point of the first program is set 20 programs in the menu settings (p. 105...
... is set , then the bottom part of the program mark changes to light blue. (8) Repeat steps 4 to light blue. Digital program editing Operation 1: Making the Program (1) Insert the tape for playback into the VCR. (2) Press FN to insert using the video control buttons on the LCD screen, then pause playback. (7) Press MARK OUT on the screen. The IN point of the first program is set 20 programs in the menu settings (p. 105...

Operating Instructions
Page 87
... camcorder and the VCR are connected, and that the VCR is set its power switch to light blue after the dubbing is selected.) - The program to end the video edit function. Digital program editing Operation 2: Performing a Digital program editing (Dubbing a tape) Make sure your camcorder and the VCR automatically stop dubbing during edit on . 87 You cannot record on the cassette is selected.) - The tape has run out. - When you use a digital video camera recorder, set...
... camcorder and the VCR are connected, and that the VCR is set its power switch to light blue after the dubbing is selected.) - The program to end the video edit function. Digital program editing Operation 2: Performing a Digital program editing (Dubbing a tape) Make sure your camcorder and the VCR automatically stop dubbing during edit on . 87 You cannot record on the cassette is selected.) - The tape has run out. - When you use a digital video camera recorder, set...
Operating Instructions
Page 106
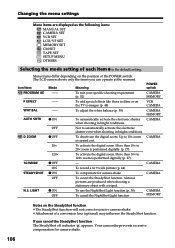
... SteadyShot function •The SteadyShot function will not correct excessive camera-shake. •Attachment of a conversion lens (optional) may influence the SteadyShot function. WHT BAL -- Natural pictures are displayed as the following icons: MANUAL SET CAMERA SET VCR SET LCD/VF SET MEMORY SET CM SET TAPE SET SETUP MENU OTHERS Selecting the mode setting of the POWER switch. If you can operate at the moment. More than 10× to 120× zoom is the default setting. LIGHT z ON...
... SteadyShot function •The SteadyShot function will not correct excessive camera-shake. •Attachment of a conversion lens (optional) may influence the SteadyShot function. WHT BAL -- Natural pictures are displayed as the following icons: MANUAL SET CAMERA SET VCR SET LCD/VF SET MEMORY SET CM SET TAPE SET SETUP MENU OTHERS Selecting the mode setting of the POWER switch. If you can operate at the moment. More than 10× to 120× zoom is the default setting. LIGHT z ON...
Operating Instructions
Page 111
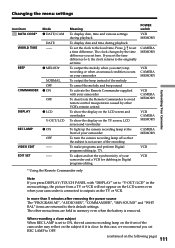
... editing (p. 77). The other VCR's remote control To show the display on the LCD screen and viewfinder To show the display on the following page) 111 Changing the menu settings Customizing Your Camcorder Icon/item Mode DATA CODE* z DATE/CAM WORLD TIME DATE -- If you set here. To adjust and set to their default settings. In more than 5 minutes after removing the power source The "PROGRAM AE", "AUDIO MIX", "COMMANDER", "HiFi SOUND" and "WHT BAL" items...
... editing (p. 77). The other VCR's remote control To show the display on the LCD screen and viewfinder To show the display on the following page) 111 Changing the menu settings Customizing Your Camcorder Icon/item Mode DATA CODE* z DATE/CAM WORLD TIME DATE -- If you set here. To adjust and set to their default settings. In more than 5 minutes after removing the power source The "PROGRAM AE", "AUDIO MIX", "COMMANDER", "HiFi SOUND" and "WHT BAL" items...
Operating Instructions
Page 132
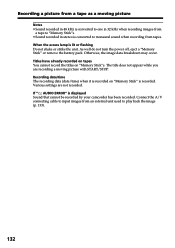
... the unit. When the access lamp is displayed Sound that cannot be recorded by your camcorder has been recorded. Otherwise, the image data breakdown may occur. The title does not appear while you are not recorded. Recording date/time The recording data (date/time) when it is recorded on "Memory Stick"s. Connect the A/V connecting cable to input images from an external unit used to monaural sound when recording from tapes. As well do not turn the power off, eject a "Memory Stick" or remove the battery pack.
... the unit. When the access lamp is displayed Sound that cannot be recorded by your camcorder has been recorded. Otherwise, the image data breakdown may occur. The title does not appear while you are not recorded. Recording date/time The recording data (date/time) when it is recorded on "Memory Stick"s. Connect the A/V connecting cable to input images from an external unit used to monaural sound when recording from tapes. As well do not turn the power off, eject a "Memory Stick" or remove the battery pack.
Operating Instructions
Page 142
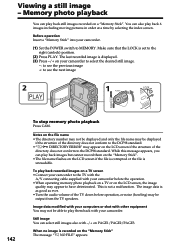
... audio volume of the TV down before the operation. • When operating memory photo playback on a TV or on the file name • The directory number may not be displayed and only the file name may be output from the TV speakers. Memory photo playback You can also play back still images recorded on a TV screen • Connect your camcorder to select the desired still image. - : to see the next image 2 PLAY VCR 1 POWER LOCK LOCK MEMORY...
... audio volume of the TV down before the operation. • When operating memory photo playback on a TV or on the file name • The directory number may not be displayed and only the file name may be output from the TV speakers. Memory photo playback You can also play back still images recorded on a TV screen • Connect your camcorder to select the desired still image. - : to see the next image 2 PLAY VCR 1 POWER LOCK LOCK MEMORY...
Operating Instructions
Page 148
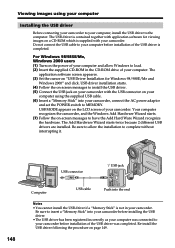
Viewing images using the supplied USB cable. (6) Insert a "Memory Stick" into the end Notes • You cannot install the USB driver if a "Memory Stick" is not in the CD-ROM drive of the USB driver was connected to MEMORY. Do not connect the USB cable to your computer before installation of your camcorder. USB MODE appears on the LCD screen of the USB driver is completed. USB driver installation starts. (4) Follow the on-screen messages to insert a "Memory Stick" into your camcorder before installation of your camcorder with the USB connector...
Viewing images using the supplied USB cable. (6) Insert a "Memory Stick" into the end Notes • You cannot install the USB driver if a "Memory Stick" is not in the CD-ROM drive of the USB driver was connected to MEMORY. Do not connect the USB cable to your computer before installation of your camcorder. USB MODE appears on the LCD screen of the USB driver is completed. USB driver installation starts. (4) Follow the on-screen messages to insert a "Memory Stick" into your camcorder before installation of your camcorder with the USB connector...
Operating Instructions
Page 149
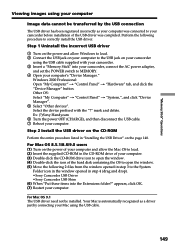
...;Sony Camcorder USB Driver •Sony Camcorder USB Shim (6) When "Put these items into your camcorder, connect the AC power adapter, and set the POWER switch to correctly install the USB driver. appears, click OK. (7) Restart your computer. Select the device prefixed with your camcorder. 3 Insert a "Memory Stick" into the Extensions folder?" mark and delete. Perform the following 2 files from the window opened in "Installing the USB Driver" on your camcorder using the USB cable supplied with the "?" For Mac OS 8.5.1/8.6/9.0 users (1) Turn on the power...
...;Sony Camcorder USB Driver •Sony Camcorder USB Shim (6) When "Put these items into your camcorder, connect the AC power adapter, and set the POWER switch to correctly install the USB driver. appears, click OK. (7) Restart your computer. Select the device prefixed with your camcorder. 3 Insert a "Memory Stick" into the Extensions folder?" mark and delete. Perform the following 2 files from the window opened in "Installing the USB Driver" on your camcorder using the USB cable supplied with the "?" For Mac OS 8.5.1/8.6/9.0 users (1) Turn on the power...

Operating Instructions
Page 151
"Memory Stick" Operations Viewing images using your computer Unplug the USB cable/Eject the "Memory Stick" For Windows 2000/Me users To unplug the USB cable or eject the "Memory Stick", follow the procedure below. (1) Move the cursor to the "Unplug or Eject Hardware" icon on the Task Tray and click to cancel the applicable drive. (2) A message to open a still image file. •When you directly modify the image on the camcorder, the image format will shorten the "Memory Stick" life. •...
"Memory Stick" Operations Viewing images using your computer Unplug the USB cable/Eject the "Memory Stick" For Windows 2000/Me users To unplug the USB cable or eject the "Memory Stick", follow the procedure below. (1) Move the cursor to the "Unplug or Eject Hardware" icon on the Task Tray and click to cancel the applicable drive. (2) A message to open a still image file. •When you directly modify the image on the camcorder, the image format will shorten the "Memory Stick" life. •...

Operating Instructions
Page 168
... (p. 176). There is set to record an image with sound that has a copyright control signal (p. 169).1) The tape cassette memory is full (p. 99).1) AUDIO MODE is set to LP.1) You cannot dub new sound (p. 110). There is connected (p. 95).1) You cannot dub new sound. DIRECTORY ERROR • Q Z TAPE END • Q NO TAPE • DELETING • FORMATTING • NOW CHARGING Set the date and time (p. 17). Use an "InfoLIHIUM" battery pack (p. 15). The video heads are trying to...
... (p. 176). There is set to record an image with sound that has a copyright control signal (p. 169).1) The tape cassette memory is full (p. 99).1) AUDIO MODE is set to LP.1) You cannot dub new sound (p. 110). There is connected (p. 95).1) You cannot dub new sound. DIRECTORY ERROR • Q Z TAPE END • Q NO TAPE • DELETING • FORMATTING • NOW CHARGING Set the date and time (p. 17). Use an "InfoLIHIUM" battery pack (p. 15). The video heads are trying to...

Operating Instructions
Page 169
... software. Your camcorder can use any other video camera recorder, you cannnot record on the TV screen if you have ejected the cassette while recording. - These are two types of tapes marked with the cassette memory function, the same result may not work correctly. You cannot use the mini DV cassette only*. mark on your camcorder can read, write, and search data such as the date of the tape concerning above. Your camcorder does not record...
... software. Your camcorder can use any other video camera recorder, you cannnot record on the TV screen if you have ejected the cassette while recording. - These are two types of tapes marked with the cassette memory function, the same result may not work correctly. You cannot use the mini DV cassette only*. mark on your camcorder can read, write, and search data such as the date of the tape concerning above. Your camcorder does not record...
Operating Instructions
Page 181
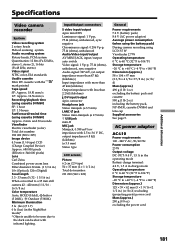
Additional Information Specifications Video camera recorder System Video recording system 2 rotary heads Helical scanning system Audio recording system Rotary heads, PCM system Quantization: 12 bits (Fs 32 kHz, stereo 1, stereo 2), 16 bits (Fs 48 kHz, stereo) Video signal NTSC color, EIA standards Usable cassette Mini DV cassette with infrared lighting. and 30 seconds Viewfinder Electric viewfinder (color) Total dot number: 180 000 (800 × 225) Image device 4.5 mm (1/4 type) CCD (Charge Coupled Device) Approx. 680 000...
Additional Information Specifications Video camera recorder System Video recording system 2 rotary heads Helical scanning system Audio recording system Rotary heads, PCM system Quantization: 12 bits (Fs 32 kHz, stereo 1, stereo 2), 16 bits (Fs 48 kHz, stereo) Video signal NTSC color, EIA standards Usable cassette Mini DV cassette with infrared lighting. and 30 seconds Viewfinder Electric viewfinder (color) Total dot number: 180 000 (800 × 225) Image device 4.5 mm (1/4 type) CCD (Charge Coupled Device) Approx. 680 000...

Operating Instructions
Page 190
... lens 185 Cassette memory 10, 169 Charging battery 13 Charging manganese-lithium battery 177 Clock set memory 68 Zoom 27 190 FADER 45 NTSC system 174 O, P, Q OLD MOVIE 49 Operation indicators 189 OVERLAP 45 PB ZOOM 67, 153 Photo save 140 Photo scan 74 Photo search 72 PICTURE EFFECT 48, 65 Picture search 38 Playback pause 38 Power zoom 27 Print mark 159 PROGRAM AE 52 R Recording time 14 Rec Review 33 Remaining battery time indicator 28 Remaining tape indicator ...... 28 Remote...
... lens 185 Cassette memory 10, 169 Charging battery 13 Charging manganese-lithium battery 177 Clock set memory 68 Zoom 27 190 FADER 45 NTSC system 174 O, P, Q OLD MOVIE 49 Operation indicators 189 OVERLAP 45 PB ZOOM 67, 153 Photo save 140 Photo scan 74 Photo search 72 PICTURE EFFECT 48, 65 Picture search 38 Playback pause 38 Power zoom 27 Print mark 159 PROGRAM AE 52 R Recording time 14 Rec Review 33 Remaining battery time indicator 28 Remaining tape indicator ...... 28 Remote...


