

Operating Instructions
Page 2
... with advanced features, but at the same time it is intended to alert the user to constitute a risk of this Sony Digital Handycam camcorder. Declaration of important operating and maintenance (servicing) instructions in the sun or under direct sunlight. "Memory Stick"...will soon be producing home video that may cause undesired operation. Welcome! Regulatory Information This symbol is very easy to the presence of Conformity Trade Name: SONY Model No.: DCR-PC9 Responsible Party:Sony Electronics Inc. and CANADA DISPOSAL OF LITHIUM ION BATTERY. If you have any ...
... with advanced features, but at the same time it is intended to alert the user to constitute a risk of this Sony Digital Handycam camcorder. Declaration of important operating and maintenance (servicing) instructions in the sun or under direct sunlight. "Memory Stick"...will soon be producing home video that may cause undesired operation. Welcome! Regulatory Information This symbol is very easy to the presence of Conformity Trade Name: SONY Model No.: DCR-PC9 Responsible Party:Sony Electronics Inc. and CANADA DISPOSAL OF LITHIUM ION BATTERY. If you have any ...
Operating Instructions
Page 5
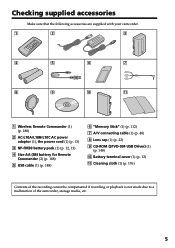
... (1) (p. 176) Contents of the recording cannot be compensated if recording or playback is not made due to a malfunction of the camcorder, storage media, etc. 5 qa 1 Wireless Remote Commander (1) (p. 188) 2 AC-L10A/L10B/L10C AC power adaptor (1), the power cord (1) (p. 13) 3 NP-FM30 battery pack (1) (p. 12, 13) 4 Size AA (R6) battery for Remote Commander (2) (p. 188...
... (1) (p. 176) Contents of the recording cannot be compensated if recording or playback is not made due to a malfunction of the camcorder, storage media, etc. 5 qa 1 Wireless Remote Commander (1) (p. 188) 2 AC-L10A/L10B/L10C AC power adaptor (1), the power cord (1) (p. 13) 3 NP-FM30 battery pack (1) (p. 12, 13) 4 Size AA (R6) battery for Remote Commander (2) (p. 188...
Operating Instructions
Page 6
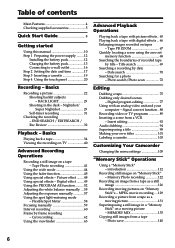
...picture - Basics Playing back a tape 34 Viewing the recording on TV 40 Advanced Recording Operations Recording a still image on tapes - Signal convert function .. 88 Recording video or TV programs 89 Inserting a scene from a tape - Digital effect ........ 49 Using the PROGRAM AE function .......... 52... battery pack 12 Charging the battery pack 13 Connecting to a wall outlet 16 Step 2 Setting the date and time 17 Step 3 Inserting a cassette 19 Step 4 Using the touch panel 20 Recording - Date search 70 Searching for a photo - MPEG movie recording .... 129 Recording...
...picture - Basics Playing back a tape 34 Viewing the recording on TV 40 Advanced Recording Operations Recording a still image on tapes - Signal convert function .. 88 Recording video or TV programs 89 Inserting a scene from a tape - Digital effect ........ 49 Using the PROGRAM AE function .......... 52... battery pack 12 Charging the battery pack 13 Connecting to a wall outlet 16 Step 2 Setting the date and time 17 Step 3 Inserting a cassette 19 Step 4 Using the touch panel 20 Recording - Date search 70 Searching for a photo - MPEG movie recording .... 129 Recording...

Operating Instructions
Page 7
... solutions ...... 160 Self-diagnosis display 166 Warning indicators and messages ......... 167 Additional Information Usable cassettes 169 About the "InfoLITHIUM" battery pack 171 About i.LINK 172 Using your computer .. 147 Enlarging still images recorded on "Memory Stick"s - Image protection 155 Deleting images 156 Writing a print mark - MPEG movie playback 145 Viewing images using...
... solutions ...... 160 Self-diagnosis display 166 Warning indicators and messages ......... 167 Additional Information Usable cassettes 169 About the "InfoLITHIUM" battery pack 171 About i.LINK 172 Using your computer .. 147 Enlarging still images recorded on "Memory Stick"s - Image protection 155 Deleting images 156 Writing a print mark - MPEG movie playback 145 Viewing images using...

Operating Instructions
Page 8
... window facing out. 3 Close the cassette compartment by pressing the mark on the cassette compartment. Quick Start Guide 8 Connecting the power cord (p. 16) Use the battery pack when using your camcorder outdoors (p. 12). After the cassette compartment goes down the Holding Grip to the basic features of the cassette to insert...
... window facing out. 3 Close the cassette compartment by pressing the mark on the cassette compartment. Quick Start Guide 8 Connecting the power cord (p. 16) Use the battery pack when using your camcorder outdoors (p. 12). After the cassette compartment goes down the Holding Grip to the basic features of the cassette to insert...

Operating Instructions
Page 9
...supporting the LCD screen from the backside of the touch panel to CAMERA while pressing the small green button. If you purchase your camcorder by holding the viewfinder, the LCD panel, the battery pack or the jack cover. Recording a picture (p. 22) 1 Remove the lens cap. 2 Press... OPEN to VCR while pressing the small green button. POWER LOCK VCR MEMORY OFF CAMERA (CHARGE) 4 Press START/STOP. Viewfinder When the LCD...
...supporting the LCD screen from the backside of the touch panel to CAMERA while pressing the small green button. If you purchase your camcorder by holding the viewfinder, the LCD panel, the battery pack or the jack cover. Recording a picture (p. 22) 1 Remove the lens cap. 2 Press... OPEN to VCR while pressing the small green button. POWER LOCK VCR MEMORY OFF CAMERA (CHARGE) 4 Press START/STOP. Viewfinder When the LCD...

Operating Instructions
Page 12
... battery terminals, install the battery terminal cover after the battery pack is removed in the direction of the arrow 2. (2) Insert the battery pack in the same way as the battery terminal cover. Step 1 Preparing the power supply Installing the battery pack We recommend that you use the battery ...pack when you use your camcorder outdoors. (1) While sliding BATT (battery) release lever in the direction ...
... battery terminals, install the battery terminal cover after the battery pack is removed in the direction of the arrow 2. (2) Insert the battery pack in the same way as the battery terminal cover. Step 1 Preparing the power supply Installing the battery pack We recommend that you use the battery ...pack when you use your camcorder outdoors. (1) While sliding BATT (battery) release lever in the direction ...

Operating Instructions
Page 13
...the plug from a wall outlet as soon as possible to OFF (CHARGE). Getting started Step 1 Preparing the power supply Charging the battery pack Use the battery pack after charging it for details of the AC power adaptor. This may cause a short-circuit, damaging the AC power adaptor. ...CHARGE lamp goes out. (full charge) 2 CHARGE lamp 14 POWER LOCK VCR MEMORY OFF CAMERA (CHARGE) After charging the battery pack Disconnect the AC power adaptor from coming into contact with the "InfoLITHIUM" battery pack (M series). Note Prevent metallic objects from the DC IN jack on your camcorder. ...
...the plug from a wall outlet as soon as possible to OFF (CHARGE). Getting started Step 1 Preparing the power supply Charging the battery pack Use the battery pack after charging it for details of the AC power adaptor. This may cause a short-circuit, damaging the AC power adaptor. ...CHARGE lamp goes out. (full charge) 2 CHARGE lamp 14 POWER LOCK VCR MEMORY OFF CAMERA (CHARGE) After charging the battery pack Disconnect the AC power adaptor from coming into contact with the "InfoLITHIUM" battery pack (M series). Note Prevent metallic objects from the DC IN jack on your camcorder. ...

Operating Instructions
Page 14
...time may be shorter. Approximate minutes at 25 °C (77 °F) to charge an empty battery pack Recording time Battery pack NP-FM30 (supplied) NP-FM50 NP-FM70 NP-FM90 NP-FM91 Recording with the viewfinder Continuous* Typical** 115 60 185 100 385 210 580 315 670 365... Recording with LCD closed 125 200 415 630 725 Approximate minutes when you use a fully charged battery * Approximate continuous recording time at 25 °C (77 °F). The battery life will be shorter if you use your camcorder in a ...
...time may be shorter. Approximate minutes at 25 °C (77 °F) to charge an empty battery pack Recording time Battery pack NP-FM30 (supplied) NP-FM50 NP-FM70 NP-FM90 NP-FM91 Recording with the viewfinder Continuous* Typical** 115 60 185 100 385 210 580 315 670 365... Recording with LCD closed 125 200 415 630 725 Approximate minutes when you use a fully charged battery * Approximate continuous recording time at 25 °C (77 °F). The battery life will be shorter if you use your camcorder in a ...

Operating Instructions
Page 15
...). What is a lithium ion battery pack which can exchange data such as battery consumption with the "InfoLITHIUM" battery. The "InfoLITHIUM" is "InfoLITHIUM"? "InfoLITHIUM" M series battery packs have the mark. Your camcorder operates only with compatible electronic equipment. Recommended charging temperature We recommend charging the battery pack in an ambient temperature of Sony Corporation. 15 Getting started...
...). What is a lithium ion battery pack which can exchange data such as battery consumption with the "InfoLITHIUM" battery. The "InfoLITHIUM" is "InfoLITHIUM"? "InfoLITHIUM" M series battery packs have the mark. Your camcorder operates only with compatible electronic equipment. Recommended charging temperature We recommend charging the battery pack in an ambient temperature of Sony Corporation. 15 Getting started...

Operating Instructions
Page 16
Step 1 Preparing the power supply Connecting to a wall outlet When you use your camcorder for a long time, we recommend that the battery pack cannot supply any power if the power cord is not disconnected from a wall outlet using the AC power adaptor. (1) Open the DC IN jack ... DC IN jack, even when the power cord is not plugged into a wall outlet. Using a car battery Use Sony DC Adaptor/Charger (optional). 16 Notes • The AC power adaptor can supply power even if the battery pack is attached to your camcorder with your camcorder to the DC IN jack on your...
Step 1 Preparing the power supply Connecting to a wall outlet When you use your camcorder for a long time, we recommend that the battery pack cannot supply any power if the power cord is not disconnected from a wall outlet using the AC power adaptor. (1) Open the DC IN jack ... DC IN jack, even when the power cord is not plugged into a wall outlet. Using a car battery Use Sony DC Adaptor/Charger (optional). 16 Notes • The AC power adaptor can supply power even if the battery pack is attached to your camcorder with your camcorder to the DC IN jack on your...

Operating Instructions
Page 17
If you set the year, then the month, the day, the hour and then the minute. (1) Set the POWER switch to CAMERA or MEMORY. (2) Press FN to display PAGE1 (p. 20). (3) Press MENU to display the menu. (4) Select with r/R, and press EXEC. (5) Select CLOCK SET with r/R, and press ... months, the date and time settings may be released (bars may appear) because the built-in rechargeable battery installed in your camcorder will be displayed each time that you set the POWER switch to CAMERA or MEMORY unless you do not use your camcorder for the first time. First, set the date...
If you set the year, then the month, the day, the hour and then the minute. (1) Set the POWER switch to CAMERA or MEMORY. (2) Press FN to display PAGE1 (p. 20). (3) Press MENU to display the menu. (4) Select with r/R, and press EXEC. (5) Select CLOCK SET with r/R, and press ... months, the date and time settings may be released (bars may appear) because the built-in rechargeable battery installed in your camcorder will be displayed each time that you set the POWER switch to CAMERA or MEMORY unless you do not use your camcorder for the first time. First, set the date...

Operating Instructions
Page 19
... take out the cassette in step 3. When you press any part of the lid other than the mark. Getting started Step 3 Inserting a cassette (1) Install the battery pack, or connect the AC power adaptor for the power supply (p. 12 to 16). (2) Slide OPEN/ZEJECT in a straight line deeply into the cassette compartment...
... take out the cassette in step 3. When you press any part of the lid other than the mark. Getting started Step 3 Inserting a cassette (1) Install the battery pack, or connect the AC power adaptor for the power supply (p. 12 to 16). (2) Slide OPEN/ZEJECT in a straight line deeply into the cassette compartment...

Operating Instructions
Page 20
... item. Operation buttons appear on the LCD screen. (5) Press PAGE2 to go to PAGE2. To cancel settings Press OFF to return to CAMERA (in the standby/recording mode) or VCR (in the playback mode) while pressing the small green button. (4) Press FN. Operation buttons appear on the LCD screen... POWER switch to PAGE1/PAGE2/PAGE3. 20 Refer to operate each function. 5,6 In CAMERA mode PAGE1 PAGE2 PAGE3 EXIT MENU FADER DIG EFFT SPOT METER END EXPO- In CAMERA or VCR mode (1) Install the battery pack, or connect the AC power adaptor for each function. To execute settings Press ...
... item. Operation buttons appear on the LCD screen. (5) Press PAGE2 to go to PAGE2. To cancel settings Press OFF to return to CAMERA (in the standby/recording mode) or VCR (in the playback mode) while pressing the small green button. (4) Press FN. Operation buttons appear on the LCD screen... POWER switch to PAGE1/PAGE2/PAGE3. 20 Refer to operate each function. 5,6 In CAMERA mode PAGE1 PAGE2 PAGE3 EXIT MENU FADER DIG EFFT SPOT METER END EXPO- In CAMERA or VCR mode (1) Install the battery pack, or connect the AC power adaptor for each function. To execute settings Press ...

Operating Instructions
Page 22
.... (1) Remove the lens cap and pull the lens cap string to the previous position. (3) Eject the cassette. (4) Remove the battery pack. 22 Hold your camcorder lights up. Your camcorder is set the Holding Grip back to fix it. (2) Install the power source... down the Holding Grip. The REC indicator appears. - Recording - To stop recording, press START/STOP again. 5 LOCK 1 LOCK VCR Microphone MEMORY OFF CAMERA (CHARGE) 4 2 Camera recording lamp 6 3 LOCK 40min REC 0:00:01 VCR MEMORY OFF CAMERA (CHARGE) After recording (1) Set the POWER switch to OFF (CHARGE). (2)...
.... (1) Remove the lens cap and pull the lens cap string to the previous position. (3) Eject the cassette. (4) Remove the battery pack. 22 Hold your camcorder lights up. Your camcorder is set the Holding Grip back to fix it. (2) Install the power source... down the Holding Grip. The REC indicator appears. - Recording - To stop recording, press START/STOP again. 5 LOCK 1 LOCK VCR Microphone MEMORY OFF CAMERA (CHARGE) 4 2 Camera recording lamp 6 3 LOCK 40min REC 0:00:01 VCR MEMORY OFF CAMERA (CHARGE) After recording (1) Set the POWER switch to OFF (CHARGE). (2)...
Operating Instructions
Page 23
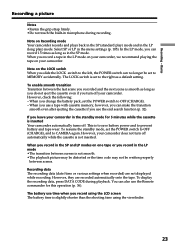
... than the shooting time using the viewfinder. 23 To resume the standby mode, set to prevent battery and tape wear. To display the recording data, press DATA CODE during recording. When you record a tape in the SP mode. However, your camcorder in the LP (long play) mode....•The playback picture may be distorted or the time code may not be set the POWER switch to CAMERA again. Recording data The recording data (date/time or various settings when recorded) are recorded automatically onto the tape. Recording - When you record in the menu settings (p. 105).
... than the shooting time using the viewfinder. 23 To resume the standby mode, set to prevent battery and tape wear. To display the recording data, press DATA CODE during recording. When you record a tape in the SP mode. However, your camcorder in the LP (long play) mode....•The playback picture may be distorted or the time code may not be set the POWER switch to CAMERA again. Recording data The recording data (date/time or various settings when recorded) are recorded automatically onto the tape. Recording - When you record in the menu settings (p. 105).

Operating Instructions
Page 25
The screen to PAGE1/PAGE2. LCD screen backlight You can change the brightness of the LCD screen (1) In CAMERA or MEMORY mode, press FN and select PAGE2. During recording in the mirror mode •ZERO SET MEMORY on the Remote Commander does not work. •FN appears mirror-... mode The picture on the screen. When you adjust the LCD screen backlight or brightness of the LCD screen using the battery pack (p. 105). OPEN 1 FN 2,3 LCD BRT OK - Basics Recording a picture Picture in the viewfinder. in the menu settings when using -/+. - : to dim + : to brighten (4) Press OK...
The screen to PAGE1/PAGE2. LCD screen backlight You can change the brightness of the LCD screen (1) In CAMERA or MEMORY mode, press FN and select PAGE2. During recording in the mirror mode •ZERO SET MEMORY on the Remote Commander does not work. •FN appears mirror-... mode The picture on the screen. When you adjust the LCD screen backlight or brightness of the LCD screen using the battery pack (p. 105). OPEN 1 FN 2,3 LCD BRT OK - Basics Recording a picture Picture in the viewfinder. in the menu settings when using -/+. - : to dim + : to brighten (4) Press OK...

Operating Instructions
Page 26
...You turn the LCD panel over and move the viewfinder lens adjustment lever. Even if you record pictures with the LCD panel closed, check the picture with the touch panel using the battery pack (p. 105). You can change the brightness of the backlight. Adjust the viewfinder lens to... your eyesight so that the indicators in CAMERA or MEMORY mode (p. 63). Recording a picture Adjusting the viewfinder If you adjust the viewfinder ...
...You turn the LCD panel over and move the viewfinder lens adjustment lever. Even if you record pictures with the LCD panel closed, check the picture with the touch panel using the battery pack (p. 105). You can change the brightness of the backlight. Adjust the viewfinder lens to... your eyesight so that the indicators in CAMERA or MEMORY mode (p. 63). Recording a picture Adjusting the viewfinder If you adjust the viewfinder ...
Operating Instructions
Page 28
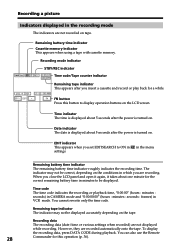
... 5 seconds after the power is displayed about one minute for a while. in the recording mode The indicators are recording. Time code The time code indicates the recording or playback time, "0:00:00" (hours : minutes : seconds) in CAMERA mode and "0:00:00:00" (hours : minutes : seconds : frames) in minutes...not be displayed accurately depending on . Date indicator The date is turned on the tape. When you insert a cassette and record or play back for the correct remaining battery time in VCR mode. JUL 4 2001 12 : 05 : 56 AM / - The indicator may not be correct, depending...
... 5 seconds after the power is displayed about one minute for a while. in the recording mode The indicators are recording. Time code The time code indicates the recording or playback time, "0:00:00" (hours : minutes : seconds) in CAMERA mode and "0:00:00:00" (hours : minutes : seconds : frames) in minutes...not be displayed accurately depending on . Date indicator The date is turned on the tape. When you insert a cassette and record or play back for the correct remaining battery time in VCR mode. JUL 4 2001 12 : 05 : 56 AM / - The indicator may not be correct, depending...
Operating Instructions
Page 37
Playback - Remaining battery time indicator during playback The indicator indicates the approximate continuous playback time. The indicator may not be displayed. The tape is being played back. - In the recording mode, the various settings will not be correct, depending on the TV screen. Data code When you connect your camcorder's... on the conditions in which you close the LCD panel and open it again, it takes about 1 minute for the correct remaining battery time to tape damage or noise. - The tape was recorded by a camcorder without the date and time set. When you have...
Playback - Remaining battery time indicator during playback The indicator indicates the approximate continuous playback time. The indicator may not be displayed. The tape is being played back. - In the recording mode, the various settings will not be correct, depending on the TV screen. Data code When you connect your camcorder's... on the conditions in which you close the LCD panel and open it again, it takes about 1 minute for the correct remaining battery time to tape damage or noise. - The tape was recorded by a camcorder without the date and time set. When you have...


