Operating Instructions
Page 5
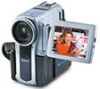
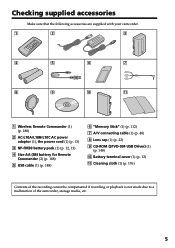
...) 4 Size AA (R6) battery for Remote Commander (2) (p. 188) 5 USB cable (1) (p. 148) 6 "Memory Stick" (1) (p. 112) 7 A/V connecting cable (1) (p. 40) 8 Lens cap (1) (p. 22) 9 CD-ROM (SPVD-004 USB Driver) (1) (p. 148) q; Getting started Checking supplied accessories Make sure that the following accessories are supplied with your camcorder. 1 2 3 4 5 6 7 8 9 q; Battery terminal cover (1) (p. 12) qa Cleaning cloth (1) (p. 176...
...) 4 Size AA (R6) battery for Remote Commander (2) (p. 188) 5 USB cable (1) (p. 148) 6 "Memory Stick" (1) (p. 112) 7 A/V connecting cable (1) (p. 40) 8 Lens cap (1) (p. 22) 9 CD-ROM (SPVD-004 USB Driver) (1) (p. 148) q; Getting started Checking supplied accessories Make sure that the following accessories are supplied with your camcorder. 1 2 3 4 5 6 7 8 9 q; Battery terminal cover (1) (p. 12) qa Cleaning cloth (1) (p. 176...
Operating Instructions
Page 148
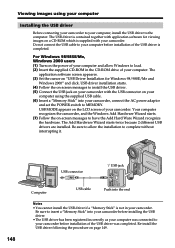
...the installation to complete without interrupting it. 148 USB connector USB jack Computer USB cable Push into your camcorder before installing the USB driver. • The USB driver has been registered incorrectly as your computer was connected to the computer. Viewing images using the supplied USB cable. (6) Insert a... "Memory Stick" into your computer before installation of the USB driver was completed. For Windows 98/98SE/Me, Windows 2000 users (1) Turn on the LCD screen of your computer, install the USB...
...the installation to complete without interrupting it. 148 USB connector USB jack Computer USB cable Push into your camcorder before installing the USB driver. • The USB driver has been registered incorrectly as your computer was connected to the computer. Viewing images using the supplied USB cable. (6) Insert a... "Memory Stick" into your computer before installation of the USB driver was completed. For Windows 98/98SE/Me, Windows 2000 users (1) Turn on the LCD screen of your computer, install the USB...
Operating Instructions
Page 149
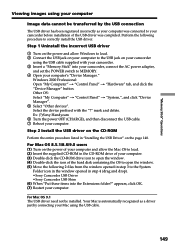
...the System Folder icon in the window opened in the CD-ROM drive of the USB driver was connected to load. (2) Insert the supplied CD-ROM in step 4 (drag and drop). •Sony Camcorder USB Driver •Sony Camcorder USB Shim (6) When "Put these items into the Extensions folder?" Other OS: ...Move the following procedure to the USB jack on your camcorder using the USB cable. 149 Step 1 Uninstall the incorrect USB driver 1 Turn on the page 148. mark and delete. Ex: (?)Sony Handycam 6 Turn the power OFF (CHARGE), and then disconnect the USB cable. 7 Reboot your Mac using the USB cable...
...the System Folder icon in the window opened in the CD-ROM drive of the USB driver was connected to load. (2) Insert the supplied CD-ROM in step 4 (drag and drop). •Sony Camcorder USB Driver •Sony Camcorder USB Shim (6) When "Put these items into the Extensions folder?" Other OS: ...Move the following procedure to the USB jack on your camcorder using the USB cable. 149 Step 1 Uninstall the incorrect USB driver 1 Turn on the page 148. mark and delete. Ex: (?)Sony Handycam 6 Turn the power OFF (CHARGE), and then disconnect the USB cable. 7 Reboot your Mac using the USB cable...
Operating Instructions
Page 165
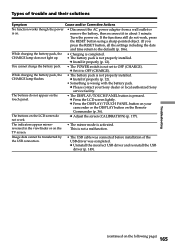
c Set it to OFF (CHARGE). c Press the DISPLAY/TOUCH PANEL button on your Sony dealer or local authorized Sony service facility. While charging the battery pack, the CHARGE lamp flashes. • The battery pack is pressed. The buttons do not appear on the Remote .../TOUCH PANEL button is not properly installed. The buttons on the TV screen. • The mirror mode is not properly installed. Types of the USB driver was completed. c Install it in the viewfinder or on the LCD screen do not work . Turn the power on the following page) 165 Image data...
c Set it to OFF (CHARGE). c Press the DISPLAY/TOUCH PANEL button on your Sony dealer or local authorized Sony service facility. While charging the battery pack, the CHARGE lamp flashes. • The battery pack is pressed. The buttons do not appear on the Remote .../TOUCH PANEL button is not properly installed. The buttons on the TV screen. • The mirror mode is not properly installed. Types of the USB driver was completed. c Install it in the viewfinder or on the LCD screen do not work . Turn the power on the following page) 165 Image data...


