
Operating Instructions
Page 4
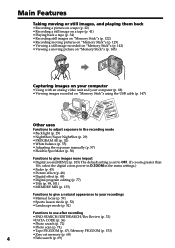
...Capturing images on your computer • Using with an analog video unit and your computer (p. 88) • Viewing images recorded on "Memory Stick"s using the USB cable (p. 147) Other uses Functions to adjust exposure in the recording mode • Back light (p. 29) • NightShot/... select the digital zoom power in D ZOOM in the menu settings.) • Fader (p. 45) • Picture effect (p. 48) • Digital effect (p. 49) • Digital program editing (p. 77) • Title (p. 98, 101) • MEMORY MIX (p. 135) Functions to give a natural appearance to your recordings • ...
...Capturing images on your computer • Using with an analog video unit and your computer (p. 88) • Viewing images recorded on "Memory Stick"s using the USB cable (p. 147) Other uses Functions to adjust exposure in the recording mode • Back light (p. 29) • NightShot/... select the digital zoom power in D ZOOM in the menu settings.) • Fader (p. 45) • Picture effect (p. 48) • Digital effect (p. 49) • Digital program editing (p. 77) • Title (p. 98, 101) • MEMORY MIX (p. 135) Functions to give a natural appearance to your recordings • ...
Operating Instructions
Page 5
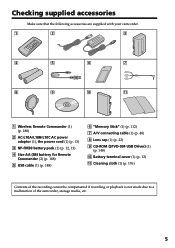
qa 1 Wireless Remote Commander (1) (p. 188) 2 AC-L10A/L10B/L10C AC power adaptor (1), the power cord (1) (p. 13) 3 NP-FM30 battery pack (1) (p. 12, 13) 4 Size AA (R6) battery for Remote Commander (2) (p. 188) 5 USB cable (1) (p. 148) 6 "Memory Stick" (1) (p. 112) 7 A/V connecting ... that the following accessories are supplied with your camcorder. 1 2 3 4 5 6 7 8 9 q; Battery terminal cover (1) (p. 12) qa Cleaning cloth (1) (p. 176) Contents of the recording cannot be compensated if recording or playback is not made due to a malfunction of the camcorder, storage media, etc. 5
qa 1 Wireless Remote Commander (1) (p. 188) 2 AC-L10A/L10B/L10C AC power adaptor (1), the power cord (1) (p. 13) 3 NP-FM30 battery pack (1) (p. 12, 13) 4 Size AA (R6) battery for Remote Commander (2) (p. 188) 5 USB cable (1) (p. 148) 6 "Memory Stick" (1) (p. 112) 7 A/V connecting ... that the following accessories are supplied with your camcorder. 1 2 3 4 5 6 7 8 9 q; Battery terminal cover (1) (p. 12) qa Cleaning cloth (1) (p. 176) Contents of the recording cannot be compensated if recording or playback is not made due to a malfunction of the camcorder, storage media, etc. 5
Operating Instructions
Page 6
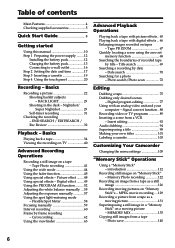
...power supply ........ 12 Installing the battery pack 12 Charging the battery pack 13 Connecting to a wall outlet 16 Step 2 Setting the date and time 17 Step 3 Inserting a cassette 19 Step 4 Using the touch panel 20 Recording - END SEARCH / EDITSEARCH / Rec Review 32 Playback - Signal convert function .. 88 Recording video...introduction 112 Recording still images on "Memory Stick"s - Tape Photo recording 41 Using the wide mode 44 Using the fader function 45 Using special effects - Digital program editing 77 Using with digital effects ... 66 Enlarging images recorded on a...
...power supply ........ 12 Installing the battery pack 12 Charging the battery pack 13 Connecting to a wall outlet 16 Step 2 Setting the date and time 17 Step 3 Inserting a cassette 19 Step 4 Using the touch panel 20 Recording - END SEARCH / EDITSEARCH / Rec Review 32 Playback - Signal convert function .. 88 Recording video...introduction 112 Recording still images on "Memory Stick"s - Tape Photo recording 41 Using the wide mode 44 Using the fader function 45 Using special effects - Digital program editing 77 Using with digital effects ... 66 Enlarging images recorded on a...

Operating Instructions
Page 8
See the page in a straight line deeply into the cassette compartment with its v mark facing the Holding Grip. Connecting the power cord (p. 16) Use the battery pack when using your camcorder. After the cassette compartment goes down the Holding Grip to hold your camcorder... the cassette in parentheses "( )" for more information. Open the DC IN jack cover. Pull down completely, close the lid until it clicks. AC power adaptor (supplied) Connect the plug with the window facing out. 3 Close the cassette compartment by pressing the mark on the cassette compartment. Quick Start Guide...
See the page in a straight line deeply into the cassette compartment with its v mark facing the Holding Grip. Connecting the power cord (p. 16) Use the battery pack when using your camcorder. After the cassette compartment goes down the Holding Grip to hold your camcorder... the cassette in parentheses "( )" for more information. Open the DC IN jack cover. Pull down completely, close the lid until it clicks. AC power adaptor (supplied) Connect the plug with the window facing out. 3 Close the cassette compartment by pressing the mark on the cassette compartment. Quick Start Guide...

Operating Instructions
Page 9
... is closed, pull out the viewfinder untill its click to focus on the LCD screen (p. 34) VCR 1 Set the POWER switch to off. To stop recording, press START/STOP again. POWER LOCK VCR MEMORY OFF CAMERA (CHARGE) 4 Press START/STOP. NOTE When using the touch panel, press operation buttons lightly with sharp-pointed objects...
... is closed, pull out the viewfinder untill its click to focus on the LCD screen (p. 34) VCR 1 Set the POWER switch to off. To stop recording, press START/STOP again. POWER LOCK VCR MEMORY OFF CAMERA (CHARGE) 4 Press START/STOP. NOTE When using the touch panel, press operation buttons lightly with sharp-pointed objects...
Operating Instructions
Page 10
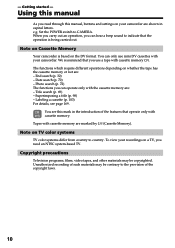
...) - You see page 169. To view your camcorder. Getting started - Copyright precautions Television programs, films, video tapes, and other materials may be copyrighted. End search (p. 32) - When you carry out an operation..., you need an NTSC system-based TV. You can only use a tape with your recordings on whether the tape has the cassette memory or not are : - Note on Cassette Memory...this mark in capital letters. Set the POWER switch to country. Note on TV color systems TV color systems differ from country to CAMERA. Using this manual As you can ...
...) - You see page 169. To view your camcorder. Getting started - Copyright precautions Television programs, films, video tapes, and other materials may be copyrighted. End search (p. 32) - When you carry out an operation..., you need an NTSC system-based TV. You can only use a tape with your recordings on whether the tape has the cassette memory or not are : - Note on Cassette Memory...this mark in capital letters. Set the POWER switch to country. Note on TV color systems TV color systems differ from country to CAMERA. Using this manual As you can ...

Operating Instructions
Page 12
... battery terminals, install the battery terminal cover after the battery pack is removed in the same way as the battery terminal cover. Step 1 Preparing the power supply Installing the battery pack We recommend that you use the battery pack when you use your camcorder outdoors. (1) While sliding BATT (battery) release lever...
... battery terminals, install the battery terminal cover after the battery pack is removed in the same way as the battery terminal cover. Step 1 Preparing the power supply Installing the battery pack We recommend that you use the battery pack when you use your camcorder outdoors. (1) While sliding BATT (battery) release lever...

Operating Instructions
Page 13
... DC IN jack with the plug's v mark facing the Holding Grip. (2) Connect the power cord to the AC power adaptor. (3) Connect the power cord to a wall outlet. (4) Set the POWER switch to cut off the power. 13 The CHARGE lamp lights up when the charge begins. This may cause a short-circuit.... - The battery pack is completed, the CHARGE lamp goes out. (full charge) 2 CHARGE lamp 14 POWER LOCK VCR MEMORY OFF CAMERA (CHARGE) After charging the battery pack Disconnect the AC power adaptor from a wall outlet as soon as possible to OFF (CHARGE). While charging the battery pack, the ...
... DC IN jack with the plug's v mark facing the Holding Grip. (2) Connect the power cord to the AC power adaptor. (3) Connect the power cord to a wall outlet. (4) Set the POWER switch to cut off the power. 13 The CHARGE lamp lights up when the charge begins. This may cause a short-circuit.... - The battery pack is completed, the CHARGE lamp goes out. (full charge) 2 CHARGE lamp 14 POWER LOCK VCR MEMORY OFF CAMERA (CHARGE) After charging the battery pack Disconnect the AC power adaptor from a wall outlet as soon as possible to OFF (CHARGE). While charging the battery pack, the ...

Operating Instructions
Page 14
... °F). The actual battery life may increase if the battery's temperature is extremely high or low because of minutes when recording while you repeat recording start/ stop, zooming and turning the power on LCD screen 90 150 310 475 550 Playing time with the LCD screen Continuous* Typical** 85 45 140 75 295...
... °F). The actual battery life may increase if the battery's temperature is extremely high or low because of minutes when recording while you repeat recording start/ stop, zooming and turning the power on LCD screen 90 150 310 475 550 Playing time with the LCD screen Continuous* Typical** 85 45 140 75 295...

Operating Instructions
Page 15
...with the "InfoLITHIUM" battery pack (M series). TM SERIES "InfoLITHIUM" is "InfoLITHIUM"? Getting started Step 1 Preparing the power supply If the power goes off although the battery remaining indicator indicates that the battery pack has enough power to 86 °F). Your camcorder operates only with compatible electronic equipment. This unit is correct. The "InfoLITHIUM...with the "InfoLITHIUM" battery. "InfoLITHIUM" M series battery packs have the mark. Recommended charging temperature We recommend charging the battery pack in an ambient temperature of Sony Corporation. 15
...with the "InfoLITHIUM" battery pack (M series). TM SERIES "InfoLITHIUM" is "InfoLITHIUM"? Getting started Step 1 Preparing the power supply If the power goes off although the battery remaining indicator indicates that the battery pack has enough power to 86 °F). Your camcorder operates only with compatible electronic equipment. This unit is correct. The "InfoLITHIUM...with the "InfoLITHIUM" battery. "InfoLITHIUM" M series battery packs have the mark. Recommended charging temperature We recommend charging the battery pack in an ambient temperature of Sony Corporation. 15

Operating Instructions
Page 16
... IN jack on your camcorder. • The DC IN jack has "source priority." Using a car battery Use Sony DC Adaptor/Charger (optional). 16 Step 1 Preparing the power supply Connecting to a wall outlet When you power it from a wall outlet using the AC power adaptor. (1) Open the DC IN jack cover and connect the AC...
... IN jack on your camcorder. • The DC IN jack has "source priority." Using a car battery Use Sony DC Adaptor/Charger (optional). 16 Step 1 Preparing the power supply Connecting to a wall outlet When you power it from a wall outlet using the AC power adaptor. (1) Open the DC IN jack cover and connect the AC...

Operating Instructions
Page 17
... settings may be displayed each time that you set the year, then the month, the day, the hour and then the minute. (1) Set the POWER switch to CAMERA or MEMORY. (2) Press FN to display PAGE1 (p. 20). (3) Press MENU to move. 2 FN 4R r SETUP MENU CLOCK SET DEMO MODE EXEC EXIT ...SETUP MENU EXIT CLOCK SET DEMO MODE r R EXEC RET. First, set the POWER switch to CAMERA or MEMORY unless you do not use your camcorder will have been discharged (p. 177). r R EXEC RET. 5 EXEC SETUP MENU EXIT CLOCK SET DEMO MODE...
... settings may be displayed each time that you set the year, then the month, the day, the hour and then the minute. (1) Set the POWER switch to CAMERA or MEMORY. (2) Press FN to display PAGE1 (p. 20). (3) Press MENU to move. 2 FN 4R r SETUP MENU CLOCK SET DEMO MODE EXEC EXIT ...SETUP MENU EXIT CLOCK SET DEMO MODE r R EXEC RET. First, set the POWER switch to CAMERA or MEMORY unless you do not use your camcorder will have been discharged (p. 177). r R EXEC RET. 5 EXEC SETUP MENU EXIT CLOCK SET DEMO MODE...

Operating Instructions
Page 19
... the mark on the cassette to expose the red mark. 19 Getting started Step 3 Inserting a cassette (1) Install the battery pack, or connect the AC power adaptor for the power supply (p. 12 to 16). (2) Slide OPEN/ZEJECT in step 3. Notes •Do not press the cassette compartment down completely, close the lid until...
... the mark on the cassette to expose the red mark. 19 Getting started Step 3 Inserting a cassette (1) Install the battery pack, or connect the AC power adaptor for the power supply (p. 12 to 16). (2) Slide OPEN/ZEJECT in step 3. Notes •Do not press the cassette compartment down completely, close the lid until...

Operating Instructions
Page 20
... appear on the LCD screen. (5) Press PAGE2 to go to CAMERA (in the standby/recording mode) or VCR (in the playback mode) while pressing the small green button. (4) Press FN. In CAMERA or VCR mode (1) Install the battery pack, or connect the AC power adaptor for each function. Operation buttons appear on the LCD...
... appear on the LCD screen. (5) Press PAGE2 to go to CAMERA (in the standby/recording mode) or VCR (in the playback mode) while pressing the small green button. (4) Press FN. In CAMERA or VCR mode (1) Install the battery pack, or connect the AC power adaptor for each function. Operation buttons appear on the LCD...

Operating Instructions
Page 22
... again. 5 LOCK 1 LOCK VCR Microphone MEMORY OFF CAMERA (CHARGE) 4 2 Camera recording lamp 6 3 LOCK 40min REC 0:00:01 VCR MEMORY OFF CAMERA (CHARGE) After recording (1) Set the POWER switch to OFF (CHARGE). (2) Close the LCD panel and set to CAMERA while pressing the small green button. Your camcorder starts recording. The camera recording lamp located on the front of your camcorder...
... again. 5 LOCK 1 LOCK VCR Microphone MEMORY OFF CAMERA (CHARGE) 4 2 Camera recording lamp 6 3 LOCK 40min REC 0:00:01 VCR MEMORY OFF CAMERA (CHARGE) After recording (1) Set the POWER switch to OFF (CHARGE). (2) Close the LCD panel and set to CAMERA while pressing the small green button. Your camcorder starts recording. The camera recording lamp located on the front of your camcorder...
Operating Instructions
Page 23
... while the cassette is to save battery power and to MEMORY accidentally. However, your camcorder. Recording data The recording data (date/time or various settings when recorded) are recorded automatically onto the tape. However, they are not displayed while recording. When you record in microphone during playback. When you use... do not eject the cassette even if you record using the LCD screen The battery time is not smooth. •The playback picture may be distorted or the time code may not be set the POWER switch to CAMERA again. When you slide the LOCK switch to...
... while the cassette is to save battery power and to MEMORY accidentally. However, your camcorder. Recording data The recording data (date/time or various settings when recorded) are recorded automatically onto the tape. However, they are not displayed while recording. When you record in microphone during playback. When you use... do not eject the cassette even if you record using the LCD screen The battery time is not smooth. •The playback picture may be distorted or the time code may not be set the POWER switch to CAMERA again. When you slide the LOCK switch to...

Operating Instructions
Page 24
... in the viewfinder and on the LCD screen. If this feature to 90 degrees. Recording a picture Adjusting the LCD screen The LCD panel moves about 90 degrees to the viewfinder...OPEN When closing the LCD panel, set to CAMERA, Xz appears in the standby mode, and z appears in the mirror mode, the viewfinder automatically turns off. When the POWER switch is opened up to check his or ... The LCD screen may be difficult to see. Note When using the LCD screen except in the recording mode. The subject uses this happens, we recommend that you adjust the angle of other indicators appear...
... in the viewfinder and on the LCD screen. If this feature to 90 degrees. Recording a picture Adjusting the LCD screen The LCD panel moves about 90 degrees to the viewfinder...OPEN When closing the LCD panel, set to CAMERA, Xz appears in the standby mode, and z appears in the mirror mode, the viewfinder automatically turns off. When the POWER switch is opened up to check his or ... The LCD screen may be difficult to see. Note When using the LCD screen except in the recording mode. The subject uses this happens, we recommend that you adjust the angle of other indicators appear...

Operating Instructions
Page 27
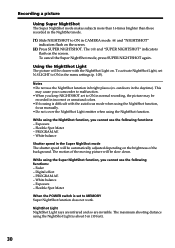
...10×. •The picture quality deteriorates as a default setting (p. 105). Basics Recording a picture Using the zoom feature Move the power zoom lever a little for a faster zoom. When the POWER switch is performed digitally. "T" side: for telephoto (subject appears closer) "W" side: for wide-angle ...cannot use the digital zoom. 27 The digital zooming zone appears when you select the digital zoom power in better-looking recordings. Recording - The right side of the bar shows the digital W T zooming zone. To activate digital zoom, select the digital zoom power in D ...
...10×. •The picture quality deteriorates as a default setting (p. 105). Basics Recording a picture Using the zoom feature Move the power zoom lever a little for a faster zoom. When the POWER switch is performed digitally. "T" side: for telephoto (subject appears closer) "W" side: for wide-angle ...cannot use the digital zoom. 27 The digital zooming zone appears when you select the digital zoom power in better-looking recordings. Recording - The right side of the bar shows the digital W T zooming zone. To activate digital zoom, select the digital zoom power in D ...
Operating Instructions
Page 28
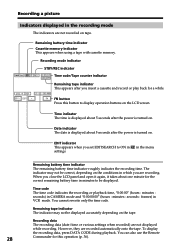
Time indicator The time is displayed about 5 seconds after the power is turned on the tape. Time code The time code indicates the recording or playback time, "0:00:00" (hours : minutes : seconds) in CAMERA mode and "0:00:00:00" (hours : minutes : seconds : frames) in the menu Remaining battery time indicator The remaining battery time...
Time indicator The time is displayed about 5 seconds after the power is turned on the tape. Time code The time code indicates the recording or playback time, "0:00:00" (hours : minutes : seconds) in CAMERA mode and "0:00:00:00" (hours : minutes : seconds : frames) in the menu Remaining battery time indicator The remaining battery time...
Operating Instructions
Page 30
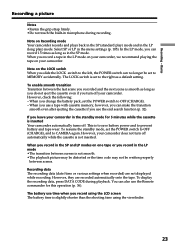
While using the NightShot function. The motion of the background. Flexible Spot Meter When the POWER switch is set to ON in normal recording, the picture may be recorded in CAMERA mode. To cancel the Super NightShot mode, press SUPER NIGHTSHOT again. To activate NightShot Light, set ... use the following functions: - Notes •Do not use the following functions: - Exposure - White balance Shutter speed in the daytime). Digital effect - The and "SUPER NIGHTSHOT" indicators flash on the screen. (2) Press SUPER NIGHTSHOT. outdoors in the Super NighShot mode The shutter ...
While using the NightShot function. The motion of the background. Flexible Spot Meter When the POWER switch is set to ON in normal recording, the picture may be recorded in CAMERA mode. To cancel the Super NightShot mode, press SUPER NIGHTSHOT again. To activate NightShot Light, set ... use the following functions: - Notes •Do not use the following functions: - Exposure - White balance Shutter speed in the daytime). Digital effect - The and "SUPER NIGHTSHOT" indicators flash on the screen. (2) Press SUPER NIGHTSHOT. outdoors in the Super NighShot mode The shutter ...

