Operating Instructions
Page 5
Battery terminal cover (1) (p. 12) qa Cleaning cloth (1) (p. 176) Contents of the recording cannot be compensated if recording or playback is not made due to a malfunction of the camcorder, storage media, etc. 5 qa 1 Wireless Remote Commander (1) (p. 188) 2 AC-L10A/L10B/L10C AC power adaptor (1), the power cord (1) (p. 13) 3 NP-FM30 battery pack (1) (p. 12, 13) 4 Size...
Battery terminal cover (1) (p. 12) qa Cleaning cloth (1) (p. 176) Contents of the recording cannot be compensated if recording or playback is not made due to a malfunction of the camcorder, storage media, etc. 5 qa 1 Wireless Remote Commander (1) (p. 188) 2 AC-L10A/L10B/L10C AC power adaptor (1), the power cord (1) (p. 13) 3 NP-FM30 battery pack (1) (p. 12, 13) 4 Size...
Operating Instructions
Page 23
... (CHARGE), and to OFF (CHARGE). - This is set the POWER switch to CAMERA again. The battery use the Remote commander for 5 minutes while the cassette is smooth as long as you do not eject the cassette even if you record in the LP mode on your camcorder, we recommend playing the tape on... Recording mode Your camcorder records and plays back in the SP (standard play) mode and...
... (CHARGE), and to OFF (CHARGE). - This is set the POWER switch to CAMERA again. The battery use the Remote commander for 5 minutes while the cassette is smooth as long as you do not eject the cassette even if you record in the LP mode on your camcorder, we recommend playing the tape on... Recording mode Your camcorder records and plays back in the SP (standard play) mode and...

Operating Instructions
Page 25
... adjust the brightness of the LCD screen appears. (3) Adjust the brightness of the LCD screen The recorded picture will be affected. 25 LCD screen backlight You can change the brightness of the LCD screen (1) In CAMERA or MEMORY mode, press FN and select PAGE2. Even if you press FN The does not... appear on the screen. in the mirror mode The picture on the Remote Commander does not work. •FN appears mirror-reversed in the...
... adjust the brightness of the LCD screen appears. (3) Adjust the brightness of the LCD screen The recorded picture will be affected. 25 LCD screen backlight You can change the brightness of the LCD screen (1) In CAMERA or MEMORY mode, press FN and select PAGE2. Even if you press FN The does not... appear on the screen. in the mirror mode The picture on the Remote Commander does not work. •FN appears mirror-reversed in the...
Operating Instructions
Page 28
... settings when recorded) are not recorded on the conditions in which you close the LCD panel and open it again, it takes about one minute for this button to display operation buttons on the tape. You can also use the Remote 28 Commander for...DATA CODE during playback. Recording a picture Indicators displayed in the recording mode The indicators are not displayed while recording. However, they are recording. JUL 4 2001 12 : 05 : 56 AM / - Time code The time code indicates the recording or playback time, "0:00:00" (hours : minutes : seconds) in CAMERA mode and "0:00:00...
... settings when recorded) are not recorded on the conditions in which you close the LCD panel and open it again, it takes about one minute for this button to display operation buttons on the tape. You can also use the Remote 28 Commander for...DATA CODE during playback. Recording a picture Indicators displayed in the recording mode The indicators are not displayed while recording. However, they are recording. JUL 4 2001 12 : 05 : 56 AM / - Time code The time code indicates the recording or playback time, "0:00:00" (hours : minutes : seconds) in CAMERA mode and "0:00:00...
Operating Instructions
Page 31
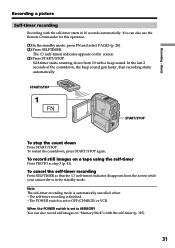
... starts in step 3 (p. 41). Recording - START/STOP 1 FN START/STOP To stop the count down from the screen while your camcorder is finished. - Note The self-timer recording mode is set to MEMORY You can also use the Remote Commander for this operation. (1) In the... standby mode, press FN and select PAGE3 (p. 20). (2) Press SELFTIMER. Basics Recording a picture Self-timer recording Recording with a beep sound. You can also record still images on "Memory...
... starts in step 3 (p. 41). Recording - START/STOP 1 FN START/STOP To stop the count down from the screen while your camcorder is finished. - Note The self-timer recording mode is set to MEMORY You can also use the Remote Commander for this operation. (1) In the... standby mode, press FN and select PAGE3 (p. 20). (2) Press SELFTIMER. Basics Recording a picture Self-timer recording Recording with a beep sound. You can also record still images on "Memory...
Operating Instructions
Page 34
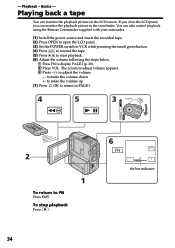
... LCD panel, you can monitor the playback picture on the LCD screen. You can also control playback using the Remote Commander supplied with your camcorder. (1) Install the power source and insert the recorded tape. (2) Press OPEN to open the LCD panel. (3) Set the POWER switch to VCR while pressing the small green... -/+ to adjust the volume. - : to make the volume down +: to make the volume up (7) Press OK to return to PAGE1. 4 5 3 POWER LOCK VCR MEMORY OFF CAMERA (CHARGE) 2 1 To return to display PAGE1 (p. 20). 2 Press VOL. -
... LCD panel, you can monitor the playback picture on the LCD screen. You can also control playback using the Remote Commander supplied with your camcorder. (1) Install the power source and insert the recorded tape. (2) Press OPEN to open the LCD panel. (3) Set the POWER switch to VCR while pressing the small green... -/+ to adjust the volume. - : to make the volume down +: to make the volume up (7) Press OK to return to PAGE1. 4 5 3 POWER LOCK VCR MEMORY OFF CAMERA (CHARGE) 2 1 To return to display PAGE1 (p. 20). 2 Press VOL. -
Operating Instructions
Page 36
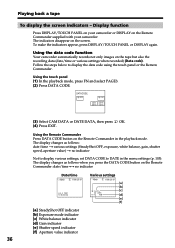
... PANEL or DISPLAY again. Using the data code function Your camcorder automatically records not only images on the screen. The display changes as follows when you press the DATA CODE button on the Remote Commander: date/time ˜ no indicator Not to display various settings... speed indicator [f] Aperture value indicator 36 Using the Remote Commander Press DATA CODE button on the Remote Commander supplied with your camcorder. The indicators disappear on the tape but also the recording data (date/time or various settings when recorded) (Data code). Follow the steps below to DATE...
... PANEL or DISPLAY again. Using the data code function Your camcorder automatically records not only images on the screen. The display changes as follows when you press the DATA CODE button on the Remote Commander: date/time ˜ no indicator Not to display various settings... speed indicator [f] Aperture value indicator 36 Using the Remote Commander Press DATA CODE button on the Remote Commander supplied with your camcorder. The indicators disappear on the tape but also the recording data (date/time or various settings when recorded) (Data code). Follow the steps below to DATE...
Operating Instructions
Page 39
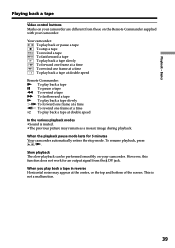
... pause mode lasts for an output signal from those on the Remote Commander supplied with your camcorder. Slow playback The slow playback can be performed smoothly on your camcorder are different from the DV jack. Basics Playing back a tape Video control buttons Marks on your camcorder. To resume playback, press... a tape To play back a tape slowly To forward one frame at a time To rewind one frame at a time To play back a tape at double speed Remote Commander: N To play back a tape X To pause a tape m To rewind a tape M To fastforward a tape y To play back a tape slowly C To forward one ...
... pause mode lasts for an output signal from those on the Remote Commander supplied with your camcorder. Slow playback The slow playback can be performed smoothly on your camcorder are different from the DV jack. Basics Playing back a tape Video control buttons Marks on your camcorder. To resume playback, press... a tape To play back a tape slowly To forward one frame at a time To rewind one frame at a time To play back a tape at double speed Remote Commander: N To play back a tape X To pause a tape m To rewind a tape M To fastforward a tape y To play back a tape slowly C To forward one ...
Operating Instructions
Page 41
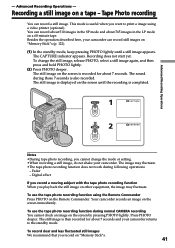
... tape photo recording function during normal CAMERA recording You cannot check an image on a 60-minute tape. Your camcorder records an image on a tape - The still image is recorded for about 7 seconds and your camcorder returns to print a image using the Remote Commander Press ...PHOTO lightly. (2) Press PHOTO deeper. The image may fluctuate. You can record a still image. The sound during following operations: - Digital effect If you record a moving subject with the tape photo recording function When you record on "Memory Stick"s (p. 122). (1) In the standby mode, keep ...
... tape photo recording function during normal CAMERA recording You cannot check an image on a 60-minute tape. Your camcorder records an image on a tape - The still image is recorded for about 7 seconds and your camcorder returns to print a image using the Remote Commander Press ...PHOTO lightly. (2) Press PHOTO deeper. The image may fluctuate. You can record a still image. The sound during following operations: - Digital effect If you record a moving subject with the tape photo recording function When you record on "Memory Stick"s (p. 122). (1) In the standby mode, keep ...
Operating Instructions
Page 42
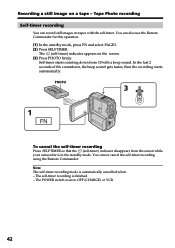
... down from the screen while your camcorder is automatically cancelled when: - You cannot cancel the self-timer recording using the Remote Commander. The POWER switch is finished. - Tape Photo recording Self-timer recording You can also use the Remote Commander for this operation. (1) In the standby mode, press FN and select PAGE3. (2) Press SELFTIMER. The...
... down from the screen while your camcorder is automatically cancelled when: - You cannot cancel the self-timer recording using the Remote Commander. The POWER switch is finished. - Tape Photo recording Self-timer recording You can also use the Remote Commander for this operation. (1) In the standby mode, press FN and select PAGE3. (2) Press SELFTIMER. The...
Operating Instructions
Page 62
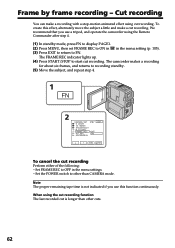
... effect, alternately move the subject a little and make a recording with a stop-motion animated effect using the cut recording function The last recorded cut is not indicated if you use a tripod, and operate the camcorder using the Remote Commander after step 4. (1) In standby mode, press FN ...to display PAGE1. (2) Press MENU, then set FRAME REC to FN. LIGHT FRAME REC OFF INT. Cut recording You can make a cut recording. S. REC ON EDITSEARCH EXEC RET. Note The proper remaining tape time is longer than CAMERA...
... effect, alternately move the subject a little and make a recording with a stop-motion animated effect using the cut recording function The last recorded cut is not indicated if you use a tripod, and operate the camcorder using the Remote Commander after step 4. (1) In standby mode, press FN ...to display PAGE1. (2) Press MENU, then set FRAME REC to FN. LIGHT FRAME REC OFF INT. Cut recording You can make a cut recording. S. REC ON EDITSEARCH EXEC RET. Note The proper remaining tape time is longer than CAMERA...
Operating Instructions
Page 68
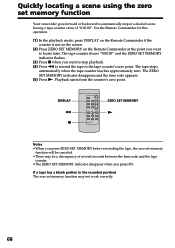
... code appears. (5) Press N. DISPLAY m x ZERO SET MEMORY N Notes •When you press FN. If a tape has a blank portion in the recorded portions The zero set memory function will be a discrepancy of "0:00:00". The tape stops automatically when the tape counter reaches approximately zero. Use the... Remote Commander for this operation. (1) In the playback mode, press DISPLAY on the Remote Commander if the counter is not on the screen. (2) Press ZERO SET MEMORY on the...
... code appears. (5) Press N. DISPLAY m x ZERO SET MEMORY N Notes •When you press FN. If a tape has a blank portion in the recorded portions The zero set memory function will be a discrepancy of "0:00:00". The tape stops automatically when the tape counter reaches approximately zero. Use the... Remote Commander for this operation. (1) In the playback mode, press DISPLAY on the Remote Commander if the counter is not on the screen. (2) Press ZERO SET MEMORY on the...
Operating Instructions
Page 69
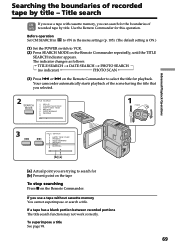
...MORNING 6 WEDDING VCR 1 POWER LOCK Advanced Playback Operations MEMORY OFF CAMERA (CHARGE) 3 TITLE SEARCH 3 HAPPY NEW YEAR! 4 PRESENT 5 GOOD MORNING 6 WEDDING 7 NIGHT 8 BASEBALL [b] [a] [a] Actual point you are trying to VCR. (2) Press SEARCH MODE on the Remote Commander. Before operation Set CM SEARCH in to ON in the ... memory, you use a tape without cassette memory You cannot superimpose or search a title. If a tape has a blank portion between recorded portions The title search function may not work correctly. To superimpose a title See page 98. 69 Searching the boundaries of...
...MORNING 6 WEDDING VCR 1 POWER LOCK Advanced Playback Operations MEMORY OFF CAMERA (CHARGE) 3 TITLE SEARCH 3 HAPPY NEW YEAR! 4 PRESENT 5 GOOD MORNING 6 WEDDING 7 NIGHT 8 BASEBALL [b] [a] [a] Actual point you are trying to VCR. (2) Press SEARCH MODE on the Remote Commander. Before operation Set CM SEARCH in to ON in the ... memory, you use a tape without cassette memory You cannot superimpose or search a title. If a tape has a blank portion between recorded portions The title search function may not work correctly. To superimpose a title See page 98. 69 Searching the boundaries of...
Operating Instructions
Page 70
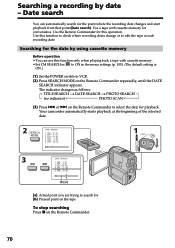
...with cassette memory for the date by date - or > on the Remote Commander to select the date for the point where the recording date changes and start playback from that point (Date search). Searching a recording by using cassette memory Before operation •You can automatically search for... MODE DATE SEARCH 1 SEP / 5 / 01 2 SEP / 6 / 01 3 DEC / 24 / 01 4 JAN / 1 / 02 5 FEB / 11 / 02 6 APR / 29 / 02 VCR 1 POWER LOCK MEMORY OFF CAMERA (CHARGE) 3 DATE SEARCH 1 SEP / 5 / 01 2 SEP / 6 / 01 3 DEC / 24 / 01 4 JAN / 1 / 02 5 FEB / 11 / 02 6 APR / 29 / 02 [b] [a] [a] Actual point...
...with cassette memory for the date by date - or > on the Remote Commander to select the date for the point where the recording date changes and start playback from that point (Date search). Searching a recording by using cassette memory Before operation •You can automatically search for... MODE DATE SEARCH 1 SEP / 5 / 01 2 SEP / 6 / 01 3 DEC / 24 / 01 4 JAN / 1 / 02 5 FEB / 11 / 02 6 APR / 29 / 02 VCR 1 POWER LOCK MEMORY OFF CAMERA (CHARGE) 3 DATE SEARCH 1 SEP / 5 / 01 2 SEP / 6 / 01 3 DEC / 24 / 01 4 JAN / 1 / 02 5 FEB / 11 / 02 6 APR / 29 / 02 [b] [a] [a] Actual point...
Operating Instructions
Page 71
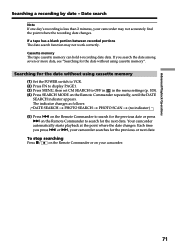
... for the previous date or press > on the Remote Commander to search for the date without using cassette memory". Each time you search the date among seven or more data, see "Searching for the next date. Cassette memory The tape cassette memory can hold 6 recording date data. If you press . or >, your...
... for the previous date or press > on the Remote Commander to search for the date without using cassette memory". Each time you search the date among seven or more data, see "Searching for the next date. Cassette memory The tape cassette memory can hold 6 recording date data. If you press . or >, your...
Operating Instructions
Page 72
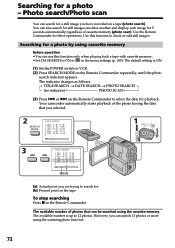
...indicator changes as follows: TITLE SEARCH t DATE SEARCH t PHOTO SEARCH (no indicator) PHOTO SCAN (3) Press . However, you have recorded on the Remote Commander to ON in in the menu settings (p. 105). Searching for a still image you can search 13 photos or more using ...: 30 2 SEP / 6 / 01 8 : 50 3 DEC / 24 / 01 1 0 : 30 4 JAN / 1 / 02 23 : 25 5 FEB / 11 / 02 1 6 : 11 6 APR / 29 / 02 1 3 : 45 VCR 1 POWER LOCK MEMORY OFF CAMERA (CHARGE) 3 PHOTO SEARCH 1 SEP / 5 / 01 1 7 : 30 2 SEP / 6 / 01 8 : 50 3 DEC / 24 / 01 1 0 : 30 4 JAN / 1 / 02 23 : 25 5 FEB / 11 / 02 1 6 : 11 6 APR /...
...indicator changes as follows: TITLE SEARCH t DATE SEARCH t PHOTO SEARCH (no indicator) PHOTO SCAN (3) Press . However, you have recorded on the Remote Commander to ON in in the menu settings (p. 105). Searching for a still image you can search 13 photos or more using ...: 30 2 SEP / 6 / 01 8 : 50 3 DEC / 24 / 01 1 0 : 30 4 JAN / 1 / 02 23 : 25 5 FEB / 11 / 02 1 6 : 11 6 APR / 29 / 02 1 3 : 45 VCR 1 POWER LOCK MEMORY OFF CAMERA (CHARGE) 3 PHOTO SEARCH 1 SEP / 5 / 01 1 7 : 30 2 SEP / 6 / 01 8 : 50 3 DEC / 24 / 01 1 0 : 30 4 JAN / 1 / 02 23 : 25 5 FEB / 11 / 02 1 6 : 11 6 APR /...
Operating Instructions
Page 73
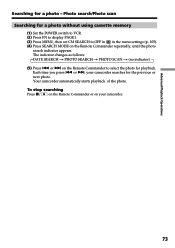
... for a photo - Your camcorder automatically starts playback of the photo. To stop searching Press x/ on the Remote Commander or on the Remote Commander to OFF in in the menu settings (p. 105). (4) Press SEARCH MODE on the Remote Commander repeatedly, until the photo search indicator appears. Photo search/Photo scan Searching for a photo without...
... for a photo - Your camcorder automatically starts playback of the photo. To stop searching Press x/ on the Remote Commander or on the Remote Commander to OFF in in the menu settings (p. 105). (4) Press SEARCH MODE on the Remote Commander repeatedly, until the photo search indicator appears. Photo search/Photo scan Searching for a photo without...
Operating Instructions
Page 74
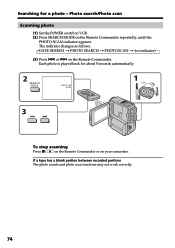
... portion between recorded portions The photo search and photo scan functions may not work correctly. 74 Each photo is played back for a photo - Searching for about 5 seconds automatically. 2 SEARCH MODE PHOTO 00 SCAN VCR 1 POWER LOCK MEMORY OFF CAMERA (CHARGE) 3 To stop scanning Press x/ on the Remote Commander or on the Remote Commander repeatedly...
... portion between recorded portions The photo search and photo scan functions may not work correctly. 74 Each photo is played back for a photo - Searching for about 5 seconds automatically. 2 SEARCH MODE PHOTO 00 SCAN VCR 1 POWER LOCK MEMORY OFF CAMERA (CHARGE) 3 To stop scanning Press x/ on the Remote Commander or on the Remote Commander repeatedly...
Operating Instructions
Page 75
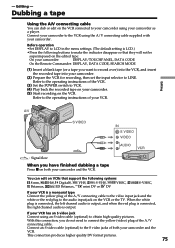
...the VCR. Connect your camcorder to VCR. (4) Play back the recorded tape on the VCR. - Refer to record over) into the VCR, and insert the recorded tape into your camcorder as a player. Editing A/V S VIDEO IN S VIDEO VIDEO AUDIO : Signal flow When you want to the operating instructions of ... tape: On your camcorder: DISPLAY/TOUCHPANEL, DATA CODE On the Remote Commander: DISPLAY, DATA CODE, SEARCH MODE (1) Insert a blank tape (or a tape you have finished dubbing a tape Press x on both your camcorder. (5) Start recording on your camcorder and the VCR. Dubbing a tape Using the ...
...the VCR. Connect your camcorder to VCR. (4) Play back the recorded tape on the VCR. - Refer to record over) into the VCR, and insert the recorded tape into your camcorder as a player. Editing A/V S VIDEO IN S VIDEO VIDEO AUDIO : Signal flow When you want to the operating instructions of ... tape: On your camcorder: DISPLAY/TOUCHPANEL, DATA CODE On the Remote Commander: DISPLAY, DATA CODE, SEARCH MODE (1) Insert a blank tape (or a tape you have finished dubbing a tape Press x on both your camcorder. (5) Start recording on your camcorder and the VCR. Dubbing a tape Using the ...
Operating Instructions
Page 78
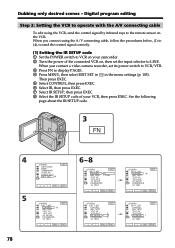
... its power switch to VCR/VTR. 3 Press FN to the remote sensor on your VCR, then press EXEC. See the following page...PAUSEMODE I R TEST EXEC RET. 6~8 OTHERS EXIT ED I T SET CONTROL I T SET IR EXEC RET. Digital program editing Step 2: Setting the VCR to operate with the A/V connecting cable To edit using the A/V connecting cable,...CUT - I N" "CUT -OUT" I R SETUP PAUSEMODE I R TEST EXEC RET. Dubbing only desired scenes - When you connect a video camera recorder, set the input selector to VCR on the VCR. I N" "CUT -OUT" I R SETUP PAUSEMODE I R TEST EXEC RET. ...
... its power switch to VCR/VTR. 3 Press FN to the remote sensor on your VCR, then press EXEC. See the following page...PAUSEMODE I R TEST EXEC RET. 6~8 OTHERS EXIT ED I T SET CONTROL I T SET IR EXEC RET. Digital program editing Step 2: Setting the VCR to operate with the A/V connecting cable To edit using the A/V connecting cable,...CUT - I N" "CUT -OUT" I R SETUP PAUSEMODE I R TEST EXEC RET. Dubbing only desired scenes - When you connect a video camera recorder, set the input selector to VCR on the VCR. I N" "CUT -OUT" I R SETUP PAUSEMODE I R TEST EXEC RET. ...


