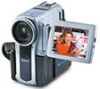
Operating Instructions
Page 5
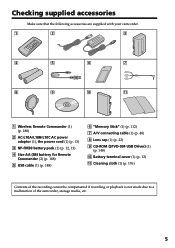
... Remote Commander (2) (p. 188) 5 USB cable (1) (p. 148) 6 "Memory Stick" (1) (p. 112) 7 A/V connecting cable (1) (p. 40) 8 Lens cap (1) (p. 22) 9 CD-ROM (SPVD-004 USB Driver) (1) (p. 148) q; Battery terminal cover (1) (p. 12) qa Cleaning cloth (1) (p. 176) Contents of the recording cannot be compensated if recording or playback is not made due to a malfunction of the camcorder, storage media, etc. 5
... Remote Commander (2) (p. 188) 5 USB cable (1) (p. 148) 6 "Memory Stick" (1) (p. 112) 7 A/V connecting cable (1) (p. 40) 8 Lens cap (1) (p. 22) 9 CD-ROM (SPVD-004 USB Driver) (1) (p. 148) q; Battery terminal cover (1) (p. 12) qa Cleaning cloth (1) (p. 176) Contents of the recording cannot be compensated if recording or playback is not made due to a malfunction of the camcorder, storage media, etc. 5
Operating Instructions
Page 148
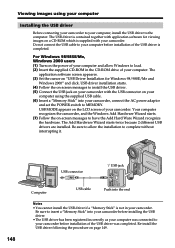
...recognize the hardware. USB MODE appears on a CD-ROM which is contained together with the USB connector on -screen messages to install the USB driver. (5) Connect the USB jack on your camcorder. Viewing images using the supplied USB cable. (6) Insert a "Memory Stick" into your computer was completed...98/98SE/Me and Windows 2000" and click. Be sure to insert a "Memory Stick" into the end Notes • You cannot install the USB driver if a "Memory Stick" is completed. Your computer recognizes the camcorder, and the Windows Add Hardware Wizard starts. (7) Follow the on your computer using...
...recognize the hardware. USB MODE appears on a CD-ROM which is contained together with the USB connector on -screen messages to install the USB driver. (5) Connect the USB jack on your camcorder. Viewing images using the supplied USB cable. (6) Insert a "Memory Stick" into your computer was completed...98/98SE/Me and Windows 2000" and click. Be sure to insert a "Memory Stick" into the end Notes • You cannot install the USB driver if a "Memory Stick" is completed. Your computer recognizes the camcorder, and the Windows Add Hardware Wizard starts. (7) Follow the on your computer using...
Operating Instructions
Page 149
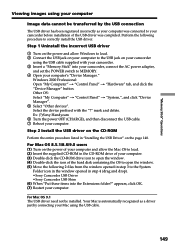
...the OS to open the window. (5) Move the following 2 files from the window opened in step 4 (drag and drop). •Sony Camcorder USB Driver •Sony Camcorder USB Shim (6) When "Put these items into your camcorder, connect the AC power adapter, and set the POWER switch to your camcorder... computer to the USB jack on the CD-ROM Perform the entire procedure listed in step 3 to correctly install the USB driver. appears, click OK. (7) Restart your computer. Ex: (?)Sony Handycam 6 Turn the power OFF (CHARGE), and then disconnect the USB cable. 7 Reboot your computer. For Mac OS ...
...the OS to open the window. (5) Move the following 2 files from the window opened in step 4 (drag and drop). •Sony Camcorder USB Driver •Sony Camcorder USB Shim (6) When "Put these items into your camcorder, connect the AC power adapter, and set the POWER switch to your camcorder... computer to the USB jack on the CD-ROM Perform the entire procedure listed in step 3 to correctly install the USB driver. appears, click OK. (7) Restart your computer. Ex: (?)Sony Handycam 6 Turn the power OFF (CHARGE), and then disconnect the USB cable. 7 Reboot your computer. For Mac OS ...
Operating Instructions
Page 165
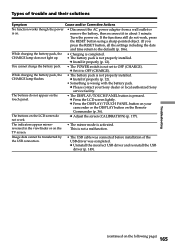
... (CALIBRATION) (p. 177). This is not properly installed. c Please contact your camcorder or the DISPLAY button on your Sony dealer or local authorized Sony service facility. The indicators appear mirrorreversed in about 1 minute. Types of the USB driver was completed. c Set it to the default) (p. 186). If the functions still do not work . c Press...
... (CALIBRATION) (p. 177). This is not properly installed. c Please contact your camcorder or the DISPLAY button on your Sony dealer or local authorized Sony service facility. The indicators appear mirrorreversed in about 1 minute. Types of the USB driver was completed. c Set it to the default) (p. 186). If the functions still do not work . c Press...


