
Operating Instructions
Page 5
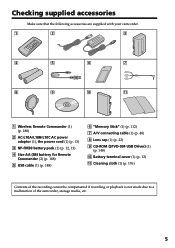
... cable (1) (p. 148) 6 "Memory Stick" (1) (p. 112) 7 A/V connecting cable (1) (p. 40) 8 Lens cap (1) (p. 22) 9 CD-ROM (SPVD-004 USB Driver) (1) (p. 148) q; Battery terminal cover (1) (p. 12) qa Cleaning cloth (1) (p. 176) Contents of the recording cannot be compensated if recording or playback is not made due to a malfunction of the camcorder, storage media, etc. 5 Getting started Checking supplied accessories...
... cable (1) (p. 148) 6 "Memory Stick" (1) (p. 112) 7 A/V connecting cable (1) (p. 40) 8 Lens cap (1) (p. 22) 9 CD-ROM (SPVD-004 USB Driver) (1) (p. 148) q; Battery terminal cover (1) (p. 12) qa Cleaning cloth (1) (p. 176) Contents of the recording cannot be compensated if recording or playback is not made due to a malfunction of the camcorder, storage media, etc. 5 Getting started Checking supplied accessories...

Operating Instructions
Page 8
... a cassette (p. 19) 1 Slide OPEN/ ZEJECT in parentheses "( )" for more information. Quick Start Guide 8 Connecting the power cord (p. 16) Use the battery pack when using your camcorder. Open the DC IN jack cover. Pull down completely, close the lid until it clicks. AC power adaptor (supplied) Connect the plug with the window facing...
... a cassette (p. 19) 1 Slide OPEN/ ZEJECT in parentheses "( )" for more information. Quick Start Guide 8 Connecting the power cord (p. 16) Use the battery pack when using your camcorder. Open the DC IN jack cover. Pull down completely, close the lid until it clicks. AC power adaptor (supplied) Connect the plug with the window facing...

Operating Instructions
Page 9
..., the LCD panel, the battery pack or the jack cover. MEMORY OFF CAMERA (CHARGE) NOTE Do not pick up your camcorder, the clock setting is closed, pull out the viewfinder untill its click to focus on the LCD screen (p. 34) VCR 1 Set the POWER switch to off. To stop recording, press START/STOP again.
..., the LCD panel, the battery pack or the jack cover. MEMORY OFF CAMERA (CHARGE) NOTE Do not pick up your camcorder, the clock setting is closed, pull out the viewfinder untill its click to focus on the LCD screen (p. 34) VCR 1 Set the POWER switch to off. To stop recording, press START/STOP again.

Operating Instructions
Page 12
Note on the battery terminal cover To protect the battery terminals, install the battery terminal cover after the battery pack is removed in the same way as the battery terminal cover. Step 1 Preparing the power supply Installing the battery pack We recommend that you use the battery pack when you use your camcorder outdoors. (1) While sliding BATT (battery) release lever in the...
Note on the battery terminal cover To protect the battery terminals, install the battery terminal cover after the battery pack is removed in the same way as the battery terminal cover. Step 1 Preparing the power supply Installing the battery pack We recommend that you use the battery pack when you use your camcorder outdoors. (1) While sliding BATT (battery) release lever in the...

Operating Instructions
Page 13
...the following cases: - If any trouble occurs with the battery pack. The battery pack is completed, the CHARGE lamp goes out. (full charge) 2 CHARGE lamp 14 POWER LOCK VCR MEMORY OFF CAMERA (CHARGE) After charging the battery pack Disconnect the AC power adaptor from coming into contact with... the metal parts of the DC plug of "InfoLITHIUM" battery pack. (1) Open the DC IN jack cover and connect the AC power adaptor supplied with ...
...the following cases: - If any trouble occurs with the battery pack. The battery pack is completed, the CHARGE lamp goes out. (full charge) 2 CHARGE lamp 14 POWER LOCK VCR MEMORY OFF CAMERA (CHARGE) After charging the battery pack Disconnect the AC power adaptor from coming into contact with... the metal parts of the DC plug of "InfoLITHIUM" battery pack. (1) Open the DC IN jack cover and connect the AC power adaptor supplied with ...

Operating Instructions
Page 16
... outlet using the AC power adaptor. (1) Open the DC IN jack cover and connect the AC power adaptor supplied with your camcorder to the DC IN jack on your camcorder. • The DC IN jack has "source priority." Using a car battery Use Sony DC Adaptor/Charger (optional). 16 Step 1 Preparing the power supply...
... outlet using the AC power adaptor. (1) Open the DC IN jack cover and connect the AC power adaptor supplied with your camcorder to the DC IN jack on your camcorder. • The DC IN jack has "source priority." Using a car battery Use Sony DC Adaptor/Charger (optional). 16 Step 1 Preparing the power supply...
Operating Instructions
Page 178
...CAMERA and VCR sections and play back a tape for example, and operate it. Do not use any type of solvent which may cause your camcorder is in or out. • Do not open the tape protect cover... or touch the tape. • Avoid touching or damaging the terminals. Sand or dust may damage the finish. • Do not let sand get inside . • Keep your camcorder and have it checked by a Sony...and thickness of the tape and if the recording tab is not to be repaired. 178 To... Camcorder operation • Operate your camcorder on 7.2 V (battery pack) or 8.4 V (AC adaptor). • For ...
...CAMERA and VCR sections and play back a tape for example, and operate it. Do not use any type of solvent which may cause your camcorder is in or out. • Do not open the tape protect cover... or touch the tape. • Avoid touching or damaging the terminals. Sand or dust may damage the finish. • Do not let sand get inside . • Keep your camcorder and have it checked by a Sony...and thickness of the tape and if the recording tab is not to be repaired. 178 To... Camcorder operation • Operate your camcorder on 7.2 V (battery pack) or 8.4 V (AC adaptor). • For ...

Operating Instructions
Page 183
... Sony video products, Sony recommends that this "GENUINE VIDEO ACCESSORIES" mark. Quick Reference 183 Quick Reference - - Identifying the parts and controls Camcorder 1 6 2 7 8 3 9 4 q; 5 qa 1 Lens cap (p. 22) 2 LCD screen/Touch panel (p. 20, 115) 3 OPEN button (p. 22) 4 CHARGE lamp (p. 13) 5 Battery/Battery terminal cover (p. 12) 6 Eyecup 7 Viewfinder (p. 26) 8 LOCK (p. 22) 9 POWER switch (p. 22) 0 START/STOP button (p. 22) qa BATT (battery...
... Sony video products, Sony recommends that this "GENUINE VIDEO ACCESSORIES" mark. Quick Reference 183 Quick Reference - - Identifying the parts and controls Camcorder 1 6 2 7 8 3 9 4 q; 5 qa 1 Lens cap (p. 22) 2 LCD screen/Touch panel (p. 20, 115) 3 OPEN button (p. 22) 4 CHARGE lamp (p. 13) 5 Battery/Battery terminal cover (p. 12) 6 Eyecup 7 Viewfinder (p. 26) 8 LOCK (p. 22) 9 POWER switch (p. 22) 0 START/STOP button (p. 22) qa BATT (battery...

Operating Instructions
Page 188
...Remote Commander may not function properly. •Your camcorder works in the Commander mode VTR 2, we recommend changing the commander mode or covering the sensor of the VCR with black paper. Commander modes 1, 2 and 3 are used to distinguish your camcorder from strong light ... away from other Sony VCRs to avoid remote control misoperation. polarities on your camcorder. marks inside the battery compartment. 188 Notes on your camcorder. To prepare the Remote Commander Insert 2 size AA (R6) batteries by matching the + and - Power zoom button (p. 27) 5 Video control buttons (p. ...
...Remote Commander may not function properly. •Your camcorder works in the Commander mode VTR 2, we recommend changing the commander mode or covering the sensor of the VCR with black paper. Commander modes 1, 2 and 3 are used to distinguish your camcorder from strong light ... away from other Sony VCRs to avoid remote control misoperation. polarities on your camcorder. marks inside the battery compartment. 188 Notes on your camcorder. To prepare the Remote Commander Insert 2 size AA (R6) batteries by matching the + and - Power zoom button (p. 27) 5 Video control buttons (p. ...


