
Operating Instructions
Page 2
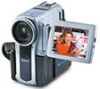
...OF PROPERLY. Telephone No.: 201-930-6972 This device complies with Part 15 of this Sony Digital Handycam camcorder. Operation is loaded with superior picture and sound quality. Welcome! Your Digital Handycam is subject to the following two conditions.: (1) This device may cause undesired operation...your purchase of the FCC Rules. You will soon be producing home video that may be of sufficient magnitude to constitute a risk of Conformity Trade Name: SONY Model No.: DCR-PC9 Responsible Party:Sony Electronics Inc. This symbol is subject to the following two conditions: (1)...
...OF PROPERLY. Telephone No.: 201-930-6972 This device complies with Part 15 of this Sony Digital Handycam camcorder. Operation is loaded with superior picture and sound quality. Welcome! Your Digital Handycam is subject to the following two conditions.: (1) This device may cause undesired operation...your purchase of the FCC Rules. You will soon be producing home video that may be of sufficient magnitude to constitute a risk of Conformity Trade Name: SONY Model No.: DCR-PC9 Responsible Party:Sony Electronics Inc. This symbol is subject to the following two conditions: (1)...
Operating Instructions
Page 5
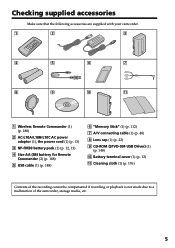
Getting started Checking supplied accessories Make sure that the following accessories are supplied with your camcorder. 1 2 3 4 5 6 7 8 9 q; qa 1 Wireless Remote Commander (1) (p. 188) 2 AC-L10A/L10B/L10C AC power adaptor (1), the power cord (1) (p. 13) 3 NP-FM30 battery pack (1) (p.... (1) (p. 40) 8 Lens cap (1) (p. 22) 9 CD-ROM (SPVD-004 USB Driver) (1) (p. 148) q; Battery terminal cover (1) (p. 12) qa Cleaning cloth (1) (p. 176) Contents of the recording cannot be compensated if recording or playback is not made due to a malfunction of the camcorder, storage media, etc. 5
Getting started Checking supplied accessories Make sure that the following accessories are supplied with your camcorder. 1 2 3 4 5 6 7 8 9 q; qa 1 Wireless Remote Commander (1) (p. 188) 2 AC-L10A/L10B/L10C AC power adaptor (1), the power cord (1) (p. 13) 3 NP-FM30 battery pack (1) (p.... (1) (p. 40) 8 Lens cap (1) (p. 22) 9 CD-ROM (SPVD-004 USB Driver) (1) (p. 148) q; Battery terminal cover (1) (p. 12) qa Cleaning cloth (1) (p. 176) Contents of the recording cannot be compensated if recording or playback is not made due to a malfunction of the camcorder, storage media, etc. 5
Operating Instructions
Page 6
... Review 32 Playback - Cut recording 62 Using the viewfinder 63 Advanced Playback Operations Playing back a tape with picture effects .. 65 Playing back a tape with an analog video unit and your own titles 101 Labeling a cassette 103 Customizing Your Camcorder Changing the menu settings 105 ... the date and time 17 Step 3 Inserting a cassette 19 Step 4 Using the touch panel 20 Recording - Digital program editing 77 Using with digital effects ... 66 Enlarging images recorded on "Memory Stick"s - Insert editing 92 Audio dubbing 94 Superimposing a title 98 Making your computer ...
... Review 32 Playback - Cut recording 62 Using the viewfinder 63 Advanced Playback Operations Playing back a tape with picture effects .. 65 Playing back a tape with an analog video unit and your own titles 101 Labeling a cassette 103 Customizing Your Camcorder Changing the menu settings 105 ... the date and time 17 Step 3 Inserting a cassette 19 Step 4 Using the touch panel 20 Recording - Digital program editing 77 Using with digital effects ... 66 Enlarging images recorded on "Memory Stick"s - Insert editing 92 Audio dubbing 94 Superimposing a title 98 Making your computer ...

Operating Instructions
Page 7
MPEG movie playback 145 Viewing images using your camcorder abroad 174 Maintenance information and precautions 175 Specifications 181 Quick Reference Identifying the parts and controls .......... 183 Index 190 7 Memory PB ZOOM 153 Playing back ... indicators and messages ......... 167 Additional Information Usable cassettes 169 About the "InfoLITHIUM" battery pack 171 About i.LINK 172 Using your computer .. 147 Enlarging still images recorded on "Memory Stick"s - Memory photo playback 142 Viewing a moving picture -
MPEG movie playback 145 Viewing images using your camcorder abroad 174 Maintenance information and precautions 175 Specifications 181 Quick Reference Identifying the parts and controls .......... 183 Index 190 7 Memory PB ZOOM 153 Playing back ... indicators and messages ......... 167 Additional Information Usable cassettes 169 About the "InfoLITHIUM" battery pack 171 About i.LINK 172 Using your computer .. 147 Enlarging still images recorded on "Memory Stick"s - Memory photo playback 142 Viewing a moving picture -

Operating Instructions
Page 8
... into the cassette compartment with its v mark facing the Holding Grip. Connecting the power cord (p. 16) Use the battery pack when using your camcorder. AC power adaptor (supplied) Connect the plug with the window facing out. 3 Close the cassette compartment by pressing the mark on the cassette compartment... (p. 19) 1 Slide OPEN/ ZEJECT in the direction of the arrow and open the lid. 2 Push the middle portion of the back of your camcorder outdoors (p. 12). Insert the cassette in parentheses "( )" for more information. Pull down completely, close the lid until it clicks.
... into the cassette compartment with its v mark facing the Holding Grip. Connecting the power cord (p. 16) Use the battery pack when using your camcorder. AC power adaptor (supplied) Connect the plug with the window facing out. 3 Close the cassette compartment by pressing the mark on the cassette compartment... (p. 19) 1 Slide OPEN/ ZEJECT in the direction of the arrow and open the lid. 2 Push the middle portion of the back of your camcorder outdoors (p. 12). Insert the cassette in parentheses "( )" for more information. Pull down completely, close the lid until it clicks.

Operating Instructions
Page 9
... to VCR while pressing the small green button. Viewfinder When the LCD panel is set the clock setting before recording (p. 17). Your camcorder starts recording. MEMORY OFF CAMERA (CHARGE) NOTE Do not pick up your camcorder, the clock setting is closed, pull out the viewfinder untill its click to focus on the LCD screen (p. 34...
... to VCR while pressing the small green button. Viewfinder When the LCD panel is set the clock setting before recording (p. 17). Your camcorder starts recording. MEMORY OFF CAMERA (CHARGE) NOTE Do not pick up your camcorder, the clock setting is closed, pull out the viewfinder untill its click to focus on the LCD screen (p. 34...
Operating Instructions
Page 10
... format. Copyright precautions Television programs, films, video tapes, and other materials may be copyrighted. Unauthorized recording of the features that operate only with cassette memory. Set the POWER switch to country. End search (p. 32) - To view your recordings on a TV, you can hear a ...the operation is based on TV color systems TV color systems differ from country to CAMERA. Labeling a cassette (p. 103) For details, see this mark in capital letters. Note on Cassette Memory Your camcorder is being carried out. You can operate only with cassette memory are : - ...
... format. Copyright precautions Television programs, films, video tapes, and other materials may be copyrighted. Unauthorized recording of the features that operate only with cassette memory. Set the POWER switch to country. End search (p. 32) - To view your recordings on a TV, you can hear a ...the operation is based on TV color systems TV color systems differ from country to CAMERA. Labeling a cassette (p. 103) For details, see this mark in capital letters. Note on Cassette Memory Your camcorder is being carried out. You can operate only with cassette memory are : - ...

Operating Instructions
Page 11
... of the pixels are normal in the manufacturing process and do not affect the recording in the sun or under direct sunlight [b]. •Be careful when placing the camera near a window or outdoors. Keep your camcorder to temperatures above 60 °C (140 °F), such as dusk [d]. [a]... [b] [c] [d] 11 Letting your camcorder get wet. Exposing the LCD screen, the finder or the lens to...
... of the pixels are normal in the manufacturing process and do not affect the recording in the sun or under direct sunlight [b]. •Be careful when placing the camera near a window or outdoors. Keep your camcorder to temperatures above 60 °C (140 °F), such as dusk [d]. [a]... [b] [c] [d] 11 Letting your camcorder get wet. Exposing the LCD screen, the finder or the lens to...

Operating Instructions
Page 12
... the battery terminal cover. Step 1 Preparing the power supply Installing the battery pack We recommend that you use the battery pack when you use your camcorder outdoors. (1) While sliding BATT (battery) release lever in the direction of the arrow 1, slide the battery terminal cover in the direction of the arrow 2. (2) Insert...
... the battery terminal cover. Step 1 Preparing the power supply Installing the battery pack We recommend that you use the battery pack when you use your camcorder outdoors. (1) While sliding BATT (battery) release lever in the direction of the arrow 1, slide the battery terminal cover in the direction of the arrow 2. (2) Insert...

Operating Instructions
Page 13
... parts of the DC plug of "InfoLITHIUM" battery pack. (1) Open the DC IN jack cover and connect the AC power adaptor supplied with your camcorder. When you use the AC power adaptor Place the AC power adaptor near a wall outlet. After the charge is completed, the CHARGE lamp goes ...out. (full charge) 2 CHARGE lamp 14 POWER LOCK VCR MEMORY OFF CAMERA (CHARGE) After charging the battery pack Disconnect the AC power adaptor from coming into contact with the plug's v mark facing the Holding Grip. (2) Connect ...
... parts of the DC plug of "InfoLITHIUM" battery pack. (1) Open the DC IN jack cover and connect the AC power adaptor supplied with your camcorder. When you use the AC power adaptor Place the AC power adaptor near a wall outlet. After the charge is completed, the CHARGE lamp goes ...out. (full charge) 2 CHARGE lamp 14 POWER LOCK VCR MEMORY OFF CAMERA (CHARGE) After charging the battery pack Disconnect the AC power adaptor from coming into contact with the plug's v mark facing the Holding Grip. (2) Connect ...

Operating Instructions
Page 14
...if you use your camcorder in a cold environment. ** Approximate number of the ambient temperature. The battery life will be shorter if you use your camcorder in a cold environment. 14 Approximate minutes at 25 °C (77 °F) to charge an empty battery pack Recording time Battery pack NP...-FM30 (supplied) NP-FM50 NP-FM70 NP-FM90 NP-FM91 Recording with the viewfinder Continuous* Typical** 115...
...if you use your camcorder in a cold environment. ** Approximate number of the ambient temperature. The battery life will be shorter if you use your camcorder in a cold environment. 14 Approximate minutes at 25 °C (77 °F) to charge an empty battery pack Recording time Battery pack NP...-FM30 (supplied) NP-FM50 NP-FM70 NP-FM90 NP-FM91 Recording with the viewfinder Continuous* Typical** 115...

Operating Instructions
Page 15
... has enough power to 86 °F). Recommended charging temperature We recommend charging the battery pack in an ambient temperature of Sony Corporation. 15 This unit is compatible with the "InfoLITHIUM" battery. Your camcorder operates only with the "InfoLITHIUM" battery pack (M series). "InfoLITHIUM" M series battery packs have the mark. TM SERIES "InfoLITHIUM" is...
... has enough power to 86 °F). Recommended charging temperature We recommend charging the battery pack in an ambient temperature of Sony Corporation. 15 This unit is compatible with the "InfoLITHIUM" battery. Your camcorder operates only with the "InfoLITHIUM" battery pack (M series). "InfoLITHIUM" M series battery packs have the mark. TM SERIES "InfoLITHIUM" is...

Operating Instructions
Page 16
...power adaptor can supply power even if the battery pack is attached to your camcorder. • The DC IN jack has "source priority." Using a car battery Use Sony DC Adaptor/Charger (optional). 16 This means that you use your camcorder for a long time, we recommend that the battery pack cannot supply any...a wall outlet using the AC power adaptor. (1) Open the DC IN jack cover and connect the AC power adaptor supplied with your camcorder to the DC IN jack on your camcorder with the plug's v mark facing the Holding Grip. (2) Connect the power cord to the AC power adaptor. (3) Connect the power...
...power adaptor can supply power even if the battery pack is attached to your camcorder. • The DC IN jack has "source priority." Using a car battery Use Sony DC Adaptor/Charger (optional). 16 This means that you use your camcorder for a long time, we recommend that the battery pack cannot supply any...a wall outlet using the AC power adaptor. (1) Open the DC IN jack cover and connect the AC power adaptor supplied with your camcorder to the DC IN jack on your camcorder with the plug's v mark facing the Holding Grip. (2) Connect the power cord to the AC power adaptor. (3) Connect the power...

Operating Instructions
Page 17
...switch to CAMERA or MEMORY unless you use your camcorder will have been discharged (p. 177). First, set the year, then the month, the day, the hour and then the minute. (1) Set the POWER switch to CAMERA or ...EXEC by the time signal. If you do not use your camcorder for about three months, the date and time settings may appear) because the built-in rechargeable battery ...installed in your camcorder for the first time. r R EXEC RET. 5 EXEC SETUP MENU EXIT CLOCK SET DEMO MODE ...
...switch to CAMERA or MEMORY unless you use your camcorder will have been discharged (p. 177). First, set the year, then the month, the day, the hour and then the minute. (1) Set the POWER switch to CAMERA or ...EXEC by the time signal. If you do not use your camcorder for about three months, the date and time settings may appear) because the built-in rechargeable battery ...installed in your camcorder for the first time. r R EXEC RET. 5 EXEC SETUP MENU EXIT CLOCK SET DEMO MODE ...

Operating Instructions
Page 18
If you do not set the date and time and are recorded on the data code of your camcorder operates on the time indicator The internal clock of the tape and the "Memory Stick". Step 2 Setting the date and time The year changes as follows: 1995 y 2001 T t 2079 To return to FN Press EXIT. Note on a 12-hour cycle. - 12:00 AM stands for midnight. - 12:00 PM stands for noon. 18
If you do not set the date and time and are recorded on the data code of your camcorder operates on the time indicator The internal clock of the tape and the "Memory Stick". Step 2 Setting the date and time The year changes as follows: 1995 y 2001 T t 2079 To return to FN Press EXIT. Note on a 12-hour cycle. - 12:00 AM stands for midnight. - 12:00 PM stands for noon. 18

Operating Instructions
Page 20
... buttons appear on the LCD screen. (5) Press PAGE2 to go to PAGE3. SCH SURE 4 FN MEMORY OFF CAMERA (CHARGE) VCR 3 POWER LOCK PAGE1 PAGE2 PAGE3 EXIT TITLE LCD VOL MEM BRT MIX PAGE1 PAGE2 PAGE3 EXIT ... Step 4 Using the touch panel Your camcorder has operation buttons on the LCD screen. (6) Press PAGE3 to go to PAGE2. To execute settings Press EXEC or OK. In CAMERA or VCR mode (1) Install the battery pack...EXIT. To cancel settings Press OFF to return to CAMERA (in the standby/recording mode) or VCR (in the playback mode) while pressing the small green button. (4) Press ...
... buttons appear on the LCD screen. (5) Press PAGE2 to go to PAGE3. SCH SURE 4 FN MEMORY OFF CAMERA (CHARGE) VCR 3 POWER LOCK PAGE1 PAGE2 PAGE3 EXIT TITLE LCD VOL MEM BRT MIX PAGE1 PAGE2 PAGE3 EXIT ... Step 4 Using the touch panel Your camcorder has operation buttons on the LCD screen. (6) Press PAGE3 to go to PAGE2. To execute settings Press EXEC or OK. In CAMERA or VCR mode (1) Install the battery pack...EXIT. To cancel settings Press OFF to return to CAMERA (in the standby/recording mode) or VCR (in the playback mode) while pressing the small green button. (4) Press ...

Operating Instructions
Page 21
... DISPLAY/TOUCH PANEL on the LCD screen, touch the LCD screen lightly to make it appear. Touch panel You can control the display with your camcorder. • When operation buttons do not work even if you press them with sharp-pointed objects such as pens. • Do not press the LCD... panel, press operation buttons with your thumb supporting the LCD screen from the back side of the items changes to display the following buttons: In CAMERA mode PAGE1 PAGE2 PAGE3 MENU, SPOT METER, FADER, DIG EFFT, END SCH, EXPOSURE TITLE, LCD BRT, VOL, MEM MIX SELFTIMER In VCR mode PAGE1 PAGE2...
... DISPLAY/TOUCH PANEL on the LCD screen, touch the LCD screen lightly to make it appear. Touch panel You can control the display with your camcorder. • When operation buttons do not work even if you press them with sharp-pointed objects such as pens. • Do not press the LCD... panel, press operation buttons with your thumb supporting the LCD screen from the back side of the items changes to display the following buttons: In CAMERA mode PAGE1 PAGE2 PAGE3 MENU, SPOT METER, FADER, DIG EFFT, END SCH, EXPOSURE TITLE, LCD BRT, VOL, MEM MIX SELFTIMER In VCR mode PAGE1 PAGE2...

Operating Instructions
Page 22
... "Step 1" and "Step 3" for you. (1) Remove the lens cap and pull the lens cap string to CAMERA while pressing the small green button. The camera recording lamp located on the front of your camcorder firmly as illustrated. (4) Press OPEN to open the LCD panel. (5) Set the POWER switch to fix it. (2) Install the power...
... "Step 1" and "Step 3" for you. (1) Remove the lens cap and pull the lens cap string to CAMERA while pressing the small green button. The camera recording lamp located on the front of your camcorder firmly as illustrated. (4) Press OPEN to open the LCD panel. (5) Set the POWER switch to fix it. (2) Install the power...
Operating Instructions
Page 23
... can no longer be written properly between the last scene you slide the LOCK switch to CAMERA again. When you record a tape in the LP mode on your camcorder in the SP mode. This is not smooth. •The playback picture may be distorted or the time code may not be set the...
... can no longer be written properly between the last scene you slide the LOCK switch to CAMERA again. When you record a tape in the LP mode on your camcorder in the SP mode. This is not smooth. •The playback picture may be distorted or the time code may not be set the...

Operating Instructions
Page 24
... Make sure if the LCD panel is set it vertically, and swing it into the camcorder body. In CAMERA or MEMORY mode. The indicator appears in the mirror mode, the viewfinder automatically turns off. Recording a picture Adjusting the LCD screen The LCD panel moves about 90 degrees to the viewfinder... side and about 180 degrees to the lens side. 180° 90° OPEN When closing the LCD panel, set to CAMERA, Xz appears in the standby mode...
... Make sure if the LCD panel is set it vertically, and swing it into the camcorder body. In CAMERA or MEMORY mode. The indicator appears in the mirror mode, the viewfinder automatically turns off. Recording a picture Adjusting the LCD screen The LCD panel moves about 90 degrees to the viewfinder... side and about 180 degrees to the lens side. 180° 90° OPEN When closing the LCD panel, set to CAMERA, Xz appears in the standby mode...


