Operating Guide
Page 4
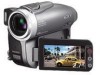
... a DVD-RW/DVD+RW (not supplied) for trial recording (p.13). • Compensation for video cameras and offers a quality typical of light from a subject coming into the lens. About the Carl Zeiss lens Your camcorder is equipped with a USB cable etc., be sure ...Carl Zeiss, in low light conditions, such as at the sun. Take pictures of the sun only in Germany, and Sony Corporation, and produces superior images. Change the screen language before using a digital still camera, and thus may be some ...lamps of the POWER switch (p.20) or the ACCESS lamp (p.24) is on the model DCR-DVD403.
... a DVD-RW/DVD+RW (not supplied) for trial recording (p.13). • Compensation for video cameras and offers a quality typical of light from a subject coming into the lens. About the Carl Zeiss lens Your camcorder is equipped with a USB cable etc., be sure ...Carl Zeiss, in low light conditions, such as at the sun. Take pictures of the sun only in Germany, and Sony Corporation, and produces superior images. Change the screen language before using a digital still camera, and thus may be some ...lamps of the POWER switch (p.20) or the ACCESS lamp (p.24) is on the model DCR-DVD403.
Operating Guide
Page 5
...• Clean the disc with marks listed below. • For reliability durability of the disc or your DVD Handycam. Do not heat the disc or use solvents such as benzine, cleaners intended for your camcorder. Use the discs with the supplied cleaning cloth. on a single sided disc, write only on the surface... from the center out. Do not dry the surface by its case. • When you use 8cm DVD-Rs, 8cm DVDRWs and 8cm DVD+RWs only. About the disc • You can use Sony discs or discs with a soft, dry cloth. When the message [C:13:] appears on the ...
...• Clean the disc with marks listed below. • For reliability durability of the disc or your DVD Handycam. Do not heat the disc or use solvents such as benzine, cleaners intended for your camcorder. Use the discs with the supplied cleaning cloth. on a single sided disc, write only on the surface... from the center out. Do not dry the surface by its case. • When you use 8cm DVD-Rs, 8cm DVDRWs and 8cm DVD+RWs only. About the disc • You can use Sony discs or discs with a soft, dry cloth. When the message [C:13:] appears on the ...
Operating Guide
Page 6
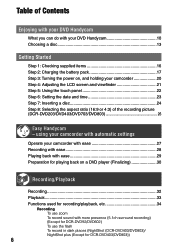
... of Contents Enjoying with your DVD Handycam What you can do with your DVD Handycam 10 Choosing a disc 13 Getting Started Step 1: Checking supplied items 16 Step 2: Charging the battery pack 17 Step 3: Turning the power on, and holding your camcorder with ease 27 Recording with ease...Playing back with ease 29 Preparation for playing back on a DVD player (Finalizing 30 Recording/Playback Recording 32 Playback 33 Functions used for DCR-DVD403/DVD803)) 6 using your camcorder with more presence (5.1ch surround recording) (Except for DCR-DVD92/DVD602) To use the flash To record in...
... of Contents Enjoying with your DVD Handycam What you can do with your DVD Handycam 10 Choosing a disc 13 Getting Started Step 1: Checking supplied items 16 Step 2: Charging the battery pack 17 Step 3: Turning the power on, and holding your camcorder with ease 27 Recording with ease...Playing back with ease 29 Preparation for playing back on a DVD player (Finalizing 30 Recording/Playback Recording 32 Playback 33 Functions used for DCR-DVD403/DVD803)) 6 using your camcorder with more presence (5.1ch surround recording) (Except for DCR-DVD92/DVD602) To use the flash To record in...
Operating Guide
Page 7
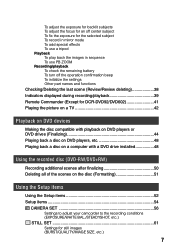
...Indicators displayed during recording/playback 39 Remote Commander (Except for DCR-DVD92/DVD602 41 Playing the picture on a TV 42 Playback on DVD devices Making the disc compatible with playback on DVD players or DVD drives (Finalizing 44 Playing back a disc on DVD players, etc 48 Playing back a disc on a ... the recorded disc (DVD-RW/DVD+RW) Recording additional scenes after finalizing 50 Deleting all of the scenes on the disc (Formatting 51 Using the Setup items Using the Setup items 52 Setup items 54 CAMERA SET 56 Settings to adjust your camcorder to the recording conditions...
...Indicators displayed during recording/playback 39 Remote Commander (Except for DCR-DVD92/DVD602 41 Playing the picture on a TV 42 Playback on DVD devices Making the disc compatible with playback on DVD players or DVD drives (Finalizing 44 Playing back a disc on DVD players, etc 48 Playing back a disc on a ... the recorded disc (DVD-RW/DVD+RW) Recording additional scenes after finalizing 50 Deleting all of the scenes on the disc (Formatting 51 Using the Setup items Using the Setup items 52 Setup items 54 CAMERA SET 56 Settings to adjust your camcorder to the recording conditions...
Operating Guide
Page 11
... you to record on it . You can also create a DVD menu that it can be able to record images. Enjoying with your camcorder (p.82). • The DCR-DVD92/DVD602 do not support a computer connection. * DVD (Digital Versatile Disc) is described as a "disc." ** ...Finalizing means converting a recorded disc so that helps you to find the desired image quickly, from a list of a computer if you finalize** it again on your DVD Handycam...
... you to record on it . You can also create a DVD menu that it can be able to record images. Enjoying with your camcorder (p.82). • The DCR-DVD92/DVD602 do not support a computer connection. * DVD (Digital Versatile Disc) is described as a "disc." ** ...Finalizing means converting a recorded disc so that helps you to find the desired image quickly, from a list of a computer if you finalize** it again on your DVD Handycam...
Operating Guide
Page 16
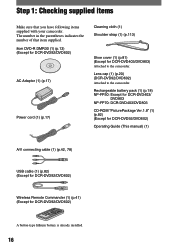
... Guide (This manual) (1) A/V connecting cable (1) (p.42, 78) USB cable (1) (p.82) (Except for DCR-DVD92/DVD602) Wireless Remote Commander (1) (p.41) (Except for DCR-DVD403/DVD803) Attached to the camcorder. Step 1: Checking supplied items Make sure that item supplied. 8cm DVD-R DMR30 (1) (p.13) (Except for DCR-DVD92/DVD602) AC Adaptor (1) (p.17) Power cord (1) (p.17) Cleaning cloth (1) Shoulder strap...
... Guide (This manual) (1) A/V connecting cable (1) (p.42, 78) USB cable (1) (p.82) (Except for DCR-DVD92/DVD602) Wireless Remote Commander (1) (p.41) (Except for DCR-DVD403/DVD803) Attached to the camcorder. Step 1: Checking supplied items Make sure that item supplied. 8cm DVD-R DMR30 (1) (p.13) (Except for DCR-DVD92/DVD602) AC Adaptor (1) (p.17) Power cord (1) (p.17) Cleaning cloth (1) Shoulder strap...
Operating Guide
Page 20
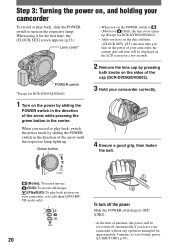
... seconds. Lens cover* • When you set the POWER switch to (Movie) or (Still), the lens cover opens up (Except for DCR-DVD92/DVD602). • After you leave your camcorder, the current date and time will be displayed on the LCD screen for the first time, the [CLOCK SET] screen appears... (p.23). When you record or play back pictures on your camcorder, or to edit them (DVD-RW: VR mode only) CHG 20 To turn off automatically if you have set to turn on the power of your...
... seconds. Lens cover* • When you set the POWER switch to (Movie) or (Still), the lens cover opens up (Except for DCR-DVD92/DVD602). • After you leave your camcorder, the current date and time will be displayed on the LCD screen for the first time, the [CLOCK SET] screen appears... (p.23). When you record or play back pictures on your camcorder, or to edit them (DVD-RW: VR mode only) CHG 20 To turn off automatically if you have set to turn on the power of your...
Operating Guide
Page 24
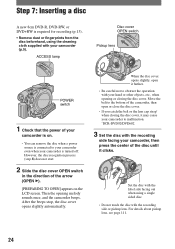
...8226; You can remove the disc when a power source is connected to your camcorder even when your camcorder is turned off. For details about pickup lens, see page 111. 24 Step 7: Inserting a disc A new 8cm DVD-R, DVD-RW, or DVD+RW is required for recording (p.13). • Remove dust or fingerprints ...If you catch the belt or the lens cap strap* when closing the disc cover. Move the belt to malfunction. *DCR-DVD92/DVD602 3 Set the disc with your camcorder is on the LCD screen. After the beeps stop, the disc cover opens slightly automatically. ACCESS lamp Disc cover OPEN ...
...8226; You can remove the disc when a power source is connected to your camcorder even when your camcorder is turned off. For details about pickup lens, see page 111. 24 Step 7: Inserting a disc A new 8cm DVD-R, DVD-RW, or DVD+RW is required for recording (p.13). • Remove dust or fingerprints ...If you catch the belt or the lens cap strap* when closing the disc cover. Move the belt to malfunction. *DCR-DVD92/DVD602 3 Set the disc with your camcorder is on the LCD screen. After the beeps stop, the disc cover opens slightly automatically. ACCESS lamp Disc cover OPEN ...
Operating Guide
Page 25
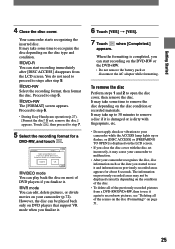
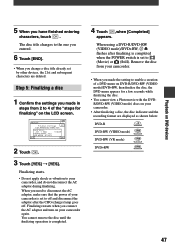
Proceed to step 6. • During Easy Handycam operation (p.27), [Format the disc? When the formatting is completed, you finalize it . 6 Touch [YES] [YES]. 7 Touch when [Completed.] appears. Proceed to step 5. DVD+RW The [FORMAT] screen appears. To remove the disc Perform steps 1...recognize the disc depending on the disc type and condition. DVD-R You can start recording immediately after step 5. DVD-RW Select the recording format, then format the disc. Your camcorder starts recognizing the inserted disc. It may not be played back ...
Proceed to step 6. • During Easy Handycam operation (p.27), [Format the disc? When the formatting is completed, you finalize it . 6 Touch [YES] [YES]. 7 Touch when [Completed.] appears. Proceed to step 5. DVD+RW The [FORMAT] screen appears. To remove the disc Perform steps 1...recognize the disc depending on the disc type and condition. DVD-R You can start recording immediately after step 5. DVD-RW Select the recording format, then format the disc. Your camcorder starts recognizing the inserted disc. It may not be played back ...
Operating Guide
Page 26
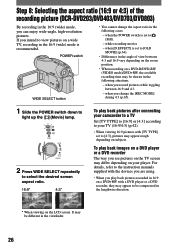
...and 16:9 vary depending on the zoom position. • When recording on subjects. To play back pictures recorded in 16:9 on a DVD+RW with a DVD player or a DVD recorder, they may be shorter in the 16:9 (wide) mode is recommended. when you change the aspect ratio in the 16:9 (...picture (DCR-DVD203/DVD403/DVD703/DVD803) By recording in the following situations. - when the POWER switch is set to your player. CHG MODE ON OFF (CHG) POWER 2 Press WIDE SELECT repeatedly to select the desired screen aspect ratio. 16:9* 4:3* To play back pictures after connecting your camcorder to a...
...and 16:9 vary depending on the zoom position. • When recording on subjects. To play back pictures recorded in 16:9 on a DVD+RW with a DVD player or a DVD recorder, they may be shorter in the 16:9 (wide) mode is recommended. when you change the aspect ratio in the 16:9 (...picture (DCR-DVD203/DVD403/DVD703/DVD803) By recording in the following situations. - when the POWER switch is set to your player. CHG MODE ON OFF (CHG) POWER 2 Press WIDE SELECT repeatedly to select the desired screen aspect ratio. 16:9* 4:3* To play back pictures after connecting your camcorder to a...
Operating Guide
Page 27
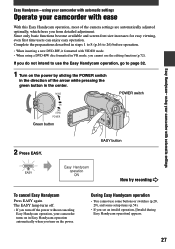
... 26) before operation. • When inserting a new DVD-RW, it formatted with automatic settings Easy Handycam - The EASY lamp turns off. • If you turn off the power without canceling Easy Handycam operation, your camcorder with VIDEO mode. • When using your camcorder turns on in Easy Handycam operation automatically when you turn on the power...
... 26) before operation. • When inserting a new DVD-RW, it formatted with automatic settings Easy Handycam - The EASY lamp turns off. • If you turn off the power without canceling Easy Handycam operation, your camcorder with VIDEO mode. • When using your camcorder turns on in Easy Handycam operation automatically when you turn on the power...
Operating Guide
Page 30
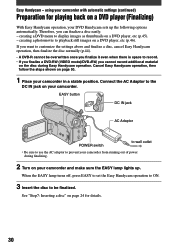
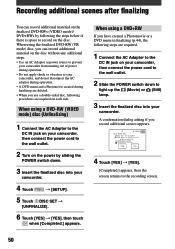
... settings above and finalize a disc, cancel Easy Handycam operation, then finalize the disc normally (p.44). • A DVD-R cannot be finalized. Therefore, you cannot record additional material on your camcorder in a stable position. Cancel Easy Handycam operation, then follow the steps shown on your DVD Handycam sets up . EASY button DC IN jack AC...
... settings above and finalize a disc, cancel Easy Handycam operation, then finalize the disc normally (p.44). • A DVD-R cannot be finalized. Therefore, you cannot record additional material on your camcorder in a stable position. Cancel Easy Handycam operation, then follow the steps shown on your DVD Handycam sets up . EASY button DC IN jack AC...
Operating Guide
Page 31
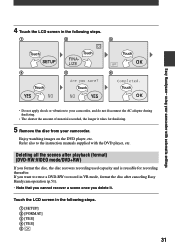
...all the scenes after canceling Easy Handycam operation (p.51). • Note that you cannot recover a scene once you format the disc, the disc recovers recording used capacity and is reusable for finalizing. 5 Remove the disc from your camcorder with the DVD player, etc. 4 Touch the ...following steps. Touch Touch Touch Touch Touch Touch Easy Handycam- If you want to reuse a DVD-RW to your camcorder, and do not disconnect the AC adaptor during finalizing. • The shorter the amount of material recorded, the...
...all the scenes after canceling Easy Handycam operation (p.51). • Note that you cannot recover a scene once you format the disc, the disc recovers recording used capacity and is reusable for finalizing. 5 Remove the disc from your camcorder with the DVD player, etc. 4 Touch the ...following steps. Touch Touch Touch Touch Touch Touch Easy Handycam- If you want to reuse a DVD-RW to your camcorder, and do not disconnect the AC adaptor during finalizing. • The shorter the amount of material recorded, the...
Operating Guide
Page 35
...be played back with DVD recorders/DVD players compatible with your fingers or other objects. • Adjust the focus manually ([FOCUS], p.58) when it is hard to focus automatically. • Do not use Super NightShot (DCR-DVD403/DVD803)/Super NightShot plus (Except for DCR-DVD403/ DVD803) function (p....dust from the surface of the flash lamp before using it. Therefore, do not cover the infrared port with your camcorder. * Dolby Digital 5.1 Creater compresses sound effectively while maintaining high quality sound. To adjust the focus for an off center subject See ...
...be played back with DVD recorders/DVD players compatible with your fingers or other objects. • Adjust the focus manually ([FOCUS], p.58) when it is hard to focus automatically. • Do not use Super NightShot (DCR-DVD403/DVD803)/Super NightShot plus (Except for DCR-DVD403/ DVD803) function (p....dust from the surface of the flash lamp before using it. Therefore, do not cover the infrared port with your camcorder. * Dolby Digital 5.1 Creater compresses sound effectively while maintaining high quality sound. To adjust the focus for an off center subject See ...
Operating Guide
Page 44
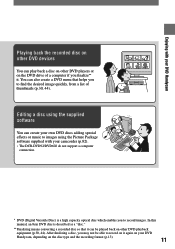
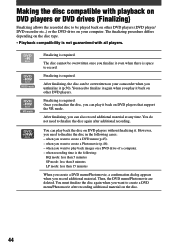
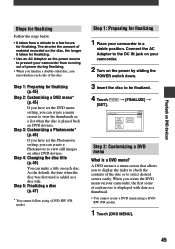
... unfinalize it . After finalizing, you can be overwritten on your camcorder when you finalize it even when there is not guaranteed with playback on DVD players or DVD drives (Finalizing) Finalizing allows the recorded disc to create a DVD menu/Photomovie after additional recording. when you want to create a Photomovie (p.46...
... unfinalize it . After finalizing, you can be overwritten on your camcorder when you finalize it even when there is not guaranteed with playback on DVD players or DVD drives (Finalizing) Finalizing allows the recorded disc to create a DVD menu/Photomovie after additional recording. when you want to create a Photomovie (p.46...
Operating Guide
Page 45
...Step 5: Finalizing a disc (p.47) * You cannot follow using a DVDRW (VR mode). 1 Touch [DVD MENU]. 45 Step 4: Changing the disc title (p.46) You can create a Photomovie to a few hours for finalizing 1 Place your camcorder, the first scene of the disc or to be finalized. 4 Touch [SET]. ...date when the disc was first used is a DVD menu? Connect the AC Adaptor to the DC IN jack on your camcorder from a minute to view still images on other DVD devices. When you create the DVD menu on each disc. A DVD menu is a menu screen that allows you to display...
...Step 5: Finalizing a disc (p.47) * You cannot follow using a DVDRW (VR mode). 1 Touch [DVD MENU]. 45 Step 4: Changing the disc title (p.46) You can create a Photomovie to a few hours for finalizing 1 Place your camcorder, the first scene of the disc or to be finalized. 4 Touch [SET]. ...date when the disc was first used is a DVD menu? Connect the AC Adaptor to the DC IN jack on your camcorder from a minute to view still images on other DVD devices. When you create the DVD menu on each disc. A DVD menu is a menu screen that allows you to display...
Operating Guide
Page 47
... that the power of your camcorder. • After finalizing a disc, the disc indicator and the recording format are deleted. When you made the setting to 4 of a DVD menu on DVD-R/DVD-RW (VIDEO mode)/DVD+RW, then finalize the disc, the DVD menu appears for finalizing..." on your camcorder is completed. 4 Touch ,when [Completed] appears. Finalizing starts. • Do not...
... that the power of your camcorder. • After finalizing a disc, the disc indicator and the recording format are deleted. When you made the setting to 4 of a DVD menu on DVD-R/DVD-RW (VIDEO mode)/DVD+RW, then finalize the disc, the DVD menu appears for finalizing..." on your camcorder is completed. 4 Touch ,when [Completed] appears. Finalizing starts. • Do not...
Operating Guide
Page 50
...the POWER switch down . 3 Insert the finalized disc into your camcorder. When using the finalized DVD-RW (VR mode) disc, you can record additional material on the finalized DVD-RWs (VIDEO mode)/ DVD+RWs by sliding the POWER switch down to light up the (Movie)... running out of power during operation. • Do not apply shock or vibration to your camcorder, and do not disconnect the AC adaptor during operation. • A DVD menu and a Photomovie created during finalizing are deleted. • When you record additional scenes appears. 4 Touch [YES] ...
...the POWER switch down . 3 Insert the finalized disc into your camcorder. When using the finalized DVD-RW (VR mode) disc, you can record additional material on the finalized DVD-RWs (VIDEO mode)/ DVD+RWs by sliding the POWER switch down to light up the (Movie)... running out of power during operation. • Do not apply shock or vibration to your camcorder, and do not disconnect the AC adaptor during operation. • A DVD menu and a Photomovie created during finalizing are deleted. • When you record additional scenes appears. 4 Touch [YES] ...
Operating Guide
Page 51
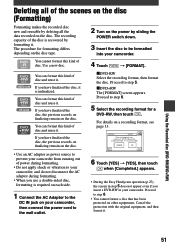
... outlet. 6 Touch [YES] [YES], then touch when [Completed.] appears. • During the Easy Handycam operation (p.27), the screen in step 5 does not appear even if you insert a DVD-RW in your camcorder, then connect the power cord to the DC IN jack on other equipments. Deleting all of the... records on finalizing remain on the disc. • Use an AC adaptor as power source to prevent your camcorder from running out of disc and reuse it . DVD-RW Select the recording format, then format the disc. You can format this kind of power during formatting. •...
... outlet. 6 Touch [YES] [YES], then touch when [Completed.] appears. • During the Easy Handycam operation (p.27), the screen in step 5 does not appear even if you insert a DVD-RW in your camcorder, then connect the power cord to the DC IN jack on other equipments. Deleting all of the... records on finalizing remain on the disc. • Use an AC adaptor as power source to prevent your camcorder from running out of disc and reuse it . DVD-RW Select the recording format, then format the disc. You can format this kind of power during formatting. •...
Operating Guide
Page 65
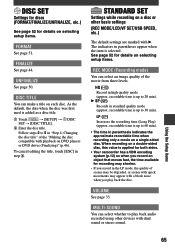
DISC SET Settings for discs (FORMAT/FINALIZE/UNFINALIZE, etc.) See page 52 for recording may appear with playback on DVD players or DVD drives (Finalizing)" (p.46). See page 52 for details on selecting setup items. REC MODE (Recording mode) You can select an image quality of scenes... cancel editing the title, touch [ESC] in high quality mode (approx. VOLUME See page 33. recordable time is applied for both sides. • Your camcorder has a VBR encoding system (p.12) so when you play back audio recorded using other basic settings (REC MODE/LCD/VF SET/USB SPEED, etc.) The...
DISC SET Settings for discs (FORMAT/FINALIZE/UNFINALIZE, etc.) See page 52 for recording may appear with playback on DVD players or DVD drives (Finalizing)" (p.46). See page 52 for details on selecting setup items. REC MODE (Recording mode) You can select an image quality of scenes... cancel editing the title, touch [ESC] in high quality mode (approx. VOLUME See page 33. recordable time is applied for both sides. • Your camcorder has a VBR encoding system (p.12) so when you play back audio recorded using other basic settings (REC MODE/LCD/VF SET/USB SPEED, etc.) The...


