Operating Guide
Page 3
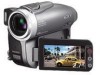
...First Step Guide" for a Class B digital device, pursuant to correct the interference by turning the equipment off and on use Your camcorder is no guarantee that may not cause harmful interference, and (2) this equipment. Operation is encouraged to try to Part 15 of operations... to radio communications. Telephone No.: 858-942-2230 This device complies with Part 15 of Conformity Trade Name: SONY Model No.: DCR-DVD403 Responsible Party:Sony Electronics Inc. "Operating guide" (This manual) - View finder LCD screen Battery 3 Declaration of Conformity Declaration...
...First Step Guide" for a Class B digital device, pursuant to correct the interference by turning the equipment off and on use Your camcorder is no guarantee that may not cause harmful interference, and (2) this equipment. Operation is encouraged to try to Part 15 of operations... to radio communications. Telephone No.: 858-942-2230 This device complies with Part 15 of Conformity Trade Name: SONY Model No.: DCR-DVD403 Responsible Party:Sony Electronics Inc. "Operating guide" (This manual) - View finder LCD screen Battery 3 Declaration of Conformity Declaration...
Operating Guide
Page 4
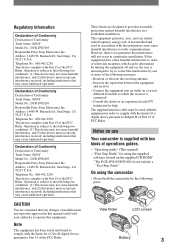
...lamps of your camcorder. If you see. • The on-screen displays in low light conditions, such as at the sun. You cannot dub copyright protected software on the model DCR-DVD403. On this...supplied) for trial recording (p.13). • Compensation for illustrating the operating procedures. Doing so might cause your camcorder. Be careful when placing the camera near a window or outdoors. • Do not aim at dusk. These..., red, blue, or green in Germany, and Sony Corporation, and produces superior images. However, there may cause malfunctions. Take pictures of time may ...
...lamps of your camcorder. If you see. • The on-screen displays in low light conditions, such as at the sun. You cannot dub copyright protected software on the model DCR-DVD403. On this...supplied) for trial recording (p.13). • Compensation for illustrating the operating procedures. Doing so might cause your camcorder. Be careful when placing the camera near a window or outdoors. • Do not aim at dusk. These..., red, blue, or green in Germany, and Sony Corporation, and produces superior images. However, there may cause malfunctions. Take pictures of time may ...
Operating Guide
Page 5
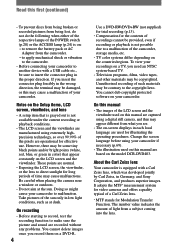
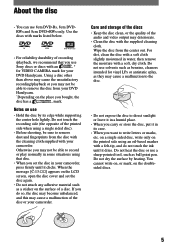
...be able to remove dust and fingerprints from the disc with the cleaning cloth supplied with your camcorder. on a single sided disc, write only on the printed side using a single sided disc). •..., then remove the moisture with a soft, dry cloth. About the disc • You can use Sony discs or discs with an * for VIDEO CAMERA mark for vinyl LPs or antistatic splay, as they...(the opposite of the disc or your camcorder. Wipe the disc from the center out. Do not use a sharp-pointed tool, such as benzine, cleaners intended for your DVD Handycam. Do not heat the disc or use...
...be able to remove dust and fingerprints from the disc with the cleaning cloth supplied with your camcorder. on a single sided disc, write only on the printed side using a single sided disc). •..., then remove the moisture with a soft, dry cloth. About the disc • You can use Sony discs or discs with an * for VIDEO CAMERA mark for vinyl LPs or antistatic splay, as they...(the opposite of the disc or your camcorder. Wipe the disc from the center out. Do not use a sharp-pointed tool, such as benzine, cleaners intended for your DVD Handycam. Do not heat the disc or use...
Operating Guide
Page 6
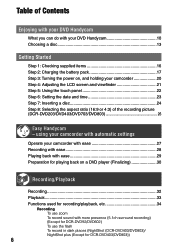
.../playback, etc 34 Recording To use the flash To record in dark places (NightShot (DCR-DVD403/DVD803)/ NightShot plus (Except for DCR-DVD92/DVD602) To use zoom To record sound with your camcorder 20 Step 4: Adjusting the LCD screen and viewfinder 21 Step 5: Using the touch... panel 22 Step 6: Setting the date and time 23 Step 7: Inserting a disc 24 Step 8: Selecting the aspect ratio (16:9 or 4:3) of the recording picture (DCR-DVD203/DVD403/DVD703/DVD803 26 Easy Handycam - ...
.../playback, etc 34 Recording To use the flash To record in dark places (NightShot (DCR-DVD403/DVD803)/ NightShot plus (Except for DCR-DVD92/DVD602) To use zoom To record sound with your camcorder 20 Step 4: Adjusting the LCD screen and viewfinder 21 Step 5: Using the touch... panel 22 Step 6: Setting the date and time 23 Step 7: Inserting a disc 24 Step 8: Selecting the aspect ratio (16:9 or 4:3) of the recording picture (DCR-DVD203/DVD403/DVD703/DVD803 26 Easy Handycam - ...
Operating Guide
Page 7
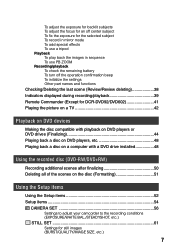
... Other part names and functions Checking/Deleting the last scene (Review/Review deleting 38 Indicators displayed during recording/playback 39 Remote Commander (Except for DCR-DVD92/DVD602 41 Playing the picture on a TV 42 Playback on DVD devices Making the disc compatible with playback on DVD players or DVD ... on the disc (Formatting 51 Using the Setup items Using the Setup items 52 Setup items 54 CAMERA SET 56 Settings to adjust your camcorder to the recording conditions (EXPOSURE/WHITE BAL./STEADYSHOT, etc.) STILL SET 61 Settings for still images (BURST/QUALITY/IMAGE SIZE, etc.) 7
... Other part names and functions Checking/Deleting the last scene (Review/Review deleting 38 Indicators displayed during recording/playback 39 Remote Commander (Except for DCR-DVD92/DVD602 41 Playing the picture on a TV 42 Playback on DVD devices Making the disc compatible with playback on DVD players or DVD ... on the disc (Formatting 51 Using the Setup items Using the Setup items 52 Setup items 54 CAMERA SET 56 Settings to adjust your camcorder to the recording conditions (EXPOSURE/WHITE BAL./STEADYSHOT, etc.) STILL SET 61 Settings for still images (BURST/QUALITY/IMAGE SIZE, etc.) 7
Operating Guide
Page 9
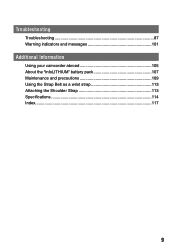
Troubleshooting Troubleshooting 87 Warning indicators and messages 101 Additional Information Using your camcorder abroad 105 About the "InfoLITHIUM" battery pack 107 Maintenance and precautions 109 Using the Strap Belt as a wrist strap 113 Attaching the Shoulder Strap 113 Specifications 114 Index...117 9
Troubleshooting Troubleshooting 87 Warning indicators and messages 101 Additional Information Using your camcorder abroad 105 About the "InfoLITHIUM" battery pack 107 Maintenance and precautions 109 Using the Strap Belt as a wrist strap 113 Attaching the Shoulder Strap 113 Specifications 114 Index...117 9
Operating Guide
Page 11
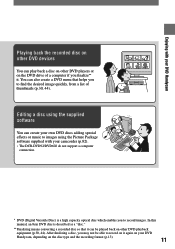
... You can create your own DVD discs adding special effects or music to images using the Picture Package software supplied with your DVD Handycam Playing back the recorded disc on other DVD devices You can be able to record on other DVD playback equipment (p.30, 44).... You can also create a DVD menu that it can play back a disc on it . Enjoying with your camcorder (p.82). • The DCR-DVD92/DVD602 do not support a computer connection. * DVD (Digital Versatile Disc) is described as a "disc." ** Finalizing means converting a recorded disc...
... You can create your own DVD discs adding special effects or music to images using the Picture Package software supplied with your DVD Handycam Playing back the recorded disc on other DVD devices You can be able to record on other DVD playback equipment (p.30, 44).... You can also create a DVD menu that it can play back a disc on it . Enjoying with your camcorder (p.82). • The DCR-DVD92/DVD602 do not support a computer connection. * DVD (Digital Versatile Disc) is described as a "disc." ** Finalizing means converting a recorded disc...
Operating Guide
Page 16
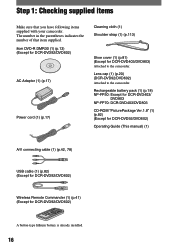
... pack (1) (p.18) NP-FP50: Except for DCR-DVD403/ DVD803 NP-FP70: DCR-DVD403/DVD803 CD-ROM "PicturePackage Ver.1.8" (1) (p.82) (Except for DCR-DVD92/DVD602) Operating Guide (This manual) (1) A/V connecting cable (1) (p.42, 78) USB cable (1) (p.82) (Except for DCR-DVD92/DVD602) Wireless Remote Commander (1) (p.41) (Except for DCR-DVD403/DVD803) Attached to the camcorder. The number in the parentheses indicates...
... pack (1) (p.18) NP-FP50: Except for DCR-DVD403/ DVD803 NP-FP70: DCR-DVD403/DVD803 CD-ROM "PicturePackage Ver.1.8" (1) (p.82) (Except for DCR-DVD92/DVD602) Operating Guide (This manual) (1) A/V connecting cable (1) (p.42, 78) USB cable (1) (p.82) (Except for DCR-DVD92/DVD602) Wireless Remote Commander (1) (p.41) (Except for DCR-DVD403/DVD803) Attached to the camcorder. The number in the parentheses indicates...
Operating Guide
Page 17
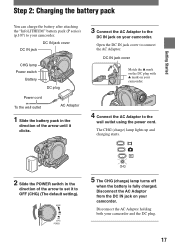
... 2 Slide the POWER switch in the direction of the arrow to set it clicks. 3 Connect the AC Adaptor to your camcorder. Disconnect the AC Adaptor from the DC IN jack on your camcorder and the DC plug. 17 DC IN jack cover Match the mark on the DC plug with ... battery pack in the direction of the arrow until it to the wall outlet using the power cord. Disconnect the AC Adaptor holding both your camcorder. Getting Started Step 2: Charging the battery pack You can charge the battery after attaching the "InfoLITHIUM" battery pack (P series) (p.107) to the DC IN ...
... 2 Slide the POWER switch in the direction of the arrow to set it clicks. 3 Connect the AC Adaptor to your camcorder. Disconnect the AC Adaptor from the DC IN jack on your camcorder and the DC plug. 17 DC IN jack cover Match the mark on the DC plug with ... battery pack in the direction of the arrow until it to the wall outlet using the power cord. Disconnect the AC Adaptor holding both your camcorder. Getting Started Step 2: Charging the battery pack You can charge the battery after attaching the "InfoLITHIUM" battery pack (P series) (p.107) to the DC IN ...
Operating Guide
Page 18
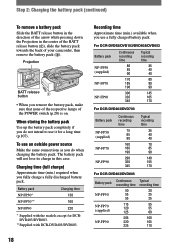
... charge in the center of the BATT release button (), slide the battery pack towards the back of your camcorder, then remove the battery pack (). For DCR-DVD92/DVD103/DVD602/DVD653 Battery pack NP-FP50 (supplied) NP-FP70 NP-FP90 Continuous recording time 80 85 90 ... 55 60 100 105 110 18 To use an outside power source Make the same connections as you use it for DCRDVD403/DVD803. **Supplied with DCR-DVD403/DVD803. Charging time (full charge) Approximate time (min.) required when you fully charge a fully discharged battery pack. Step 2: Charging the battery pack...
... charge in the center of the BATT release button (), slide the battery pack towards the back of your camcorder, then remove the battery pack (). For DCR-DVD92/DVD103/DVD602/DVD653 Battery pack NP-FP50 (supplied) NP-FP70 NP-FP90 Continuous recording time 80 85 90 ... 55 60 100 105 110 18 To use an outside power source Make the same connections as you use it for DCRDVD403/DVD803. **Supplied with DCR-DVD403/DVD803. Charging time (full charge) Approximate time (min.) required when you fully charge a fully discharged battery pack. Step 2: Charging the battery pack...
Operating Guide
Page 19
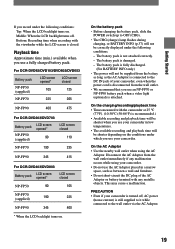
...FP90 battery pack when a video light (optional) is attached. On the AC Adaptor • Use the nearby wall outlet when using your camcorder. • Do not use the AC Adaptor placed in low temperatures. • The available recording and playback time will be correctly displayed ...screen closed NP-FP50 (supplied) 90 110 NP-FP70 190 235 NP-FP90 345 415 For DCR-DVD403/DVD803 Battery pack LCD screen opened* LCD screen closed . Getting Started If you use your camcorder. On the charging/recording/playback time • Times measured with any metallic objects. PRECAUTION &#...
...FP90 battery pack when a video light (optional) is attached. On the AC Adaptor • Use the nearby wall outlet when using your camcorder. • Do not use the AC Adaptor placed in low temperatures. • The available recording and playback time will be correctly displayed ...screen closed NP-FP50 (supplied) 90 110 NP-FP70 190 235 NP-FP90 345 415 For DCR-DVD403/DVD803 Battery pack LCD screen opened* LCD screen closed . Getting Started If you use your camcorder. On the charging/recording/playback time • Times measured with any metallic objects. PRECAUTION &#...
Operating Guide
Page 20
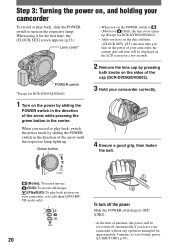
... of purchase, the power will be set to turn off automatically if you leave your camcorder without any operation attempted for approximately 5 minutes, to (Movie) or (Still), the lens cover opens up (Except for DCR-DVD92/DVD602). • After you have set the POWER switch to save battery power.... ([A.SHUT OFF], p.69). When using it for DCR-DVD92/DVD602 2 Remove the lens cap by pressing both knobs on the sides of the cap (DCR-DVD92/DVD602). 3 Hold your camcorder correctly. 1 Turn on the respective lamp. POWER switch *Except for the first...
... of purchase, the power will be set to turn off automatically if you leave your camcorder without any operation attempted for approximately 5 minutes, to (Movie) or (Still), the lens cover opens up (Except for DCR-DVD92/DVD602). • After you have set the POWER switch to save battery power.... ([A.SHUT OFF], p.69). When using it for DCR-DVD92/DVD602 2 Remove the lens cap by pressing both knobs on the sides of the cap (DCR-DVD92/DVD602). 3 Hold your camcorder correctly. 1 Turn on the respective lamp. POWER switch *Except for the first...
Operating Guide
Page 21
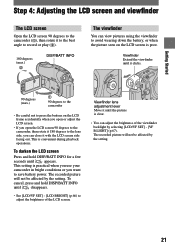
... the setting. 21 Getting Started Step 4: Adjusting the LCD screen and viewfinder The LCD screen Open the LCD screen 90 degrees to the camcorder (), then rotate it with the LCD screen side facing out. This is clear. • You can close it to the best angle to record... seen on the LCD frame accidentally when you open or adjust the LCD screen. • If you open the LCD screen 90 degrees to the camcorder, then rotate it 180 degrees to the lens side, you want to save battery power. To darken the LCD screen Press and hold DISP/BATT...
... the setting. 21 Getting Started Step 4: Adjusting the LCD screen and viewfinder The LCD screen Open the LCD screen 90 degrees to the camcorder (), then rotate it with the LCD screen side facing out. This is clear. • You can close it to the best angle to record... seen on the LCD frame accidentally when you open or adjust the LCD screen. • If you open the LCD screen 90 degrees to the camcorder, then rotate it 180 degrees to the lens side, you want to save battery power. To darken the LCD screen Press and hold DISP/BATT...

Operating Guide
Page 23
...do not set the date and time again (p.111). Step 6: Setting the date and time Getting Started Set the date and time when using this camcorder for about 3 months, the built-in rechargeable battery gets discharged and the date and time settings may be cleared from the memory. In that ... battery and then set the date and time, the [CLOCK SET] screen appears every time you turn on your camcorder or slide the POWER switch down. • If you do not use your camcorder for the first time. CLOCK SET -:--:-- with / , then touch . 3 Select [CLOCK SET] with then touch . /, 7 Set [M] ...
...do not set the date and time again (p.111). Step 6: Setting the date and time Getting Started Set the date and time when using this camcorder for about 3 months, the built-in rechargeable battery gets discharged and the date and time settings may be cleared from the memory. In that ... battery and then set the date and time, the [CLOCK SET] screen appears every time you turn on your camcorder or slide the POWER switch down. • If you do not use your camcorder for the first time. CLOCK SET -:--:-- with / , then touch . 3 Select [CLOCK SET] with then touch . /, 7 Set [M] ...
Operating Guide
Page 24
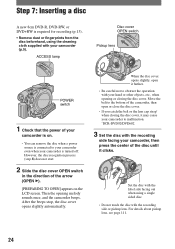
...Remove dust or fingerprints from the disc beforehand, using a single sided disc. • Do not touch the disc with the recording side facing your camcorder is on the LCD screen. For details about pickup lens, see page 111. 24 Step 7: Inserting a disc A new 8cm DVD-R, DVD-RW, or ... the center of the camcorder, then open it clicks. ACCESS lamp Disc cover OPEN switch Pickup lens POWER switch 1 Check that the power of the arrow (OPEN ). [PREPARING TO OPEN] appears on . • You can remove the disc when a power source is connected to malfunction. *DCR-DVD92/DVD602 3 Set...
...Remove dust or fingerprints from the disc beforehand, using a single sided disc. • Do not touch the disc with the recording side facing your camcorder is on the LCD screen. For details about pickup lens, see page 111. 24 Step 7: Inserting a disc A new 8cm DVD-R, DVD-RW, or ... the center of the camcorder, then open it clicks. ACCESS lamp Disc cover OPEN switch Pickup lens POWER switch 1 Check that the power of the arrow (OPEN ). [PREPARING TO OPEN] appears on . • You can remove the disc when a power source is connected to malfunction. *DCR-DVD92/DVD602 3 Set...
Operating Guide
Page 25
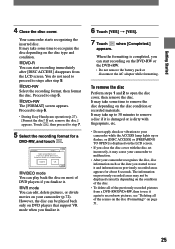
...8226; Do not remove the battery pack or disconnect the AC adaptor while formatting. The information on previously recorded areas may cause your camcorder to record new pictures, see "Deleting all of the scenes on the disc (Formatting)" on the disc condition or recorded materials.... damaged or is completed, you started to step 6. • During Easy Handycam operation (p.27), [Format the disc? Proceed to use it . 6 Touch [YES] [YES]. 7 Touch when [Completed.] appears. Cannot edit in Camcorder VIDEO VR OK VIDEO mode You can be displayed correctly depending on...
...8226; Do not remove the battery pack or disconnect the AC adaptor while formatting. The information on previously recorded areas may cause your camcorder to record new pictures, see "Deleting all of the scenes on the disc (Formatting)" on the disc condition or recorded materials.... damaged or is completed, you started to step 6. • During Easy Handycam operation (p.27), [Format the disc? Proceed to use it . 6 Touch [YES] [YES]. 7 Touch when [Completed.] appears. Cannot edit in Camcorder VIDEO VR OK VIDEO mode You can be displayed correctly depending on...
Operating Guide
Page 26
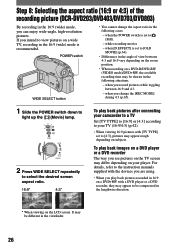
...DVD player or a DVD recorder, they may appear to be compressed in the 16:9 (wide) mode is recommended. To play back pictures after connecting your camcorder to a TV Set [TV TYPE] to [16:9] or [4:3] according to view pictures on a wide TV, recording in the lengthwise direction. * When ...MODE] during 4:3 (p.65). 1 Slide the POWER switch down to [OLD MOVIE] (p.64). • Differences in the angle of the recording picture (DCR-DVD203/DVD403/DVD703/DVD803) By recording in the following situations. - when the POWER switch is set to light up the (Movie) lamp. when you see pictures...
...DVD player or a DVD recorder, they may appear to be compressed in the 16:9 (wide) mode is recommended. To play back pictures after connecting your camcorder to a TV Set [TV TYPE] to [16:9] or [4:3] according to view pictures on a wide TV, recording in the lengthwise direction. * When ...MODE] during 4:3 (p.65). 1 Slide the POWER switch down to [OLD MOVIE] (p.64). • Differences in the angle of the recording picture (DCR-DVD203/DVD403/DVD703/DVD803) By recording in the following situations. - when the POWER switch is set to light up the (Movie) lamp. when you see pictures...
Operating Guide
Page 27
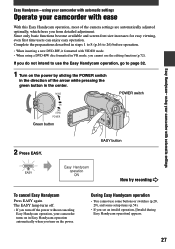
... operation. MODE POWER switch ON OFF (CHG) POWER Green button 2 Press EASY. The EASY lamp turns off the power without canceling Easy Handycam operation, your camcorder with automatic settings Easy Handycam - Complete the preparations described in steps 1 to 8 (p.16 to 26) before operation. • When inserting a new DVD-RW, it formatted with VIDEO...
... operation. MODE POWER switch ON OFF (CHG) POWER Green button 2 Press EASY. The EASY lamp turns off the power without canceling Easy Handycam operation, your camcorder with automatic settings Easy Handycam - Complete the preparations described in steps 1 to 8 (p.16 to 26) before operation. • When inserting a new DVD-RW, it formatted with VIDEO...
Operating Guide
Page 28
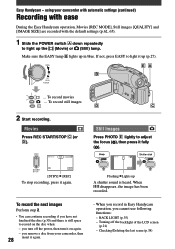
... following functions: - Turning off the power, then turn it up the (Movie) or (Still) lamp. Easy Handycam - To record movies ... BACK LIGHT (p.35) - using your camcorder, then 28 insert it fully (). 0 SETUP Flashing Lights up A shutter sound...record the next images Perform step 2. • You can continue recording if you remove a disc from your camcorder with automatic settings (continued) Recording with ease During the Easy Handycam operation, Movies [REC MODE], Still images [QUALITY] and [IMAGE SIZE] are recorded with the default settings...
... following functions: - Turning off the power, then turn it up the (Movie) or (Still) lamp. Easy Handycam - To record movies ... BACK LIGHT (p.35) - using your camcorder, then 28 insert it fully (). 0 SETUP Flashing Lights up A shutter sound...record the next images Perform step 2. • You can continue recording if you remove a disc from your camcorder with automatic settings (continued) Recording with ease During the Easy Handycam operation, Movies [REC MODE], Still images [QUALITY] and [IMAGE SIZE] are recorded with the default settings...
Operating Guide
Page 29
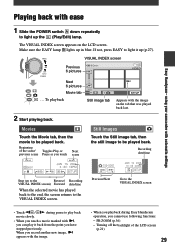
... the LCD screen. Beginning of the LCD screen (p.21) 29 VISUAL INDEX screen Previous 6 pictures Next 6 pictures Movie tab ... during Easy Handycam operation, you have stopped previously. Make sure the EASY lamp lights up the (Play/Edit) lamp. To playback Still image tab Appears... with , you can play it up (p.27). Easy Handycam- Previous/Next Go to light up in blue. using your camcorder with automatic settings Playing back with the image. • When you playback during pause to be played back...
... the LCD screen. Beginning of the LCD screen (p.21) 29 VISUAL INDEX screen Previous 6 pictures Next 6 pictures Movie tab ... during Easy Handycam operation, you have stopped previously. Make sure the EASY lamp lights up the (Play/Edit) lamp. To playback Still image tab Appears... with , you can play it up (p.27). Easy Handycam- Previous/Next Go to light up in blue. using your camcorder with automatic settings Playing back with the image. • When you playback during pause to be played back...


