Operating Guide
Page 16
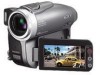
... items supplied with your camcorder. Lens cap (1) (p.20) (DCR-DVD92/DVD602) Attached to the camcorder. Rechargeable battery pack (1) (p.18) NP-FP50: Except for DCR-DVD403/ DVD803 NP-FP70: DCR-DVD403/DVD803 CD-ROM "PicturePackage Ver.1.8" (1) (p.82) (Except for DCR-DVD92/DVD602) Operating Guide...DCR-DVD403/DVD803) Attached to the camcorder. Step 1: Checking supplied items Make sure that item supplied. 8cm DVD-R DMR30 (1) (p.13) (Except for DCR-DVD92/DVD602) AC Adaptor (1) (p.17) Power cord (1) (p.17) Cleaning cloth (1) Shoulder strap (1) (p.113) Shoe cover (1) (p.81) (Except for DCR...
... items supplied with your camcorder. Lens cap (1) (p.20) (DCR-DVD92/DVD602) Attached to the camcorder. Rechargeable battery pack (1) (p.18) NP-FP50: Except for DCR-DVD403/ DVD803 NP-FP70: DCR-DVD403/DVD803 CD-ROM "PicturePackage Ver.1.8" (1) (p.82) (Except for DCR-DVD92/DVD602) Operating Guide...DCR-DVD403/DVD803) Attached to the camcorder. Step 1: Checking supplied items Make sure that item supplied. 8cm DVD-R DMR30 (1) (p.13) (Except for DCR-DVD92/DVD602) AC Adaptor (1) (p.17) Power cord (1) (p.17) Cleaning cloth (1) Shoulder strap (1) (p.113) Shoe cover (1) (p.81) (Except for DCR...
Operating Guide
Page 20
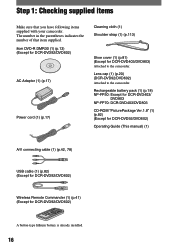
...you have set the POWER switch to (Movie) or (Still), the lens cover opens up . POWER switch *Except for DCR-DVD92/DVD602 2 Remove the lens cap by pressing both knobs on the sides of the cap (DCR-DVD92/DVD602). 3 Hold your camcorder, or to edit them (DVD-RW: VR mode only) CHG 20... displayed on the LCD screen for a few seconds. Step 3: Turning the power on, and holding your camcorder without any operation attempted for approximately 5 minutes, to save battery power. ([A.SHUT OFF], p.69). Lens cover* • When you set the date and time ([CLOCK SET], p23), the next time you leave...
...you have set the POWER switch to (Movie) or (Still), the lens cover opens up . POWER switch *Except for DCR-DVD92/DVD602 2 Remove the lens cap by pressing both knobs on the sides of the cap (DCR-DVD92/DVD602). 3 Hold your camcorder, or to edit them (DVD-RW: VR mode only) CHG 20... displayed on the LCD screen for a few seconds. Step 3: Turning the power on, and holding your camcorder without any operation attempted for approximately 5 minutes, to save battery power. ([A.SHUT OFF], p.69). Lens cover* • When you set the date and time ([CLOCK SET], p23), the next time you leave...
Operating Guide
Page 24
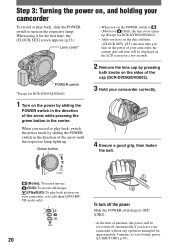
... LCD screen. Then the opening or closing the disc cover, it may cause your camcorder to malfunction. *DCR-DVD92/DVD602 3 Set the disc with the recording side facing your camcorder (p.5). When the disc cover opens slightly, open or close the disc cover. • If you catch the belt or the lens cap strap* when closing the disc...
... LCD screen. Then the opening or closing the disc cover, it may cause your camcorder to malfunction. *DCR-DVD92/DVD602 3 Set the disc with the recording side facing your camcorder (p.5). When the disc cover opens slightly, open or close the disc cover. • If you catch the belt or the lens cap strap* when closing the disc...
Operating Guide
Page 32
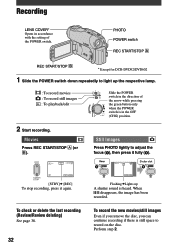
Still Images Press PHOTO lightly to record on the disc. Perform step 2. Recording LENS COVER* Opens in accordance with the setting of the arrow while pressing MODE the green button only when the POWER ON OFF switch is in the ... you remove the disc, you can continue recording if there is heard. PHOTO POWER switch REC START/STOP REC START/STOP * Except for DCR-DVD92/DVD602 1 Slide the POWER switch down repeatedly to light up A shutter sound is still space to adjust the focus (), then press it again...
Still Images Press PHOTO lightly to record on the disc. Perform step 2. Recording LENS COVER* Opens in accordance with the setting of the arrow while pressing MODE the green button only when the POWER ON OFF switch is in the ... you remove the disc, you can continue recording if there is heard. PHOTO POWER switch REC START/STOP REC START/STOP * Except for DCR-DVD92/DVD602 1 Slide the POWER switch down repeatedly to light up A shutter sound is still space to adjust the focus (), then press it again...
Operating Guide
Page 35
...DCR-DVD403/DVD803)/ NightShot plus (Except for DCR-DVD403/DVD803) (p.58). If you will be converted to 2ch to select a setting (DCR-DVD403/DVD803). Therefore, do not cover the infrared port with ordinary stereo sound that covers...a backlit subject, the flash may not be effective. • Attaching a conversion lens (optional) may create a shadow. • You can change the brightness of a deep... the exposure for an off center subject See [SPOT FOCUS] on your camcorder. * Dolby Digital 5.1 Creater compresses sound effectively while maintaining high quality sound...
...DCR-DVD403/DVD803)/ NightShot plus (Except for DCR-DVD403/DVD803) (p.58). If you will be converted to 2ch to select a setting (DCR-DVD403/DVD803). Therefore, do not cover the infrared port with ordinary stereo sound that covers...a backlit subject, the flash may not be effective. • Attaching a conversion lens (optional) may create a shadow. • You can change the brightness of a deep... the exposure for an off center subject See [SPOT FOCUS] on your camcorder. * Dolby Digital 5.1 Creater compresses sound effectively while maintaining high quality sound...
Operating Guide
Page 92
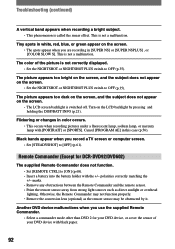
... lamp, sodium lamp, or mercury lamp with the +/- The color of your DVD device, or cover the sensor of the picture is not correctly displayed. • Set the NIGHTSHOT or NIGHTSHOT PLUS...when you use the supplied Remote Commander. • Select a commander mode other than DVD 2 for DCR-DVD92/DVD602) The supplied Remote Commander does not function. • Set [REMOTE CTRL] to [OFF...strong light sources such as the remote sensor may not function properly. • Remove the conversion lens (optional) as direct sunlight or overhead lighting. This is called the smear effect. Turn on...
... lamp, sodium lamp, or mercury lamp with the +/- The color of your DVD device, or cover the sensor of the picture is not correctly displayed. • Set the NIGHTSHOT or NIGHTSHOT PLUS...when you use the supplied Remote Commander. • Select a commander mode other than DVD 2 for DCR-DVD92/DVD602) The supplied Remote Commander does not function. • Set [REMOTE CTRL] to [OFF...strong light sources such as the remote sensor may not function properly. • Remove the conversion lens (optional) as direct sunlight or overhead lighting. This is called the smear effect. Turn on...

Operating Guide
Page 103
...;nalized DVD-R cannot be recorded due to play back an incompatible disc with the strobe and disable charging. Lens cover Lens cover not fully open Turn power off once (p.20) Troubleshooting 103 Your camcorder cannot recognize the disc because of the disc. Access error • An error occurred during reading or writing the disc... malfunctions such as scratches, or the disc is not set correctly. Format error • The disc recorded in the different format code from your camcorder. Disc finalized Cannot record on (p.20) Lens cover is charging.
...;nalized DVD-R cannot be recorded due to play back an incompatible disc with the strobe and disable charging. Lens cover Lens cover not fully open Turn power off once (p.20) Troubleshooting 103 Your camcorder cannot recognize the disc because of the disc. Access error • An error occurred during reading or writing the disc... malfunctions such as scratches, or the disc is not set correctly. Format error • The disc recorded in the different format code from your camcorder. Disc finalized Cannot record on (p.20) Lens cover is charging.
Operating Guide
Page 111
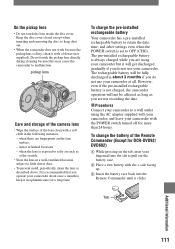
... prevent mold, periodically clean the lens as you operate your camcorder. It is set to keep it with the POWER switch turned off for DCR-DVD92/ DVD602) While pressing on the lens surface. - On the pickup lens • Do not touch the lens inside the disc cover. Keep the disc cover closed except when inserting and removing...
... prevent mold, periodically clean the lens as you operate your camcorder. It is set to keep it with the POWER switch turned off for DCR-DVD92/ DVD602) While pressing on the lens surface. - On the pickup lens • Do not touch the lens inside the disc cover. Keep the disc cover closed except when inserting and removing...

Operating Guide
Page 117
... 21, 22, 37 Display indicators .......... 39, 40 DISP OUTPUT 68 Dubbing 79 DVD menu 45 D.EFFECT (Digital effect 63 E EASY button 27 Easy Handycam operation ... 27 Edit 72 EXPOSURE 57, 94 EXT SUR MIC 66 F FADER 63, 95 FILE NO. (File number) ...... 62 Finalize 44 First Step... 39 INDOOR 57 InfoLITHIUM 107 Initialize (Reset 37 Install 83 Insulation sheet 41 L LANDSCAPE 56 LCD/VF SET 66 LCD BRIGHT 66 LCD COLOR 67 Lens cover 20, 32 LP (Long Play 65 LUMI. Index Numeric 4ch surround recording ........ 66 5.1ch surround recording ..... 34 A A/V connecting cable..... 42, 78 A/V ...
... 21, 22, 37 Display indicators .......... 39, 40 DISP OUTPUT 68 Dubbing 79 DVD menu 45 D.EFFECT (Digital effect 63 E EASY button 27 Easy Handycam operation ... 27 Edit 72 EXPOSURE 57, 94 EXT SUR MIC 66 F FADER 63, 95 FILE NO. (File number) ...... 62 Finalize 44 First Step... 39 INDOOR 57 InfoLITHIUM 107 Initialize (Reset 37 Install 83 Insulation sheet 41 L LANDSCAPE 56 LCD/VF SET 66 LCD BRIGHT 66 LCD COLOR 67 Lens cover 20, 32 LP (Long Play 65 LUMI. Index Numeric 4ch surround recording ........ 66 5.1ch surround recording ..... 34 A A/V connecting cable..... 42, 78 A/V ...


