Operating Guide
Page 4
... record, test the recording function to make sure the picture and sound are based on the model DCR-DVD403. On this manual • The images of the LCD screen and the viewfinder used on this manual are captured using your camcorder if necessary (p.69). • The illustration used for Modulation Transfer Function. The number value indicates the amount of a Carl Zeiss lens. * MTF stands for illustrating the operating procedures. Change the screen language before using a digital still camera...
... record, test the recording function to make sure the picture and sound are based on the model DCR-DVD403. On this manual • The images of the LCD screen and the viewfinder used on this manual are captured using your camcorder if necessary (p.69). • The illustration used for Modulation Transfer Function. The number value indicates the amount of a Carl Zeiss lens. * MTF stands for illustrating the operating procedures. Change the screen language before using a digital still camera...
Operating Guide
Page 6
... Recording/Playback Recording 32 Playback 33 Functions used for recording/playback, etc 34 Recording To use zoom To record sound with your DVD Handycam 10 Choosing a disc 13 Getting Started Step 1: Checking supplied items 16 Step 2: Charging the battery pack 17 Step 3: Turning the power on, and holding your DVD Handycam What you can do with more presence (5.1ch surround recording) (Except for DCR-DVD92/DVD602) To use the flash To record in dark places (NightShot (DCR-DVD403...
... Recording/Playback Recording 32 Playback 33 Functions used for recording/playback, etc 34 Recording To use zoom To record sound with your DVD Handycam 10 Choosing a disc 13 Getting Started Step 1: Checking supplied items 16 Step 2: Charging the battery pack 17 Step 3: Turning the power on, and holding your DVD Handycam What you can do with more presence (5.1ch surround recording) (Except for DCR-DVD92/DVD602) To use the flash To record in dark places (NightShot (DCR-DVD403...
Operating Guide
Page 7
... mode To add special effects To use a tripod Playback To play back the images in sequence To use PB ZOOM Recording/playback To check the remaining battery To turn off the operation confirmation beep To initialize the settings Other part names and functions Checking/Deleting the last scene (Review/Review deleting 38 Indicators displayed during recording/playback 39 Remote Commander (Except for DCR-DVD92/DVD602 41 Playing the picture on a TV 42 Playback on DVD devices Making the disc compatible with playback...
... mode To add special effects To use a tripod Playback To play back the images in sequence To use PB ZOOM Recording/playback To check the remaining battery To turn off the operation confirmation beep To initialize the settings Other part names and functions Checking/Deleting the last scene (Review/Review deleting 38 Indicators displayed during recording/playback 39 Remote Commander (Except for DCR-DVD92/DVD602 41 Playing the picture on a TV 42 Playback on DVD devices Making the disc compatible with playback...
Operating Guide
Page 18
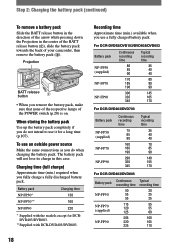
... models except for a long time (p.107). Projection BATT release button • When you do not intend to use an outside power source Make the same connections as you remove the battery pack, make sure that none of the respective lamps of your camcorder, then remove the battery pack (). Battery pack NP-FP50* NP-FP70** Charging time 130 160 NP-FP90 220 * Supplied with DCR-DVD403...
... models except for a long time (p.107). Projection BATT release button • When you do not intend to use an outside power source Make the same connections as you remove the battery pack, make sure that none of the respective lamps of your camcorder, then remove the battery pack (). Battery pack NP-FP50* NP-FP70** Charging time 130 160 NP-FP90 220 * Supplied with DCR-DVD403...
Operating Guide
Page 19
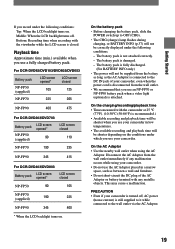
...-FP90 345 415 For DCR-DVD403/DVD803 Battery pack LCD screen opened* LCD screen closed . On the charging/recording/playback time • Times measured with any malfunction occurs while using the AC Adaptor. On the AC Adaptor • Use the nearby wall outlet when using your camcorder in a narrow space, such as the AC Adaptor is fully discharged. (For BATTERY INFO only.) • The power will not be supplied...
...-FP90 345 415 For DCR-DVD403/DVD803 Battery pack LCD screen opened* LCD screen closed . On the charging/recording/playback time • Times measured with any malfunction occurs while using the AC Adaptor. On the AC Adaptor • Use the nearby wall outlet when using your camcorder in a narrow space, such as the AC Adaptor is fully discharged. (For BATTERY INFO only.) • The power will not be supplied...
Operating Guide
Page 25
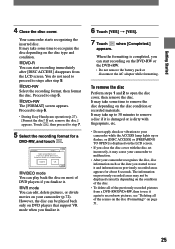
... camcorder while the ACCESS lamp lights up to 30 minutes to use it . VR mode You can start recording on the LCD screen. • If you can start recording immediately after step 5. DVD-RW Select the recording format, then format the disc. Proceed to step 6. • During Easy Handycam operation (p.27), [Format the disc? When the formatting is displayed on the DVD-RW or the DVD+RW. • Do not remove...
... camcorder while the ACCESS lamp lights up to 30 minutes to use it . VR mode You can start recording on the LCD screen. • If you can start recording immediately after step 5. DVD-RW Select the recording format, then format the disc. Proceed to step 6. • During Easy Handycam operation (p.27), [Format the disc? When the formatting is displayed on the DVD-RW or the DVD+RW. • Do not remove...
Operating Guide
Page 34
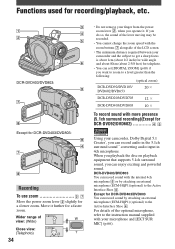
... recording/playback, etc. When you playback the disc on playback equipment that supports 5.1ch surround sound, you operate it further for DCR-DVD403/DVD803 You can record audio in the 5.1ch surround sound** converting audio input in 4ch microphone. Wider range of view: (Wide) Close view: (Telephoto) 34 • Do not remove your finger from the power zoom lever , when you can enjoy exciting and powerful sound. For details of the LCD screen...
... recording/playback, etc. When you playback the disc on playback equipment that supports 5.1ch surround sound, you operate it further for DCR-DVD403/DVD803 You can record audio in the 5.1ch surround sound** converting audio input in 4ch microphone. Wider range of view: (Wide) Close view: (Telephoto) 34 • Do not remove your finger from the power zoom lever , when you can enjoy exciting and powerful sound. For details of the LCD screen...
Operating Guide
Page 37
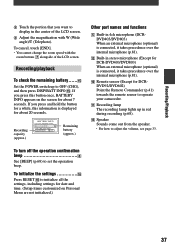
... that you want to display in the center of the LCD screen. To initialize the settings Press RESET to OFF (CHG), and then press DISP/BATT INFO . Recording/playback To check the remaining battery ...... Set the POWER switch up in stereo microphone (Except for DCR-DVD403/DVD803) When an external microphone (optional) is connected, it takes precedence over the internal microphone (p.81). Remote sensor (Except for DCRDVD92...
... that you want to display in the center of the LCD screen. To initialize the settings Press RESET to OFF (CHG), and then press DISP/BATT INFO . Recording/playback To check the remaining battery ...... Set the POWER switch up in stereo microphone (Except for DCR-DVD403/DVD803) When an external microphone (optional) is connected, it takes precedence over the internal microphone (p.81). Remote sensor (Except for DCRDVD92...

Operating Guide
Page 58
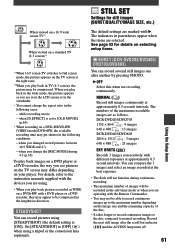
... close subjects)/ (focusing on the screen. appears. Touch [END]. AUTO Flashes automatically to adjust the zoom for more than 5 minutes. FLASH LEVEL HIGH( ) Makes the flash level higher. NORMAL ( ) SPOT FOCUS You can select only [ON] or [AUTO]. • The setting returns to [ON] when you use the built-in flash (DCR-DVD403/DVD803) or an external flash (optional...
... close subjects)/ (focusing on the screen. appears. Touch [END]. AUTO Flashes automatically to adjust the zoom for more than 5 minutes. FLASH LEVEL HIGH( ) Makes the flash level higher. NORMAL ( ) SPOT FOCUS You can select only [ON] or [AUTO]. • The setting returns to [ON] when you use the built-in flash (DCR-DVD403/DVD803) or an external flash (optional...
Operating Guide
Page 61
... are using a tripod or the conversion lens (optional). when you change the aspect ratio in the viewfinder. • You cannot change the [REC MODE] during continuous recording. • The maximum number of images will be recorded in the following cases: - For details, refer to the instruction manuals supplied with a DVD player or a DVD recorder, they may appear to be compressed in TV (4:3 screen), the picture may...
... are using a tripod or the conversion lens (optional). when you change the aspect ratio in the viewfinder. • You cannot change the [REC MODE] during continuous recording. • The maximum number of images will be recorded in the following cases: - For details, refer to the instruction manuals supplied with a DVD player or a DVD recorder, they may appear to be compressed in TV (4:3 screen), the picture may...
Operating Guide
Page 79
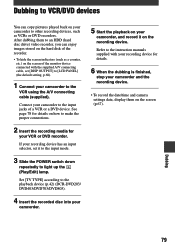
... screen of the monitor device connected with your recording device for your camcorder and the recording device. • To record the date/time and camera settings data, display them to an HDD (hard disc drive) video recorder, you can copy pictures played back on the screen (p.67). Set [TV TYPE] according to the playback device (p.42) (DCR-DVD203/ DVD403/DVD703/DVD803). 4 Insert the recorded disc into your camcorder. 5 Start the playback on the recording device. Connect your camcorder, and record it to the input mode. 3 Slide the POWER switch down repeatedly to light up the (Play...
... screen of the monitor device connected with your recording device for your camcorder and the recording device. • To record the date/time and camera settings data, display them to an HDD (hard disc drive) video recorder, you can copy pictures played back on the screen (p.67). Set [TV TYPE] according to the playback device (p.42) (DCR-DVD203/ DVD403/DVD703/DVD803). 4 Insert the recorded disc into your camcorder. 5 Start the playback on the recording device. Connect your camcorder, and record it to the input mode. 3 Slide the POWER switch down repeatedly to light up the (Play...
Operating Guide
Page 82
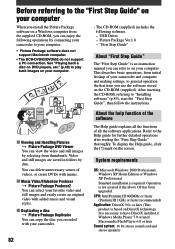
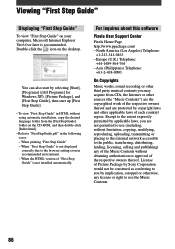
... inserting the CD-ROM, referring to "Installing software" (p.83), start the "First Step Guide", then follow the instructions. Viewing and Handling Pictures Picture Package DVD Viewer You can view the video and still images by date. System requirements OS: Microsoft Windows 2000 Professional, Windows XP Home Edition or Windows XP Professional Standard installation is based on the screen. Operation is an instruction manual you can copy the disc you recorded with added...
... inserting the CD-ROM, referring to "Installing software" (p.83), start the "First Step Guide", then follow the instructions. Viewing and Handling Pictures Picture Package DVD Viewer You can view the video and still images by date. System requirements OS: Microsoft Windows 2000 Professional, Windows XP Home Edition or Windows XP Professional Standard installation is based on the screen. Operation is an instruction manual you can copy the disc you recorded with added...
Operating Guide
Page 86
...-2-438-0090 On Copyrights Music works, sound recording or other sources (the "Music Contents") are the copyrighted work of the respective owners thereof and are not permitted to use (including, without obtaining authorization or approval of the Music Contents without limitation, copying, modifying, reproducing, uploading, transmitting or placing to the external network accessible to the public, transferring, distributing, lending, licensing, selling...
...-2-438-0090 On Copyrights Music works, sound recording or other sources (the "Music Contents") are the copyrighted work of the respective owners thereof and are not permitted to use (including, without obtaining authorization or approval of the Music Contents without limitation, copying, modifying, reproducing, uploading, transmitting or placing to the external network accessible to the public, transferring, distributing, lending, licensing, selling...
Operating Guide
Page 89
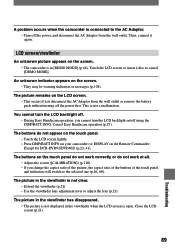
... outlet or remove the battery pack without turning off the power, and disconnect the AC Adaptor from the wall outlet. You cannot turn the LCD backlight on the screen. • They may be warning indicators or messages (p.101). Close the LCD screen (p.21). 89 Troubleshooting Touch the LCD screen or insert a disc to cancel [DEMO MODE]. This is open. Cancel Easy Handycam operation (p.27). The buttons on the LCD screen. • This...
... outlet or remove the battery pack without turning off the power, and disconnect the AC Adaptor from the wall outlet. You cannot turn the LCD backlight on the screen. • They may be warning indicators or messages (p.101). Close the LCD screen (p.21). 89 Troubleshooting Touch the LCD screen or insert a disc to cancel [DEMO MODE]. This is open. Cancel Easy Handycam operation (p.27). The buttons on the LCD screen. • This...
Operating Guide
Page 91
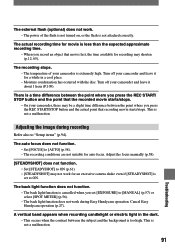
... too high. Adjusting the image during Easy Handycam operation. Turn off your camcorder, there may shorten (p.12, 65). The auto focus does not function. • Set [FOCUS] to ON. The back light function does not function. • The back light function is a time difference between the point where you press the REC START/STOP button and the actual point that the recorded movie starts/stops. • On your camcorder and leave it for auto focus. There...
... too high. Adjusting the image during Easy Handycam operation. Turn off your camcorder, there may shorten (p.12, 65). The auto focus does not function. • Set [FOCUS] to ON. The back light function does not function. • The back light function is a time difference between the point where you press the REC START/STOP button and the actual point that the recorded movie starts/stops. • On your camcorder and leave it for auto focus. There...
Operating Guide
Page 101
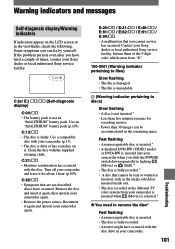
... for recording movies. • Fewer than 30 images can fix by yourself. Warning indicators and messages Self-diagnosis display/Warning indicators If indicators appear on it again and operate your camcorder again. Turn off your camcorder and leave it again, then operate your camcorder (p.13). • The disc is faulty. C:32: • Symptoms that you slide the POWER switch down repeatedly to discs) Slow...
... for recording movies. • Fewer than 30 images can fix by yourself. Warning indicators and messages Self-diagnosis display/Warning indicators If indicators appear on it again and operate your camcorder again. Turn off your camcorder and leave it again, then operate your camcorder (p.13). • The disc is faulty. C:32: • Symptoms that you slide the POWER switch down repeatedly to discs) Slow...
Operating Guide
Page 107
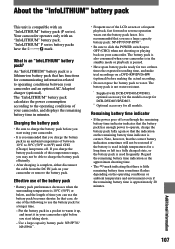
... not shooting or playing back on the operating conditions or ambient temperature and environment even if the remaining battery time is paused. • Have spare battery packs ready for two or three times the expected recording time, and make trial recordings on your camcorder is in your camcorder right before you can use the battery pack for all models. What is not water-resistant. * Supplied with DCR-DVD403...
... not shooting or playing back on the operating conditions or ambient temperature and environment even if the remaining battery time is paused. • Have spare battery packs ready for two or three times the expected recording time, and make trial recordings on your camcorder is in your camcorder right before you can use the battery pack for all models. What is not water-resistant. * Supplied with DCR-DVD403...
Operating Guide
Page 115
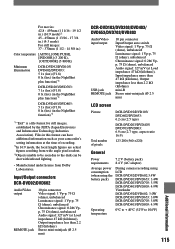
... NightShot plus function)*3 DCR-DVD403/DVD803: 5 1x (lux) (F1.8) 0 lx (lux) (in this format can have additional information such as your camcorder's setting information at Load impedance 47 kΩ (kilohms)), Input impedance more than 47 kΩ (kilohms), Output impedance less than 2.2 kΩ (kilohms) Stereo mini-minijack (Ø 2.5 mm) DCR-DVD103/DVD203/DVD403/ DVD653/DVD703/DVD803 Audio/Video input/output USB jack REMOTE jack 10 pin connector Input/Output auto switch Video signal...
... NightShot plus function)*3 DCR-DVD403/DVD803: 5 1x (lux) (F1.8) 0 lx (lux) (in this format can have additional information such as your camcorder's setting information at Load impedance 47 kΩ (kilohms)), Input impedance more than 47 kΩ (kilohms), Output impedance less than 2.2 kΩ (kilohms) Stereo mini-minijack (Ø 2.5 mm) DCR-DVD103/DVD203/DVD403/ DVD653/DVD703/DVD803 Audio/Video input/output USB jack REMOTE jack 10 pin connector Input/Output auto switch Video signal...

Operating Guide
Page 117
... (charge) lamp 17 Cleaning cloth 5 CLOCK SET 23 COLOR SLOW S (Color Slow Shutter) ...... 59, 95 Computer 82 Connect TV 42, 78 VCR 78 Copyright 4, 80, 86, 104 Counter 39 D DATA CODE 67 DATE/TIME 68 DC IN jack 17 DC plug 17 DEMO MODE 64 DIGITAL ZOOM 60 Disc cover OPEN switch...... 24 DISC REMAIN 68 DISC SET 65 Disc title 46, 65 DISP/BATT INFO.... 21, 22, 37 Display indicators .......... 39, 40 DISP OUTPUT 68 Dubbing 79 DVD menu...
... (charge) lamp 17 Cleaning cloth 5 CLOCK SET 23 COLOR SLOW S (Color Slow Shutter) ...... 59, 95 Computer 82 Connect TV 42, 78 VCR 78 Copyright 4, 80, 86, 104 Counter 39 D DATA CODE 67 DATE/TIME 68 DC IN jack 17 DC plug 17 DEMO MODE 64 DIGITAL ZOOM 60 Disc cover OPEN switch...... 24 DISC REMAIN 68 DISC SET 65 Disc title 46, 65 DISP/BATT INFO.... 21, 22, 37 Display indicators .......... 39, 40 DISP OUTPUT 68 Dubbing 79 DVD menu...
Operating Guide
Page 118
See Personal Menu R Rechargeable battery pack See Battery Recording 28, 32 Recording time 18 REC lamp 37, 68 REC MODE 65 REC START/STOP 32 Remaining battery 37 Remote Commander 41 Remote sensor 37 RESET 37 Review 38 Review deleting 38 S Self-diagnosis display ........ 101 SELF-TIMER 59 SEPIA 64 Setup 52 CAMERA SET 56 DISC SET 65 PICT.APPLI 63 Setup items 54 STANDARD SET......... 65 STILL SET 61 TIME/LANGU 69 Using the Setup items ... 52 SETUP ROTATE 68 Shoulder...
See Personal Menu R Rechargeable battery pack See Battery Recording 28, 32 Recording time 18 REC lamp 37, 68 REC MODE 65 REC START/STOP 32 Remaining battery 37 Remote Commander 41 Remote sensor 37 RESET 37 Review 38 Review deleting 38 S Self-diagnosis display ........ 101 SELF-TIMER 59 SEPIA 64 Setup 52 CAMERA SET 56 DISC SET 65 PICT.APPLI 63 Setup items 54 STANDARD SET......... 65 STILL SET 61 TIME/LANGU 69 Using the Setup items ... 52 SETUP ROTATE 68 Shoulder...


