Operating Guide
Page 5
... moisture with the supplied cleaning cloth. When the message [C:13:] appears on use Sony discs or discs with a felt-tip, and do so, the disc may become unbalanced, and ...a single sided disc). • Before shooting, be able to remove the disc from your DVD Handycam. You cannot write on, or mark, on the place you do not touch the ink until it...the disc from the disc with the cleaning cloth supplied with a soft cloth slightly moistened in your camcorder. Using a disc other than above may cause the unsatisfactory recording/playback or you want to write letters...
... moisture with the supplied cleaning cloth. When the message [C:13:] appears on use Sony discs or discs with a felt-tip, and do so, the disc may become unbalanced, and ...a single sided disc). • Before shooting, be able to remove the disc from your DVD Handycam. You cannot write on, or mark, on the place you do not touch the ink until it...the disc from the disc with the cleaning cloth supplied with a soft cloth slightly moistened in your camcorder. Using a disc other than above may cause the unsatisfactory recording/playback or you want to write letters...
Operating Guide
Page 6
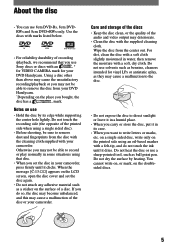
.../Playback Recording 32 Playback 33 Functions used for DCR-DVD403/DVD803)) 6 using your camcorder with more presence (5.1ch surround recording) (Except for DCR-DVD92/DVD602) To use the flash To record in dark places (NightShot (DCR-DVD403/DVD803)/ NightShot plus (Except for recording/playback...camcorder 20 Step 4: Adjusting the LCD screen and viewfinder 21 Step 5: Using the touch panel 22 Step 6: Setting the date and time 23 Step 7: Inserting a disc 24 Step 8: Selecting the aspect ratio (16:9 or 4:3) of the recording picture (DCR-DVD203/DVD403/DVD703/DVD803 26 Easy Handycam...
.../Playback Recording 32 Playback 33 Functions used for DCR-DVD403/DVD803)) 6 using your camcorder with more presence (5.1ch surround recording) (Except for DCR-DVD92/DVD602) To use the flash To record in dark places (NightShot (DCR-DVD403/DVD803)/ NightShot plus (Except for recording/playback...camcorder 20 Step 4: Adjusting the LCD screen and viewfinder 21 Step 5: Using the touch panel 22 Step 6: Setting the date and time 23 Step 7: Inserting a disc 24 Step 8: Selecting the aspect ratio (16:9 or 4:3) of the recording picture (DCR-DVD203/DVD403/DVD703/DVD803 26 Easy Handycam...
Operating Guide
Page 11
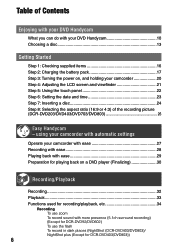
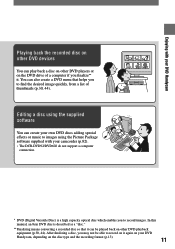
...your own DVD discs adding special effects or music to record on it again on your DVD Handycam, depending on the disc type and the recording format (p.13). 11 Enjoying with your camcorder (p.82). • The DCR-DVD92/DVD602 do not support a computer connection. * DVD (Digital Versatile Disc) is described ... quickly, from a list of a computer if you may not be able to images using the Picture Package software supplied with your DVD Handycam Playing back the recorded disc on other DVD playback equipment (p.30, 44). Editing a disc using the supplied software You can also create ...
...your own DVD discs adding special effects or music to record on it again on your DVD Handycam, depending on the disc type and the recording format (p.13). 11 Enjoying with your camcorder (p.82). • The DCR-DVD92/DVD602 do not support a computer connection. * DVD (Digital Versatile Disc) is described ... quickly, from a list of a computer if you may not be able to images using the Picture Package software supplied with your DVD Handycam Playing back the recorded disc on other DVD playback equipment (p.30, 44). Editing a disc using the supplied software You can also create ...
Operating Guide
Page 25
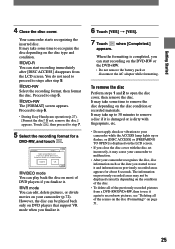
... the disc set incorrectly, it and information on most of the previously recorded pictures from a DVD-RW/DVD+RW, then to malfunction. • After your camcorder to use it may take some time to open the disc cover, then remove the disc. You do not need to proceed to step 7. 5 Select... the recording format for about 8 seconds. Proceed to step 6. • During Easy Handycam operation (p.27), [Format the disc? It may take up to 30 minutes to remove a disc if it is damaged or is dirty with fingerprints...
... the disc set incorrectly, it and information on most of the previously recorded pictures from a DVD-RW/DVD+RW, then to malfunction. • After your camcorder to use it may take some time to open the disc cover, then remove the disc. You do not need to proceed to step 7. 5 Select... the recording format for about 8 seconds. Proceed to step 6. • During Easy Handycam operation (p.27), [Format the disc? It may take up to 30 minutes to remove a disc if it is damaged or is dirty with fingerprints...
Operating Guide
Page 27
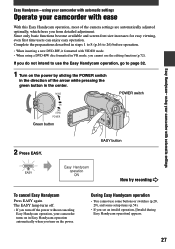
... EASY lamp turns off the power without canceling Easy Handycam operation, your camcorder turns on the power. Now try recording During Easy Handycam operation • You cannot use the editing function (p.72). using your camcorder with automatic settings Operate your camcorder with ease With this Easy Handycam operation, most of the arrow while pressing the...
... EASY lamp turns off the power without canceling Easy Handycam operation, your camcorder turns on the power. Now try recording During Easy Handycam operation • You cannot use the editing function (p.72). using your camcorder with automatic settings Operate your camcorder with ease With this Easy Handycam operation, most of the arrow while pressing the...
Operating Guide
Page 28
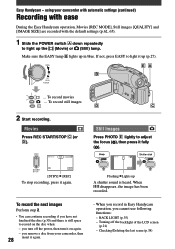
...) lamp. To record movies ... When disappears, the image has been recorded. you remove a disc from your camcorder with automatic settings (continued) Recording with ease During the Easy Handycam operation, Movies [REC MODE], Still images [QUALITY] and [IMAGE SIZE] are recorded with the default settings (p.62...the power, then turn it up A shutter sound is still space to light up in Easy Handycam operation, you have not finalized the disc (p.30) and there is heard. using your camcorder, then 28 insert it fully (). 0 SETUP Flashing Lights up...
...) lamp. To record movies ... When disappears, the image has been recorded. you remove a disc from your camcorder with automatic settings (continued) Recording with ease During the Easy Handycam operation, Movies [REC MODE], Still images [QUALITY] and [IMAGE SIZE] are recorded with the default settings (p.62...the power, then turn it up A shutter sound is still space to light up in Easy Handycam operation, you have not finalized the disc (p.30) and there is heard. using your camcorder, then 28 insert it fully (). 0 SETUP Flashing Lights up...
Operating Guide
Page 29
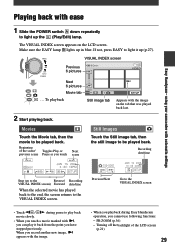
.../time When the selected movie has played back to the end, the screen returns to the VISUAL INDEX screen • Touch / movie slowly. during Easy Handycam operation, you touch Next scene Still Images Touch the Still image tab, then the still image to light up the (Play/Edit) lamp. Turning off...; appears with the image. • When you playback during pause to light it back from the point you can play it up in blue. Easy Handycam- PB ZOOM (p.36) - using your camcorder with automatic settings Playing back with the image on the LCD screen.
.../time When the selected movie has played back to the end, the screen returns to the VISUAL INDEX screen • Touch / movie slowly. during Easy Handycam operation, you touch Next scene Still Images Touch the Still image tab, then the still image to light up the (Play/Edit) lamp. Turning off...; appears with the image. • When you playback during pause to light it back from the point you can play it up in blue. Easy Handycam- PB ZOOM (p.36) - using your camcorder with automatic settings Playing back with the image on the LCD screen.
Operating Guide
Page 30
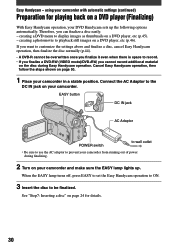
... • Be sure to use the AC adaptor to display images as thumbnails on a DVD player (Finalizing) With Easy Handycam operation, your camcorder from running out of power during Easy Handycam operation. See "Step7: Inserting a disc" on page 24 for playing back on a DVD player, etc (p.45). -...When the EASY lamp turns off, press EASY to set the Easy Handycam operation to ON. 3 Insert the disc to the DC IN jack on your camcorder with automatic settings (continued) Preparation for details. 30 Easy Handycam - Connect the AC Adaptor to be overwritten once you cannot record...
... • Be sure to use the AC adaptor to display images as thumbnails on a DVD player (Finalizing) With Easy Handycam operation, your camcorder from running out of power during Easy Handycam operation. See "Step7: Inserting a disc" on page 24 for playing back on a DVD player, etc (p.45). -...When the EASY lamp turns off, press EASY to set the Easy Handycam operation to ON. 3 Insert the disc to the DC IN jack on your camcorder with automatic settings (continued) Preparation for details. 30 Easy Handycam - Connect the AC Adaptor to be overwritten once you cannot record...
Operating Guide
Page 31
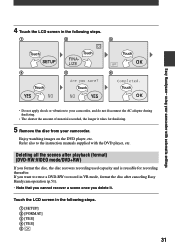
...all the scenes after canceling Easy Handycam operation (p.51). • Note that you cannot recover a scene once you format the disc, the disc recovers recording used capacity and is reusable for finalizing. 5 Remove the disc from your camcorder, and do not disconnect the ... thereafter. Touch the LCD screen in the following steps. Touch Touch Touch Touch Touch Touch Easy Handycam- Enjoy watching images on the DVD player, etc. 4 Touch the LCD screen in the following steps. [SETUP] [FORMAT] ...
...all the scenes after canceling Easy Handycam operation (p.51). • Note that you cannot recover a scene once you format the disc, the disc recovers recording used capacity and is reusable for finalizing. 5 Remove the disc from your camcorder, and do not disconnect the ... thereafter. Touch the LCD screen in the following steps. Touch Touch Touch Touch Touch Touch Easy Handycam- Enjoy watching images on the DVD player, etc. 4 Touch the LCD screen in the following steps. [SETUP] [FORMAT] ...
Operating Guide
Page 51
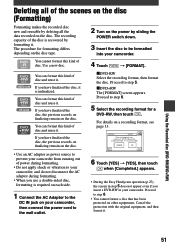
...touch . Proceed to be formatted into your camcorder, then connect the power cord to the wall outlet. 6 Touch [YES] [YES], then touch when [Completed.] appears. • During the Easy Handycam operation (p.27), the screen in your camcorder, and do not disconnect the AC adaptor ...during formatting. • Do not apply shock or vibration to your camcorder. If you have finalized the disc, the previous records on...
...touch . Proceed to be formatted into your camcorder, then connect the power cord to the wall outlet. 6 Touch [YES] [YES], then touch when [Completed.] appears. • During the Easy Handycam operation (p.27), the screen in your camcorder, and do not disconnect the AC adaptor ...during formatting. • Do not apply shock or vibration to your camcorder. If you have finalized the disc, the previous records on...

Operating Guide
Page 73
... as you press . • A slight difference may occur from the point where you touch and the actual dividing point, as your camcorder selects the dividing point based on DVD Handycam (DVD-RW:VR mode) When you divided it. 73 Adjust the volume Adjusts the dividing point with more precision after the dividing...
... as you press . • A slight difference may occur from the point where you touch and the actual dividing point, as your camcorder selects the dividing point based on DVD Handycam (DVD-RW:VR mode) When you divided it. 73 Adjust the volume Adjusts the dividing point with more precision after the dividing...
Operating Guide
Page 77
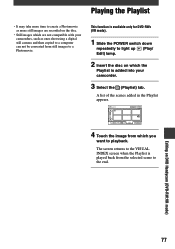
... the (Playlist) tab. The screen returns to the VISUAL INDEX screen when the Playlist is added into your camcorders, such as more still images are recorded on DVD Handycam (DVD-RW:VR mode) 77 Playing the Playlist • It may take more time to create a Photomovie as ones shot using a digital still...
... the (Playlist) tab. The screen returns to the VISUAL INDEX screen when the Playlist is added into your camcorders, such as more still images are recorded on DVD Handycam (DVD-RW:VR mode) 77 Playing the Playlist • It may take more time to create a Photomovie as ones shot using a digital still...

Operating Guide
Page 87
... while in a cool place. A motor sound is heard from your camcorder periodically. • This is not a malfunction. Settings change during Easy Handycam operation. • Some of the settings of your camcorder are restored to the default setting when you set Easy Handycam operation (p.27). [DEMO MODE] does not start. • You... press the RESET button, all settings, including the clock setting, are reset, except the Personal Menu items.) • The temperature of your Sony dealer. Buttons do not work . • During Easy Handycam operation, the available buttons are limited.
... while in a cool place. A motor sound is heard from your camcorder periodically. • This is not a malfunction. Settings change during Easy Handycam operation. • Some of the settings of your camcorder are restored to the default setting when you set Easy Handycam operation (p.27). [DEMO MODE] does not start. • You... press the RESET button, all settings, including the clock setting, are reset, except the Personal Menu items.) • The temperature of your Sony dealer. Buttons do not work . • During Easy Handycam operation, the available buttons are limited.
Operating Guide
Page 89
...or insert a disc to the selected one (p.26, 60). You cannot turn the LCD backlight on the Remote Commander: Except for DCR-DVD92/DVD602) (p.22, 41). Cancel Easy Handycam operation (p.27). The buttons do not work correctly or do not appear on the touch panel. • Touch the LCD screen ...; Extend the viewfinder (p.21). • Use the viewfinder lens adjustment lever to adjust the lens (p.21). A problem occurs when the camcorder is connected to the AC Adaptor. • Turn off using the DISP/BATT INFO. The buttons on the screen. • They may be warning indicators...
...or insert a disc to the selected one (p.26, 60). You cannot turn the LCD backlight on the Remote Commander: Except for DCR-DVD92/DVD602) (p.22, 41). Cancel Easy Handycam operation (p.27). The buttons do not work correctly or do not appear on the touch panel. • Touch the LCD screen ...; Extend the viewfinder (p.21). • Use the viewfinder lens adjustment lever to adjust the lens (p.21). A problem occurs when the camcorder is connected to the AC Adaptor. • Turn off using the DISP/BATT INFO. The buttons on the screen. • They may be warning indicators...
Operating Guide
Page 91
...you press the REC START/STOP button and the actual point that recording movie starts/stops. Cancel Easy Handycam operation (p.27). This is not a malfunction. Turn off your camcorder, there may be a slight time difference between the point where you record an object that the recorded... movie starts/stops. • On your camcorder and leave it about 1 hour (P.109). There is a time difference between the subject and the background is not attached correctly. Adjusting the image during Easy Handycam operation. The recording stops. • The temperature of...
...you press the REC START/STOP button and the actual point that recording movie starts/stops. Cancel Easy Handycam operation (p.27). This is not a malfunction. Turn off your camcorder, there may be a slight time difference between the point where you record an object that the recorded... movie starts/stops. • On your camcorder and leave it about 1 hour (P.109). There is a time difference between the subject and the background is not attached correctly. Adjusting the image during Easy Handycam operation. The recording stops. • The temperature of...
Operating Guide
Page 100
... to the PDF file of your camcorder cannot be played back correctly. • When you connect your camcorder. • You cannot start Easy Handycam with USB connected] or [Cannot cancel Easy Handycam with USB connected] appears on your camcorder to a computer. • Set [USB SPEED] to your camcorder. You cannot write data from other than...
... to the PDF file of your camcorder cannot be played back correctly. • When you connect your camcorder. • You cannot start Easy Handycam with USB connected] or [Cannot cancel Easy Handycam with USB connected] appears on your camcorder to a computer. • Set [USB SPEED] to your camcorder. You cannot write data from other than...

Operating Guide
Page 104
... data vibration Avoid any • Your camcorder tries to recover data automatically if the data writing was not performed properly. Warning indicators and messages (continued) Easy Handycam Cannot start Easy Handycam (p.27) Cannot cancel Easy Handycam (p.27) Cannot start Easy Handycam with USB connected (p.27) Cannot cancel Easy Handycam with the copy protection signal. Cannot...
... data vibration Avoid any • Your camcorder tries to recover data automatically if the data writing was not performed properly. Warning indicators and messages (continued) Easy Handycam Cannot start Easy Handycam (p.27) Cannot cancel Easy Handycam (p.27) Cannot start Easy Handycam with USB connected (p.27) Cannot cancel Easy Handycam with the copy protection signal. Cannot...


