Operating Guide
Page 3
... W. Telephone No.: 858-942-2230 This device complies with the limits for using the camcorder • Do not hold the camcorder by turning the equipment off and on use Your camcorder is subject to the following two conditions: (1) This device may not cause harmful interference,...residential installation. Bernardo Dr, San Diego, CA 92127 U.S.A. CAUTION You are designed to Part 15 of Conformity Trade Name: SONY Model No.: DCR-DVD403 Responsible Party:Sony Electronics Inc. However, there is no guarantee that may not cause harmful interference, and (2) this equipment. Increase the ...
... W. Telephone No.: 858-942-2230 This device complies with the limits for using the camcorder • Do not hold the camcorder by turning the equipment off and on use Your camcorder is subject to the following two conditions: (1) This device may not cause harmful interference,...residential installation. Bernardo Dr, San Diego, CA 92127 U.S.A. CAUTION You are designed to Part 15 of Conformity Trade Name: SONY Model No.: DCR-DVD403 Responsible Party:Sony Electronics Inc. However, there is no guarantee that may not cause harmful interference, and (2) this equipment. Increase the ...
Operating Guide
Page 4
...8226; Television programs, films, video tapes, and other materials may cause malfunctions. About the Carl Zeiss lens Your camcorder is equipped with a USB cable etc., be copyrighted. However, there may be some tiny black points and/or bright ... of the POWER switch (p.20) or the ACCESS lamp (p.24) is on the model DCR-DVD403. If you see. • The on your camcorder to another device with a Carl Zeiss lens, which was developed jointly by Carl Zeiss, in... different from what you insert the connector plug forcibly in Germany, and Sony Corporation, and produces superior images.
...8226; Television programs, films, video tapes, and other materials may cause malfunctions. About the Carl Zeiss lens Your camcorder is equipped with a USB cable etc., be copyrighted. However, there may be some tiny black points and/or bright ... of the POWER switch (p.20) or the ACCESS lamp (p.24) is on the model DCR-DVD403. If you see. • The on your camcorder to another device with a Carl Zeiss lens, which was developed jointly by Carl Zeiss, in... different from what you insert the connector plug forcibly in Germany, and Sony Corporation, and produces superior images.
Operating Guide
Page 5
...use a sharp-pointed tool, such as a sticker on use solvents such as benzine, cleaners intended for your camcorder. You cannot write on, or mark, on the printed side using a single sided disc). • ...mark. Wipe the disc from your camcorder, press firmly until it dries. Using a disc other than above may not be able to record or play normally in your DVD Handycam. * Depending on the LCD ...Do not use • Hold the disc by heating. About the disc • You can use Sony discs or discs with an * for VIDEO CAMERA mark for vinyl LPs or antistatic splay, as ...
...use a sharp-pointed tool, such as a sticker on use solvents such as benzine, cleaners intended for your camcorder. You cannot write on, or mark, on the printed side using a single sided disc). • ...mark. Wipe the disc from your camcorder, press firmly until it dries. Using a disc other than above may not be able to record or play normally in your DVD Handycam. * Depending on the LCD ...Do not use • Hold the disc by heating. About the disc • You can use Sony discs or discs with an * for VIDEO CAMERA mark for vinyl LPs or antistatic splay, as ...
Operating Guide
Page 6
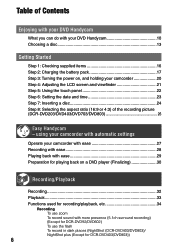
... camcorder 20 Step 4: Adjusting the LCD screen and viewfinder 21 Step 5: Using the touch panel 22 Step 6: Setting the date and time 23 Step 7: Inserting a disc 24 Step 8: Selecting the aspect ratio (16:9 or 4:3) of the recording picture (DCR-DVD203/DVD403/DVD703/DVD803 26 Easy Handycam ...recording/playback, etc 34 Recording To use the flash To record in dark places (NightShot (DCR-DVD403/DVD803)/ NightShot plus (Except for playing back on , and holding your camcorder with ease 27 Recording with ease 28 Playing back with more presence (5.1ch surround recording) (Except ...
... camcorder 20 Step 4: Adjusting the LCD screen and viewfinder 21 Step 5: Using the touch panel 22 Step 6: Setting the date and time 23 Step 7: Inserting a disc 24 Step 8: Selecting the aspect ratio (16:9 or 4:3) of the recording picture (DCR-DVD203/DVD403/DVD703/DVD803 26 Easy Handycam ...recording/playback, etc 34 Recording To use the flash To record in dark places (NightShot (DCR-DVD403/DVD803)/ NightShot plus (Except for playing back on , and holding your camcorder with ease 27 Recording with ease 28 Playing back with more presence (5.1ch surround recording) (Except ...
Operating Guide
Page 7
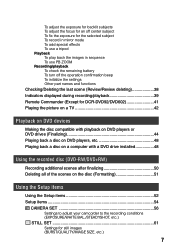
... Other part names and functions Checking/Deleting the last scene (Review/Review deleting 38 Indicators displayed during recording/playback 39 Remote Commander (Except for DCR-DVD92/DVD602 41 Playing the picture on a TV 42 Playback on DVD devices Making the disc compatible with playback on DVD players or DVD ... on the disc (Formatting 51 Using the Setup items Using the Setup items 52 Setup items 54 CAMERA SET 56 Settings to adjust your camcorder to the recording conditions (EXPOSURE/WHITE BAL./STEADYSHOT, etc.) STILL SET 61 Settings for still images (BURST/QUALITY/IMAGE SIZE, etc.) 7
... Other part names and functions Checking/Deleting the last scene (Review/Review deleting 38 Indicators displayed during recording/playback 39 Remote Commander (Except for DCR-DVD92/DVD602 41 Playing the picture on a TV 42 Playback on DVD devices Making the disc compatible with playback on DVD players or DVD ... on the disc (Formatting 51 Using the Setup items Using the Setup items 52 Setup items 54 CAMERA SET 56 Settings to adjust your camcorder to the recording conditions (EXPOSURE/WHITE BAL./STEADYSHOT, etc.) STILL SET 61 Settings for still images (BURST/QUALITY/IMAGE SIZE, etc.) 7
Operating Guide
Page 9
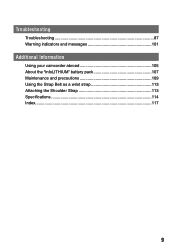
Troubleshooting Troubleshooting 87 Warning indicators and messages 101 Additional Information Using your camcorder abroad 105 About the "InfoLITHIUM" battery pack 107 Maintenance and precautions 109 Using the Strap Belt as a wrist strap 113 Attaching the Shoulder Strap 113 Specifications 114 Index...117 9
Troubleshooting Troubleshooting 87 Warning indicators and messages 101 Additional Information Using your camcorder abroad 105 About the "InfoLITHIUM" battery pack 107 Maintenance and precautions 109 Using the Strap Belt as a wrist strap 113 Attaching the Shoulder Strap 113 Specifications 114 Index...117 9
Operating Guide
Page 11
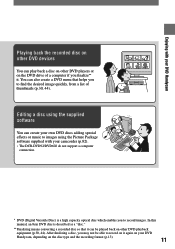
... to images using the Picture Package software supplied with your DVD Handycam Playing back the recorded disc on other DVD devices You can play back a disc on other DVD playback equipment (p.30, 44). Enjoying with your camcorder (p.82). • The DCR-DVD92/DVD602 do not support a computer connection. * DVD (...or music to find the desired image quickly, from a list of a computer if you finalize** it again on your DVD Handycam, depending on the disc type and the recording format (p.13). 11 Editing a disc using the supplied software You can be able to record images....
... to images using the Picture Package software supplied with your DVD Handycam Playing back the recorded disc on other DVD devices You can play back a disc on other DVD playback equipment (p.30, 44). Enjoying with your camcorder (p.82). • The DCR-DVD92/DVD602 do not support a computer connection. * DVD (...or music to find the desired image quickly, from a list of a computer if you finalize** it again on your DVD Handycam, depending on the disc type and the recording format (p.13). 11 Editing a disc using the supplied software You can be able to record images....
Operating Guide
Page 16
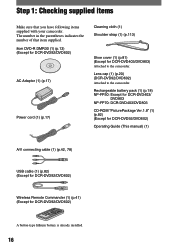
The number in the parentheses indicates the number of that you have following items supplied with your camcorder. Rechargeable battery pack (1) (p.18) NP-FP50: Except for DCR-DVD403/ DVD803 NP-FP70: DCR-DVD403/DVD803 CD-ROM "PicturePackage Ver.1.8" (1) (p.82) (Except for DCR-DVD92/DVD602) Operating Guide (This manual) (1) A/V connecting cable (1) (p.42, 78) USB cable (1) (p.82) (Except for...
The number in the parentheses indicates the number of that you have following items supplied with your camcorder. Rechargeable battery pack (1) (p.18) NP-FP50: Except for DCR-DVD403/ DVD803 NP-FP70: DCR-DVD403/DVD803 CD-ROM "PicturePackage Ver.1.8" (1) (p.82) (Except for DCR-DVD92/DVD602) Operating Guide (This manual) (1) A/V connecting cable (1) (p.42, 78) USB cable (1) (p.82) (Except for...
Operating Guide
Page 17
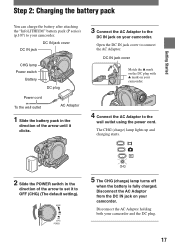
... the DC plug with mark on your camcorder. Disconnect the AC Adaptor from the DC IN jack on your camcorder. Getting Started Step 2: Charging the battery pack You can charge the battery after attaching the "InfoLITHIUM" battery pack (P series) (p.107) to your camcorder and the DC plug. 17 Open the DC IN... jack cover to the wall outlet using the power cord. Disconnect the AC Adaptor holding both your camcorder. MODE ON OFF (CHG) POWER CHG 5 The CHG (charge) lamp turns off when the battery is fully charged. DC IN jack cover DC IN jack...
... the DC plug with mark on your camcorder. Disconnect the AC Adaptor from the DC IN jack on your camcorder. Getting Started Step 2: Charging the battery pack You can charge the battery after attaching the "InfoLITHIUM" battery pack (P series) (p.107) to your camcorder and the DC plug. 17 Open the DC IN... jack cover to the wall outlet using the power cord. Disconnect the AC Adaptor holding both your camcorder. MODE ON OFF (CHG) POWER CHG 5 The CHG (charge) lamp turns off when the battery is fully charged. DC IN jack cover DC IN jack...
Operating Guide
Page 18
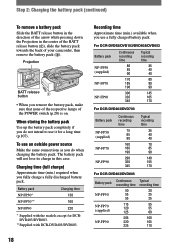
...a long time (p.107). To use an outside power source Make the same connections as you use it for DCRDVD403/DVD803. **Supplied with DCR-DVD403/DVD803. The battery pack will not lose its charge in the center of the BATT release button (), slide the battery pack towards the...Charging time (full charge) Approximate time (min.) required when you remove the battery pack, make sure that none of the respective lamps of your camcorder, then remove the battery pack (). Step 2: Charging the battery pack (continued) To remove a battery pack Slide the BATT release button in ...
...a long time (p.107). To use an outside power source Make the same connections as you use it for DCRDVD403/DVD803. **Supplied with DCR-DVD403/DVD803. The battery pack will not lose its charge in the center of the BATT release button (), slide the battery pack towards the...Charging time (full charge) Approximate time (min.) required when you remove the battery pack, make sure that none of the respective lamps of your camcorder, then remove the battery pack (). Step 2: Charging the battery pack (continued) To remove a battery pack Slide the BATT release button in ...
Operating Guide
Page 19
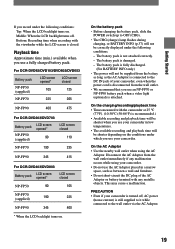
.../DVD703 Battery pack LCD screen opened* LCD screen closed NP-FP50 (supplied) 90 110 NP-FP70 190 235 NP-FP90 345 415 For DCR-DVD403/DVD803 Battery pack LCD screen opened* LCD screen closed . Getting Started If you record under the following conditions: Top: When the LCD ...power (house current) is damaged. - The battery pack is recommended.) • Available recording and playback time will be shorter when you use your camcorder, even when the power cord is closed NP-FP50 90 105 NP-FP70 (supplied) 190 225 NP-FP90 345 400 * When the LCD backlight turns...
.../DVD703 Battery pack LCD screen opened* LCD screen closed NP-FP50 (supplied) 90 110 NP-FP70 190 235 NP-FP90 345 415 For DCR-DVD403/DVD803 Battery pack LCD screen opened* LCD screen closed . Getting Started If you record under the following conditions: Top: When the LCD ...power (house current) is damaged. - The battery pack is recommended.) • Available recording and playback time will be shorter when you use your camcorder, even when the power cord is closed NP-FP50 90 105 NP-FP70 (supplied) 190 225 NP-FP90 345 400 * When the LCD backlight turns...
Operating Guide
Page 20
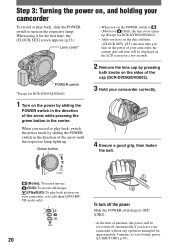
... (Still), the lens cover opens up (Except for DCR-DVD92/DVD602). • After you have set the date and time ([CLOCK SET], p23), the next time you turn on the power of your camcorder, the current date and time will be displayed on your camcorder, or to edit them (DVD-RW: VR mode...): To play back pictures on the LCD screen for a few seconds. POWER switch *Except for DCR-DVD92/DVD602 2 Remove the lens cap by pressing both knobs on the sides of the cap (DCR-DVD92/DVD602). 3 Hold your camcorder correctly. 1 Turn on the respective lamp. When you record or play back, switch the power...
... (Still), the lens cover opens up (Except for DCR-DVD92/DVD602). • After you have set the date and time ([CLOCK SET], p23), the next time you turn on the power of your camcorder, the current date and time will be displayed on your camcorder, or to edit them (DVD-RW: VR mode...): To play back pictures on the LCD screen for a few seconds. POWER switch *Except for DCR-DVD92/DVD602 2 Remove the lens cap by pressing both knobs on the sides of the cap (DCR-DVD92/DVD602). 3 Hold your camcorder correctly. 1 Turn on the respective lamp. When you record or play back, switch the power...
Operating Guide
Page 21
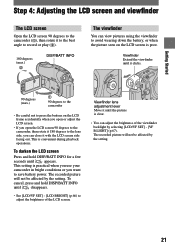
... by the setting. Getting Started Step 4: Adjusting the LCD screen and viewfinder The LCD screen Open the LCD screen 90 degrees to the camcorder (), then rotate it to the best angle to record or play (). 180 degrees (max.) DISP/BATT INFO The viewfinder You... by selecting [LCD/VF SET] - [VF B.LIGHT] (p.67). Viewfinder Extend the viewfinder until the picture is practical when you use your camcorder in bright conditions or you want to avoid wearing down the battery, or when the picture seen on the LCD frame accidentally when you open...
... by the setting. Getting Started Step 4: Adjusting the LCD screen and viewfinder The LCD screen Open the LCD screen 90 degrees to the camcorder (), then rotate it to the best angle to record or play (). 180 degrees (max.) DISP/BATT INFO The viewfinder You... by selecting [LCD/VF SET] - [VF B.LIGHT] (p.67). Viewfinder Extend the viewfinder until the picture is practical when you use your camcorder in bright conditions or you want to avoid wearing down the battery, or when the picture seen on the LCD frame accidentally when you open...

Operating Guide
Page 23
... touch . /, 7 Set [M] (month), [D] (day), hour and minute, then touch . Step 6: Setting the date and time Getting Started Set the date and time when using this camcorder for about 3 months, the built-in rechargeable battery gets discharged and the date and time settings may be cleared from the memory. In that case..., charge the rechargeable battery and then set any year up to step 4 when you do not use your camcorder for the first time. AREA26 GMT -5.0 New York , Bogota DST OFF DATE 2005Y JANM 1D 12: 00 AM OK Skip to the year ...
... touch . /, 7 Set [M] (month), [D] (day), hour and minute, then touch . Step 6: Setting the date and time Getting Started Set the date and time when using this camcorder for about 3 months, the built-in rechargeable battery gets discharged and the date and time settings may be cleared from the memory. In that case..., charge the rechargeable battery and then set any year up to step 4 when you do not use your camcorder for the first time. AREA26 GMT -5.0 New York , Bogota DST OFF DATE 2005Y JANM 1D 12: 00 AM OK Skip to the year ...
Operating Guide
Page 24
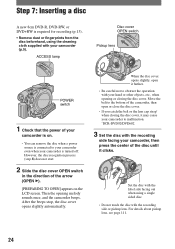
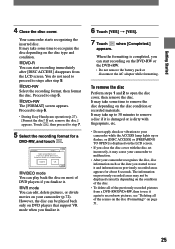
...). [PREPARING TO OPEN] appears on . • You can remove the disc when a power source is connected to malfunction. *DCR-DVD92/DVD602 3 Set the disc with your camcorder is turned off. For details about pickup lens, see page 111. 24 Set the disc with the label side facing out when...with the recording side or pickup lens. After the beeps stop, the disc cover opens slightly automatically. Move the belt to the bottom of your camcorder (p.5). However, the disc recognition process (step 4) does not start. 2 Slide the disc cover OPEN switch in the direction of the disc until...
...). [PREPARING TO OPEN] appears on . • You can remove the disc when a power source is connected to malfunction. *DCR-DVD92/DVD602 3 Set the disc with your camcorder is turned off. For details about pickup lens, see page 111. 24 Set the disc with the label side facing out when...with the recording side or pickup lens. After the beeps stop, the disc cover opens slightly automatically. Move the belt to the bottom of your camcorder (p.5). However, the disc recognition process (step 4) does not start. 2 Slide the disc cover OPEN switch in the direction of the disc until...
Operating Guide
Page 25
... To delete all of the previously recorded pictures from the LCD screen. To remove the disc Perform steps 1 and 2 to step 6. • During Easy Handycam operation (p.27), [Format the disc? It may take some time to step 7. 5 Select the recording format for about 8 seconds. When the formatting is ... is damaged or is displayed on the disc type and condition. DVD-R You can edit, delete pictures, or divide movies on your camcorder recognizes the disc, disc information such as the date you close the disc cover with fingerprints, etc. • Do not apply shock...
... To delete all of the previously recorded pictures from the LCD screen. To remove the disc Perform steps 1 and 2 to step 6. • During Easy Handycam operation (p.27), [Format the disc? It may take some time to step 7. 5 Select the recording format for about 8 seconds. When the formatting is ... is damaged or is displayed on the disc type and condition. DVD-R You can edit, delete pictures, or divide movies on your camcorder recognizes the disc, disc information such as the date you close the disc cover with fingerprints, etc. • Do not apply shock...
Operating Guide
Page 26
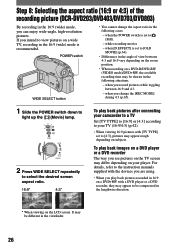
... MODE ON OFF (CHG) POWER 2 Press WIDE SELECT repeatedly to select the desired screen aspect ratio. 16:9* 4:3* To play back pictures after connecting your camcorder to a TV Set [TV TYPE] to [16:9] or [4:3] according to your player. For details, refer to the instruction manuals supplied with the devices you...16:9 on the LCD screen. when the POWER switch is set to [OLD MOVIE] (p.64). • Differences in the angle of the recording picture (DCR-DVD203/DVD403/DVD703/DVD803) By recording in the 16:9 (wide) mode, you change the aspect ratio in the 16:9 (wide) mode is set to (Still). -...
... MODE ON OFF (CHG) POWER 2 Press WIDE SELECT repeatedly to select the desired screen aspect ratio. 16:9* 4:3* To play back pictures after connecting your camcorder to a TV Set [TV TYPE] to [16:9] or [4:3] according to your player. For details, refer to the instruction manuals supplied with the devices you...16:9 on the LCD screen. when the POWER switch is set to [OLD MOVIE] (p.64). • Differences in the angle of the recording picture (DCR-DVD203/DVD403/DVD703/DVD803) By recording in the 16:9 (wide) mode, you change the aspect ratio in the 16:9 (wide) mode is set to (Still). -...
Operating Guide
Page 27
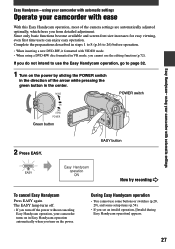
...detailed adjustment. using a DVD-RW disc formatted in Easy Handycam operation automatically when you turn off the power without canceling Easy Handycam operation, your camcorder turns on the power. Now try recording During Easy Handycam operation • You cannot use some buttons or switches (p....8226; When inserting a new DVD-RW, it formatted with VIDEO mode. • When using your camcorder with automatic settings Operate your camcorder with ease With this Easy Handycam operation, most of the arrow while pressing the green button in the center. Since only basic functions ...
...detailed adjustment. using a DVD-RW disc formatted in Easy Handycam operation automatically when you turn off the power without canceling Easy Handycam operation, your camcorder turns on the power. Now try recording During Easy Handycam operation • You cannot use some buttons or switches (p....8226; When inserting a new DVD-RW, it formatted with VIDEO mode. • When using your camcorder with automatic settings Operate your camcorder with ease With this Easy Handycam operation, most of the arrow while pressing the green button in the center. Since only basic functions ...
Operating Guide
Page 28
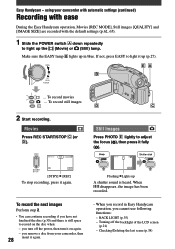
... When you record in blue. Movies Press REC START/STOP (or ). you remove a disc from your camcorder with automatic settings (continued) Recording with ease During the Easy Handycam operation, Movies [REC MODE], Still images [QUALITY] and [IMAGE SIZE] are recorded with the default settings (p.62, 65).... disc (p.30) and there is heard. Turning off the power, then turn off the backlight of the LCD screen (p.21) - using your camcorder, then 28 insert it on the disc when: - When disappears, the image has been recorded. To record the next images Perform step 2. ...
... When you record in blue. Movies Press REC START/STOP (or ). you remove a disc from your camcorder with automatic settings (continued) Recording with ease During the Easy Handycam operation, Movies [REC MODE], Still images [QUALITY] and [IMAGE SIZE] are recorded with the default settings (p.62, 65).... disc (p.30) and there is heard. Turning off the power, then turn off the backlight of the LCD screen (p.21) - using your camcorder, then 28 insert it on the disc when: - When disappears, the image has been recorded. To record the next images Perform step 2. ...
Operating Guide
Page 29
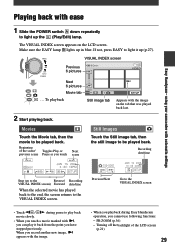
using your camcorder with automatic settings Playing back with ease 1 Slide the POWER switch down repeatedly to light up in blue. The VISUAL INDEX screen appears on ... (Play/Edit) lamp. Movies Touch the Movie tab, then the movie to light it back from the point you cannot use following functions: - during Easy Handycam operation, you have stopped previously. Easy...
using your camcorder with automatic settings Playing back with ease 1 Slide the POWER switch down repeatedly to light up in blue. The VISUAL INDEX screen appears on ... (Play/Edit) lamp. Movies Touch the Movie tab, then the movie to light it back from the point you cannot use following functions: - during Easy Handycam operation, you have stopped previously. Easy...


