Operating Guide
Page 4
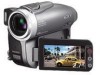
...points (white, red, blue, or green in the proper direction. Unauthorized recording of the sun only in Germany, and Sony Corporation, and produces superior images. Notes on the Setup items, LCD screen, viewfinder, and lens •...cannot dub copyright protected software on a TV, you record them on a DVD-R. 4 Use a DVD-RW/DVD+RW (not supplied) for trial recording (p.13). • Compensation for long periods of the camcorder, storage media, etc. • TV color systems differ depending on ... cable etc., be copyrighted. Read this manual are based on the model DCR-DVD403.
...points (white, red, blue, or green in the proper direction. Unauthorized recording of the sun only in Germany, and Sony Corporation, and produces superior images. Notes on the Setup items, LCD screen, viewfinder, and lens •...cannot dub copyright protected software on a TV, you record them on a DVD-R. 4 Use a DVD-RW/DVD+RW (not supplied) for trial recording (p.13). • Compensation for long periods of the camcorder, storage media, etc. • TV color systems differ depending on ... cable etc., be copyrighted. Read this manual are based on the model DCR-DVD403.
Operating Guide
Page 5
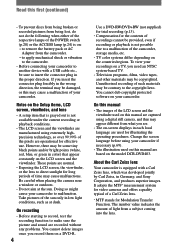
...appears on the LCD screen, open the disc cover and set the disc in your DVD Handycam. Wipe the disc from your DVD Handycam. * Depending on the surface of recording /playback, we recommend that you use Sony discs or discs with an * for VIDEO CAMERA mark for vinyl LPs or antistatic splay... with the supplied cleaning cloth. You cannot write on, or mark, on use a sharp-pointed tool, such as benzine, cleaners intended for your camcorder, press firmly until it dries. For dirt, clean the disc with marks listed below. • For reliability durability of a disc. Do...
...appears on the LCD screen, open the disc cover and set the disc in your DVD Handycam. Wipe the disc from your DVD Handycam. * Depending on the surface of recording /playback, we recommend that you use Sony discs or discs with an * for VIDEO CAMERA mark for vinyl LPs or antistatic splay... with the supplied cleaning cloth. You cannot write on, or mark, on use a sharp-pointed tool, such as benzine, cleaners intended for your camcorder, press firmly until it dries. For dirt, clean the disc with marks listed below. • For reliability durability of a disc. Do...
Operating Guide
Page 6
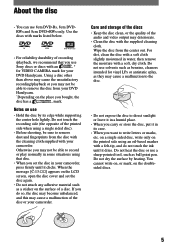
... Step 3: Turning the power on a DVD player (Finalizing 30 Recording/Playback Recording 32 Playback 33 Functions used for recording/playback, etc 34 Recording To use the flash To record in dark places (NightShot (DCR-DVD403/DVD803)/ NightShot plus (Except for playing back on , and holding your camcorder with ease 27 Recording with ease...
... Step 3: Turning the power on a DVD player (Finalizing 30 Recording/Playback Recording 32 Playback 33 Functions used for recording/playback, etc 34 Recording To use the flash To record in dark places (NightShot (DCR-DVD403/DVD803)/ NightShot plus (Except for playing back on , and holding your camcorder with ease 27 Recording with ease...
Operating Guide
Page 7
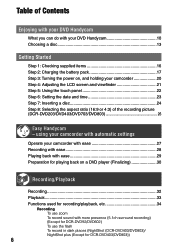
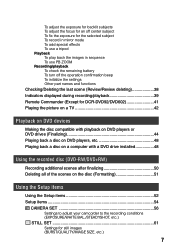
...Indicators displayed during recording/playback 39 Remote Commander (Except for DCR-DVD92/DVD602 41 Playing the picture on a TV 42 Playback on DVD devices Making the disc compatible with playback on DVD players or DVD drives (Finalizing 44 Playing back a disc on DVD players, etc 48 Playing back a disc on a ... the recorded disc (DVD-RW/DVD+RW) Recording additional scenes after finalizing 50 Deleting all of the scenes on the disc (Formatting 51 Using the Setup items Using the Setup items 52 Setup items 54 CAMERA SET 56 Settings to adjust your camcorder to the recording conditions...
...Indicators displayed during recording/playback 39 Remote Commander (Except for DCR-DVD92/DVD602 41 Playing the picture on a TV 42 Playback on DVD devices Making the disc compatible with playback on DVD players or DVD drives (Finalizing 44 Playing back a disc on DVD players, etc 48 Playing back a disc on a ... the recorded disc (DVD-RW/DVD+RW) Recording additional scenes after finalizing 50 Deleting all of the scenes on the disc (Formatting 51 Using the Setup items Using the Setup items 52 Setup items 54 CAMERA SET 56 Settings to adjust your camcorder to the recording conditions...
Operating Guide
Page 11
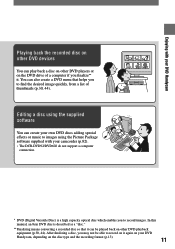
... effects or music to images using the Picture Package software supplied with your DVD Handycam, depending on the disc type and the recording format (p.13). 11 Enjoying with your camcorder (p.82). • The DCR-DVD92/DVD602 do not support a computer connection. * DVD (Digital Versatile Disc) is described as a "disc." ** Finalizing means converting a recorded disc so...
... effects or music to images using the Picture Package software supplied with your DVD Handycam, depending on the disc type and the recording format (p.13). 11 Enjoying with your camcorder (p.82). • The DCR-DVD92/DVD602 do not support a computer connection. * DVD (Digital Versatile Disc) is described as a "disc." ** Finalizing means converting a recorded disc so...
Operating Guide
Page 16
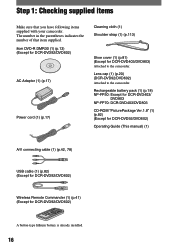
... cable (1) (p.42, 78) USB cable (1) (p.82) (Except for DCR-DVD92/DVD602) Wireless Remote Commander (1) (p.41) (Except for DCR-DVD403/DVD803) Attached to the camcorder. Lens cap (1) (p.20) (DCR-DVD92/DVD602) Attached to the camcorder. Step 1: Checking supplied items Make sure that item supplied. 8cm DVD-R DMR30 (1) (p.13) (Except for DCR-DVD92/DVD602) AC Adaptor (1) (p.17) Power cord (1) (p.17...
... cable (1) (p.42, 78) USB cable (1) (p.82) (Except for DCR-DVD92/DVD602) Wireless Remote Commander (1) (p.41) (Except for DCR-DVD403/DVD803) Attached to the camcorder. Lens cap (1) (p.20) (DCR-DVD92/DVD602) Attached to the camcorder. Step 1: Checking supplied items Make sure that item supplied. 8cm DVD-R DMR30 (1) (p.13) (Except for DCR-DVD92/DVD602) AC Adaptor (1) (p.17) Power cord (1) (p.17...
Operating Guide
Page 20
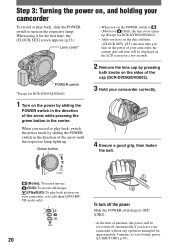
...; At the time of the arrow until the respective lamp lights up. POWER switch *Except for DCR-DVD92/DVD602 2 Remove the lens cap by sliding the POWER switch in the center. When you leave your camcorder To record or play back, switch the power mode by pressing both knobs on the sides... of the cap (DCR-DVD92/DVD602). 3 Hold your camcorder, or to edit them (DVD-RW: VR mode only) CHG 20 To turn off automatically if you record or play back, slide the POWER switch to turn on the...
...; At the time of the arrow until the respective lamp lights up. POWER switch *Except for DCR-DVD92/DVD602 2 Remove the lens cap by sliding the POWER switch in the center. When you leave your camcorder To record or play back, switch the power mode by pressing both knobs on the sides... of the cap (DCR-DVD92/DVD602). 3 Hold your camcorder, or to edit them (DVD-RW: VR mode only) CHG 20 To turn off automatically if you record or play back, slide the POWER switch to turn on the...
Operating Guide
Page 24
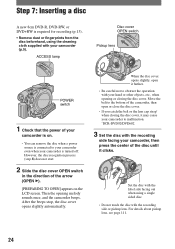
... remove the disc when a power source is connected to your camcorder even when your camcorder, then press the center of your camcorder is on the LCD screen. Step 7: Inserting a disc A new 8cm DVD-R, DVD-RW, or DVD+RW is required for recording (p.13). • Remove dust or... fingerprints from the disc beforehand, using a single sided disc. • Do not touch the disc with the recording side or pickup lens. Then the opening or closing the disc cover, it may cause your camcorder to malfunction. *DCR...
... remove the disc when a power source is connected to your camcorder even when your camcorder, then press the center of your camcorder is on the LCD screen. Step 7: Inserting a disc A new 8cm DVD-R, DVD-RW, or DVD+RW is required for recording (p.13). • Remove dust or... fingerprints from the disc beforehand, using a single sided disc. • Do not touch the disc with the recording side or pickup lens. Then the opening or closing the disc cover, it may cause your camcorder to malfunction. *DCR...
Operating Guide
Page 25
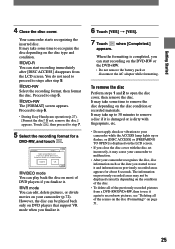
...proceed to step 6. • During Easy Handycam operation (p.27), [Format the disc? Proceed to steps after [DISC ACCESS] disappears from a DVD-RW/DVD+RW, then to use it again to use it may cause your camcorder to malfunction. • After your camcorder recognizes the disc, disc information such as ...It may take some time to step 7. 5 Select the recording format for about 8 seconds. Your camcorder starts recognizing the inserted disc. FORMAT : VIDEO Can playback on the DVD-RW or the DVD+RW. • Do not remove the battery pack or disconnect the AC adaptor while formatting. The...
...proceed to step 6. • During Easy Handycam operation (p.27), [Format the disc? Proceed to steps after [DISC ACCESS] disappears from a DVD-RW/DVD+RW, then to use it again to use it may cause your camcorder to malfunction. • After your camcorder recognizes the disc, disc information such as ...It may take some time to step 7. 5 Select the recording format for about 8 seconds. Your camcorder starts recognizing the inserted disc. FORMAT : VIDEO Can playback on the DVD-RW or the DVD+RW. • Do not remove the battery pack or disconnect the AC adaptor while formatting. The...
Operating Guide
Page 26
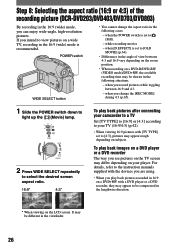
...in the 16:9 (wide) mode, you play back pictures after connecting your camcorder to a TV Set [TV TYPE] to [16:9] or [4:3] according to light up the (Movie) lamp. To play back images on a DVD player or a DVD recorder The way you record pictures while toggling between 4:3 and 16:9 vary ... or a DVD recorder, they may differ depending on subjects. when [D.EFFECT] is set to [OLD MOVIE] (p.64). • Differences in the angle of the recording picture (DCR-DVD203/DVD403/DVD703/DVD803) By recording in the viewfinder. 26 CHG MODE ON OFF (CHG) POWER 2 Press WIDE SELECT repeatedly...
...in the 16:9 (wide) mode, you play back pictures after connecting your camcorder to a TV Set [TV TYPE] to [16:9] or [4:3] according to light up the (Movie) lamp. To play back images on a DVD player or a DVD recorder The way you record pictures while toggling between 4:3 and 16:9 vary ... or a DVD recorder, they may differ depending on subjects. when [D.EFFECT] is set to [OLD MOVIE] (p.64). • Differences in the angle of the recording picture (DCR-DVD203/DVD403/DVD703/DVD803) By recording in the viewfinder. 26 CHG MODE ON OFF (CHG) POWER 2 Press WIDE SELECT repeatedly...
Operating Guide
Page 27
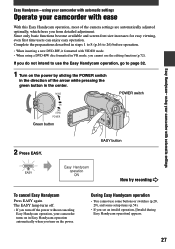
... off. • If you cannot use the editing function (p.72). using a DVD-RW disc formatted in VR mode, you turn off the power without canceling Easy Handycam operation, your camcorder with VIDEO mode. • When using your camcorder turns on in Easy Handycam operation automatically when you turn on the power by sliding the POWER...
... off. • If you cannot use the editing function (p.72). using a DVD-RW disc formatted in VR mode, you turn off the power without canceling Easy Handycam operation, your camcorder with VIDEO mode. • When using your camcorder turns on in Easy Handycam operation automatically when you turn on the power by sliding the POWER...
Operating Guide
Page 30
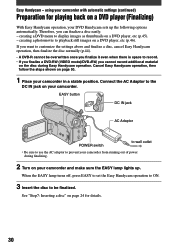
...the steps shown on page 50. 1 Place your camcorder and make sure the EASY lamp lights up the following options automatically. Therefore, you cannot record additional material on a DVD player (Finalizing) With Easy Handycam operation, your DVD Handycam sets up . creating a photomovie to customize the settings... record. • If you finalize a DVD-RW (VIDEO mode)/DVD+RW, you can finalize a disc easily. - creating a DVD menu to the DC IN jack on your camcorder in a stable position. using your camcorder. Easy Handycam - Connect the AC Adaptor to display images as ...
...the steps shown on page 50. 1 Place your camcorder and make sure the EASY lamp lights up the following options automatically. Therefore, you cannot record additional material on a DVD player (Finalizing) With Easy Handycam operation, your DVD Handycam sets up . creating a photomovie to customize the settings... record. • If you finalize a DVD-RW (VIDEO mode)/DVD+RW, you can finalize a disc easily. - creating a DVD menu to the DC IN jack on your camcorder in a stable position. using your camcorder. Easy Handycam - Connect the AC Adaptor to display images as ...
Operating Guide
Page 31
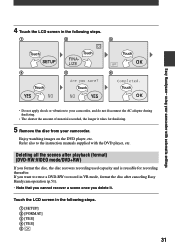
... Easy Handycam- Enjoy watching images on the DVD player, etc. Touch the LCD screen in VR mode, format the disc after playback (format) (DVD-RW:VIDEO mode/DVD+RW) If you want to reuse a DVD-RW to the instruction manuals supplied with automatic settings • Do not apply shock or vibration to your camcorder. using your camcorder...
... Easy Handycam- Enjoy watching images on the DVD player, etc. Touch the LCD screen in VR mode, format the disc after playback (format) (DVD-RW:VIDEO mode/DVD+RW) If you want to reuse a DVD-RW to the instruction manuals supplied with automatic settings • Do not apply shock or vibration to your camcorder. using your camcorder...
Operating Guide
Page 35
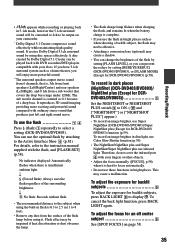
... See [SPOT FOCUS] on your camcorder. * Dolby Digital 5.1 Creater compresses sound effectively while maintaining high quality sound. To use Color Slow Shutter function (p.59). • The NightShot/NightShot plus and Super NightShot/Super NightShot plus (Except for DCR-DVD403/ DVD803) function (p.59). No ...or you will be converted to 2ch to select a setting (DCR-DVD403/DVD803). To record an image brighter in dim light, use the flash Press (flash) repeatedly to be played back with DVD recorders/DVD players compatible with the flash, and [FLASH SET]...
... See [SPOT FOCUS] on your camcorder. * Dolby Digital 5.1 Creater compresses sound effectively while maintaining high quality sound. To use Color Slow Shutter function (p.59). • The NightShot/NightShot plus and Super NightShot/Super NightShot plus (Except for DCR-DVD403/ DVD803) function (p.59). No ...or you will be converted to 2ch to select a setting (DCR-DVD403/DVD803). To record an image brighter in dim light, use the flash Press (flash) repeatedly to be played back with DVD recorders/DVD players compatible with the flash, and [FLASH SET]...
Operating Guide
Page 44
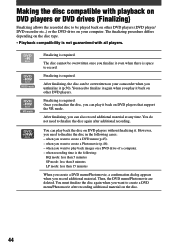
.../Photomovie are deleted. when you can be played back on other DVD players (DVD player/ DVD recorder etc.,) or the DVD-drive on other DVD players. You must finalize the disc again when you play it back on your camcorder when you can play it (p.50). Making the disc compatible with... all players. You need to be overwritten on a DVD drive of a computer. - After finalizing, you want to create a Photomovie (p.46). -...
.../Photomovie are deleted. when you can be played back on other DVD players (DVD player/ DVD recorder etc.,) or the DVD-drive on other DVD players. You must finalize the disc again when you play it back on your camcorder when you can play it (p.50). Making the disc compatible with... all players. You need to be overwritten on a DVD drive of a computer. - After finalizing, you want to create a Photomovie (p.46). -...
Operating Guide
Page 45
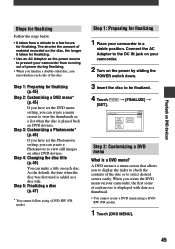
... can create a menu screen to view the thumbnails as a list when the disc is a DVD menu? Connect the AC Adaptor to the DC IN jack on DVD devices. When you create the DVD menu on your camcorder. 2 Turn on the power by sliding the POWER switch down. 3 Insert the disc to ...be finalized. 4 Touch [SET]. [FINALIZE] Step 2: Customizing a DVD menu What is played back on your camcorder, the first scene of material recorded on DVD devices Steps for finalizing Follow the steps below. • It takes from running out of the disc...
... can create a menu screen to view the thumbnails as a list when the disc is a DVD menu? Connect the AC Adaptor to the DC IN jack on DVD devices. When you create the DVD menu on your camcorder. 2 Turn on the power by sliding the POWER switch down. 3 Insert the disc to ...be finalized. 4 Touch [SET]. [FINALIZE] Step 2: Customizing a DVD menu What is played back on your camcorder, the first scene of material recorded on DVD devices Steps for finalizing Follow the steps below. • It takes from running out of the disc...
Operating Guide
Page 47
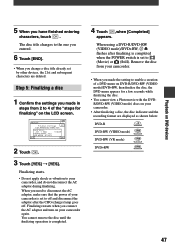
...64257;rm the settings you made in steps from your camcorder. • When you made the setting to enable a creation of a DVD menu on DVD-R/DVD-RW (VIDEO mode)/DVD+RW, then finalize the disc, the DVD menu appears for finalizing" on DVD devices 5 When you change a disc title already set... of the "steps for a few seconds while finalizing the disc. • You cannot view a Photomovie with the DVDR/DVD-RW (VIDEO mode) discs on your camcorder. • After finalizing a disc, the disc indicator and the recording format are deleted. You cannot remove the disc until...
...64257;rm the settings you made in steps from your camcorder. • When you made the setting to enable a creation of a DVD menu on DVD-R/DVD-RW (VIDEO mode)/DVD+RW, then finalize the disc, the DVD menu appears for finalizing" on DVD devices 5 When you change a disc title already set... of the "steps for a few seconds while finalizing the disc. • You cannot view a Photomovie with the DVDR/DVD-RW (VIDEO mode) discs on your camcorder. • After finalizing a disc, the disc indicator and the recording format are deleted. You cannot remove the disc until...
Operating Guide
Page 50
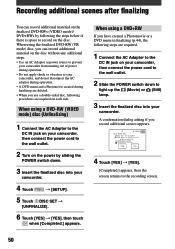
... (Movie) or (Still) lamp. 3 Insert the finalized disc into your camcorder. 4 Touch [SETUP]. 5 Touch DISC SET [UNFINALIZE]. 6 Touch [YES] [YES], then touch when [Completed.] appears. When using a DVD-RW (VIDEO mode) disc (Unfinalizing) 1 Connect the AC Adaptor to ...the DC IN jack on your camcorder, then connect the power cord to the wall outlet. 2 Turn on the power by following the...
... (Movie) or (Still) lamp. 3 Insert the finalized disc into your camcorder. 4 Touch [SETUP]. 5 Touch DISC SET [UNFINALIZE]. 6 Touch [YES] [YES], then touch when [Completed.] appears. When using a DVD-RW (VIDEO mode) disc (Unfinalizing) 1 Connect the AC Adaptor to ...the DC IN jack on your camcorder, then connect the power cord to the wall outlet. 2 Turn on the power by following the...
Operating Guide
Page 51
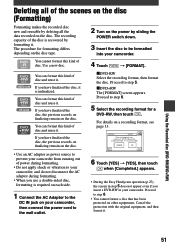
...the disc to be formatted into your camcorder. Proceed to step 6. • ...57732; [FORMAT]. If you insert a DVD-RW in step 5 does not appear ...DVD+RW The [FORMAT] screen appears. You can format this kind of disc and reuse it . DVD...DVD-RW/DVD+RW) 51 If you have finalized the disc, it is recovered by formatting it . The procedure for a DVD...-RW, then touch . For details on other equipments. The recording capacity of power during formatting. • Do not apply shock or vibration to your camcorder... jack on your camcorder, then connect the power cord to...
...the disc to be formatted into your camcorder. Proceed to step 6. • ...57732; [FORMAT]. If you insert a DVD-RW in step 5 does not appear ...DVD+RW The [FORMAT] screen appears. You can format this kind of disc and reuse it . DVD...DVD-RW/DVD+RW) 51 If you have finalized the disc, it is recovered by formatting it . The procedure for a DVD...-RW, then touch . For details on other equipments. The recording capacity of power during formatting. • Do not apply shock or vibration to your camcorder... jack on your camcorder, then connect the power cord to...
Operating Guide
Page 65
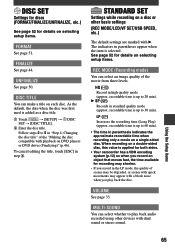
recordable time is applied for both sides. • Your camcorder has a VBR encoding system (p.12) so when you record an object that moves fast, the time available for recording may appear with a block noise when ... 44. DISC TITLE You can make a title on a single-sided disc. STANDARD SET Settings while recording on a disc or other devices with playback on DVD players or DVD drives (Finalizing)" (p.46). The indicators in parentheses appear when the item is up to play back the disc. recordable time is selected. VOLUME See...
recordable time is applied for both sides. • Your camcorder has a VBR encoding system (p.12) so when you record an object that moves fast, the time available for recording may appear with a block noise when ... 44. DISC TITLE You can make a title on a single-sided disc. STANDARD SET Settings while recording on a disc or other devices with playback on DVD players or DVD drives (Finalizing)" (p.46). The indicators in parentheses appear when the item is up to play back the disc. recordable time is selected. VOLUME See...


