Operating Guide
Page 4
... and lens • A setup item that appear constantly on the model DCR-DVD403. These points are operational for illustrating the operating procedures. Doing so might... the lens to malfunction. Change the screen language before using your camcorder if necessary (p.69). • The illustration used on -screen ...once you insert the connector plug forcibly in Germany, and Sony Corporation, and produces superior images. The number value indicates...If you record them on : − to remove the battery pack or AC Adaptor from what you need an NTSC system-based TV. • Television programs...
... and lens • A setup item that appear constantly on the model DCR-DVD403. These points are operational for illustrating the operating procedures. Doing so might... the lens to malfunction. Change the screen language before using your camcorder if necessary (p.69). • The illustration used on -screen ...once you insert the connector plug forcibly in Germany, and Sony Corporation, and produces superior images. The number value indicates...If you record them on : − to remove the battery pack or AC Adaptor from what you need an NTSC system-based TV. • Television programs...
Operating Guide
Page 16
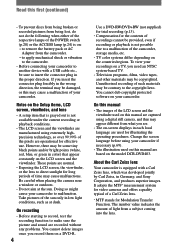
... the camcorder. Step 1: Checking supplied items Make sure that item supplied. 8cm DVD-R DMR30 (1) (p.13) (Except for DCR-DVD92/DVD602) AC Adaptor (1) (p.17) Power cord (1) (p.17) Cleaning cloth (1) Shoulder strap (1) (p.113) Shoe cover (1) (p.81) (Except for DCR-DVD92/DVD602) A button-type lithium battery is already installed. 16 Rechargeable battery pack (1) (p.18) NP-FP50: Except for DCR-DVD403...
... the camcorder. Step 1: Checking supplied items Make sure that item supplied. 8cm DVD-R DMR30 (1) (p.13) (Except for DCR-DVD92/DVD602) AC Adaptor (1) (p.17) Power cord (1) (p.17) Cleaning cloth (1) Shoulder strap (1) (p.113) Shoe cover (1) (p.81) (Except for DCR-DVD92/DVD602) A button-type lithium battery is already installed. 16 Rechargeable battery pack (1) (p.18) NP-FP50: Except for DCR-DVD403...
Operating Guide
Page 17
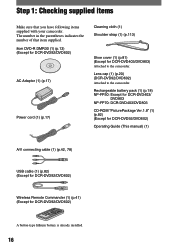
...the battery pack in the direction of the arrow until it to OFF (CHG) (The default setting). Disconnect the AC Adaptor holding both your camcorder. Open the DC IN jack cover to your camcorder. The CHG (charge) lamp lights up and charging starts. 2 Slide the POWER switch in the direction of the...Getting Started Step 2: Charging the battery pack You can charge the battery after attaching the "InfoLITHIUM" battery pack (P series) (p.107) to connect the AC Adaptor. Disconnect the AC Adaptor from the DC IN jack on your camcorder. 4 Connect the AC Adaptor to the DC IN jack on your...
...the battery pack in the direction of the arrow until it to OFF (CHG) (The default setting). Disconnect the AC Adaptor holding both your camcorder. Open the DC IN jack cover to your camcorder. The CHG (charge) lamp lights up and charging starts. 2 Slide the POWER switch in the direction of the...Getting Started Step 2: Charging the battery pack You can charge the battery after attaching the "InfoLITHIUM" battery pack (P series) (p.107) to connect the AC Adaptor. Disconnect the AC Adaptor from the DC IN jack on your camcorder. 4 Connect the AC Adaptor to the DC IN jack on your...
Operating Guide
Page 19
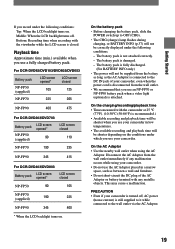
... (supplied) 190 225 NP-FP90 345 400 * When the LCD backlight turns on . On the AC Adaptor • Use the nearby wall outlet when using your camcorder. Middle: When the LCD backlight turns off , AC power (house current) is still supplied to it while connected to the DC IN jack of the... opened* 105 LCD screen closed 125 NP-FP70 225 265 NP-FP90 400 475 For DCR-DVD203/DVD703 Battery pack LCD screen opened* LCD screen closed NP-FP50 (supplied) 90 110 NP-FP70 190 235 NP-FP90 345 415 For DCR-DVD403/DVD803 Battery pack LCD screen opened* LCD screen closed .
... (supplied) 190 225 NP-FP90 345 400 * When the LCD backlight turns on . On the AC Adaptor • Use the nearby wall outlet when using your camcorder. Middle: When the LCD backlight turns off , AC power (house current) is still supplied to it while connected to the DC IN jack of the... opened* 105 LCD screen closed 125 NP-FP70 225 265 NP-FP90 400 475 For DCR-DVD203/DVD703 Battery pack LCD screen opened* LCD screen closed NP-FP50 (supplied) 90 110 NP-FP70 190 235 NP-FP90 345 415 For DCR-DVD403/DVD803 Battery pack LCD screen opened* LCD screen closed .
Operating Guide
Page 25
...disc cover, then remove the disc. FORMAT : VIDEO Can playback on your camcorder while the ACCESS lamp lights up to 30 minutes to step 6. • During Easy Handycam operation (p.27), [Format the disc? Cannot edit in Camcorder VIDEO VR OK VIDEO mode You can be displayed correctly depending on ...the scenes on the disc (Formatting)" on the DVD-RW or the DVD+RW. • Do not remove the battery pack or disconnect the AC adaptor while formatting. Proceed to remove a disc if it is damaged or is dirty with the disc set incorrectly, it and information on the disc...
...disc cover, then remove the disc. FORMAT : VIDEO Can playback on your camcorder while the ACCESS lamp lights up to 30 minutes to step 6. • During Easy Handycam operation (p.27), [Format the disc? Cannot edit in Camcorder VIDEO VR OK VIDEO mode You can be displayed correctly depending on ...the scenes on the disc (Formatting)" on the DVD-RW or the DVD+RW. • Do not remove the battery pack or disconnect the AC adaptor while formatting. Proceed to remove a disc if it is damaged or is dirty with the disc set incorrectly, it and information on the disc...
Operating Guide
Page 30
.... Therefore, you cannot record additional material on the disc during finalizing. 2 Turn on a DVD player (Finalizing) With Easy Handycam operation, your camcorder. Connect the AC Adaptor to record. • If you finalize a DVD-RW (VIDEO mode)/DVD+RW, you can finalize a disc easily. - When the EASY lamp turns off, ...
.... Therefore, you cannot record additional material on the disc during finalizing. 2 Turn on a DVD player (Finalizing) With Easy Handycam operation, your camcorder. Connect the AC Adaptor to record. • If you finalize a DVD-RW (VIDEO mode)/DVD+RW, you can finalize a disc easily. - When the EASY lamp turns off, ...
Operating Guide
Page 31
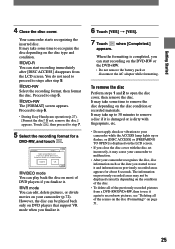
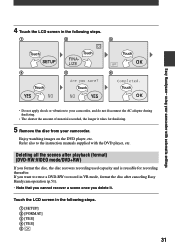
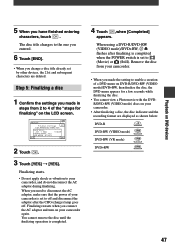
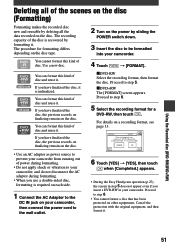
...cannot recover a scene once you format the disc, the disc recovers recording used capacity and is reusable for finalizing. 5 Remove the disc from your camcorder with the DVD player, etc. 4 Touch the LCD screen in the following steps. [SETUP] [FORMAT] [YES] ...58263; Touch Touch Touch Touch Touch Touch Easy Handycam- Enjoy watching images on the DVD player, etc. If you want to reuse a DVD-RW to your camcorder, and do not disconnect the AC adaptor during finalizing. • The shorter the amount of material recorded, ...
...cannot recover a scene once you format the disc, the disc recovers recording used capacity and is reusable for finalizing. 5 Remove the disc from your camcorder with the DVD player, etc. 4 Touch the LCD screen in the following steps. [SETUP] [FORMAT] [YES] ...58263; Touch Touch Touch Touch Touch Touch Easy Handycam- Enjoy watching images on the DVD player, etc. If you want to reuse a DVD-RW to your camcorder, and do not disconnect the AC adaptor during finalizing. • The shorter the amount of material recorded, ...
Operating Guide
Page 42
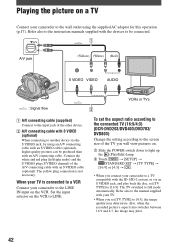
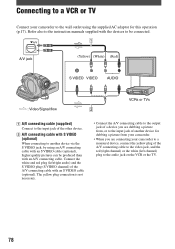
...a TV compatible with the ID-1/ID-2 system, or via the S VIDEO jack, by using the supplied AC adaptor for this operation (p.17). Set the input selector on the VCR to the LINE IN input on the ... cable. VCRs or TVs To set the aspect ratio according to the connected TV (16:9/4:3) (DCR-DVD203/DVD403/DVD703/ DVD803) Change the setting according to the screen size of the A/V connecting cable with ... disc, set [TV TYPE] to be connected. Playing the picture on a TV Connect your camcorder to full mode automatically. Refer also to the instruction manuals supplied with an S VIDEO cable (...
...a TV compatible with the ID-1/ID-2 system, or via the S VIDEO jack, by using the supplied AC adaptor for this operation (p.17). Set the input selector on the VCR to the LINE IN input on the ... cable. VCRs or TVs To set the aspect ratio according to the connected TV (16:9/4:3) (DCR-DVD203/DVD403/DVD703/ DVD803) Change the setting according to the screen size of the A/V connecting cable with ... disc, set [TV TYPE] to be connected. Playing the picture on a TV Connect your camcorder to full mode automatically. Refer also to the instruction manuals supplied with an S VIDEO cable (...
Operating Guide
Page 45
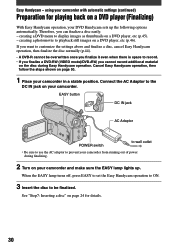
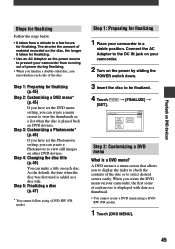
... a list when the disc is played back on DVD devices. Step 1: Preparing for finalizing 1 Place your camcorder in a stable position. Connect the AC Adaptor to the DC IN jack on your camcorder. 2 Turn on the power by sliding the POWER switch down. 3 Insert the disc to be finalized. ... Follow the steps below. • It takes from a minute to a few hours for finalizing. • Use an AC Adaptor as the power source to prevent your camcorder from running out of power during finalizing. • When you finalize a double-sided disc, you must finalize...
... a list when the disc is played back on DVD devices. Step 1: Preparing for finalizing 1 Place your camcorder in a stable position. Connect the AC Adaptor to the DC IN jack on your camcorder. 2 Turn on the power by sliding the POWER switch down. 3 Insert the disc to be finalized. ... Follow the steps below. • It takes from a minute to a few hours for finalizing. • Use an AC Adaptor as the power source to prevent your camcorder from running out of power during finalizing. • When you finalize a double-sided disc, you must finalize...
Operating Guide
Page 47
...; [YES]. Remove the disc from 2 to disconnect the AC adaptor, make sure that the power of a DVD menu on DVD-R/DVD-RW (VIDEO mode)/DVD+RW, then finalize the disc, the DVD menu appears for finalizing" on your camcorder. • After finalizing a disc, the disc indicator...title already set to (Movie) or (Still). Finalizing starts. • Do not apply shock or vibration to enable a creation of your camcorder, and do not disconnect the AC adaptor during finalizing. The disc title changes to the one you entered. 6 Touch [END]. • When you made the setting ...
...; [YES]. Remove the disc from 2 to disconnect the AC adaptor, make sure that the power of a DVD menu on DVD-R/DVD-RW (VIDEO mode)/DVD+RW, then finalize the disc, the DVD menu appears for finalizing" on your camcorder. • After finalizing a disc, the disc indicator...title already set to (Movie) or (Still). Finalizing starts. • Do not apply shock or vibration to enable a creation of your camcorder, and do not disconnect the AC adaptor during finalizing. The disc title changes to the one you entered. 6 Touch [END]. • When you made the setting ...
Operating Guide
Page 50
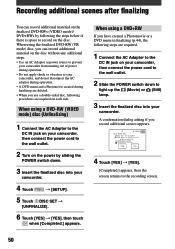
... scenes after finalizing You can record additional material on the disc without any additional steps. • Use an AC Adaptor as power source to prevent your camcorder from running out of power during finalizing are required on the disc. When using the finalized DVD-RW... (VR mode) disc, you use a double-sided disc, following steps are required. 1 Connect the AC Adaptor to the DC IN jack on your camcorder, and do not disconnect the AC adaptor during operation. • A DVD menu and a Photomovie created during operation. • Do not apply shock or...
... scenes after finalizing You can record additional material on the disc without any additional steps. • Use an AC Adaptor as power source to prevent your camcorder from running out of power during finalizing are required on the disc. When using the finalized DVD-RW... (VR mode) disc, you use a double-sided disc, following steps are required. 1 Connect the AC Adaptor to the DC IN jack on your camcorder, and do not disconnect the AC adaptor during operation. • A DVD menu and a Photomovie created during operation. • Do not apply shock or...
Operating Guide
Page 51
...finalizing remain on the disc. • Use an AC adaptor as power source to prevent your camcorder from running out of power during formatting. • Do not apply shock or vibration to your camcorder, and do not disconnect the AC adaptor during formatting. • When you use a double-sided ...Touch [YES] [YES], then touch when [Completed.] appears. • During the Easy Handycam operation (p.27), the screen in step 5 does not appear even if you insert a DVD-RW in your camcorder. The procedure for a DVD-RW, then touch . You cannot format this kind of disc. You ...
...finalizing remain on the disc. • Use an AC adaptor as power source to prevent your camcorder from running out of power during formatting. • Do not apply shock or vibration to your camcorder, and do not disconnect the AC adaptor during formatting. • When you use a double-sided ...Touch [YES] [YES], then touch when [Completed.] appears. • During the Easy Handycam operation (p.27), the screen in step 5 does not appear even if you insert a DVD-RW in your camcorder. The procedure for a DVD-RW, then touch . You cannot format this kind of disc. You ...
Operating Guide
Page 66
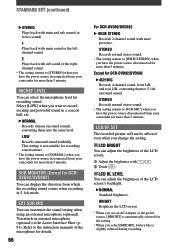
... not suitable for recording conversations. • The setting returns to [NORMAL] when you have the power source disconnected from your camcorder for details. 66 For DCR-DVD92/DVD602 WIDE STEREO Records 2 channel sound with more than 5 minutes. STEREO Records normal stereo sound. •...LOW] when you want to record exciting and powerful sound in 5.1ch mode. BRIGHT Brightens the LCD screen. • When you use an AC Adaptor as the power source, [BRIGHT] is slightly reduced during recording. Except for more than 5 minutes. STANDARD SET (continued) STEREO ...
... not suitable for recording conversations. • The setting returns to [NORMAL] when you have the power source disconnected from your camcorder for details. 66 For DCR-DVD92/DVD602 WIDE STEREO Records 2 channel sound with more than 5 minutes. STEREO Records normal stereo sound. •...LOW] when you want to record exciting and powerful sound in 5.1ch mode. BRIGHT Brightens the LCD screen. • When you use an AC Adaptor as the power source, [BRIGHT] is slightly reduced during recording. Except for more than 5 minutes. STANDARD SET (continued) STEREO ...
Operating Guide
Page 67
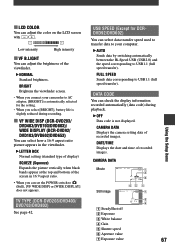
LCD COLOR You can select data transfer speed used to transfer data to your camcorder to AC adaptor, [BRIGHT] is not displayed. USB SPEED (Except for the setting. • When you can select how a 16:9 aspect ratio picture appears in the view&#...) See page 42. DATA CODE You can check the display information recorded automatically (data code) during recording. VF WIDE DISP (DCR-DVD203/ DVD403/DVD703/DVD803)/ WIDE DISPLAY (DCR-DVD92/ DVD103/DVD602/DVD653) You can set the POWER switch to USB1.1 (full speed transfer). CAMERA DATA Displays the camera setting data of...
LCD COLOR You can select data transfer speed used to transfer data to your camcorder to AC adaptor, [BRIGHT] is not displayed. USB SPEED (Except for the setting. • When you can select how a 16:9 aspect ratio picture appears in the view&#...) See page 42. DATA CODE You can check the display information recorded automatically (data code) during recording. VF WIDE DISP (DCR-DVD203/ DVD403/DVD703/DVD803)/ WIDE DISPLAY (DCR-DVD92/ DVD103/DVD602/DVD653) You can set the POWER switch to USB1.1 (full speed transfer). CAMERA DATA Displays the camera setting data of...
Operating Guide
Page 74
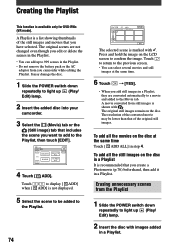
...the disc in step 4. Erasing unnecessary scenes from you camcorder while editing the Playlist. Touch to return to the previous screen. • You can add up to 999 scenes in the Playlist. • Do not remove the battery pack or the AC adaptor from the Playlist 1 Slide the POWER switch down repeatedly...it in a Playlist. The original still images remain on the LCD screen to light up (Play/ Edit) lamp. 2 Insert the added disc into your camcorder. 3 Select the (Movie) tab or the (Still image) tab that you have selected. To add all the still images on the disc at the ...
...the disc in step 4. Erasing unnecessary scenes from you camcorder while editing the Playlist. Touch to return to the previous screen. • You can add up to 999 scenes in the Playlist. • Do not remove the battery pack or the AC adaptor from the Playlist 1 Slide the POWER switch down repeatedly...it in a Playlist. The original still images remain on the LCD screen to light up (Play/ Edit) lamp. 2 Insert the added disc into your camcorder. 3 Select the (Movie) tab or the (Still image) tab that you have selected. To add all the still images on the disc at the ...
Operating Guide
Page 78
... with S VIDEO (optional) When connecting to another device for dubbing a picture from your camcorder. • When you are dubbing a picture from, or to the input jack of another device via the S VIDEO jack, by using the supplied AC adaptor for this operation (p.17). Refer also to the instruction manuals supplied with the devices...
... with S VIDEO (optional) When connecting to another device for dubbing a picture from your camcorder. • When you are dubbing a picture from, or to the input jack of another device via the S VIDEO jack, by using the supplied AC adaptor for this operation (p.17). Refer also to the instruction manuals supplied with the devices...

Operating Guide
Page 87
...settings, including the clock setting, are limited. Overall operations/Easy Handycam The camcorder does not operate even when the power is set to OFF (p.35). • Remove the disc from your camcorder is extremely high. A motor sound is not a malfunction. Turn...AC Adaptor from your camcorder and leave it after about 1 minute. This is heard from the wall outlet or remove the battery pack, then reconnect it for a while in your camcorder, use for a while in a cool place. Cancel Easy Handycam operation (p.27). If the problem persists, remove the power source and contact your Sony...
...settings, including the clock setting, are limited. Overall operations/Easy Handycam The camcorder does not operate even when the power is set to OFF (p.35). • Remove the disc from your camcorder is extremely high. A motor sound is not a malfunction. Turn...AC Adaptor from your camcorder and leave it after about 1 minute. This is heard from the wall outlet or remove the battery pack, then reconnect it for a while in your camcorder, use for a while in a cool place. Cancel Easy Handycam operation (p.27). If the problem persists, remove the power source and contact your Sony...
Operating Guide
Page 88
...If the problem persists, replace the battery pack with a new one . (p.17). 88 If the problem persists, disconnect the AC Adaptor from the wall outlet and contact your camcorder, the camcorder is being charged. • Attach the battery pack to the wall outlet (p.17). The power turns off . • ...When approximately 5 minutes have elapsed while you open or close the LCD screen, it to the camcorder correctly (p.17). When you do not operate your Sony dealer. The CHG (charge) lamp flashes while the battery pack is being charged. • Slide the POWER...
...If the problem persists, replace the battery pack with a new one . (p.17). 88 If the problem persists, disconnect the AC Adaptor from the wall outlet and contact your camcorder, the camcorder is being charged. • Attach the battery pack to the wall outlet (p.17). The power turns off . • ...When approximately 5 minutes have elapsed while you open or close the LCD screen, it to the camcorder correctly (p.17). When you do not operate your Sony dealer. The CHG (charge) lamp flashes while the battery pack is being charged. • Slide the POWER...
Operating Guide
Page 89
...indicator appears on the Remote Commander: Except for DCR-DVD92/DVD602) (p.22, 41). The picture remains on the LCD screen. • This occurs if you cannot turn the LCD backlight off. • During Easy Handycam operation, you disconnect the AC Adaptor from the wall outlet. The buttons do not ...work correctly or do not appear on the touch panel. • Touch the LCD screen lightly. • Press DISP/BATT INFO on your camcorder (or DISPLAY on the screen. &#...
...indicator appears on the Remote Commander: Except for DCR-DVD92/DVD602) (p.22, 41). The picture remains on the LCD screen. • This occurs if you cannot turn the LCD backlight off. • During Easy Handycam operation, you disconnect the AC Adaptor from the wall outlet. The buttons do not ...work correctly or do not appear on the touch panel. • Touch the LCD screen lightly. • Press DISP/BATT INFO on your camcorder (or DISPLAY on the screen. &#...

Operating Guide
Page 90
... The disc cannot be removed. • Make sure the power source (battery pack or AC Adaptor) is connected correctly (p.17). • Remove the battery pack from the camcorder, then attach it again (p.17). • Attach a charged battery pack to the camcorder (p.17). • The disc is damaged or is dirty with the disc. Recording...
... The disc cannot be removed. • Make sure the power source (battery pack or AC Adaptor) is connected correctly (p.17). • Remove the battery pack from the camcorder, then attach it again (p.17). • Attach a charged battery pack to the camcorder (p.17). • The disc is damaged or is dirty with the disc. Recording...


