Operating Guide
Page 4
...the connector plug in low light conditions, such as at the sun. Notes on -screen displays in Germany, and Sony Corporation, and produces superior images. Doing so might cause your camcorder. It adopts the MTF* measurement system for video cameras and offers a quality typical of the pixels are manufactured ... any problems. You cannot delete images once you insert the connector plug forcibly in color) that is grayed out is not possible due to a malfunction of the sun only in the proper direction. If you record them on the model DCR-DVD403. You cannot dub copyright protected ...
...the connector plug in low light conditions, such as at the sun. Notes on -screen displays in Germany, and Sony Corporation, and produces superior images. Doing so might cause your camcorder. It adopts the MTF* measurement system for video cameras and offers a quality typical of the pixels are manufactured ... any problems. You cannot delete images once you insert the connector plug forcibly in color) that is grayed out is not possible due to a malfunction of the sun only in the proper direction. If you record them on the model DCR-DVD403. You cannot dub copyright protected ...
Operating Guide
Page 7
... To record in mirror mode To add special effects To use a tripod Playback To play back the images in sequence To use PB ZOOM Recording/playback To check the remaining battery To turn off the operation ... the last scene (Review/Review deleting 38 Indicators displayed during recording/playback 39 Remote Commander (Except for DCR-DVD92/DVD602 41 Playing the picture on a TV 42 Playback on DVD devices Making the disc compatible ... Setup items 54 CAMERA SET 56 Settings to adjust your camcorder to the recording conditions (EXPOSURE/WHITE BAL./STEADYSHOT, etc.) STILL SET 61 Settings for still...
... To record in mirror mode To add special effects To use a tripod Playback To play back the images in sequence To use PB ZOOM Recording/playback To check the remaining battery To turn off the operation ... the last scene (Review/Review deleting 38 Indicators displayed during recording/playback 39 Remote Commander (Except for DCR-DVD92/DVD602 41 Playing the picture on a TV 42 Playback on DVD devices Making the disc compatible ... Setup items 54 CAMERA SET 56 Settings to adjust your camcorder to the recording conditions (EXPOSURE/WHITE BAL./STEADYSHOT, etc.) STILL SET 61 Settings for still...
Operating Guide
Page 8
... (REC MODE/LCD/VF SET/USB SPEED, etc.) TIME/LANGU 69 (CLOCK SET/AREA SET/LANGUAGE, etc.) Customizing Personal Menu 70 Editing on DVD Handycam (DVD-RW:VR mode) Editing the original data 72 Creating the Playlist 74 Playing the Playlist 77 Dubbing Connecting to a VCR or TV 78 Dubbing... to VCR/DVD devices 79 Recording images from a TV or VCR/DVD device (Except for DCR-DVD92/DVD602 80 Jacks to connect external devices 81 Using a Computer (Except for DCR-DVD92/DVD602) Before referring to the "First Step Guide" on your computer 82 Installing...
... (REC MODE/LCD/VF SET/USB SPEED, etc.) TIME/LANGU 69 (CLOCK SET/AREA SET/LANGUAGE, etc.) Customizing Personal Menu 70 Editing on DVD Handycam (DVD-RW:VR mode) Editing the original data 72 Creating the Playlist 74 Playing the Playlist 77 Dubbing Connecting to a VCR or TV 78 Dubbing... to VCR/DVD devices 79 Recording images from a TV or VCR/DVD device (Except for DCR-DVD92/DVD602 80 Jacks to connect external devices 81 Using a Computer (Except for DCR-DVD92/DVD602) Before referring to the "First Step Guide" on your computer 82 Installing...
Operating Guide
Page 10
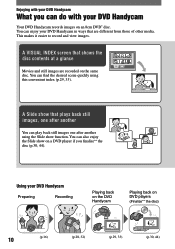
...after another using this convenient index (p.29, 33). You can do with your DVD Handycam Your DVD Handycam records images on the same disc. You can enjoy your DVD Handycam Preparing Recording Playing back on the DVD Handycam Playing back on a DVD player if you can also enjoy the Slide show function.... A VISUAL INDEX screen that are recorded on an 8cm DVD* disc. Using your DVD Handycam in ways that shows the disc contents at a glance Movies and still images are different from those of other media. This makes it easier to record and view...
...after another using this convenient index (p.29, 33). You can do with your DVD Handycam Your DVD Handycam records images on the same disc. You can enjoy your DVD Handycam Preparing Recording Playing back on the DVD Handycam Playing back on a DVD player if you can also enjoy the Slide show function.... A VISUAL INDEX screen that are recorded on an 8cm DVD* disc. Using your DVD Handycam in ways that shows the disc contents at a glance Movies and still images are different from those of other media. This makes it easier to record and view...
Operating Guide
Page 11
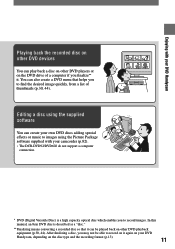
...camcorder (p.82). • The DCR-DVD92/DVD602 do not support a computer connection. * DVD (Digital Versatile Disc) is described as a "disc." ** Finalizing means converting a recorded disc so that helps you to find the desired image quickly, from a list of a computer if you to images using the Picture Package software supplied with your DVD Handycam...an 8cm DVD disc is a high capacity optical disc which enables you finalize** it again on your DVD Handycam Playing back the recorded disc on the DVD drive of thumbnails (p.30, 44). Editing a disc using the supplied ...
...camcorder (p.82). • The DCR-DVD92/DVD602 do not support a computer connection. * DVD (Digital Versatile Disc) is described as a "disc." ** Finalizing means converting a recorded disc so that helps you to find the desired image quickly, from a list of a computer if you to images using the Picture Package software supplied with your DVD Handycam...an 8cm DVD disc is a high capacity optical disc which enables you finalize** it again on your DVD Handycam Playing back the recorded disc on the DVD drive of thumbnails (p.30, 44). Editing a disc using the supplied ...
Operating Guide
Page 12
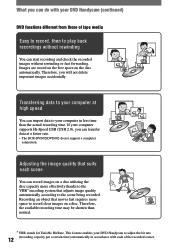
... in accordance with your computer at a faster rate. • The DCR-DVD92/DVD602 do with each scene You can start recording and check the recorded images without rewinding You can record images on a disc utilizing the disc capacity more space to the scene being... import data to play back recordings without rewinding or fast forwarding. Adjusting the image quality that adjusts image quality automatically according to record clear images on the disc automatically. Transferring data to your DVD Handycam (continued) DVD functions different from those of the recorded scenes.
... in accordance with your computer at a faster rate. • The DCR-DVD92/DVD602 do with each scene You can start recording and check the recorded images without rewinding You can record images on a disc utilizing the disc capacity more space to the scene being... import data to play back recordings without rewinding or fast forwarding. Adjusting the image quality that adjusts image quality automatically according to record clear images on the disc automatically. Transferring data to your DVD Handycam (continued) DVD functions different from those of the recorded scenes.
Operating Guide
Page 13
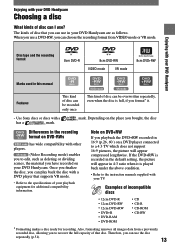
...Handycam...of that you can play back the disc with your DVD Handycam Choosing a disc What kinds of disc can be overwritten repeatedly...not support 16:9 pictures, the picture will appear in your DVD Handycam are as deleting or dividing scenes, the material you have recorded...default setting, the picture will appear compressed lengthwise. mark. Note on your DVD Handycam. Examples of incompatible discs • 12cm DVD-R • 12cm DVD-RW...;cations of your playback equipment for recording. Also, formatting removes all images data from VIDEO mode or VR mode. The kinds of disc that...
...Handycam...of that you can play back the disc with your DVD Handycam Choosing a disc What kinds of disc can be overwritten repeatedly...not support 16:9 pictures, the picture will appear in your DVD Handycam are as deleting or dividing scenes, the material you have recorded...default setting, the picture will appear compressed lengthwise. mark. Note on your DVD Handycam. Examples of incompatible discs • 12cm DVD-R • 12cm DVD-RW...;cations of your playback equipment for recording. Also, formatting removes all images data from VIDEO mode or VR mode. The kinds of disc that...
Operating Guide
Page 14
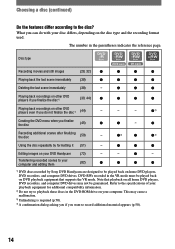
...57864; - Transferring recorded scenes to playback these discs in the VR mode must be played back on your computer. Disc type Recording movies and still images (28, 32) Playing back the last scene immediately (38) &#... Recording additional scenes after finalizing the disc (50) - 3) 4) Using the disc repeatedly by Sony DVD Handycam are designed to the disc? The number in the parentheses indicates the reference page. Note that supports the VR mode. Choosing a disc ...
...57864; - Transferring recorded scenes to playback these discs in the VR mode must be played back on your computer. Disc type Recording movies and still images (28, 32) Playing back the last scene immediately (38) &#... Recording additional scenes after finalizing the disc (50) - 3) 4) Using the disc repeatedly by Sony DVD Handycam are designed to the disc? The number in the parentheses indicates the reference page. Note that supports the VR mode. Choosing a disc ...
Operating Guide
Page 15
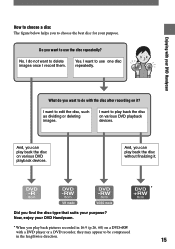
... finalizing it ? Enjoying with your DVD Handycam How to choose a disc The figure below helps you want to use one disc repeatedly. Do you to choose the best disc for your purpose? I want to edit the disc, such as dividing or deleting images. I do you find the disc type...
... finalizing it ? Enjoying with your DVD Handycam How to choose a disc The figure below helps you want to use one disc repeatedly. Do you to choose the best disc for your purpose? I want to edit the disc, such as dividing or deleting images. I do you find the disc type...
Operating Guide
Page 20
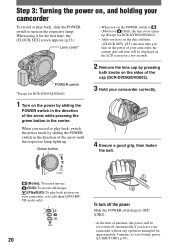
...record still images (Play/Edit): To play back pictures on the LCD screen for approximately 5 minutes, to save battery power. ([A.SHUT OFF], p.69). When using it for DCR-DVD92/DVD602 2 Remove the lens cap by pressing both knobs on the sides of the cap (DCR-DVD92/DVD602). 3 Hold your camcorder correctly....Lens cover* • When you set the POWER switch to (Movie) or (Still), the lens cover opens up (Except for DCR-DVD92/DVD602). • After you leave your camcorder without any operation attempted for a few seconds. POWER switch *Except for the first time, the [CLOCK SET] screen ...
...record still images (Play/Edit): To play back pictures on the LCD screen for approximately 5 minutes, to save battery power. ([A.SHUT OFF], p.69). When using it for DCR-DVD92/DVD602 2 Remove the lens cap by pressing both knobs on the sides of the cap (DCR-DVD92/DVD602). 3 Hold your camcorder correctly....Lens cover* • When you set the POWER switch to (Movie) or (Still), the lens cover opens up (Except for DCR-DVD92/DVD602). • After you leave your camcorder without any operation attempted for a few seconds. POWER switch *Except for the first time, the [CLOCK SET] screen ...
Operating Guide
Page 26
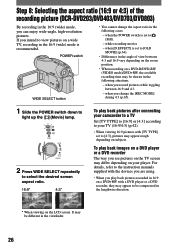
...to select the desired screen aspect ratio. 16:9* 4:3* To play back images on a DVD player or a DVD recorder The way you intend to [OLD MOVIE] (p.64). • Differences in the angle of the recording picture (DCR-DVD203/DVD403/DVD703/DVD803) By recording in the 16:9 (wide) mode, you ...change the aspect ratio in the following situations. - If you see pictures on the TV screen may be shorter in the following cases: - To play back pictures after connecting your camcorder to a TV...
...to select the desired screen aspect ratio. 16:9* 4:3* To play back images on a DVD player or a DVD recorder The way you intend to [OLD MOVIE] (p.64). • Differences in the angle of the recording picture (DCR-DVD203/DVD403/DVD703/DVD803) By recording in the 16:9 (wide) mode, you ...change the aspect ratio in the following situations. - If you see pictures on the TV screen may be shorter in the following cases: - To play back pictures after connecting your camcorder to a TV...
Operating Guide
Page 28
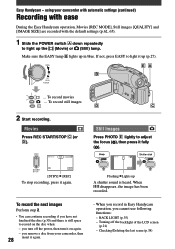
... 60min REC 0:00:00 START/ STOP 16:9 SETUP [STBY] [REC] To stop recording, press it again. Still Images Press PHOTO lightly to adjust the focus (), then press it again. • When you record in blue. BACK LIGHT (p.35) -... A shutter sound is still space to light up in Easy Handycam operation, you remove a disc from your camcorder with automatic settings (continued) Recording with ease During the Easy Handycam operation, Movies [REC MODE], Still images [QUALITY] and [IMAGE SIZE] are recorded with the default settings (p.62, 65). ...
... 60min REC 0:00:00 START/ STOP 16:9 SETUP [STBY] [REC] To stop recording, press it again. Still Images Press PHOTO lightly to adjust the focus (), then press it again. • When you record in blue. BACK LIGHT (p.35) -... A shutter sound is still space to light up in Easy Handycam operation, you remove a disc from your camcorder with automatic settings (continued) Recording with ease During the Easy Handycam operation, Movies [REC MODE], Still images [QUALITY] and [IMAGE SIZE] are recorded with the default settings (p.62, 65). ...
Operating Guide
Page 29
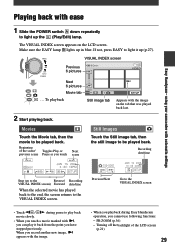
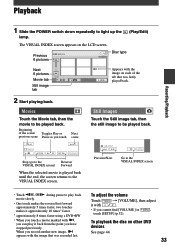
...played back to the end, the screen returns to light it back from the point you cannot use following functions: - during Easy Handycam operation, you have stopped previously. The VISUAL INDEX screen appears on the tab that was played back last. 2 Start playing back. To...; Touch / movie slowly. Beginning of the LCD screen (p.21) 29 Previous/Next Go to light up in blue. using your camcorder with automatic settings Playing back with the image on the LCD screen. VISUAL INDEX screen Previous 6 pictures Next 6 pictures Movie tab ... When you record another new...
...played back to the end, the screen returns to light it back from the point you cannot use following functions: - during Easy Handycam operation, you have stopped previously. The VISUAL INDEX screen appears on the tab that was played back last. 2 Start playing back. To...; Touch / movie slowly. Beginning of the LCD screen (p.21) 29 Previous/Next Go to light up in blue. using your camcorder with automatic settings Playing back with the image on the LCD screen. VISUAL INDEX screen Previous 6 pictures Next 6 pictures Movie tab ... When you record another new...
Operating Guide
Page 30
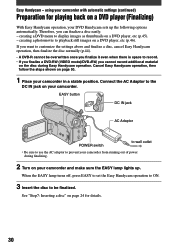
... lamp lights up the following options automatically. Cancel Easy Handycam operation, then follow the steps shown on your DVD Handycam sets up . Connect the AC Adaptor to playback still images on the disc during finalizing. 2 Turn on a DVD player (Finalizing) With Easy Handycam operation, your camcorder. See "Step7: Inserting a disc" on a DVD player, etc...
... lamp lights up the following options automatically. Cancel Easy Handycam operation, then follow the steps shown on your DVD Handycam sets up . Connect the AC Adaptor to playback still images on the disc during finalizing. 2 Turn on a DVD player (Finalizing) With Easy Handycam operation, your camcorder. See "Step7: Inserting a disc" on a DVD player, etc...
Operating Guide
Page 31
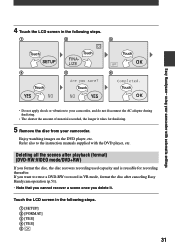
...automatic settings • Do not apply shock or vibration to your camcorder. If you delete it takes for recording thereafter. 4 Touch the LCD screen in the following steps. Touch Touch Touch Touch Touch Touch Easy Handycam- Refer also to record in VR mode, format the disc... recorded, the longer it . Touch the LCD screen in the following steps. [SETUP] [FORMAT] [YES] [YES] 31 using your camcorder with the DVD player, etc. Enjoy watching images on the DVD player, etc.
...automatic settings • Do not apply shock or vibration to your camcorder. If you delete it takes for recording thereafter. 4 Touch the LCD screen in the following steps. Touch Touch Touch Touch Touch Touch Easy Handycam- Refer also to record in VR mode, format the disc... recorded, the longer it . Touch the LCD screen in the following steps. [SETUP] [FORMAT] [YES] [YES] 31 using your camcorder with the DVD player, etc. Enjoy watching images on the DVD player, etc.
Operating Guide
Page 32
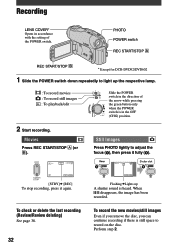
..., press it fully (). 2016 FINE 0 P-MENU Flashing Lights up the respective lamp. : To record movies : To record still images : To playback/edit Slide the POWER switch in the direction of the POWER switch. PHOTO POWER switch REC START/STOP REC START/STOP ...; * Except for DCR-DVD92/DVD602 1 Slide the POWER switch down repeatedly to record on the disc. To check or delete the last recording (Review/Review deleting) ...
..., press it fully (). 2016 FINE 0 P-MENU Flashing Lights up the respective lamp. : To record movies : To record still images : To playback/edit Slide the POWER switch in the direction of the POWER switch. PHOTO POWER switch REC START/STOP REC START/STOP ...; * Except for DCR-DVD92/DVD602 1 Slide the POWER switch down repeatedly to record on the disc. To check or delete the last recording (Review/Review deleting) ...
Operating Guide
Page 33
...approximately 10 times* faster. * approximately 8 times faster using a DVD+RW • When you have stopped previously. When you record another new image, appears with , you can play back • One touch makes the reverse/fast forward approximately 5 times faster, two touches... makes it back from the point you touch a movie marked with the image that was recorded last. Playback 1 Slide the POWER switch down repeatedly to the VISUAL INDEX screen • Touch / movie slowly. ...
...approximately 10 times* faster. * approximately 8 times faster using a DVD+RW • When you have stopped previously. When you record another new image, appears with , you can play back • One touch makes the reverse/fast forward approximately 5 times faster, two touches... makes it back from the point you touch a movie marked with the image that was recorded last. Playback 1 Slide the POWER switch down repeatedly to the VISUAL INDEX screen • Touch / movie slowly. ...
Operating Guide
Page 35
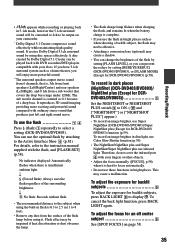
...flash lamp before using it. Flash effect may cause a malfunction. Therefore, do not cover the infrared port with your camcorder. * Dolby Digital 5.1 Creater compresses sound effectively while maintaining high quality sound. The sub woofer channel is , 5ch from front speakers (...or NIGHTSHOT PLUS switch to ON. ( and ["NIGHTSHOT"] or ["NIGHTSHOT PLUS"] appear.) • To record an image brighter, use Super NightShot (DCR-DVD403/DVD803)/Super NightShot plus use infrared light. To cancel the back light function, press BACK LIGHT again. To record in 5.1ch...
...flash lamp before using it. Flash effect may cause a malfunction. Therefore, do not cover the infrared port with your camcorder. * Dolby Digital 5.1 Creater compresses sound effectively while maintaining high quality sound. The sub woofer channel is , 5ch from front speakers (...or NIGHTSHOT PLUS switch to ON. ( and ["NIGHTSHOT"] or ["NIGHTSHOT PLUS"] appear.) • To record an image brighter, use Super NightShot (DCR-DVD403/DVD803)/Super NightShot plus use infrared light. To cancel the back light function, press BACK LIGHT again. To record in 5.1ch...

Operating Guide
Page 36
Functions used for recording/playback, etc.(continued) DCR-DVD403/DVD803: Except for DCR-DVD403/DVD803: 36 To fix the exposure for the selected subject See [SPOT METER] on page 63. To add special effects See PICT. APPLI on page ...). A frame appears on page 64. Magnification can magnify pictures from about 1.1 to 5 times the original size. Playback To play back the images in mirror mode Open the LCD screen 90 degrees to the camcorder (), then rotate it 180 degrees to the lens side (). • A mirror...
Functions used for recording/playback, etc.(continued) DCR-DVD403/DVD803: Except for DCR-DVD403/DVD803: 36 To fix the exposure for the selected subject See [SPOT METER] on page 63. To add special effects See PICT. APPLI on page ...). A frame appears on page 64. Magnification can magnify pictures from about 1.1 to 5 times the original size. Playback To play back the images in mirror mode Open the LCD screen 90 degrees to the camcorder (), then rotate it 180 degrees to the lens side (). • A mirror...
Operating Guide
Page 38
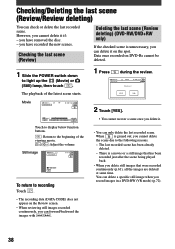
... after the scene being played back. • When you have removed the disc. - The playback of the viewing movie. / :Adjust the volume Still image To return to recording Touch . • The recording data (DATA CODE) does not appear on DVD-Rs cannot be deleted. 1 Slide the POWER switch... the new scenes. The last recorded scene has been already deleted. - Data once recorded on the Review screen. • When reviewing still images recorded continuously, you can only delete the last recorded scene. When is grayed out, you cannot delete it . • You can forward/backward the...
... after the scene being played back. • When you have removed the disc. - The playback of the viewing movie. / :Adjust the volume Still image To return to recording Touch . • The recording data (DATA CODE) does not appear on DVD-Rs cannot be deleted. 1 Slide the POWER switch... the new scenes. The last recorded scene has been already deleted. - Data once recorded on the Review screen. • When reviewing still images recorded continuously, you can only delete the last recorded scene. When is grayed out, you cannot delete it . • You can forward/backward the...


