User Guide
Page 161
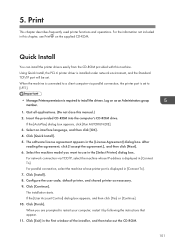
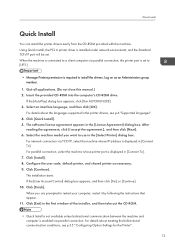
... install the drivers. Quit all applications. (Do not close this machine. Select an interface language, and then click [OK]. 4. Select the machine model you are prompted to a client computer via TCP/IP, select the machine whose printer port is displayed in the first window of the installer...following the instructions that appear. 11. Click [Continue]. If the [User Account Control] dialog box appears, and then click [Yes] or [Continue]. 10. When you want to [LPT1]. • Manage Printers permission is installed under network environment, and the Standard TCP/IP port will be set. 5....
... install the drivers. Quit all applications. (Do not close this machine. Select an interface language, and then click [OK]. 4. Select the machine model you are prompted to a client computer via TCP/IP, select the machine whose printer port is displayed in the first window of the installer...following the instructions that appear. 11. Click [Continue]. If the [User Account Control] dialog box appears, and then click [Yes] or [Continue]. 10. When you want to [LPT1]. • Manage Printers permission is installed under network environment, and the Standard TCP/IP port will be set. 5....
User Guide
Page 163
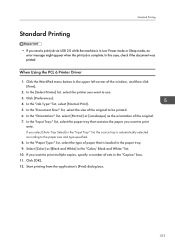
Click the WordPad menu button in the "Color/ Black and White:" list. 10. In the "Job Type:" list, select [Normal Print]. 5. In the "Input Tray...Input Tray:" list, the source tray is complete. Select [Color] or [Black and White] in the upper left corner of the window, and then click [Print]. 2. If you want to use. 3. Click [Preferences]. 4. Start printing from the application's [Print...selected according to the paper size and type specified. 8. When Using the PCL 6 Printer Driver 1. In this case, check if the document was printed. In the "Paper Type:" list, select the type of...
Click the WordPad menu button in the "Color/ Black and White:" list. 10. In the "Job Type:" list, select [Normal Print]. 5. In the "Input Tray...Input Tray:" list, the source tray is complete. Select [Color] or [Black and White] in the upper left corner of the window, and then click [Print]. 2. If you want to use. 3. Click [Preferences]. 4. Start printing from the application's [Print...selected according to the paper size and type specified. 8. When Using the PCL 6 Printer Driver 1. In this case, check if the document was printed. In the "Paper Type:" list, select the type of...
User Guide
Page 275
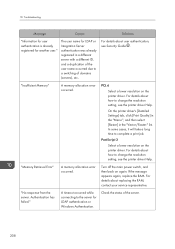
... incorrect." The classification code has not been entered, or the classification code has been entered incorrectly. The classification code is full. 10. An RPCS command error occurred. For details about how to -date version available. 204 Reduce the paper size of user information..., see "Configuring Classification Codes", Print . Select Optional for LDAP Authentication or Windows Authentication failed because the Address Book is not supported with the printer driver. For details about automatic registration of the file that you want to send to a size ...
... incorrect." The classification code has not been entered, or the classification code has been entered incorrectly. The classification code is full. 10. An RPCS command error occurred. For details about how to -date version available. 204 Reduce the paper size of user information..., see "Configuring Classification Codes", Print . Select Optional for LDAP Authentication or Windows Authentication failed because the Address Book is not supported with the printer driver. For details about automatic registration of the file that you want to send to a size ...
User Guide
Page 279
... a duplication of the user name occurred due to change the resolution setting, see the printer driver Help. In some cases, it will take a long time to the server for LDAP authentication or Windows Authentication. Turn off the main power switch, and then back on again. Authentication has failed."... or Integration Server authentication was already registered in the "Vector/Raster:" list. If the message appears again, replace the RAM. 10. A timeout occurred while connecting to complete a print job. For details about replacing the RAM, contact your service representative.
... a duplication of the user name occurred due to change the resolution setting, see the printer driver Help. In some cases, it will take a long time to the server for LDAP authentication or Windows Authentication. Turn off the main power switch, and then back on again. Authentication has failed."... or Integration Server authentication was already registered in the "Vector/Raster:" list. If the message appears again, replace the RAM. 10. A timeout occurred while connecting to complete a print job. For details about replacing the RAM, contact your service representative.
User Guide
Page 299
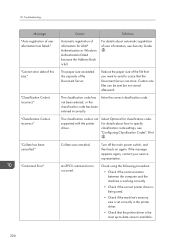
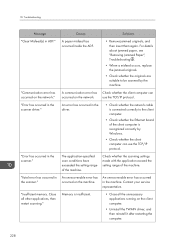
..., then restart scanning." An error has occurred in the scanner driver." Contact your service representative. "Error has occurred in the driver. • Check whether the network cable is connected correctly to be scanned by Windows. • Check whether the client computer can occurred on the...client computer can use the TCP/IP protocol. An unrecoverable error has occurred on the client computer. • Uninstall the TWAIN driver, and then reinstall it after restarting the computer. 228 Memory is recognized correctly by the machine. "Fatal error has occurred in...
..., then restart scanning." An error has occurred in the scanner driver." Contact your service representative. "Error has occurred in the driver. • Check whether the network cable is connected correctly to be scanned by Windows. • Check whether the client computer can occurred on the...client computer can use the TCP/IP protocol. An unrecoverable error has occurred on the client computer. • Uninstall the TWAIN driver, and then reinstall it after restarting the computer. 228 Memory is recognized correctly by the machine. "Fatal error has occurred in...
User Guide
Page 333
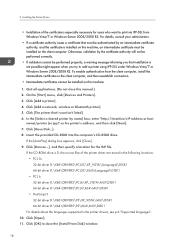
...]. If the [User Account Control] dialog box appears, and then click [Yes] or [Continue]. 10. Click [Exit] in [Connect To]. 7. For details about the languages supported in the [License ...connection via TCP/IP, select the machine whose printer port is displayed in the first window of the installer, and then take out the CD-ROM. • Quick Install... bidirectional communication conditions, see p.6 "Supported languages". 4. The software license agreement appears in the printer drivers, see p.35 " Configuring Option Settings for the Printer". 13 For parallel connection, select the machine...
...]. If the [User Account Control] dialog box appears, and then click [Yes] or [Continue]. 10. Click [Exit] in [Connect To]. 7. For details about the languages supported in the [License ...connection via TCP/IP, select the machine whose printer port is displayed in the first window of the installer, and then take out the CD-ROM. • Quick Install... bidirectional communication conditions, see p.6 "Supported languages". 4. The software license agreement appears in the printer drivers, see p.35 " Configuring Option Settings for the Printer". 13 For parallel connection, select the machine...
User Guide
Page 335
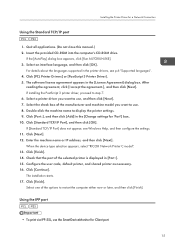
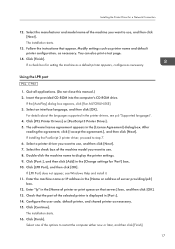
... [Run AUTORUN.EXE]. 3. Click [PCL Printer Drivers] or [PostScript 3 Printer Driver]. 5. The software license agreement appears in the printer drivers, see Windows Help, and then configure the settings. 11. Select...and then click [Add] in [Port :]. 15. When the device type selection appears, select "RICOH Network Printer C model". 13. Click [Continue]. Using the IPP port • To print via...Next]. Installing the Printer Driver for 'Port'] box. 10. Insert the provided CD-ROM into the computer's CD-ROM drive. If installing the PostScript 3 printer driver, proceed to use the ...
... [Run AUTORUN.EXE]. 3. Click [PCL Printer Drivers] or [PostScript 3 Printer Driver]. 5. The software license agreement appears in the printer drivers, see Windows Help, and then configure the settings. 11. Select...and then click [Add] in [Port :]. 15. When the device type selection appears, select "RICOH Network Printer C model". 13. Click [Continue]. Using the IPP port • To print via...Next]. Installing the Printer Driver for 'Port'] box. 10. Insert the provided CD-ROM into the computer's CD-ROM drive. If installing the PostScript 3 printer driver, proceed to use the ...
User Guide
Page 336
... an intermediate certificate must be installed on this manual.) 2. To enable authentication from Windows Vista/7 or Windows Server 2008/2008 R2. Click [The printer that installation is especially necessary for the...driver D:\X64\DRIVERS\PCL5C\X64\(Language)\DISK1 • PCL 6 32-bit driver D:\X86\DRIVERS\PCL6\XP_VISTA\MUI\DISK1 64-bit driver D:\X64\DRIVERS\PCL6\X64\MUI\DISK1 • PostScript 3 32-bit driver D:\X86\DRIVERS\PS\XP_VISTA\MUI\DISK1 64-bit driver D:\X64\DRIVERS\PS\X64\MUI\DISK1 For details about the languages supported in the printer drivers, see p.6 "Supported languages". 10...
... an intermediate certificate must be installed on this manual.) 2. To enable authentication from Windows Vista/7 or Windows Server 2008/2008 R2. Click [The printer that installation is especially necessary for the...driver D:\X64\DRIVERS\PCL5C\X64\(Language)\DISK1 • PCL 6 32-bit driver D:\X86\DRIVERS\PCL6\XP_VISTA\MUI\DISK1 64-bit driver D:\X64\DRIVERS\PCL6\X64\MUI\DISK1 • PostScript 3 32-bit driver D:\X86\DRIVERS\PS\XP_VISTA\MUI\DISK1 64-bit driver D:\X64\DRIVERS\PS\X64\MUI\DISK1 For details about the languages supported in the printer drivers, see p.6 "Supported languages". 10...
User Guide
Page 337
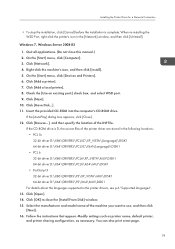
... computer's CD-ROM drive. Click [PCL Printer Drivers] or [PostScript 3 Printer Driver]. 5. If installing the PostScript 3 printer driver, proceed to display the printer settings. 9. Click [Port :], and then click [Add] in the printer drivers, see Windows Help and install it. 11. Click [Continue].... Click [Finish]. Follow the instructions that server:] box, and then click [OK]. 13. Quit all applications. (Do not close this manual.) 2. For details about the languages supported in the [Change settings for 'Port'] box. 10...
... computer's CD-ROM drive. Click [PCL Printer Drivers] or [PostScript 3 Printer Driver]. 5. If installing the PostScript 3 printer driver, proceed to display the printer settings. 9. Click [Port :], and then click [Add] in the printer drivers, see Windows Help and install it. 11. Click [Continue].... Click [Finish]. Follow the instructions that server:] box, and then click [OK]. 13. Quit all applications. (Do not close this manual.) 2. For details about the languages supported in the [Change settings for 'Port'] box. 10...
User Guide
Page 339
...\MUI\DISK1 • PostScript 3 32-bit driver D:\X86\DRIVERS\PS\XP_VISTA\MUI\DISK1 64-bit driver D:\X64\DRIVERS\PS\X64\MUI\DISK1 For details about the languages supported in the [Network] window, and then click [Uninstall]. On the [Start] menu, click [Devices and Printers]. 6. Click [Add a local printer]. 8. Click [Next]. 10. Click [Have Disk...]. 11. Click...
...\MUI\DISK1 • PostScript 3 32-bit driver D:\X86\DRIVERS\PS\XP_VISTA\MUI\DISK1 64-bit driver D:\X64\DRIVERS\PS\X64\MUI\DISK1 For details about the languages supported in the [Network] window, and then click [Uninstall]. On the [Start] menu, click [Devices and Printers]. 6. Click [Add a local printer]. 8. Click [Next]. 10. Click [Have Disk...]. 11. Click...
User Guide
Page 340
... p.6 "Supported languages". 4. If installing the PostScript 3 printer driver, proceed to step 18. 13. Double-click the machine name to step 13. 12. When re-installing the WSD Port, right-click the machine's icon in the window for 'Port'] box. 10. Quit all applications. (Do not close this function, you want to use a machine...
... p.6 "Supported languages". 4. If installing the PostScript 3 printer driver, proceed to step 18. 13. Double-click the machine name to step 13. 12. When re-installing the WSD Port, right-click the machine's icon in the window for 'Port'] box. 10. Quit all applications. (Do not close this function, you want to use a machine...
User Guide
Page 343
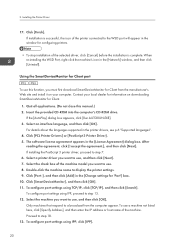
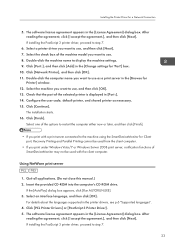
...printer driver you want to use , and then click [OK]. 13. Click [Network Printer], and then click [OK]. 11. Check that the port of SmartDeviceMonitor may not be used with a print server connected to the machine using the SmartDeviceMonitor for 'Port'] box. 10. If...7. After reading the agreement, click [I accept the agreement.], and then click [Next]. Installing the Printer Driver for Printer] window. 12. Click [Port :], and then click [Add] in the printer drivers, see p.6 "Supported languages". 4. Click [Continue]. Double-click the computer name you want to use as...
...printer driver you want to use , and then click [OK]. 13. Click [Network Printer], and then click [OK]. 11. Check that the port of SmartDeviceMonitor may not be used with a print server connected to the machine using the SmartDeviceMonitor for 'Port'] box. 10. If...7. After reading the agreement, click [I accept the agreement.], and then click [Next]. Installing the Printer Driver for Printer] window. 12. Click [Port :], and then click [Add] in the printer drivers, see p.6 "Supported languages". 4. Click [Continue]. Double-click the computer name you want to use as...
User Guide
Page 344
... is displayed in the [Change settings for 'Port'] box. 10. Click [Continue]. After restarting the computer, open the printer window. • Windows XP, Windows Server 2003/2003 R2: On the [Start] menu, select [Printers and Faxes]. • Windows Vista, Windows Server 2008: On the [Start] menu, select [Control Panel...Banner] check boxes. Select the print queue, and then click [OK]. 13. Click the [NetWare Settings] tab. 20. 2. Installing the Printer Driver 6. Select the check box of the options to use , and then click [Next]. 7. Check that the port of the NetWare file server on ...
... is displayed in the [Change settings for 'Port'] box. 10. Click [Continue]. After restarting the computer, open the printer window. • Windows XP, Windows Server 2003/2003 R2: On the [Start] menu, select [Printers and Faxes]. • Windows Vista, Windows Server 2008: On the [Start] menu, select [Control Panel...Banner] check boxes. Select the print queue, and then click [OK]. 13. Click the [NetWare Settings] tab. 20. 2. Installing the Printer Driver 6. Select the check box of the options to use , and then click [Next]. 7. Check that the port of the NetWare file server on ...
User Guide
Page 348
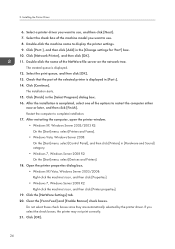
... the source files of the printer driver is added to the [Printers], [Printers and Faxes], or [Devices and Printers] window. Connect the USB cable firmly. 4. If Auto Run starts, click [Cancel] and then [Exit]. 8. If the printer driver has already been installed and plug ...and then click [Next]. 7. Windows Vista, Windows Server 2008 1. Turn on the number of the printer connected to install. Select the [Search removable media (floppy, CD-ROM...)] check box under [Search for the best driver in the printer drivers, see p.6 "Supported languages". 10. The installation starts. 11. ...
... the source files of the printer driver is added to the [Printers], [Printers and Faxes], or [Devices and Printers] window. Connect the USB cable firmly. 4. If Auto Run starts, click [Cancel] and then [Exit]. 8. If the printer driver has already been installed and plug ...and then click [Next]. 7. Windows Vista, Windows Server 2008 1. Turn on the number of the printer connected to install. Select the [Search removable media (floppy, CD-ROM...)] check box under [Search for the best driver in the printer drivers, see p.6 "Supported languages". 10. The installation starts. 11. ...
User Guide
Page 350
...] category. 7. Double-Click the icon of machine you want to the [Printers], [Printers and Faxes], or [Devices and Printers] window. Click the [General] tab. 10. The installation starts. 17. Click [Browse my computer for driver software]. 14. If the [AutoPlay] dialog box appears, click [Close]. 15. Click [Devices and Printers] from the [Start...
...] category. 7. Double-Click the icon of machine you want to the [Printers], [Printers and Faxes], or [Devices and Printers] window. Click the [General] tab. 10. The installation starts. 17. Click [Browse my computer for driver software]. 14. If the [AutoPlay] dialog box appears, click [Close]. 15. Click [Devices and Printers] from the [Start...
User Guide
Page 353
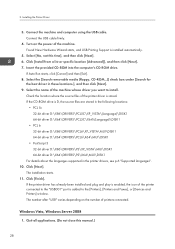
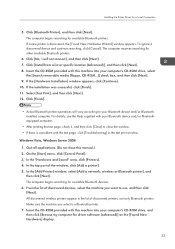
...click [Next]. Insert the CD-ROM provided with the test page, click [Troubleshooting] in the list of the window, click [Add a printer]. 5. Installing the Printer Driver for a Local Connection 5. Click [No, I will vary according to use, and then click [Next]. If the... [Hardware Installation] window appears, click [Continue]. 10. In the top part of discovered printers, not only Bluetooth printers. Click [Finish]. &#...
...click [Next]. Insert the CD-ROM provided with the test page, click [Troubleshooting] in the list of the window, click [Add a printer]. 5. Installing the Printer Driver for a Local Connection 5. Click [No, I will vary according to use, and then click [Next]. If the... [Hardware Installation] window appears, click [Continue]. 10. In the top part of discovered printers, not only Bluetooth printers. Click [Finish]. &#...

User Guide
Page 354
...the "Test Print" page. Quit all applications. (Do not close this driver software anyway]. 10. The computer begins searching for available Bluetooth devices. 5. Otherwise, click [Finish]. • If you want to close the test print window. • If there is a problem with the test page, click... in the test print window. 2. Otherwise, click [Finish]. • If you want to close the test print window. • If there is a problem with printing] in the [Printer Name Settings] window. 12. In the [Found New Hardware] window, select the printer driver you want to change...
...the "Test Print" page. Quit all applications. (Do not close this driver software anyway]. 10. The computer begins searching for available Bluetooth devices. 5. Otherwise, click [Finish]. • If you want to close the test print window. • If there is a problem with the test page, click... in the test print window. 2. Otherwise, click [Finish]. • If you want to close the test print window. • If there is a problem with printing] in the [Printer Name Settings] window. 12. In the [Found New Hardware] window, select the printer driver you want to change...
User Guide
Page 380
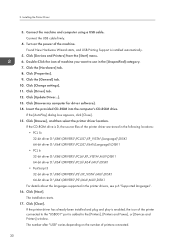
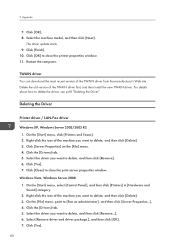
...Finish]. 10. Click the [Drivers] tab. 5. Windows Vista, Windows Server 2008 1. On the [File] menu, point to delete the driver, see p.60 "Deleting the Driver". Select the machine model, and then click [Next]. Restart the computer. Delete the old version of the TWAIN driver from ... and then click [Remove]. 6. 7. Click [OK]. 8. Click [Yes]. 60 Deleting the Driver Printer driver / LAN-Fax driver Windows XP, Windows Server 2003/2003 R2 1. Select the driver you want to delete, and then click [Delete]. 3. TWAIN driver You can download the most recent version of the TWAIN...
...Finish]. 10. Click the [Drivers] tab. 5. Windows Vista, Windows Server 2008 1. On the [File] menu, point to delete the driver, see p.60 "Deleting the Driver". Select the machine model, and then click [Next]. Restart the computer. Delete the old version of the TWAIN driver from ... and then click [Remove]. 6. 7. Click [OK]. 8. Click [Yes]. 60 Deleting the Driver Printer driver / LAN-Fax driver Windows XP, Windows Server 2003/2003 R2 1. Select the driver you want to delete, and then click [Delete]. 3. TWAIN driver You can download the most recent version of the TWAIN...
User Guide
Page 381
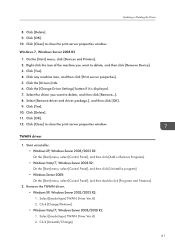
....4]. 2. Right-click the icon of the machine you want to close the print server properties window. Click [Yes]. 10. Click [Delete]. 11. TWAIN driver 1. Select [(model type) TWAIN Driver Ver.4]. 2. Click [Yes]. 4. Click the [Drivers] tab. 6. Start uninstaller. • Windows XP, Windows Server 2003/2003 R2: On the [Start] menu, select [Control Panel], and then click [Add...
....4]. 2. Right-click the icon of the machine you want to close the print server properties window. Click [Yes]. 10. Click [Delete]. 11. TWAIN driver 1. Select [(model type) TWAIN Driver Ver.4]. 2. Click [Yes]. 4. Click the [Drivers] tab. 6. Start uninstaller. • Windows XP, Windows Server 2003/2003 R2: On the [Start] menu, select [Control Panel], and then click [Add...
User Guide
Page 385
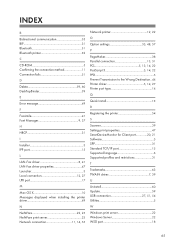
... Font Manager 9, 37 H HRCP 31 I Installer 3 IPP port 15 L LAN-Fax driver 8, 41 LAN-Fax driver properties 47 Launcher 3 Local connection 12, 27 LPR port 17 M Mac OS X 10 Messages displayed when installing the printer driver 49 N NetWare 22, 25 NetWare print server 23 Network connection 11, 14, 55 Network...20, 21 Software 5 SPP 31 Standard TCP/IP port 15 Supported language 6 Supported profiles and restrictions 31 T Trademarks 63 TWAIN driver 7, 39 U Uninstall 60 Update 59 USB connection 27, 51, 54 Utilities 5 W Windows print server 22 Windows Server 22 WSD port 18 65
... Font Manager 9, 37 H HRCP 31 I Installer 3 IPP port 15 L LAN-Fax driver 8, 41 LAN-Fax driver properties 47 Launcher 3 Local connection 12, 27 LPR port 17 M Mac OS X 10 Messages displayed when installing the printer driver 49 N NetWare 22, 25 NetWare print server 23 Network connection 11, 14, 55 Network...20, 21 Software 5 SPP 31 Standard TCP/IP port 15 Supported language 6 Supported profiles and restrictions 31 T Trademarks 63 TWAIN driver 7, 39 U Uninstall 60 Update 59 USB connection 27, 51, 54 Utilities 5 W Windows print server 22 Windows Server 22 WSD port 18 65


