User Guide
Page 9
... that you first make the following settings: • Install the Device Certificate. • Enable SSL (Secure Sockets Layer) Encryption. • Change the user name and password of the machine, data tampering, or information leakage.
... that you first make the following settings: • Install the Device Certificate. • Enable SSL (Secure Sockets Layer) Encryption. • Change the user name and password of the machine, data tampering, or information leakage.
User Guide
Page 55
...characters, and then press [OK]. Step 5 To use SIP digest authentication, press [Set], and then enter the password. Re-enter the password after the message Confirm Password appears on the screen, and then press [OK]. Settings for encryption Setting: All Data Data to be kept: Both... Features > Initial Settings > SIP Settings Step 5 To use SIP digest authentication, press [Set], and then enter the user name and the password. If the machine enters the Energy tem Settings > Connecting the Saver mode, both Reception and received document File Received with this machine. To...
...characters, and then press [OK]. Step 5 To use SIP digest authentication, press [Set], and then enter the password. Re-enter the password after the message Confirm Password appears on the screen, and then press [OK]. Settings for encryption Setting: All Data Data to be kept: Both... Features > Initial Settings > SIP Settings Step 5 To use SIP digest authentication, press [Set], and then enter the user name and the password. If the machine enters the Energy tem Settings > Connecting the Saver mode, both Reception and received document File Received with this machine. To...
User Guide
Page 83
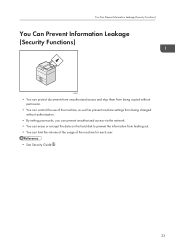
... without permission. • You can control the use of the machine, as well as prevent machine settings from being changed without authorization. • By setting passwords, you can prevent unauthorized access via the network. • You can erase or encrypt the data on the hard disk to prevent the information from...
... without permission. • You can control the use of the machine, as well as prevent machine settings from being changed without authorization. • By setting passwords, you can prevent unauthorized access via the network. • You can erase or encrypt the data on the hard disk to prevent the information from...

User Guide
Page 113
..., original type, density, Special Original, paper tray, Store File (except for User Name and Password), Create Margin, Finishing, Cover/Slip Sheet (except for User Name and Password), Preview, Text, Subject, Security, Recept. Notice This section explains how to Bottom, Booklet, Magazine.../ Enlarge, number of prints Facsimile: Scan Settings, density, Original Feed Type, File Type, Store File (except for User Name and Password), Preview, transmission type, destinations (except for folder destinations), Select Line, Adv.Features, memory transmission/immediate transmission, TX Status Report, TX...
..., original type, density, Special Original, paper tray, Store File (except for User Name and Password), Create Margin, Finishing, Cover/Slip Sheet (except for User Name and Password), Preview, Text, Subject, Security, Recept. Notice This section explains how to Bottom, Booklet, Magazine.../ Enlarge, number of prints Facsimile: Scan Settings, density, Original Feed Type, File Type, Store File (except for User Name and Password), Preview, transmission type, destinations (except for folder destinations), Select Line, Adv.Features, memory transmission/immediate transmission, TX Status Report, TX...
User Guide
Page 121
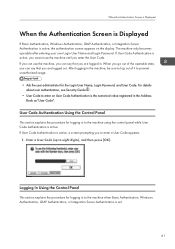
The machine only becomes operable after entering your own Login User Name and Login Password. After logging in to prevent unauthorized usage. • Ask the user administrator for logging in . Logging In Using the Control Panel This section explains the ... logged in to enter a User Code appears. 1. User Code Authentication Using the Control Panel This section explains the procedure for the Login User Name, Login Password, and User Code. Enter a User Code (up to enter on the display. When you go out of it to the machine when Basic Authentication, Windows...
The machine only becomes operable after entering your own Login User Name and Login Password. After logging in to prevent unauthorized usage. • Ask the user administrator for logging in . Logging In Using the Control Panel This section explains the ... logged in to enter a User Code appears. 1. User Code Authentication Using the Control Panel This section explains the procedure for the Login User Name, Login Password, and User Code. Enter a User Code (up to enter on the display. When you go out of it to the machine when Basic Authentication, Windows...
User Guide
Page 122
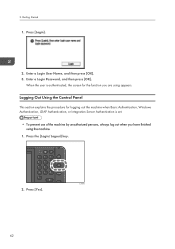
CJS040 2. Press [Login]. 2. Press the [Login/Logout] key. Enter a Login Password, and then press [OK]. Logging Out Using the Control Panel This section explains the procedure for logging out the machine when Basic Authentication, Windows Authentication, ...
CJS040 2. Press [Login]. 2. Press the [Login/Logout] key. Enter a Login Password, and then press [OK]. Logging Out Using the Control Panel This section explains the procedure for logging out the machine when Basic Authentication, Windows Authentication, ...
User Guide
Page 146
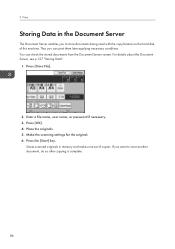
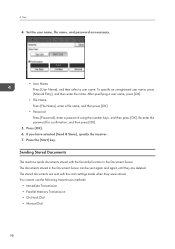
...]. 2. If you can check the stored documents from the Document Server screen. Make the scanning settings for the original. 6. Enter a file name, user name, or password if necessary. 3. Press the [Start] key. For details about the Document Server, see p.127 "Storing Data". 1. Place the originals. 5. 3. Thus you want to store documents...
...]. 2. If you can check the stored documents from the Document Server screen. Make the scanning settings for the original. 6. Enter a file name, user name, or password if necessary. 3. Press the [Start] key. For details about the Document Server, see p.127 "Storing Data". 1. Place the originals. 5. 3. Thus you want to store documents...
User Guide
Page 157
... as necessary: User Name You can be set this function if necessary to eight digit number can be automatically assigned names such as a password. A four to know who and what departments stored documents in the preview. 2. If you do not specify a name, scanned documents ...will not be specified as "FAX0001" or "FAX0002". Password You can also change the file information after they are stored. Select [Send & Store] to store documents. 97 Specify the "Original Orientation" setting...
... as necessary: User Name You can be set this function if necessary to eight digit number can be automatically assigned names such as a password. A four to know who and what departments stored documents in the preview. 2. If you do not specify a name, scanned documents ...will not be specified as "FAX0001" or "FAX0002". Password You can also change the file information after they are stored. Select [Send & Store] to store documents. 97 Specify the "Original Orientation" setting...
User Guide
Page 158
...], and then enter the name. If you have selected [Send & Store], specify the receiver. 7. The stored documents are deleted. Re-enter the password for confirmation, and then press [OK]. 5. Press [OK]. 6. Fax 4. After specifying a user name, press [OK]. • File Name ...Press [File Name], enter a file name, and then press [OK]. • Password Press [Password], enter a password using the number keys, and then press [OK]. 4. Sending Stored Documents The machine sends documents stored with the facsimile function in the Document ...
...], and then enter the name. If you have selected [Send & Store], specify the receiver. 7. The stored documents are deleted. Re-enter the password for confirmation, and then press [OK]. 5. Press [OK]. 6. Fax 4. After specifying a user name, press [OK]. • File Name ...Press [File Name], enter a file name, and then press [OK]. • Password Press [Password], enter a password using the number keys, and then press [OK]. 4. Sending Stored Documents The machine sends documents stored with the facsimile function in the Document ...
User Guide
Page 159
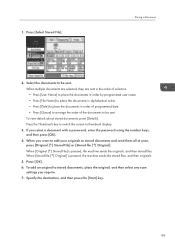
... add an original to be sent. Select the documents to stored documents, place the original, and then select any scan settings you select a document with a password, enter the password using the number keys, and then press [OK]. 4.
... add an original to be sent. Select the documents to stored documents, place the original, and then select any scan settings you select a document with a password, enter the password using the number keys, and then press [OK]. 4.
User Guide
Page 164
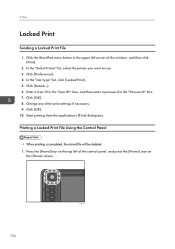
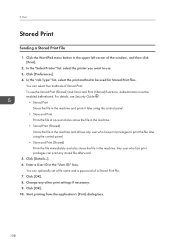
... a Locked Print File Using the Control Panel • When printing is completed, the stored file will be deleted. 1. Click the WordPad menu button in the "Password:" box. 7. In the "Select Printer" list, select the printer you want to use. 3. Press the [Home] key on the top left corner of the control... the "Job Type:" list, click [Locked Print]. 5. Print Locked Print Sending a Locked Print File 1. 5. Enter a User ID in the "User ID:" box, and then enter a password in the upper left of the window, and then click [Print]. 2.
... a Locked Print File Using the Control Panel • When printing is completed, the stored file will be deleted. 1. Click the WordPad menu button in the "Password:" box. 7. In the "Select Printer" list, select the printer you want to use. 3. Press the [Home] key on the top left corner of the control... the "Job Type:" list, click [Locked Print]. 5. Print Locked Print Sending a Locked Print File 1. 5. Enter a User ID in the "User ID:" box, and then enter a password in the upper left of the window, and then click [Print]. 2.
User Guide
Page 165
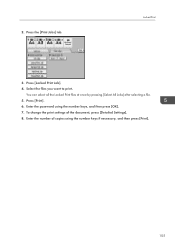
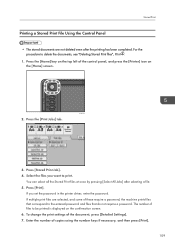
2. Press [Locked Print Job]. 4. Select the files you want to print. Enter the number of the document, press [Detailed Settings]. 8. You can select all the Locked Print files at once by pressing [Select All Jobs] after selecting a file. 5. Locked Print 3. Press [Print]. 6. To change the print settings of copies using the number keys, and then press [OK]. 7. Press the [Print Jobs] tab. Enter the password using the number keys if necessary, and then press [Print]. 105
2. Press [Locked Print Job]. 4. Select the files you want to print. Enter the number of the document, press [Detailed Settings]. 8. You can select all the Locked Print files at once by pressing [Select All Jobs] after selecting a file. 5. Locked Print 3. Press [Print]. 6. To change the print settings of copies using the number keys, and then press [OK]. 7. Press the [Print Jobs] tab. Enter the password using the number keys if necessary, and then press [Print]. 105
User Guide
Page 168
You can optionally set a file name and a password of the window, and then click [Print]. 2. Change any stored file afterward. 5. Click [Preferences]. 4. Start printing from the application's [Print] dialog box. 108 Click the ...
You can optionally set a file name and a password of the window, and then click [Print]. 2. Change any stored file afterward. 5. Click [Preferences]. 4. Start printing from the application's [Print] dialog box. 108 Click the ...
User Guide
Page 169
...]. 4. The number of files to be printed is displayed on the [Home] screen. Select the files you set the password in the printer driver, enter the password. To change the print settings of copies using the number keys if necessary, and then press [Print]. 109 You can select...File Using the Control Panel • The stored documents are selected, and some of these require a password, the machine prints files that correspond to the entered password and files that do not require a password. If multiple print files are not deleted even after selecting a file. 5. For the procedure to ...
...]. 4. The number of files to be printed is displayed on the [Home] screen. Select the files you set the password in the printer driver, enter the password. To change the print settings of copies using the number keys if necessary, and then press [Print]. 109 You can select...File Using the Control Panel • The stored documents are selected, and some of these require a password, the machine prints files that correspond to the entered password and files that do not require a password. If multiple print files are not deleted even after selecting a file. 5. For the procedure to ...
User Guide
Page 171
... details, contact your sales or service representative. • This machine supports SD cards with a maximum capacity of 32 GB. • USB flash memory devices with password protection or other type of USB device. • Do not use of TIFF files are compatible with this function. Insert the USB memory directly into...
... details, contact your sales or service representative. • This machine supports SD cards with a maximum capacity of 32 GB. • USB flash memory devices with password protection or other type of USB device. • Do not use of TIFF files are compatible with this function. Insert the USB memory directly into...
User Guide
Page 175
...; 6" • Custom size PDF files may not be displayed as the file of that format stays selected. • The machine will remember an entered PDF password until you switch out of the 5 printer function. • If you try to select a removable memory device that the machine cannot display correctly. • JPEG...
...; 6" • Custom size PDF files may not be displayed as the file of that format stays selected. • The machine will remember an entered PDF password until you switch out of the 5 printer function. • If you try to select a removable memory device that the machine cannot display correctly. • JPEG...
User Guide
Page 182
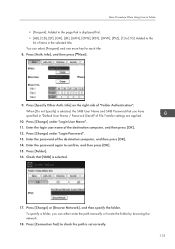
... or locate the folder by browsing the network. 18. Enter the login user name of the destination computer, and then press [OK]. 14. Enter the password of the destination computer, and then press [OK]. 12. Check that [SMB] is set correctly. 115 Basic Procedure When Using Scan to Folder • [... you can select [Frequent] and one more key for each title. 8. Press [Specify Other Auth. Press [Change] under "Login Password". 13. Enter the password again to check the path is selected. 17. Press [Connection Test] to confirm, and then press [OK]. 15. Info] on the right side of "...
... or locate the folder by browsing the network. 18. Enter the login user name of the destination computer, and then press [OK]. 14. Enter the password of the destination computer, and then press [OK]. 12. Check that [SMB] is set correctly. 115 Basic Procedure When Using Scan to Folder • [... you can select [Frequent] and one more key for each title. 8. Press [Specify Other Auth. Press [Change] under "Login Password". 13. Enter the password again to check the path is selected. 17. Press [Connection Test] to confirm, and then press [OK]. 15. Info] on the right side of "...
User Guide
Page 185
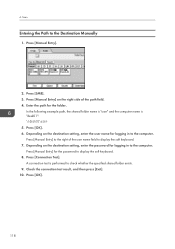
...[SMB]. 3. Press [Connection Test]. A connection test is "desk01": \\desk01\user 5. Depending on the destination setting, enter the user name for the password to the Destination Manually 1. Press [Manual Entry] to display the soft keyboard. 7. Check the connection test result, and then press [Exit]. 10. ... name field to the right of the path field. 4. Press [OK]. 6. Press [Manual Entry] on the destination setting, enter the password for the folder. In the following example path, the shared folder name is "user" and the computer name is performed to the computer.
...[SMB]. 3. Press [Connection Test]. A connection test is "desk01": \\desk01\user 5. Depending on the destination setting, enter the user name for the password to the Destination Manually 1. Press [Manual Entry] to display the soft keyboard. 7. Check the connection test result, and then press [Exit]. 10. ... name field to the right of the path field. 4. Press [OK]. 6. Press [Manual Entry] on the destination setting, enter the password for the folder. In the following example path, the shared folder name is "user" and the computer name is performed to the computer.
User Guide
Page 190
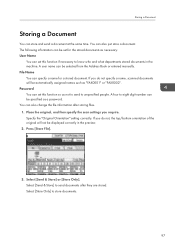
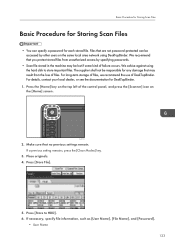
... 3. Place originals. 4. If necessary, specify file information, such as [User Name], [File Name], and [Password]. • User Name 123 The supplier shall not be accessed by specifying passwords. • Scan file stored in the machine may result from the loss of files. Press [Store File]. ...5. Press [Store to store important files. Files that are not password-protected can specify a password for each stored file. Basic Procedure for Storing Scan Files Basic Procedure for Storing Scan Files • You can ...
... 3. Place originals. 4. If necessary, specify file information, such as [User Name], [File Name], and [Password]. • User Name 123 The supplier shall not be accessed by specifying passwords. • Scan file stored in the machine may result from the loss of files. Press [Store File]. ...5. Press [Store to store important files. Files that are not password-protected can specify a password for each stored file. Basic Procedure for Storing Scan Files Basic Procedure for Storing Scan Files • You can ...
User Guide
Page 191
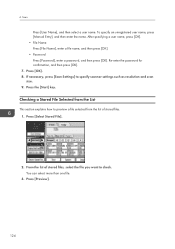
Scan Press [User Name], and then select a user name. Re-enter the password for confirmation, and then press [OK]. 7. Checking a Stored File Selected from the List This section explains how to preview a file selected from the list of .... Press the [Start] key. After specifying a user name, press [OK]. • File Name Press [File Name], enter a file name, and then press [OK]. • Password Press [Password], enter a password, and then press [OK]. Press [OK]. 8. From the list of stored files. 1. To specify an unregistered user name, press [Manual Entry], and then enter...
Scan Press [User Name], and then select a user name. Re-enter the password for confirmation, and then press [OK]. 7. Checking a Stored File Selected from the List This section explains how to preview a file selected from the list of .... Press the [Start] key. After specifying a user name, press [OK]. • File Name Press [File Name], enter a file name, and then press [OK]. • Password Press [Password], enter a password, and then press [OK]. Press [OK]. 8. From the list of stored files. 1. To specify an unregistered user name, press [Manual Entry], and then enter...


