Owner's Manual
Page 4
... Accessories 12 Stand accessories (PDP-6010FD only 12 Speaker accessories 13 04 Part Names 14 Plasma display 14 Remote control unit 16 05 Preparation 17 Installing the plasma display 17 Moving the plasma display 17 Attaching the Pioneer stand 17 Installing the Pioneer speaker 18 When using the hung... on wall unit (PDP-6010FD 22 When using the hung on wall unit (PDP-5010FD 26 Preventing the plasma display from that shown in this...
... Accessories 12 Stand accessories (PDP-6010FD only 12 Speaker accessories 13 04 Part Names 14 Plasma display 14 Remote control unit 16 05 Preparation 17 Installing the plasma display 17 Moving the plasma display 17 Attaching the Pioneer stand 17 Installing the Pioneer speaker 18 When using the hung... on wall unit (PDP-6010FD 22 When using the hung on wall unit (PDP-5010FD 26 Preventing the plasma display from that shown in this...
Owner's Manual
Page 10
...product, please read and understood before cleaning the product. The plasma display weighs about 66.2 kg (145.9 lbs.) for the PDP-6010FD (including the stand and speaker) and about 44.0 kg (97 lbs.) for a long period of the following instructions when installing, operating and cleaning the...fire, electric shock and/or other danger. 9. Read instructions-All operating instructions must be sure to direct sunlight for the PDP-5010FD (including the stand and speaker). Use only a cart, stand, tripod, bracket or table recommended by the manufacturer. 21. When mounting the product on ...
...product, please read and understood before cleaning the product. The plasma display weighs about 66.2 kg (145.9 lbs.) for the PDP-6010FD (including the stand and speaker) and about 44.0 kg (97 lbs.) for a long period of the following instructions when installing, operating and cleaning the...fire, electric shock and/or other danger. 9. Read instructions-All operating instructions must be sure to direct sunlight for the PDP-5010FD (including the stand and speaker). Use only a cart, stand, tripod, bracket or table recommended by the manufacturer. 21. When mounting the product on ...
Owner's Manual
Page 15
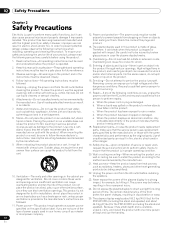
...panel are common to the terminal position sheet located near the terminal compartment. Part Names 04 Parts name (Rear) PDP-6010FD PDP-5010FD English 4 5 4 5 4 5 4 5 26 19 20 21 27 13 4 5 14 15...PDP-6010FD and PDP-5010FD. 17 INPUT 1 terminals (AUDIO) 18 INPUT 2 terminals (AUDIO) 19 INPUT 4 terminals (AUDIO) 20 INPUT 5 terminals (AUDIO) 21 INPUT 2 terminal (VIDEO) 22 DIGITAL OUT terminal (OPTICAL) 23 PC INPUT terminal (AUDIO) 24 INPUT 2 terminals (COMPONENT VIDEO: Y, PB, PR) 25 SPEAKERS (R/L) terminals 26 SPEAKERS (R) terminal (Speaker side) 27 SPEAKERS (L) terminal (Speaker...
...panel are common to the terminal position sheet located near the terminal compartment. Part Names 04 Parts name (Rear) PDP-6010FD PDP-5010FD English 4 5 4 5 4 5 4 5 26 19 20 21 27 13 4 5 14 15...PDP-6010FD and PDP-5010FD. 17 INPUT 1 terminals (AUDIO) 18 INPUT 2 terminals (AUDIO) 19 INPUT 4 terminals (AUDIO) 20 INPUT 5 terminals (AUDIO) 21 INPUT 2 terminal (VIDEO) 22 DIGITAL OUT terminal (OPTICAL) 23 PC INPUT terminal (AUDIO) 24 INPUT 2 terminals (COMPONENT VIDEO: Y, PB, PR) 25 SPEAKERS (R/L) terminals 26 SPEAKERS (R) terminal (Speaker side) 27 SPEAKERS (L) terminal (Speaker...
Owner's Manual
Page 18
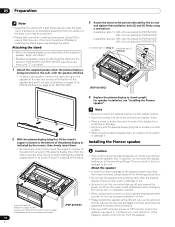
...plasma display so that an arrow with "FRONT/FACE AVANT" mark inscribed at the bottom of the stand indicates downward. (PDP-6010FD) • Please handle the speaker with the plasma display lying flat on a table or similar surface. • When lying the plasma display down, be... careful not to scratch or damage it out (see "Installing the Pioneer speaker". For speaker installation, see illustrations on page 22 for PDP-6010FD and PDP-5010FD (use the speaker with the speaker attached. • To detach the speaker, remove the cable wiring for attaching the stand are in interference or...
...plasma display so that an arrow with "FRONT/FACE AVANT" mark inscribed at the bottom of the stand indicates downward. (PDP-6010FD) • Please handle the speaker with the plasma display lying flat on a table or similar surface. • When lying the plasma display down, be... careful not to scratch or damage it out (see "Installing the Pioneer speaker". For speaker installation, see illustrations on page 22 for PDP-6010FD and PDP-5010FD (use the speaker with the speaker attached. • To detach the speaker, remove the cable wiring for attaching the stand are in interference or...
Owner's Manual
Page 19
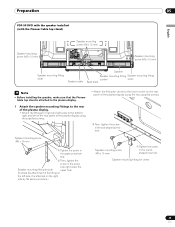
... in the order followed by a one person alone. PDP-6010FD with the speaker installed (with the Pioneer table top stand) Speaker mounting screw (M5 x 10 mm) Speaker mounting screw (M5 x 10 mm) Speaker mounting screw (M5 x 10 mm) Speaker mounting fitting (right side) Speaker Speaker cable Note • Before attaching the speaker, please attach the table top stand to the plasma...
... in the order followed by a one person alone. PDP-6010FD with the speaker installed (with the Pioneer table top stand) Speaker mounting screw (M5 x 10 mm) Speaker mounting screw (M5 x 10 mm) Speaker mounting screw (M5 x 10 mm) Speaker mounting fitting (right side) Speaker Speaker cable Note • Before attaching the speaker, please attach the table top stand to the plasma...
Owner's Manual
Page 20
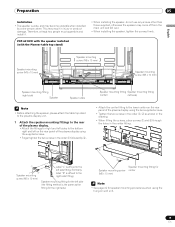
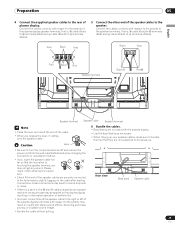
...you want to move the display holding on the wall. Caution • To avoid any damage to the speaker and/or table top stand from striking against each other, fit the speaker to the mounting fittings. This can result in the correct direction. • Be sure not to mount the...and then tighten the screws again at the rear of the speaker, adjust the speaker mounting fittings angle. 3 Fix the speaker mounting fittings and the speaker with the supplied screws. • Fix the center part of the speaker. 05 Preparation 2 Fit the speaker to the mounting fittings in injury or damage to the ...
...you want to move the display holding on the wall. Caution • To avoid any damage to the speaker and/or table top stand from striking against each other, fit the speaker to the mounting fittings. This can result in the correct direction. • Be sure not to mount the...and then tighten the screws again at the rear of the speaker, adjust the speaker mounting fittings angle. 3 Fix the speaker mounting fittings and the speaker with the supplied screws. • Fix the center part of the speaker. 05 Preparation 2 Fit the speaker to the mounting fittings in injury or damage to the ...

Owner's Manual
Page 21
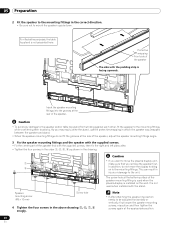
...61483; cable to terminals and cable to the terminals. Black Gray Red Black Red Black Speaker terminal Red Speaker terminal Speaker cable Speaker terminal Note • Press the lever and insert the end of the cable. • When you release the lever, it ...with showing the copper wire. • Check if the end of the plasma display and the speaker terminals, that the insulation is touching the speaker terminal, you insert the speaker cable too far so that is a short in insufficient stereo sound effects, delivering poor bass sounds...
...61483; cable to terminals and cable to the terminals. Black Gray Red Black Red Black Speaker terminal Red Speaker terminal Speaker cable Speaker terminal Note • Press the lever and insert the end of the cable. • When you release the lever, it ...with showing the copper wire. • Check if the end of the plasma display and the speaker terminals, that the insulation is touching the speaker terminal, you insert the speaker cable too far so that is a short in insufficient stereo sound effects, delivering poor bass sounds...
Owner's Manual
Page 22
... the supplied speaker cables to the back of the plasma display. 2 Place the plasma display on the mounting fittings of the hung on the wall. It is not used when the plasma display is installed with the table top stand. 05 Preparation When using the hung on wall unit (PDP-6010FD) Note ...• First lay the plasma display on top of a soft sheet etc., remove the stand, then attach the speaker mounting fittings. • Install the plasma display on the wall with only the...
... the supplied speaker cables to the back of the plasma display. 2 Place the plasma display on the mounting fittings of the hung on the wall. It is not used when the plasma display is installed with the table top stand. 05 Preparation When using the hung on wall unit (PDP-6010FD) Note ...• First lay the plasma display on top of a soft sheet etc., remove the stand, then attach the speaker mounting fittings. • Install the plasma display on the wall with only the...
Owner's Manual
Page 23
... screw in the oval-shaped screw hole. Preparation 05 English PDP-5010FD with the speaker installed (with the Pioneer table top stand) Speaker mounting screw (M5 x 10 mm) Speaker mounting screw (M5 x 10 mm) 4 5 Speaker mounting screw (M5 x 10 mm) Speaker mounting fitting (side) Speaker cable Speaker Speaker mounting fitting Speaker mounting fitting (center) (side) Bead band Note • Before installing...
... screw in the oval-shaped screw hole. Preparation 05 English PDP-5010FD with the speaker installed (with the Pioneer table top stand) Speaker mounting screw (M5 x 10 mm) Speaker mounting screw (M5 x 10 mm) 4 5 Speaker mounting screw (M5 x 10 mm) Speaker mounting fitting (side) Speaker cable Speaker Speaker mounting fitting Speaker mounting fitting (center) (side) Bead band Note • Before installing...

Owner's Manual
Page 24
...Caution • If you want to move the plasma display holding on to the mounting fittings. Caution • To avoid any damage to the speaker and/or table top stand from back using the (M5 x 10 mm) table top stand, do not move the plasma display, make sure that... screw (M5 x 10 mm) The screw hole at the bottom of the speaker mounting fitting is installed on the back of the speaker into the speaker mounting fitting. Speaker mounting screw (M5 x 10 mm) 1 Speaker mounting screw When using the supplied screws (three locations). In 3 addition, do not use the protective ...
...Caution • If you want to move the plasma display holding on to the mounting fittings. Caution • To avoid any damage to the speaker and/or table top stand from back using the (M5 x 10 mm) table top stand, do not move the plasma display, make sure that... screw (M5 x 10 mm) The screw hole at the bottom of the speaker mounting fitting is installed on the back of the speaker into the speaker mounting fitting. Speaker mounting screw (M5 x 10 mm) 1 Speaker mounting screw When using the supplied screws (three locations). In 3 addition, do not use the protective ...
Owner's Manual
Page 25
...connected devices off and remove the power cord from the wall outlet beforehand when changing the connection or installation method. • If you insert the speaker cable too far so that the insulation is , cable (Gray) to terminals (Red) and cable (Black)...and cable (Black) to terminals (Black). Rear view Bead band Speaker cable 25 En Gray Black Gray Black Gray Red Black Red Speaker terminal Black Red Speaker terminal Speaker cable Speaker terminal Note • Press the lever and insert the end of the cable. &#...
...connected devices off and remove the power cord from the wall outlet beforehand when changing the connection or installation method. • If you insert the speaker cable too far so that the insulation is , cable (Gray) to terminals (Red) and cable (Black)...and cable (Black) to terminals (Black). Rear view Bead band Speaker cable 25 En Gray Black Gray Black Gray Red Black Red Speaker terminal Black Red Speaker terminal Speaker cable Speaker terminal Note • Press the lever and insert the end of the cable. &#...
Owner's Manual
Page 26
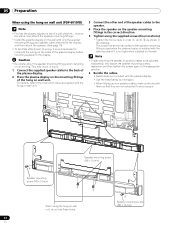
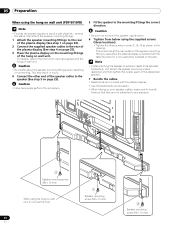
... three screws in order , , as necessary. • When tidying up your speaker cables, make sure to bundle them so that they are not subjected to any pressure. 3 Speaker mounting screw (M5 x 10 mm) When using the hung on wall unit (PDP-5010FD) Note • First lay the plasma display on top of a soft... sheet etc., remove the stand, then attach the speaker mounting fittings. 1 Attach the speaker mounting fittings to the rear of the hung on wall unit. This may result in...
... three screws in order , , as necessary. • When tidying up your speaker cables, make sure to bundle them so that they are not subjected to any pressure. 3 Speaker mounting screw (M5 x 10 mm) When using the hung on wall unit (PDP-5010FD) Note • First lay the plasma display on top of a soft... sheet etc., remove the stand, then attach the speaker mounting fittings. 1 Attach the speaker mounting fittings to the rear of the hung on wall unit. This may result in...
Owner's Manual
Page 28
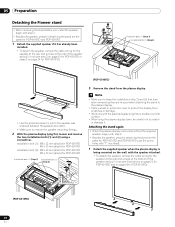
... out (see illustrations on page 22 for PDP-6010FD and on page 26 for PDP-5010FD). (PDP-6010FD) 28 En Installation bolts (1) (Step 1) Installation bolts (2) (Step 2) (PDP-5010FD) • Use the protective sheet in which the speaker was wrapped between the speaker and stand. • Make sure to ...from the plasma display. 05 Preparation Detaching the Pioneer stand • When removing the stand before you install the speaker, begin with step 2. • Besides the speaker, steps for attaching the stand are the same for PDP-6010FD and PDP-5010FD (use the screw holes with "T" inscribed)....
... out (see illustrations on page 22 for PDP-6010FD and on page 26 for PDP-5010FD). (PDP-6010FD) 28 En Installation bolts (1) (Step 1) Installation bolts (2) (Step 2) (PDP-5010FD) • Use the protective sheet in which the speaker was wrapped between the speaker and stand. • Make sure to ...from the plasma display. 05 Preparation Detaching the Pioneer stand • When removing the stand before you install the speaker, begin with step 2. • Besides the speaker, steps for attaching the stand are the same for PDP-6010FD and PDP-5010FD (use the screw holes with "T" inscribed)....
Owner's Manual
Page 29
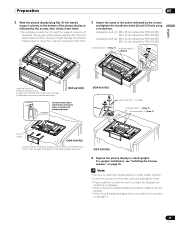
...Pioneer speaker" on a table or similar surface. • When lying the plasma display down, be careful not to scratch or damage it. 29 En Preparation 05 English 2 With the plasma display lying flat, fit the stand's support columns to the bottom of the plasma display as indicated in the accompanying diagram. (PDP-6010FD...the plasma display so that an arrow with "FRONT/FACE AVANT" mark inscribed at the bottom of the stand indicates downward. (PDP-6010FD) Line up the column supports with the bottom of the plasma display, as indicated by the arrows and tighten the installation bolts ...
...Pioneer speaker" on a table or similar surface. • When lying the plasma display down, be careful not to scratch or damage it. 29 En Preparation 05 English 2 With the plasma display lying flat, fit the stand's support columns to the bottom of the plasma display as indicated in the accompanying diagram. (PDP-6010FD...the plasma display so that an arrow with "FRONT/FACE AVANT" mark inscribed at the bottom of the stand indicates downward. (PDP-6010FD) Line up the column supports with the bottom of the plasma display, as indicated by the arrows and tighten the installation bolts ...
Owner's Manual
Page 31
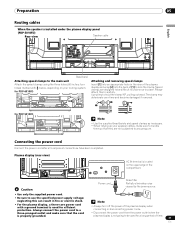
...clamps as necessary. • When tidying up your routing system. Preparation 05 English Routing cables When the speaker is installed under the plasma display panel (PDP-5010FD) Rear view Speaker cable 4 5 Bead band Attaching speed clamps to the main unit Attach the speed clamps using the three ... outlet when the plasma display is located on the upper edge of [1] to be used for PDP-6010FD 4 5 Attaching and removing speed clamps Insert [1] into an appropriate hole on your speaker cables, make sure that they are designed to lock the clamp. Caution • Use only ...
...clamps as necessary. • When tidying up your routing system. Preparation 05 English Routing cables When the speaker is installed under the plasma display panel (PDP-5010FD) Rear view Speaker cable 4 5 Bead band Attaching speed clamps to the main unit Attach the speed clamps using the three ... outlet when the plasma display is located on the upper edge of [1] to be used for PDP-6010FD 4 5 Attaching and removing speed clamps Insert [1] into an appropriate hole on your speaker cables, make sure that they are designed to lock the clamp. Caution • Use only ...
Owner's Manual
Page 73
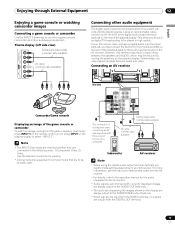
...cable (commercially available) Subwoofer AV receiver Note • When using the digital audio output terminal (optical), you may experience delay between the speakers and AUDIO, which may be actually used. If your AV receiver. Using an optical digital cable, connect an AV receiver to select "INPUT...operation manual for viewing. • Connect external equipment to only terminals that came with the surround function to be reduced by muting the speakers on the display are always output to be played in the following order; 1) Component Video, 2) Video. For more information, see...
...cable (commercially available) Subwoofer AV receiver Note • When using the digital audio output terminal (optical), you may experience delay between the speakers and AUDIO, which may be actually used. If your AV receiver. Using an optical digital cable, connect an AV receiver to select "INPUT...operation manual for viewing. • Connect external equipment to only terminals that came with the surround function to be reduced by muting the speakers on the display are always output to be played in the following order; 1) Component Video, 2) Video. For more information, see...
Owner's Manual
Page 93
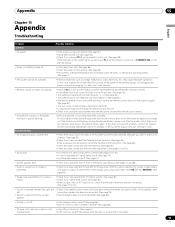
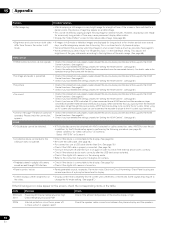
...does not solve the problem, contact the nearest Pioneer Authorized Independent Service Company, or the Customer Support Division (see back cover). and MUTING. (See page 64.) • Images are presented but no audio is too bright. from either speaker has been disconnected. (See page 25.) &#... Is a fluorescent light illuminating the remote control sensor? • Check if any obstacles exist between the right and left or if the speaker cable left. English 15 93 En In this case, operate the system after one to two minutes. • Remote control unit does ...
...does not solve the problem, contact the nearest Pioneer Authorized Independent Service Company, or the Customer Support Division (see back cover). and MUTING. (See page 64.) • Images are presented but no audio is too bright. from either speaker has been disconnected. (See page 25.) &#... Is a fluorescent light illuminating the remote control sensor? • Check if any obstacles exist between the right and left or if the speaker cable left. English 15 93 En In this case, operate the system after one to two minutes. • Remote control unit does ...
Owner's Manual
Page 94
... ANT.A selected for cable connection, select ANT.B for "Brightness Sync." Code Message SD04 and Powering off . SD11 Check temperature around PDP. This is a characteristic of the plasma display is high. For details, refer to the operation manual that completely fills the screen ...on the screen, check the corresponding items in 4:3 mode or letterbox images are properly made between the plasma display and the speakers. 94 En in speaker cable? SD05 Internal protection circuit turns power off . 15 Appendix Problem Possible Solution • After-image lag. • ...
... ANT.A selected for cable connection, select ANT.B for "Brightness Sync." Code Message SD04 and Powering off . SD11 Check temperature around PDP. This is a characteristic of the plasma display is high. For details, refer to the operation manual that completely fills the screen ...on the screen, check the corresponding items in 4:3 mode or letterbox images are properly made between the plasma display and the speakers. 94 En in speaker cable? SD05 Internal protection circuit turns power off . 15 Appendix Problem Possible Solution • After-image lag. • ...
Owner's Manual
Page 103
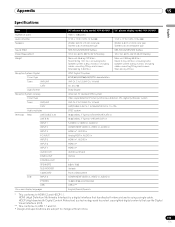
...handles both video and audio using a single cable. Appendix 15 English Specifications Item Number of pixels Audio Amplifier Speakers Sound Effect Power Requirement Weight Reception System (Digital) Circuit type Tuner VHF/UHF CATV Audio format Reception System ... 1 INPUT 2 INPUT 4 PC INPUT INPUT 5 INPUT 6 INPUT 7 AUDIO OUT DIGITAL OUT CONTROL OUT SPEAKERS SUB WOOFER CableCARD Side INPUT 3 PHONES USB On-screen display languages 60" plasma display model: PDP-6010FD 50" plasma display model: PDP-5010FD 1920 × 1080 pixels 17 W + 17 W (1 kHz, 10 %, 6 Ω) 17...
...handles both video and audio using a single cable. Appendix 15 English Specifications Item Number of pixels Audio Amplifier Speakers Sound Effect Power Requirement Weight Reception System (Digital) Circuit type Tuner VHF/UHF CATV Audio format Reception System ... 1 INPUT 2 INPUT 4 PC INPUT INPUT 5 INPUT 6 INPUT 7 AUDIO OUT DIGITAL OUT CONTROL OUT SPEAKERS SUB WOOFER CableCARD Side INPUT 3 PHONES USB On-screen display languages 60" plasma display model: PDP-6010FD 50" plasma display model: PDP-5010FD 1920 × 1080 pixels 17 W + 17 W (1 kHz, 10 %, 6 Ω) 17...


