Owner's Manual
Page 4
...Supplied Accessories 12 Stand accessories (PDP-6010FD only 12 Speaker accessories 13 04 Part Names 14 Plasma display 14 Remote control unit 16 05 Preparation 17 Installing the plasma display 17 Moving the plasma display 17 Attaching the Pioneer stand 17 Installing the Pioneer speaker 18 When using the ...hung on wall unit (PDP-6010FD 22 When using the hung on ...
...Supplied Accessories 12 Stand accessories (PDP-6010FD only 12 Speaker accessories 13 04 Part Names 14 Plasma display 14 Remote control unit 16 05 Preparation 17 Installing the plasma display 17 Moving the plasma display 17 Attaching the Pioneer stand 17 Installing the Pioneer speaker 18 When using the ...hung on wall unit (PDP-6010FD 22 When using the hung on ...
Owner's Manual
Page 6
... Using the HDMI Control functions............79 Making the HDMI Control connections ....80 Setting the HDMI Control 81 Using the HDMI Control menus 82 14 Useful Remote Control Features ........ 83 Presetting manufacturer codes to control other devices 83 Presetting manufacturer codes 83 Library Search 83 Manufacturing Reset 83 Programming codes 84 Using...
... Using the HDMI Control functions............79 Making the HDMI Control connections ....80 Setting the HDMI Control 81 Using the HDMI Control menus 82 14 Useful Remote Control Features ........ 83 Presetting manufacturer codes to control other devices 83 Presetting manufacturer codes 83 Library Search 83 Manufacturing Reset 83 Programming codes 84 Using...
Owner's Manual
Page 8
...do not switch on the screen for this product, gently wipe it emits a small amount of noise. 01 Important User Guidance Information Caution Pioneer bears no responsibility for any damage arising from incorrect use of the product by holding only a single handle. Plasma display protection function When...a normal viewing distance of preventing the product from a cold place to a warm place or just after a heater is composed of its remote control sensor is in malfunction. Use the handles as benzene or thinner to hang the product when installing or carrying the product, for the ...
...do not switch on the screen for this product, gently wipe it emits a small amount of noise. 01 Important User Guidance Information Caution Pioneer bears no responsibility for any damage arising from incorrect use of the product by holding only a single handle. Plasma display protection function When...a normal viewing distance of preventing the product from a cold place to a warm place or just after a heater is composed of its remote control sensor is in malfunction. Use the handles as benzene or thinner to hang the product when installing or carrying the product, for the ...
Owner's Manual
Page 12
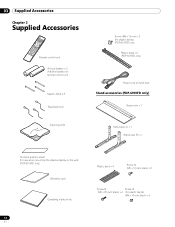
... unit AA size battery × 2 (Alkaline battery for remote control unit) Speed clamp × 3 Bead band × 3 Cleaning cloth Screw (M4 x 10 mm) x 2 (for plastic bands) (PDP-5010FD only) Plastic band x 2 (PDP-5010FD only) Power cord (2 m/6.6 feet) Stand accessories (PDP-6010FD only) Base cover x 1 Stand pipe (L) x 1 Stand pipe (R) x 1 Terminal position sheet (for use when mounting...
... unit AA size battery × 2 (Alkaline battery for remote control unit) Speed clamp × 3 Bead band × 3 Cleaning cloth Screw (M4 x 10 mm) x 2 (for plastic bands) (PDP-5010FD only) Plastic band x 2 (PDP-5010FD only) Power cord (2 m/6.6 feet) Stand accessories (PDP-6010FD only) Base cover x 1 Stand pipe (L) x 1 Stand pipe (R) x 1 Terminal position sheet (for use when mounting...
Owner's Manual
Page 14
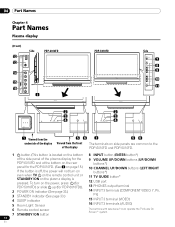
... STANDBY SLEEP 4 1 Viewed from the underside of the display 56 1 56 Viewed from the front of the display The terminals on the rear panel for PDP-6010FD)). 2 POWER ON indicator (See page 33.) 3 STANDBY indicator (See page 33.) 4 SLEEP indicator 5 Room Light Sensor 9 VOLUME UP/DOWN buttons (UP/DOWN buttons*) 10 ..., the power will not turn on even when TV a on the remote control unit or STANDBY/ON on the plasma display is located on the bottom 8 INPUT button (ENTER button*) of the side panel of the plasma display for the PDP-6010FD and at the bottom on side panels are common to the...
... STANDBY SLEEP 4 1 Viewed from the underside of the display 56 1 56 Viewed from the front of the display The terminals on the rear panel for PDP-6010FD)). 2 POWER ON indicator (See page 33.) 3 STANDBY indicator (See page 33.) 4 SLEEP indicator 5 Room Light Sensor 9 VOLUME UP/DOWN buttons (UP/DOWN buttons*) 10 ..., the power will not turn on even when TV a on the remote control unit or STANDBY/ON on the plasma display is located on the bottom 8 INPUT button (ENTER button*) of the side panel of the plasma display for the PDP-6010FD and at the bottom on side panels are common to the...
Owner's Manual
Page 16
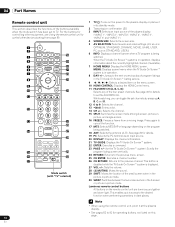
...channel (if available). 7 HOME MENU: Displays the HOME MENU screen. Press again to TV. This enables quick access to the previous channel. Luminous remote control buttons All buttons on the program being watched. MENU: Displays a panel menu when the TV Guide On Screen™ system is in the TV...the buttons available when the mode switch has been set to cancel the function. 17 MTS: Selects MTS/SAP or language depending on the remote control unit are luminous and gather and store light. While watching, you can toggle the set the FAVORITE CH. This button is disabled ...
...channel (if available). 7 HOME MENU: Displays the HOME MENU screen. Press again to TV. This enables quick access to the previous channel. Luminous remote control buttons All buttons on the program being watched. MENU: Displays a panel menu when the TV Guide On Screen™ system is in the TV...the buttons available when the mode switch has been set to cancel the function. 17 MTS: Selects MTS/SAP or language depending on the remote control unit are luminous and gather and store light. While watching, you can toggle the set the FAVORITE CH. This button is disabled ...
Owner's Manual
Page 32
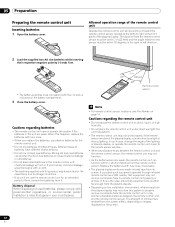
.... Replace the batteries with new ones. • When you will occur. The strength of time, remove the batteries from it toward the remote control sensor located at a location far enough from the plasma display. • Depending on the installation environment, infrared rays from the plasma ...leakage will not use alkaline batteries for an extended period of infrared rays emitted from its screen. Cautions regarding batteries • The remote control unit cannot operate the system if the batteries in the unit are weak. Battery disposal When disposing of the plasma display is ...
.... Replace the batteries with new ones. • When you will occur. The strength of time, remove the batteries from it toward the remote control sensor located at a location far enough from the plasma display. • Depending on the installation environment, infrared rays from the plasma ...leakage will not use alkaline batteries for an extended period of infrared rays emitted from its screen. Cautions regarding batteries • The remote control unit cannot operate the system if the batteries in the unit are weak. Battery disposal When disposing of the plasma display is ...
Owner's Manual
Page 33
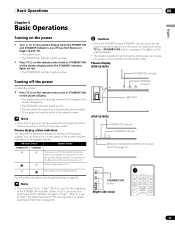
...STANDBY indicators are not going to use this system for the brightness of time, remove the power cord from the power outlet. Plasma display (PDP-6010FD) POWER ON indicator Turning off the power (to automatically receive digital TV program information while in the standby mode. Plasma display status indicators The... on . Turn a on on the plasma display. • The plasma display will allow the system to standby mode) 1 Press TV a on the remote control unit or STANDBY/ON on the plasma display. • The system enters the standby mode and the image on page 69. Or, the power...
...STANDBY indicators are not going to use this system for the brightness of time, remove the power cord from the power outlet. Plasma display (PDP-6010FD) POWER ON indicator Turning off the power (to automatically receive digital TV program information while in the standby mode. Plasma display status indicators The... on . Turn a on on the plasma display. • The plasma display will allow the system to standby mode) 1 Press TV a on the remote control unit or STANDBY/ON on the plasma display. • The system enters the standby mode and the image on page 69. Or, the power...
Owner's Manual
Page 34
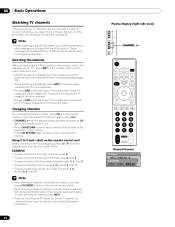
...the other antenna. • Pressing ANT while watching in those channels. Press CH RETURN again to the previously tuned channel. on the remote control unit Select channels directly by TV stations as CH +/- Note • After entering a channel or subchannel number, you do ...while watching in emergency situations. Those messages are broadcasted by pressing buttons 0 to 9. Using 0 to 9 and • (dot) on the remote control unit. • Press CH RETURN to switch the currently tuned channel to restore the currently tuned channel. on the plasma display operates the ...
...the other antenna. • Pressing ANT while watching in those channels. Press CH RETURN again to the previously tuned channel. on the remote control unit Select channels directly by TV stations as CH +/- Note • After entering a channel or subchannel number, you do ...while watching in emergency situations. Those messages are broadcasted by pressing buttons 0 to 9. Using 0 to 9 and • (dot) on the remote control unit. • Press CH RETURN to switch the currently tuned channel to restore the currently tuned channel. on the plasma display operates the ...
Owner's Manual
Page 35
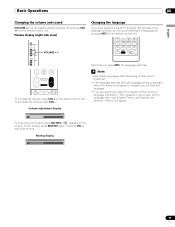
... you are selected, "Others" will hear that provides multilanguage services, you press MTS, the language switches. " " appears on the remote control unit. Note • Switchable languages differ depending on the current broadcast. • If the language selected through language setting is available... language other than English, French, and Spanish are watching a digital TV program without sound or language information, "N/A" appears on the remote control unit. Basic Operations 06 Changing the volume and sound VOLUME +/- To increase the volume, press VOL + on the screen. Volume...
... you are selected, "Others" will hear that provides multilanguage services, you press MTS, the language switches. " " appears on the remote control unit. Note • Switchable languages differ depending on the current broadcast. • If the language selected through language setting is available... language other than English, French, and Spanish are watching a digital TV program without sound or language information, "N/A" appears on the remote control unit. Basic Operations 06 Changing the volume and sound VOLUME +/- To increase the volume, press VOL + on the screen. Volume...
Owner's Manual
Page 45
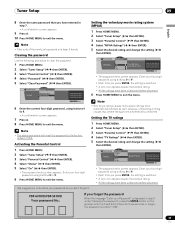
... TV-Y TV-Y7 TV-G TV-PG Blocked TV Ratings xxxxxxxxxxxxxxxxxxxxx xxxxxxxxxxxxxxxxxxxxx xxxxxxxxxxxxxxxxxxxxx Home Menu Exit • The password entry screen appears. PDP-6010FD/PDP-5010FD Your password No.: If you forget the password When the message "Enter your four-digit password using buttons 0 to 9. &#... rating. • All the ratings have entered in step 6 under "Clearing the password", press the ENTER button on the remote control unit and hold it down your password so you have been unblocked before shipment. Parental Control Password Password Change Password Clear Password...
... TV-Y TV-Y7 TV-G TV-PG Blocked TV Ratings xxxxxxxxxxxxxxxxxxxxx xxxxxxxxxxxxxxxxxxxxx xxxxxxxxxxxxxxxxxxxxx Home Menu Exit • The password entry screen appears. PDP-6010FD/PDP-5010FD Your password No.: If you forget the password When the message "Enter your four-digit password using buttons 0 to 9. &#... rating. • All the ratings have entered in step 6 under "Clearing the password", press the ENTER button on the remote control unit and hold it down your password so you have been unblocked before shipment. Parental Control Password Password Change Password Clear Password...
Owner's Manual
Page 49
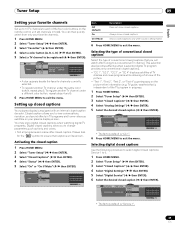
... with an internal closed caption decoder. Please look for the " " symbol to each of the picture. • "Text 1", "Text 2", "Text 3", or "Text 4" superimposes on the remote control unit (40 channels in progress. 1 Press HOME MENU. 2 Select "Tuner Setup" ( / then ENTER). 3 Select "Closed Captions" ( / then ENTER). 4 Select "Analog Settings" ( / then ENTER). 5 Select...
... with an internal closed caption decoder. Please look for the " " symbol to each of the picture. • "Text 1", "Text 2", "Text 3", or "Text 4" superimposes on the remote control unit (40 channels in progress. 1 Press HOME MENU. 2 Select "Tuner Setup" ( / then ENTER). 3 Select "Closed Captions" ( / then ENTER). 4 Select "Analog Settings" ( / then ENTER). 5 Select...
Owner's Manual
Page 52
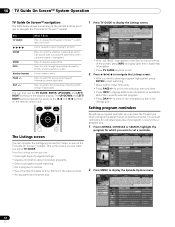
...of program listings. • Display information about individual programs. • Select a program to start watching. • Set a program to start on the remote control unit. • With "LISTINGS" highlighted in the listings grid. Use for the current program or screen. Press to select the previous/next page of...to display the Listings screen. Number buttons PAGE +/- The UP/DOWN and LEFT/ RIGHT buttons operate the same as the "home" screen of the remote buttons you'll use to navigate the TV Guide On Screen™ system. 1 Press TV GUIDE to start watching. • Move right for...
...of program listings. • Display information about individual programs. • Select a program to start watching. • Set a program to start on the remote control unit. • With "LISTINGS" highlighted in the listings grid. Use for the current program or screen. Press to select the previous/next page of...to display the Listings screen. Number buttons PAGE +/- The UP/DOWN and LEFT/ RIGHT buttons operate the same as the "home" screen of the remote buttons you'll use to navigate the TV Guide On Screen™ system. 1 Press TV GUIDE to start watching. • Move right for...
Owner's Manual
Page 60
... the "Option" menu. 60 En This selection is shared by the external input and TV input sources. You can also press AV SELECTION on the remote control unit to switch the viewing option. • If you have selected "OPTIMUM", you to change the AV selection mode while enjoying the Home Gallery...
... the "Option" menu. 60 En This selection is shared by the external input and TV input sources. You can also press AV SELECTION on the remote control unit to switch the viewing option. • If you have selected "OPTIMUM", you to change the AV selection mode while enjoying the Home Gallery...
Owner's Manual
Page 63
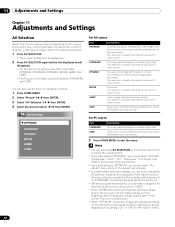
... Field NR Mid Standard Field NR Low Moderate Field NR 7 Press HOME MENU to be adjusted ( / then ENTER). 4 While performing adjustment, press BLUE on the remote control unit. Each press of the button toggles between different parameters on the confirmation screen for comparison. See page 60. 1 Press HOME MENU. 2 Select "Sound...
... Field NR Mid Standard Field NR Low Moderate Field NR 7 Press HOME MENU to be adjusted ( / then ENTER). 4 While performing adjustment, press BLUE on the remote control unit. Each press of the button toggles between different parameters on the confirmation screen for comparison. See page 60. 1 Press HOME MENU. 2 Select "Sound...
Owner's Manual
Page 65
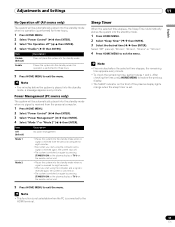
... received again, the system stays off. • The system is switched on again by pressing STANDBY/ON on the plasma display or TV on the remote control unit. • Places the system into the standby mode when no signal is received for eight seconds. • When you start using the ... the standby mode if no operation is performed for three hours 5 Press HOME MENU to restore the previous display. • The SLEEP indicator on the remote control unit. After checking the time, press HOME MENU to exit the menu. Adjustments and Settings 11 English No Operation off (AV source only) The...
... received again, the system stays off. • The system is switched on again by pressing STANDBY/ON on the plasma display or TV on the remote control unit. • Places the system into the standby mode when no signal is received for eight seconds. • When you start using the ... the standby mode if no operation is performed for three hours 5 Press HOME MENU to restore the previous display. • The SLEEP indicator on the remote control unit. After checking the time, press HOME MENU to exit the menu. Adjustments and Settings 11 English No Operation off (AV source only) The...
Owner's Manual
Page 69
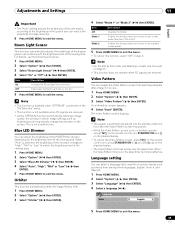
...; This function is disabled when "OPTIMUM" is selected on the "AV Selection" menu. • This function is on, no buttons operate except TVa on the remote control unit, STANDBY/ON and a on the plasma display. • To cancel the Video Pattern screen, press TVa on the... remote control unit, press STANDBY/ON or a (or slide a up) on the plasma display. • The Video Pattern timer has priority over the sleep timer. Note &#...
...; This function is disabled when "OPTIMUM" is selected on the "AV Selection" menu. • This function is on, no buttons operate except TVa on the remote control unit, STANDBY/ON and a on the plasma display. • To cancel the Video Pattern screen, press TVa on the... remote control unit, press STANDBY/ON or a (or slide a up) on the plasma display. • The Video Pattern timer has priority over the sleep timer. Note &#...
Owner's Manual
Page 70
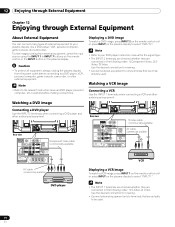
...audiovisual equipment. 4 5 Rear view Component Video cable (commercially available) Displaying a DVD image To watch a VCR image, press INPUT 1 on the remote control unit or press INPUT on the plasma display to select "INPUT 2". Watching a DVD image Connecting a DVD player Use the INPUT 2 terminals ...available) AV cable (commercially available) DVD player VCR Displaying a VCR image To watch a DVD image, press INPUT 2 on the remote control unit or press INPUT on the plasma display to select "INPUT 1". 12 Enjoying through External Equipment Chapter 12 Enjoying through External Equipment...
...audiovisual equipment. 4 5 Rear view Component Video cable (commercially available) Displaying a DVD image To watch a VCR image, press INPUT 1 on the remote control unit or press INPUT on the plasma display to select "INPUT 2". Watching a DVD image Connecting a DVD player Use the INPUT 2 terminals ...available) AV cable (commercially available) DVD player VCR Displaying a VCR image To watch a DVD image, press INPUT 2 on the remote control unit or press INPUT on the plasma display to select "INPUT 1". 12 Enjoying through External Equipment Chapter 12 Enjoying through External Equipment...
Owner's Manual
Page 71
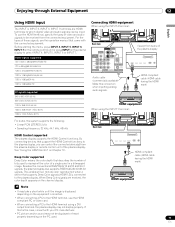
... that support the HDMI Control functions to which digital video and audio signals can control the connected device(s) from the plasma display or remote control unit of these signals, see the operation manual that supports Deep Color signals (HDMI1.3) is the case, consult with the connected... cable (HDMI cable having the HDMI mark) HDMI equipment 71 En Before starting the menu, press INPUT 4, INPUT 5, INPUT 6, INPUT 7 on the remote control unit or press INPUT on Chapter 13. HDMI compliant cable (HDMI cable having the HDMI mark) HDMI equipment When using the INPUT 7 terminal: 4...
... that support the HDMI Control functions to which digital video and audio signals can control the connected device(s) from the plasma display or remote control unit of these signals, see the operation manual that supports Deep Color signals (HDMI1.3) is the case, consult with the connected... cable (HDMI cable having the HDMI mark) HDMI equipment 71 En Before starting the menu, press INPUT 4, INPUT 5, INPUT 6, INPUT 7 on the remote control unit or press INPUT on Chapter 13. HDMI compliant cable (HDMI cable having the HDMI mark) HDMI equipment When using the INPUT 7 terminal: 4...
Owner's Manual
Page 73
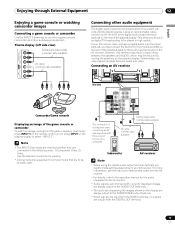
... to be actually used. Note • The INPUT 3 terminals are checked whether they are output from the game console or camcorder, press INPUT 3 on the remote control unit or press INPUT on the AV receiver. Plasma display (left side view) Component Video cable (commercially available) AV cable (commercially available) Connecting other...
... to be actually used. Note • The INPUT 3 terminals are checked whether they are output from the game console or camcorder, press INPUT 3 on the remote control unit or press INPUT on the AV receiver. Plasma display (left side view) Component Video cable (commercially available) AV cable (commercially available) Connecting other...


