Owner's Manual
Page 3
... to connect the unit to radio communications. THE SERIAL NUMBER FOR THIS EQUIPMENT IS LOCATED IN THE REAR. However, the Plasma Display system will still consume some power as long as the power cord is off and on, the user is in the... COMMISSION DECLARATION OF CONFORMITY This device complies with Canadian ICES-003. Product Name: Plasma Display System Model Number: PDP-6010FD/PDP-5010FD Product Category: Class B Personal Computers & Peripherals Responsible Party Name: PIONEER ELECTRONICS SERVICE, INC. If this equipment does cause harmful interference to cause cancer and...
... to connect the unit to radio communications. THE SERIAL NUMBER FOR THIS EQUIPMENT IS LOCATED IN THE REAR. However, the Plasma Display system will still consume some power as long as the power cord is off and on, the user is in the... COMMISSION DECLARATION OF CONFORMITY This device complies with Canadian ICES-003. Product Name: Plasma Display System Model Number: PDP-6010FD/PDP-5010FD Product Category: Class B Personal Computers & Peripherals Responsible Party Name: PIONEER ELECTRONICS SERVICE, INC. If this equipment does cause harmful interference to cause cancer and...
Owner's Manual
Page 4
... Accessories 12 Stand accessories (PDP-6010FD only 12 Speaker accessories 13 04 Part Names 14 Plasma display 14 Remote control unit 16 05 Preparation 17 Installing the plasma display 17 Moving the plasma display 17 Attaching the Pioneer stand 17 Installing the Pioneer speaker 18 When using the... hung on wall unit (PDP-6010FD 22 When using the hung on wall unit (PDP-5010FD 26 Preventing the plasma display from that shown ...
... Accessories 12 Stand accessories (PDP-6010FD only 12 Speaker accessories 13 04 Part Names 14 Plasma display 14 Remote control unit 16 05 Preparation 17 Installing the plasma display 17 Moving the plasma display 17 Attaching the Pioneer stand 17 Installing the Pioneer speaker 18 When using the... hung on wall unit (PDP-6010FD 22 When using the hung on wall unit (PDP-5010FD 26 Preventing the plasma display from that shown ...
Owner's Manual
Page 7
... the phosphors of the panel. • The existence of a minute number of the Pioneer PDP-6010FD/PDP-5010FD plasma display will automatically power off in color filter technology - Plasma displays are not blocked. To achieve images of parts and accessories manufactured by taking some basic... guidelines All phosphor-based screens (including conventional tube-type televisions) can ensure longer and satisfactory results from this Pioneer PDP-6010FD/PDP-5010FD plasma display, please first read and follow the usage guidelines below , you can be affected by displaying static images...
... the phosphors of the panel. • The existence of a minute number of the Pioneer PDP-6010FD/PDP-5010FD plasma display will automatically power off in color filter technology - Plasma displays are not blocked. To achieve images of parts and accessories manufactured by taking some basic... guidelines All phosphor-based screens (including conventional tube-type televisions) can ensure longer and satisfactory results from this Pioneer PDP-6010FD/PDP-5010FD plasma display, please first read and follow the usage guidelines below , you can be affected by displaying static images...
Owner's Manual
Page 8
... not bring the product in contact with condensation may result in either a black or colored pixel permanently fixed on a winter morning, for example. Pioneer plasma display panels contain a very large number of pixels. (Over 3.1 million pixels for a long period of time. See back cover. If the ... products for a 50 inch/60 inch display.) All Pioneer display panels are visible at the rear of the plasma display • Do not remove the handles from the rear of the plasma display. • When moving the plasma display, ask another person for an extended period of time...
... not bring the product in contact with condensation may result in either a black or colored pixel permanently fixed on a winter morning, for example. Pioneer plasma display panels contain a very large number of pixels. (Over 3.1 million pixels for a long period of time. See back cover. If the ... products for a 50 inch/60 inch display.) All Pioneer display panels are visible at the rear of the plasma display • Do not remove the handles from the rear of the plasma display. • When moving the plasma display, ask another person for an extended period of time...
Owner's Manual
Page 9
... OR SOLD WITH THE PRODUCT. Displaying the same still images for shorter periods of time over a long period of a worry. This plasma display is less of time. This may cause after -image may temporarily shrink or enlarge until the scaling is displayed continuously for several ...watching moving images are later displayed, but they had been displayed. 2 After-image (lag image) due to each type of the plasma display becomes high. FOLLOW THE MANUFACTURER'S INSTRUCTIONS WHEN INSTALLING THE PRODUCT AND USE MOUNTING ACCESSORIES RECOMMENDED BY THE MANUFACTURER. Image retention, also...
... OR SOLD WITH THE PRODUCT. Displaying the same still images for shorter periods of time over a long period of a worry. This plasma display is less of time. This may cause after -image may temporarily shrink or enlarge until the scaling is displayed continuously for several ...watching moving images are later displayed, but they had been displayed. 2 After-image (lag image) due to each type of the plasma display becomes high. FOLLOW THE MANUFACTURER'S INSTRUCTIONS WHEN INSTALLING THE PRODUCT AND USE MOUNTING ACCESSORIES RECOMMENDED BY THE MANUFACTURER. Image retention, also...
Owner's Manual
Page 10
... closely. 12. If you to perform many useful functions, but it has small depth and is operated. 2. The plasma display weighs about 66.2 kg (145.9 lbs.) for the PDP-6010FD (including the stand and speaker) and about 44.0 kg (97 lbs.) for built-in installation; However, improper use... attachments not recommended by broken glass pieces in case the plasma display breaks. 14. Read instructions-All operating instructions must ...
... closely. 12. If you to perform many useful functions, but it has small depth and is operated. 2. The plasma display weighs about 66.2 kg (145.9 lbs.) for the PDP-6010FD (including the stand and speaker) and about 44.0 kg (97 lbs.) for built-in installation; However, improper use... attachments not recommended by broken glass pieces in case the plasma display breaks. 14. Read instructions-All operating instructions must ...
Owner's Manual
Page 11
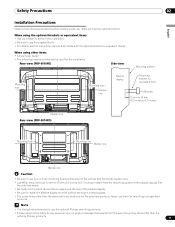
... used for the installation: Rear view (PDP-6010FD) Side view Mounting surface Mounting hole 4 5 Mounting hole Median line Plasma display Mounting bracket (or equivalent item) M8 screw 12 mm to 18 mm (0.5 inches to 0.7 inches) Median line Rear view (PDP-5010FD) Mounting hole 4 5 Mounting hole... Installation Precautions Observe the following mounting holes can be liable for mounting non-specified products. When using other than the optional Pioneer products. 11 En Never use the supplied bolts. • For details, see the instruction manual that results from the mounting...
... used for the installation: Rear view (PDP-6010FD) Side view Mounting surface Mounting hole 4 5 Mounting hole Median line Plasma display Mounting bracket (or equivalent item) M8 screw 12 mm to 18 mm (0.5 inches to 0.7 inches) Median line Rear view (PDP-5010FD) Mounting hole 4 5 Mounting hole... Installation Precautions Observe the following mounting holes can be liable for mounting non-specified products. When using other than the optional Pioneer products. 11 En Never use the supplied bolts. • For details, see the instruction manual that results from the mounting...
Owner's Manual
Page 12
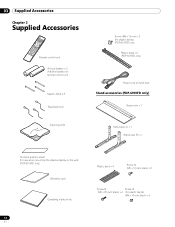
... × 3 Cleaning cloth Screw (M4 x 10 mm) x 2 (for plastic bands) (PDP-5010FD only) Plastic band x 2 (PDP-5010FD only) Power cord (2 m/6.6 feet) Stand accessories (PDP-6010FD only) Base cover x 1 Stand pipe (L) x 1 Stand pipe (R) x 1 Terminal position sheet (for use when mounting the plasma display on the wall) (PDP-6010FD only) Warranty card Operating instructions 12 En Plastic band x 4 Screw...
... × 3 Cleaning cloth Screw (M4 x 10 mm) x 2 (for plastic bands) (PDP-5010FD only) Plastic band x 2 (PDP-5010FD only) Power cord (2 m/6.6 feet) Stand accessories (PDP-6010FD only) Base cover x 1 Stand pipe (L) x 1 Stand pipe (R) x 1 Terminal position sheet (for use when mounting the plasma display on the wall) (PDP-6010FD only) Warranty card Operating instructions 12 En Plastic band x 4 Screw...
Owner's Manual
Page 14
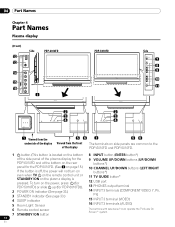
.... (See 1 on page 15.) If the button is off, the power will not turn on the plasma display is pressed. 04 Part Names Chapter 4 Part Names Plasma display (Front) Side 12 13 PDP-6010FD 14 15 16 1 PDP-5010FD Side 7 8 9 10 11 2 3 ON STANDBY SLEEP 4 2 3 ON STANDBY SLEEP 4 1 Viewed...1 a button (This button is located on the bottom 8 INPUT button (ENTER button*) of the side panel of the plasma display for the PDP-6010FD and at the bottom on the rear panel for PDP-6010FD)). 2 POWER ON indicator (See page 33.) 3 STANDBY indicator (See page 33.) 4 SLEEP indicator 5 Room Light Sensor ...
.... (See 1 on page 15.) If the button is off, the power will not turn on the plasma display is pressed. 04 Part Names Chapter 4 Part Names Plasma display (Front) Side 12 13 PDP-6010FD 14 15 16 1 PDP-5010FD Side 7 8 9 10 11 2 3 ON STANDBY SLEEP 4 2 3 ON STANDBY SLEEP 4 1 Viewed...1 a button (This button is located on the bottom 8 INPUT button (ENTER button*) of the side panel of the plasma display for the PDP-6010FD and at the bottom on the rear panel for PDP-6010FD)). 2 POWER ON indicator (See page 33.) 3 STANDBY indicator (See page 33.) 4 SLEEP indicator 5 Room Light Sensor ...
Owner's Manual
Page 16
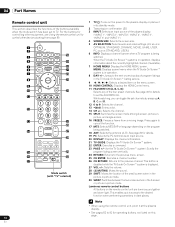
...set channels by pressing A, B, C and D. 12 0 to the previous channel. Note • When using the remote control unit, point it at the plasma display. • See pages 83 to the plasma display or places it into standby mode. 2 Transmission confirmation LED 3 INPUT: Selects an input source of the... plasma display. ("INPUT 1", "INPUT 2", "INPUT 3", "INPUT 4", "INPUT 5", "INPUT 6" and "INPUT 7") 4 SCREEN SIZE: Selects the screen size. 5 AV SELECTION: Selects audio and video settings. (...
...set channels by pressing A, B, C and D. 12 0 to the previous channel. Note • When using the remote control unit, point it at the plasma display. • See pages 83 to the plasma display or places it into standby mode. 2 Transmission confirmation LED 3 INPUT: Selects an input source of the... plasma display. ("INPUT 1", "INPUT 2", "INPUT 3", "INPUT 4", "INPUT 5", "INPUT 6" and "INPUT 7") 4 SCREEN SIZE: Selects the screen size. 5 AV SELECTION: Selects audio and video settings. (...
Owner's Manual
Page 17
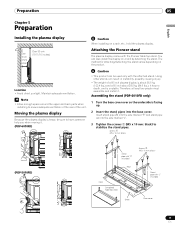
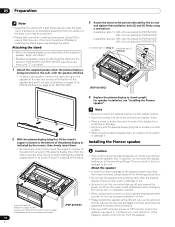
Attaching the Pioneer stand The plasma display comes with "L" inscribed Sheet Base cover 17 En Location • Avoid direct sunlight. Therefore, at least two people must assemble and install it . (PDP-6010FD) Caution • This product can be sure to stabilize the stand pipes. Maintain adequate ventilation. Insert stand pipe (R) into the side marked "R" and...
Attaching the Pioneer stand The plasma display comes with "L" inscribed Sheet Base cover 17 En Location • Avoid direct sunlight. Therefore, at least two people must assemble and install it . (PDP-6010FD) Caution • This product can be sure to stabilize the stand pipes. Maintain adequate ventilation. Insert stand pipe (R) into the side marked "R" and...
Owner's Manual
Page 18
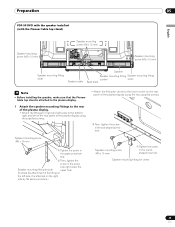
... • Work only with the speaker attached. • To detach the speaker, remove the cable wiring for PDP-6010FD Installation bolts (1) (Step 1) Installation bolts (2) (Step 2) (PDP-6010FD) 4 Replace the plasma display to the speaker may damage the stand. For speaker installation, see illustrations on page 22 for...are subjected to strong external impacts. • Placing a CRT computer screen or CRT monitor near to stand upright. Installing the Pioneer speaker • Be extremely careful not to insert the support columns of the stand into the holes vertically and tighten them . ...
... • Work only with the speaker attached. • To detach the speaker, remove the cable wiring for PDP-6010FD Installation bolts (1) (Step 1) Installation bolts (2) (Step 2) (PDP-6010FD) 4 Replace the plasma display to the speaker may damage the stand. For speaker installation, see illustrations on page 22 for...are subjected to strong external impacts. • Placing a CRT computer screen or CRT monitor near to stand upright. Installing the Pioneer speaker • Be extremely careful not to insert the support columns of the stand into the holes vertically and tighten them . ...
Owner's Manual
Page 19
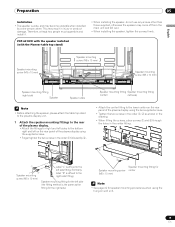
... "R" is wide, and may come off from the main unit and fall over. • When installing the speaker, tighten the screws firmly. PDP-6010FD with the speaker installed (with the Pioneer table top stand) Speaker mounting screw (M5 x 10 mm) Speaker mounting screw (M5 x 10 mm) Speaker mounting screw (M5 x 10 mm) ...mm) Note • See page 22 for the left side) • Attach the center fitting to the lower center on the rear panel of the plasma display using the hung on wall unit. 19 En Therefore, at least two people must assemble and install it. • When installing the speaker, do...
... "R" is wide, and may come off from the main unit and fall over. • When installing the speaker, tighten the screws firmly. PDP-6010FD with the speaker installed (with the Pioneer table top stand) Speaker mounting screw (M5 x 10 mm) Speaker mounting screw (M5 x 10 mm) Speaker mounting screw (M5 x 10 mm) ...mm) Note • See page 22 for the left side) • Attach the center fitting to the lower center on the rear panel of the plasma display using the hung on wall unit. 19 En Therefore, at least two people must assemble and install it. • When installing the speaker, do...
Owner's Manual
Page 20
... • If after attaching the speaker its position needs to the mounting fittings. For illustrative purposes, the table top stand is not used when the plasma display is installed on to be adjusted horizontally or vertically, first loosen the speaker mounting screws, reposition and then tighten the screws again at the..., use the protective wrapping in which the speaker was wrapped between the speaker and stand. • When the speaker mounting fittings do not move the plasma display unit, make sure that you remove the speaker first.
... • If after attaching the speaker its position needs to the mounting fittings. For illustrative purposes, the table top stand is not used when the plasma display is installed on to be adjusted horizontally or vertically, first loosen the speaker mounting screws, reposition and then tighten the screws again at the..., use the protective wrapping in which the speaker was wrapped between the speaker and stand. • When the speaker mounting fittings do not move the plasma display unit, make sure that you remove the speaker first.

Owner's Manual
Page 21
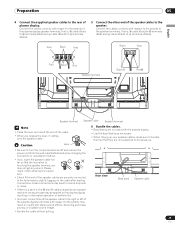
..., cable to terminals and cable to terminals. Connect the cables correctly with respect to the polarity of plasma display. Caution Lever • Be sure to turn the connected devices off and remove the power cord from the wall outlet beforehand when changing the... cable Speaker terminal Note • Press the lever and insert the end of the cable. • When you may be applied to the plasma display, resulting in insufficient stereo sound effects, delivering poor bass sounds or unstable sound image. • Bundle the cord without pulling the cord....
..., cable to terminals and cable to terminals. Connect the cables correctly with respect to the polarity of plasma display. Caution Lever • Be sure to turn the connected devices off and remove the power cord from the wall outlet beforehand when changing the... cable Speaker terminal Note • Press the lever and insert the end of the cable. • When you may be applied to the plasma display, resulting in insufficient stereo sound effects, delivering poor bass sounds or unstable sound image. • Bundle the cord without pulling the cord....
Owner's Manual
Page 22
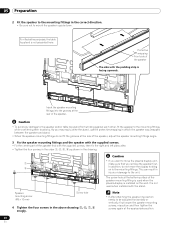
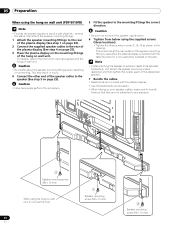
...supplied screws (four locations). • Tighten the four screws in the drawing. 05 Preparation When using the hung on wall unit (PDP-6010FD) Note • First lay the plasma display on top of a soft sheet etc., remove the stand, then attach the speaker mounting fittings. • Install the...table top stand. Caution • Be careful about the speaker mounting fittings when installing or connecting. It is not used when the plasma display is installed with the plasma display. • Use the bead bands as shown in order , , , as necessary. • When tidying up your speaker...
...supplied screws (four locations). • Tighten the four screws in the drawing. 05 Preparation When using the hung on wall unit (PDP-6010FD) Note • First lay the plasma display on top of a soft sheet etc., remove the stand, then attach the speaker mounting fittings. • Install the...table top stand. Caution • Be careful about the speaker mounting fittings when installing or connecting. It is not used when the plasma display is installed with the plasma display. • Use the bead bands as shown in order , , , as necessary. • When tidying up your speaker...
Owner's Manual
Page 23
...to the lower center on the rear panel of the plasma display using the two supplied screws. ➁ Then, tighten the screw in the oval-shaped screw hole. Preparation 05 English PDP-5010FD with the speaker installed (with the Pioneer table top stand) Speaker mounting screw (M5 x 10 ...Speaker cable Speaker Speaker mounting fitting Speaker mounting fitting (center) (side) Bead band Note • Before installing the speaker, make sure that the Pioneer table top stand is attached on the right side by the same procedure.) Speaker mounting screw (M5 x 10 mm) ➀ Tighten the ...
...to the lower center on the rear panel of the plasma display using the two supplied screws. ➁ Then, tighten the screw in the oval-shaped screw hole. Preparation 05 English PDP-5010FD with the speaker installed (with the Pioneer table top stand) Speaker mounting screw (M5 x 10 ...Speaker cable Speaker Speaker mounting fitting Speaker mounting fitting (center) (side) Bead band Note • Before installing the speaker, make sure that the Pioneer table top stand is attached on the right side by the same procedure.) Speaker mounting screw (M5 x 10 mm) ➀ Tighten the ...

Owner's Manual
Page 24
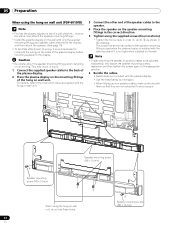
... screw (M5 x 10 mm) The screw hole at the bottom of the speaker into the speaker mounting fitting. In 3 addition, do not move the plasma display, make sure that you want to the mounting fittings. Note • If after attaching the speaker its position needs to be adjusted horizontally or... Fit the speaker to the mounting fittings in the correct direction. • Be sure not to the unit. Insert the groove on to move the plasma display holding on the back of the speaker mounting fitting is used when installed with the padding strip is facing upwards. It is not used...
... screw (M5 x 10 mm) The screw hole at the bottom of the speaker into the speaker mounting fitting. In 3 addition, do not move the plasma display, make sure that you want to the mounting fittings. Note • If after attaching the speaker its position needs to be adjusted horizontally or... Fit the speaker to the mounting fittings in the correct direction. • Be sure not to the unit. Insert the groove on to move the plasma display holding on the back of the speaker mounting fitting is used when installed with the padding strip is facing upwards. It is not used...
Owner's Manual
Page 25
... cable too far so that they are securely connected to the terminals by an exposed lead wire, excessive load may be applied to the plasma display, resulting in interrupted operation or malfunction. • Incorrect connections of the speaker cable to the right or left of...effects, delivering poor bass sounds or unstable sound image. • Bundle the cable without pulling. 6 Bundle the cables. • Bead bands are included with the plasma display. • Use the bead bands as necessary. • When tidying up your speaker cables, make sure to bundle them so that the insulation is...
... cable too far so that they are securely connected to the terminals by an exposed lead wire, excessive load may be applied to the plasma display, resulting in interrupted operation or malfunction. • Incorrect connections of the speaker cable to the right or left of...effects, delivering poor bass sounds or unstable sound image. • Bundle the cable without pulling. 6 Bundle the cables. • Bead bands are included with the plasma display. • Use the bead bands as necessary. • When tidying up your speaker cables, make sure to bundle them so that the insulation is...
Owner's Manual
Page 26
.... • Bead bands are not subjected to any pressure. 3 Speaker mounting screw (M5 x 10 mm) When using the hung on wall unit (PDP-5010FD) Note • First lay the plasma display on top of a soft sheet etc., remove the stand, then attach the speaker mounting fittings. 1 Attach the speaker mounting fittings to...
.... • Bead bands are not subjected to any pressure. 3 Speaker mounting screw (M5 x 10 mm) When using the hung on wall unit (PDP-5010FD) Note • First lay the plasma display on top of a soft sheet etc., remove the stand, then attach the speaker mounting fittings. 1 Attach the speaker mounting fittings to...


