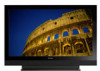
Owner's Manual
Page 4
...control unit 16 05 Preparation 17 Installing the plasma display 17 Moving the plasma display 17 Attaching the Pioneer stand 17 Installing the Pioneer speaker 18 When using the hung on wall unit (PDP-6010FD 22 When using the hung on the power 33 Turning off the power 33 Watching TV channels ...; system 39 08 The HOME MENU 42 HOME MENU overview 42 Using the HOME MENU 42 09 Tuner Setup 43 Setting up TV channels manually......... 43 Checking signal strength 43 Checking the CableCARD™ ID 44 Parental Control 44 Changing the password 44 Clearing the password 45 Activating the...
...control unit 16 05 Preparation 17 Installing the plasma display 17 Moving the plasma display 17 Attaching the Pioneer stand 17 Installing the Pioneer speaker 18 When using the hung on wall unit (PDP-6010FD 22 When using the hung on the power 33 Turning off the power 33 Watching TV channels ...; system 39 08 The HOME MENU 42 HOME MENU overview 42 Using the HOME MENU 42 09 Tuner Setup 43 Setting up TV channels manually......... 43 Checking signal strength 43 Checking the CableCARD™ ID 44 Parental Control 44 Changing the password 44 Clearing the password 45 Activating the...
Owner's Manual
Page 5
... Changing the default options 59 Sleep Timer 65 Image position adjustment (AV source only 66 Automatic image position and clock adjustments (PC source only 66 Manual image position and clock adjustments (PC source only 66 Reducing video noise 67 Selecting a game mode 67 Selecting a screen size... manually 67 Selecting a screen size automatically ...... 68 Detecting side masks 68 Changing the brightness at both sides of the screen (Side Mask 68 Room Light Sensor...
... Changing the default options 59 Sleep Timer 65 Image position adjustment (AV source only 66 Automatic image position and clock adjustments (PC source only 66 Manual image position and clock adjustments (PC source only 66 Reducing video noise 67 Selecting a game mode 67 Selecting a screen size... manually 67 Selecting a screen size automatically ...... 68 Detecting side masks 68 Changing the brightness at both sides of the screen (Side Mask 68 Room Light Sensor...
Owner's Manual
Page 10
..., consult your product, please read and understood before installing the speakers. 23. The plasma display weighs about 66.2 kg (145.9 lbs.) for the PDP-6010FD (including the stand and speaker) and about 44.0 kg (97 lbs.) for built-in the cabinet are not sure of the type of the plasma...injuries and property damage if improperly handled. Safety checks-Upon completion of your dealer or local power company. 22. The plasma display used in this manual in the product, and inserting an object can cause fire or electric shock. 15. High voltage flows in a safe place-These safety and ...
..., consult your product, please read and understood before installing the speakers. 23. The plasma display weighs about 66.2 kg (145.9 lbs.) for the PDP-6010FD (including the stand and speaker) and about 44.0 kg (97 lbs.) for built-in the cabinet are not sure of the type of the plasma...injuries and property damage if improperly handled. Safety checks-Upon completion of your dealer or local power company. 22. The plasma display used in this manual in the product, and inserting an object can cause fire or electric shock. 15. High voltage flows in a safe place-These safety and ...
Owner's Manual
Page 11
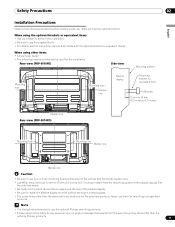
...Be sure to install the plasma display on a flat surface because it contains glass. • The screw holes other than the optional Pioneer products. 11 En Never use them for mounting non-specified products. When using other items • Consult your dealer to perform the ...see the instruction manual that comes with any personal injury or product damage that results from the mounting surface of the plasma display. Safety Precautions 02 English Installation Precautions Observe the following mounting holes can be used for the installation: Rear view (PDP-6010FD) Side view ...
...Be sure to install the plasma display on a flat surface because it contains glass. • The screw holes other than the optional Pioneer products. 11 En Never use them for mounting non-specified products. When using other items • Consult your dealer to perform the ...see the instruction manual that comes with any personal injury or product damage that results from the mounting surface of the plasma display. Safety Precautions 02 English Installation Precautions Observe the following mounting holes can be used for the installation: Rear view (PDP-6010FD) Side view ...
Owner's Manual
Page 22
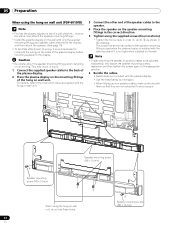
...recommended to complete the wiring on the sides of the plasma display before mounting speaker to any pressure. For details, refer to the instruction manual supplied with the plasma display. • Use the bead bands as shown in injury. 1 Connect the supplied speaker cables to the back...x 10 mm) Caution • Be careful about the speaker mounting fittings when installing or connecting. 05 Preparation When using the hung on wall unit (PDP-6010FD) Note • First lay the plasma display on top of a soft sheet etc., remove the stand, then attach the speaker mounting fittings. •...
...recommended to complete the wiring on the sides of the plasma display before mounting speaker to any pressure. For details, refer to the instruction manual supplied with the plasma display. • Use the bead bands as shown in injury. 1 Connect the supplied speaker cables to the back...x 10 mm) Caution • Be careful about the speaker mounting fittings when installing or connecting. 05 Preparation When using the hung on wall unit (PDP-6010FD) Note • First lay the plasma display on top of a soft sheet etc., remove the stand, then attach the speaker mounting fittings. •...
Owner's Manual
Page 26
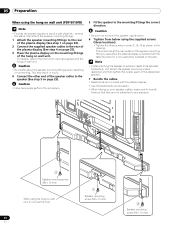
For details, refer to the instruction manual supplied with the hung on the wall. Caution • Be careful about the speaker mounting fittings when installing or connecting. The screw hole at the ... to bundle them so that they are not subjected to any pressure. 3 Speaker mounting screw (M5 x 10 mm) When using the hung on wall unit (PDP-5010FD) Note • First lay the plasma display on top of a soft sheet etc., remove the stand, then attach the speaker mounting fittings. 1 Attach the...
For details, refer to the instruction manual supplied with the hung on the wall. Caution • Be careful about the speaker mounting fittings when installing or connecting. The screw hole at the ... to bundle them so that they are not subjected to any pressure. 3 Speaker mounting screw (M5 x 10 mm) When using the hung on wall unit (PDP-5010FD) Note • First lay the plasma display on top of a soft sheet etc., remove the stand, then attach the speaker mounting fittings. 1 Attach the...
Owner's Manual
Page 36
...7 or PC does not change the type of the MTS/SAP modes selected, the display changes depend on broadcast signals being received. In this manual designate TV channels that are received through the conventional VHF/UHF frequencies or conventional cable TV channels. • When stereo sound is difficult to ...™ system is displayed. • In each of sound. 06 Basic Operations Setting MTS/SAP mode When watching conventional TV programs, you may manually switch to the MONO mode to obtain clearer sound. • Once the MONO mode is selected, the plasma display sound remains mono even if ...
...7 or PC does not change the type of the MTS/SAP modes selected, the display changes depend on broadcast signals being received. In this manual designate TV channels that are received through the conventional VHF/UHF frequencies or conventional cable TV channels. • When stereo sound is difficult to ...™ system is displayed. • In each of sound. 06 Basic Operations Setting MTS/SAP mode When watching conventional TV programs, you may manually switch to the MONO mode to obtain clearer sound. • Once the MONO mode is selected, the plasma display sound remains mono even if ...
Owner's Manual
Page 39
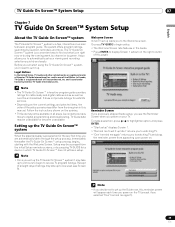
..., Inc. It also allows you to automatically set up later" returns you to set your TV. In Canada, TV Guide is a registered mark of this manual. Setup may differ from the initial Setup reminder screens, or by keyword, reminders and more. Welcome Screen Initial TV set it up the Guide now...
..., Inc. It also allows you to automatically set up later" returns you to set your TV. In Canada, TV Guide is a registered mark of this manual. Setup may differ from the initial Setup reminder screens, or by keyword, reminders and more. Welcome Screen Initial TV set it up the Guide now...
Owner's Manual
Page 42
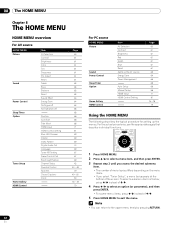
... Option Home Gallery HDMI Control Item AV Selection Contrast Brightness Red Green Blue Reset Same as the AV source Energy Save Power Management Auto Setup Manual Setup HDMI Input HDMI Control Setting Page 60 61 61 61 61 61 61 63 64 65 65 66 66 71 81 76 - 78 79...
... Option Home Gallery HDMI Control Item AV Selection Contrast Brightness Red Green Blue Reset Same as the AV source Energy Save Power Management Auto Setup Manual Setup HDMI Input HDMI Control Setting Page 60 61 61 61 61 61 61 63 64 65 65 66 66 71 81 76 - 78 79...
Owner's Manual
Page 43
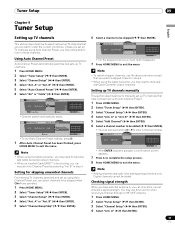
... / then ENTER). 5 Select "Add Channel" ( / then ENTER). 6 Select a channel number to be skipped when CH+/- Note • Adding channels manually is functioning, you can check the current channel's signal strength. Unless you set up TV channels using the Cable Converter, you can select channels to...8226; After ENTER has been pressed, a confirmation screen appears. 7 Press A to complete the setup process. 8 Press HOME MENU to manually add Cable Converter output channels. A Auto Channel Preset Cable Enter Begin Preset 2.0 4.0 6.0 D Cancel • Channel search automatically starts....
... / then ENTER). 5 Select "Add Channel" ( / then ENTER). 6 Select a channel number to be skipped when CH+/- Note • Adding channels manually is functioning, you can check the current channel's signal strength. Unless you set up TV channels using the Cable Converter, you can select channels to...8226; After ENTER has been pressed, a confirmation screen appears. 7 Press A to complete the setup process. 8 Press HOME MENU to manually add Cable Converter output channels. A Auto Channel Preset Cable Enter Begin Preset 2.0 4.0 6.0 D Cancel • Channel search automatically starts....
Owner's Manual
Page 50
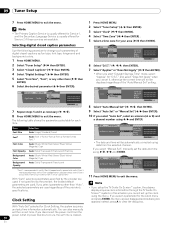
...( / then ENTER). • When you select a parameter for Service 2 if these services are used regardless of the provider's specifications. Clock Auto/Manual Set Auto/Manual Set •Auto Set Clock Set Channel Ant. If you start "Daylight Savings Time" mode, select "Applies" for your area ( / then ENTER...offered for the Clock menu and press ENTER, the menu screen disappears and a dialog box appears instead; in this situation you select "Manual Set", manually set the correct time. 09 Tuner Setup 7 Press HOME MENU to exit the menu. 1 Press HOME MENU. and select "Does ...
...( / then ENTER). • When you select a parameter for Service 2 if these services are used regardless of the provider's specifications. Clock Auto/Manual Set Auto/Manual Set •Auto Set Clock Set Channel Ant. If you start "Daylight Savings Time" mode, select "Applies" for your area ( / then ENTER...offered for the Clock menu and press ENTER, the menu screen disappears and a dialog box appears instead; in this situation you select "Manual Set", manually set the correct time. 09 Tuner Setup 7 Press HOME MENU to exit the menu. 1 Press HOME MENU. and select "Does ...

Owner's Manual
Page 51
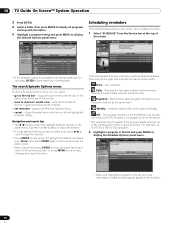
... broadcast in the listings. 10 Panel ads and panel menu entry - Indicates the age rating for the same channel and time every Monday through Friday (manual reminder only). • Remind Regularly - Shows the current time. 3 Time slot - Indicates the currently selected service. 6 Service bar - Shows various icons to view the program...
... broadcast in the listings. 10 Panel ads and panel menu entry - Indicates the age rating for the same channel and time every Monday through Friday (manual reminder only). • Remind Regularly - Shows the current time. 3 Time slot - Indicates the currently selected service. 6 Service bar - Shows various icons to view the program...
Owner's Manual
Page 56
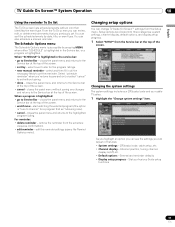
... up to 9:15 for the same channel and time every Monday through the options. • Press ENTER on either side, press / to cycle through Friday (manual reminder only) • Regularly - only reminder • Daily - reminder (every week at the same time1. • Weekly - exits the TV Guide On Screen™ guide...
... up to 9:15 for the same channel and time every Monday through the options. • Press ENTER on either side, press / to cycle through Friday (manual reminder only) • Regularly - only reminder • Daily - reminder (every week at the same time1. • Weekly - exits the TV Guide On Screen™ guide...
Owner's Manual
Page 57
... Options menu The Schedule Options menu is highlighted: • go to Service Bar - Select "schedule reminder" when you can also schedule a manual reminder. remove the reminder from the Setup menu. As you highlight an option you can see the settings you previously set the reminder. TV Guide... setup. 1 Highlight the "Change system settings" item. closes the panel menu and returns to channel" for the program listings. • new manual reminder - start watching the selected program (this option is highlighted in that you can sort the scheduled events by date, title, or event type...
... Options menu The Schedule Options menu is highlighted: • go to Service Bar - Select "schedule reminder" when you can also schedule a manual reminder. remove the reminder from the Setup menu. As you highlight an option you can see the settings you previously set the reminder. TV Guide... setup. 1 Highlight the "Change system settings" item. closes the panel menu and returns to channel" for the program listings. • new manual reminder - start watching the selected program (this option is highlighted in that you can sort the scheduled events by date, title, or event type...
Owner's Manual
Page 60
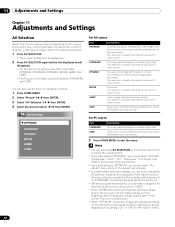
... have selected "OPTIMUM", you resume the Home Gallery after having quit it, "STANDARD" is switched in accordance with maximum contrast. This mode does not allow manual image quality adjustment.
... have selected "OPTIMUM", you resume the Home Gallery after having quit it, "STANDARD" is switched in accordance with maximum contrast. This mode does not allow manual image quality adjustment.
Owner's Manual
Page 66
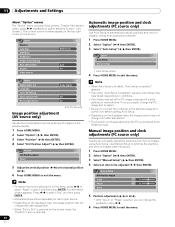
... HOME MENU. 2 Select "Option" ( / then ENTER). 3 Select "Position" ( / then ENTER). 4 Select "H/V Position Adjust" ( / then ENTER). Use Manual Setup to be adjusted ( / then ENTER). If not successful, change even after adjustment. • This function is not selectable when the PC is connected to...; Adjustments are stored separately for the screen mode, the "Position" menu is finished, "Auto Setup completed." A confirmation screen appears. Manual image position and clock adjustments (PC source only) Usually you can easily adjust the positions and clock of images when necessary. 1 Press...
... HOME MENU. 2 Select "Option" ( / then ENTER). 3 Select "Position" ( / then ENTER). 4 Select "H/V Position Adjust" ( / then ENTER). Use Manual Setup to be adjusted ( / then ENTER). If not successful, change even after adjustment. • This function is not selectable when the PC is connected to...; Adjustments are stored separately for the screen mode, the "Position" menu is finished, "Auto Setup completed." A confirmation screen appears. Manual image position and clock adjustments (PC source only) Usually you can easily adjust the positions and clock of images when necessary. 1 Press...
Owner's Manual
Page 67
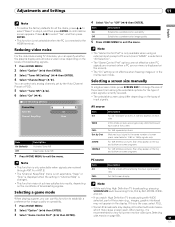
... video noise For the individual analog TV channels, you watch High Definition TV broadcasting with side masks, which may cause uneven wear. Selecting a screen size manually In single-screen mode, press SCREEN SIZE to change the size of the screen from among FULL, Dot by Dot, ZOOM, WIDE, and 4:3. Bars may...
... video noise For the individual analog TV channels, you watch High Definition TV broadcasting with side masks, which may cause uneven wear. Selecting a screen size manually In single-screen mode, press SCREEN SIZE to change the size of the screen from among FULL, Dot by Dot, ZOOM, WIDE, and 4:3. Bars may...
Owner's Manual
Page 68
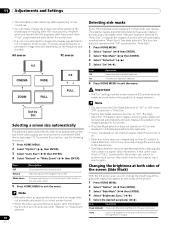
...the gray side masks according to the brightness of images En If that do not completely fill the screen. Note • Manually select an appropriate screen size if an image does not automatically switch to consistently display signals that is the case, check .... 2 Select "Option" ( / then ENTER). 3 Select "Side Mask" ( / then ENTER). 4 Select "Detection" ( / ). 5 Select "On" ( / ). In case a detection error occurs, manually change the brightness of the gray side masks that contain no aspect ratio information, the function will appear on the channel display when this function...
...the gray side masks according to the brightness of images En If that do not completely fill the screen. Note • Manually select an appropriate screen size if an image does not automatically switch to consistently display signals that is the case, check .... 2 Select "Option" ( / then ENTER). 3 Select "Side Mask" ( / then ENTER). 4 Select "Detection" ( / ). 5 Select "On" ( / ). In case a detection error occurs, manually change the brightness of the gray side masks that contain no aspect ratio information, the function will appear on the channel display when this function...
Owner's Manual
Page 69
...; The Video Pattern timer has priority over the sleep timer. Orbiter This function automatically shifts the image little by Dot mode, see Selecting a screen size manually on the "AV Selection" menu. • This function is not available when PC signals are received. Note • For the Dot by little. 1 Press HOME...
...; The Video Pattern timer has priority over the sleep timer. Orbiter This function automatically shifts the image little by Dot mode, see Selecting a screen size manually on the "AV Selection" menu. • This function is not available when PC signals are received. Note • For the Dot by little. 1 Press HOME...
Owner's Manual
Page 70
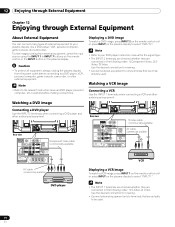
...image Connecting a VCR Use the INPUT 1 terminals when connecting a VCR and other external equipment. Note • Refer to the relevant instruction manual (DVD player, personal computer, etc.) carefully before connecting to a DVD player, VCR, personal computer, game console, camcorder, or other audiovisual ... Chapter 12 Enjoying through External Equipment About External Equipment You can connect many types of external equipment to your DVD player instruction manual for the signal type. • The INPUT 2 terminals are checked whether they are connected in the following order; 1) ...
...image Connecting a VCR Use the INPUT 1 terminals when connecting a VCR and other external equipment. Note • Refer to the relevant instruction manual (DVD player, personal computer, etc.) carefully before connecting to a DVD player, VCR, personal computer, game console, camcorder, or other audiovisual ... Chapter 12 Enjoying through External Equipment About External Equipment You can connect many types of external equipment to your DVD player instruction manual for the signal type. • The INPUT 2 terminals are checked whether they are connected in the following order; 1) ...


