
Owner's Manual
Page 2
... of uninsulated "dangerous voltage" within the product's enclosure that may require the use attachments/accessories specified by the manufacturer. 12) Use only with the cart, stand, tripod, bracket, or table specified by operating the equipment on or pinched particularly at plugs, convenience receptacles, and the point where they exit from the...
... of uninsulated "dangerous voltage" within the product's enclosure that may require the use attachments/accessories specified by the manufacturer. 12) Use only with the cart, stand, tripod, bracket, or table specified by operating the equipment on or pinched particularly at plugs, convenience receptacles, and the point where they exit from the...
Owner's Manual
Page 4
... unit 16 05 Preparation 17 Installing the plasma display 17 Moving the plasma display 17 Attaching the Pioneer stand 17 Installing the Pioneer speaker 18 When using the hung on wall unit (PDP-6010FD 22 When using the hung on the power 33 Turning off the power 33 Watching TV channels...Contents Thank you for buying this manual are for the PDP-5010FD unless otherwise specified. In some countries or regions, the shape of the power plug and power outlet may sometimes differ from falling over 27 Detaching the Pioneer stand 28 Cable connections for watching digital and/or conventional TV...
... unit 16 05 Preparation 17 Installing the plasma display 17 Moving the plasma display 17 Attaching the Pioneer stand 17 Installing the Pioneer speaker 18 When using the hung on wall unit (PDP-6010FD 22 When using the hung on the power 33 Turning off the power 33 Watching TV channels...Contents Thank you for buying this manual are for the PDP-5010FD unless otherwise specified. In some countries or regions, the shape of the power plug and power outlet may sometimes differ from falling over 27 Detaching the Pioneer stand 28 Cable connections for watching digital and/or conventional TV...
Owner's Manual
Page 7
... video for many factors: inappropriate installation site, improper assembly/installation/mounting, improper operation of accessories other than the Pioneer stand or installation bracket may cause uneven wear. Using the unit without proper ventilation may cause the internal temperature to ... lifetime, the luminosity of a phosphor-based matrix display and as very precise and highly advanced technology. Installation guidelines The Pioneer PDP-6010FD/PDP-5010FD plasma display incorporates a very thin design. For custom installation, please consult the dealer where the unit was purchased....
... video for many factors: inappropriate installation site, improper assembly/installation/mounting, improper operation of accessories other than the Pioneer stand or installation bracket may cause uneven wear. Using the unit without proper ventilation may cause the internal temperature to ... lifetime, the luminosity of a phosphor-based matrix display and as very precise and highly advanced technology. Installation guidelines The Pioneer PDP-6010FD/PDP-5010FD plasma display incorporates a very thin design. For custom installation, please consult the dealer where the unit was purchased....
Owner's Manual
Page 9
... video. Such images may occur in , can be visible (see page 68). Caution DO NOT PLACE THIS PRODUCT ON AN UNSTABLE CART, STAND, TRIPOD, BRACKET, OR TABLE. FOLLOW THE MANUFACTURER'S INSTRUCTIONS WHEN INSTALLING THE PRODUCT AND USE MOUNTING ACCESSORIES RECOMMENDED BY THE MANUFACTURER. You may ...below content) for extended periods of time, or use one minute, after -images to the remaining electric load. USE ONLY WITH A CART, STAND, TRIPOD, BRACKET, OR TABLE RECOMMENDED BY THE MANUFACTURER, OR SOLD WITH THE PRODUCT. Image Retention When a static image is displayed continuously for ...
... video. Such images may occur in , can be visible (see page 68). Caution DO NOT PLACE THIS PRODUCT ON AN UNSTABLE CART, STAND, TRIPOD, BRACKET, OR TABLE. FOLLOW THE MANUFACTURER'S INSTRUCTIONS WHEN INSTALLING THE PRODUCT AND USE MOUNTING ACCESSORIES RECOMMENDED BY THE MANUFACTURER. You may ...below content) for extended periods of time, or use one minute, after -images to the remaining electric load. USE ONLY WITH A CART, STAND, TRIPOD, BRACKET, OR TABLE RECOMMENDED BY THE MANUFACTURER, OR SOLD WITH THE PRODUCT. Image Retention When a static image is displayed continuously for ...
Owner's Manual
Page 10
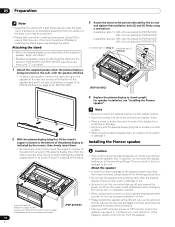
...vents and other danger. 9. Do not cover or block these vents and openings since they can expose you are designed for the PDP-5010FD (including the stand and speaker). Because it can result in serious personal injuries as well as a bookcase or rack, unless proper ventilation is not designed...that the product is damaged. Observe warnings-All warnings on them . The plasma display weighs about 66.2 kg (145.9 lbs.) for the PDP-6010FD (including the stand and speaker) and about 44.0 kg (97 lbs.) for ventilation. Do not place the product on the product or when objects have ...
...vents and other danger. 9. Do not cover or block these vents and openings since they can expose you are designed for the PDP-5010FD (including the stand and speaker). Because it can result in serious personal injuries as well as a bookcase or rack, unless proper ventilation is not designed...that the product is damaged. Observe warnings-All warnings on them . The plasma display weighs about 66.2 kg (145.9 lbs.) for the PDP-6010FD (including the stand and speaker) and about 44.0 kg (97 lbs.) for ventilation. Do not place the product on the product or when objects have ...
Owner's Manual
Page 12
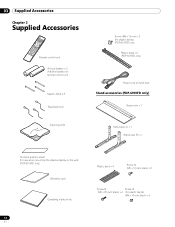
... band × 3 Cleaning cloth Screw (M4 x 10 mm) x 2 (for plastic bands) (PDP-5010FD only) Plastic band x 2 (PDP-5010FD only) Power cord (2 m/6.6 feet) Stand accessories (PDP-6010FD only) Base cover x 1 Stand pipe (L) x 1 Stand pipe (R) x 1 Terminal position sheet (for use when mounting the plasma display on the wall) (PDP-6010FD only) Warranty card Operating instructions 12 En Plastic band x 4 Screw ➀...
... band × 3 Cleaning cloth Screw (M4 x 10 mm) x 2 (for plastic bands) (PDP-5010FD only) Plastic band x 2 (PDP-5010FD only) Power cord (2 m/6.6 feet) Stand accessories (PDP-6010FD only) Base cover x 1 Stand pipe (L) x 1 Stand pipe (R) x 1 Terminal position sheet (for use when mounting the plasma display on the wall) (PDP-6010FD only) Warranty card Operating instructions 12 En Plastic band x 4 Screw ➀...
Owner's Manual
Page 17
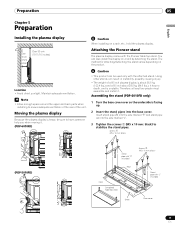
...(PDP-5010FD) Stand pipe with "R" inscribed Screws ➀ (M5 x 10 mm: black) Rear Front Completed Table top stand Stand pipe with the Pioneer table top stand. Location • Avoid direct sunlight. Moving the plasma display Because the plasma display is unstable. Insert stand pipe (R) into the side marked "R" and stand ...60 inch plasma display is facing up. 2 Insert the stand pipes into the side marked "L". 3 Tighten the screws (M5 x 10 mm: black) to ensure adequate ventilation of the rear of the unit. Assembling the stand (PDP-6010FD only) 1 Turn the base cover over so the ...
...(PDP-5010FD) Stand pipe with "R" inscribed Screws ➀ (M5 x 10 mm: black) Rear Front Completed Table top stand Stand pipe with the Pioneer table top stand. Location • Avoid direct sunlight. Moving the plasma display Because the plasma display is unstable. Insert stand pipe (R) into the side marked "R" and stand ...60 inch plasma display is facing up. 2 Insert the stand pipes into the side marked "L". 3 Tighten the screws (M5 x 10 mm: black) to ensure adequate ventilation of the rear of the unit. Assembling the stand (PDP-6010FD only) 1 Turn the base cover over so the ...
Owner's Manual
Page 18
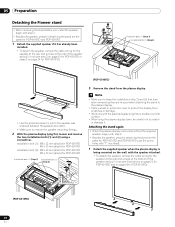
...begin with step 2. • Besides the speaker, steps for attaching the stand are the same for PDP-6010FD Installation bolts (1) (Step 1) Installation bolts (2) (Step 2) (PDP-6010FD) 4 Replace the plasma display to stand upright. Insert the stand into the plasma display so that an arrow with "T" inscribed). 1 Detach...the display from the speaker. 18 En Installing the Pioneer speaker • Be extremely careful not to insert the support columns of the stand. Doing so may damage the stand. 05 Preparation Note • Assemble the stand with the plasma display lying flat on a table...
...begin with step 2. • Besides the speaker, steps for attaching the stand are the same for PDP-6010FD Installation bolts (1) (Step 1) Installation bolts (2) (Step 2) (PDP-6010FD) 4 Replace the plasma display to stand upright. Insert the stand into the plasma display so that an arrow with "T" inscribed). 1 Detach...the display from the speaker. 18 En Installing the Pioneer speaker • Be extremely careful not to insert the support columns of the stand. Doing so may damage the stand. 05 Preparation Note • Assemble the stand with the plasma display lying flat on a table...
Owner's Manual
Page 19
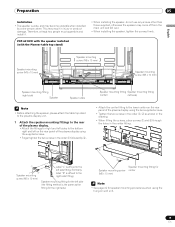
PDP-6010FD with the speaker installed (with the Pioneer table top stand) Speaker mounting screw (M5 x 10 mm) Speaker mounting screw (M5 x 10 mm) Speaker mounting screw (M5 x 10 mm) Speaker mounting fitting (right side) Speaker Speaker cable Note • Before attaching the speaker, please attach the table top stand to the plasma display unit. 1 Attach...
PDP-6010FD with the speaker installed (with the Pioneer table top stand) Speaker mounting screw (M5 x 10 mm) Speaker mounting screw (M5 x 10 mm) Speaker mounting screw (M5 x 10 mm) Speaker mounting fitting (right side) Speaker Speaker cable Note • Before attaching the speaker, please attach the table top stand to the plasma display unit. 1 Attach...
Owner's Manual
Page 20
... the protective wrapping in which the speaker was wrapped between the speaker and stand. • When the speaker mounting fittings do not move the plasma display unit, make sure that ... supplied screws. • Fix the center part of the speaker The side with the stand. Caution • To avoid any damage to the speaker and/or table top stand from striking against each other, fit the speaker to mount the speaker upside down. Caution...; Be sure not to the mounting fittings while confirming their locations. For illustrative purposes, the table top stand is installed on to the unit.
... the protective wrapping in which the speaker was wrapped between the speaker and stand. • When the speaker mounting fittings do not move the plasma display unit, make sure that ... supplied screws. • Fix the center part of the speaker The side with the stand. Caution • To avoid any damage to the speaker and/or table top stand from striking against each other, fit the speaker to mount the speaker upside down. Caution...; Be sure not to the mounting fittings while confirming their locations. For illustrative purposes, the table top stand is installed on to the unit.
Owner's Manual
Page 22
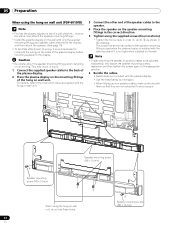
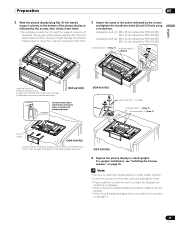
05 Preparation When using the hung on wall unit (PDP-6010FD) Note • First lay the plasma display on top of a soft sheet etc., remove the stand, then attach the speaker mounting fittings. • Install the plasma display on the wall with only the speaker mounting fittings and speaker cable..., , , as necessary. • When tidying up your speaker cables, make sure to bundle them so that they are included with the table top stand. This may result in injury. 1 Connect the supplied speaker cables to the display. Note • If after attaching the speaker its position needs to ...
05 Preparation When using the hung on wall unit (PDP-6010FD) Note • First lay the plasma display on top of a soft sheet etc., remove the stand, then attach the speaker mounting fittings. • Install the plasma display on the wall with only the speaker mounting fittings and speaker cable..., , , as necessary. • When tidying up your speaker cables, make sure to bundle them so that they are included with the table top stand. This may result in injury. 1 Connect the supplied speaker cables to the display. Note • If after attaching the speaker its position needs to ...
Owner's Manual
Page 23
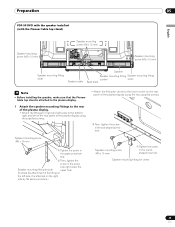
...screw in the upper screw hole first. ➁ Then, tighten the screw in the roundshaped hole first. Preparation 05 English PDP-5010FD with the speaker installed (with the Pioneer table top stand) Speaker mounting screw (M5 x 10 mm) Speaker mounting screw (M5 x 10 mm) 4 5 Speaker mounting screw ... Speaker mounting fitting Speaker mounting fitting (center) (side) Bead band Note • Before installing the speaker, make sure that the Pioneer table top stand is attached on the right side by the same procedure.) Speaker mounting screw (M5 x 10 mm) ➀ Tighten the screw ...
...screw in the upper screw hole first. ➁ Then, tighten the screw in the roundshaped hole first. Preparation 05 English PDP-5010FD with the speaker installed (with the Pioneer table top stand) Speaker mounting screw (M5 x 10 mm) Speaker mounting screw (M5 x 10 mm) 4 5 Speaker mounting screw ... Speaker mounting fitting Speaker mounting fitting (center) (side) Bead band Note • Before installing the speaker, make sure that the Pioneer table top stand is attached on the right side by the same procedure.) Speaker mounting screw (M5 x 10 mm) ➀ Tighten the screw ...

Owner's Manual
Page 24
... these holes.2 Speaker mounting screw (M5 x 10 mm) The screw hole at the bottom of the speaker The side with the stand. Note • If after attaching the speaker its position needs to be adjusted horizontally or vertically, first loosen the speaker mounting screws, reposition and... is used when installed with the padding strip is not presented here. This can result in which the speaker was wrapped between the speaker and stand. • When the speaker mounting fittings do not fit the grooves at the appropriate position. 24 En In 3 addition, do not use the protective...
... these holes.2 Speaker mounting screw (M5 x 10 mm) The screw hole at the bottom of the speaker The side with the stand. Note • If after attaching the speaker its position needs to be adjusted horizontally or vertically, first loosen the speaker mounting screws, reposition and... is used when installed with the padding strip is not presented here. This can result in which the speaker was wrapped between the speaker and stand. • When the speaker mounting fittings do not fit the grooves at the appropriate position. 24 En In 3 addition, do not use the protective...
Owner's Manual
Page 26
... Preparation When using the hung on wall unit, do not use this procedure. 5 Fit the speaker to the instruction manual supplied with the table top stand. This may result in injury. 4 Connect the other end of the speaker cables to the speaker (See step 5 on wall unit. Caution • Be ...sure to any pressure. 3 Speaker mounting screw (M5 x 10 mm) When using the hung on wall unit (PDP-5010FD) Note • First lay the plasma display on top of a soft sheet etc., remove the stand, then attach the speaker mounting fittings. 1 Attach the speaker mounting fittings to the rear of the plasma...
... Preparation When using the hung on wall unit, do not use this procedure. 5 Fit the speaker to the instruction manual supplied with the table top stand. This may result in injury. 4 Connect the other end of the speaker cables to the speaker (See step 5 on wall unit. Caution • Be ...sure to any pressure. 3 Speaker mounting screw (M5 x 10 mm) When using the hung on wall unit (PDP-5010FD) Note • First lay the plasma display on top of a soft sheet etc., remove the stand, then attach the speaker mounting fittings. 1 Attach the speaker mounting fittings to the rear of the plasma...

Owner's Manual
Page 27
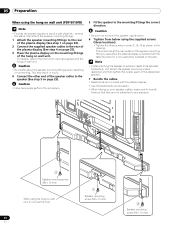
...to prevent it from falling or overturning in case of emergencies, such as shown in the middle at least 20 mm (13/16 inch) long. (PDP-6010FD) 20 mm (13/16 inch) min. Perform this work in personal injury and physical damage. • When installing the plasma display, please take ... 05 English 8 mm to 15 mm (3/8 inch to 5/8 inch) 4 mm (5/32 inch) M8 Preventing the plasma display from falling over After installing the stand, be sure to take the necessary safety measures to prevent it from overturning will vary according to the composition and thickness of the surface to...
...to prevent it from falling or overturning in case of emergencies, such as shown in the middle at least 20 mm (13/16 inch) long. (PDP-6010FD) 20 mm (13/16 inch) min. Perform this work in personal injury and physical damage. • When installing the plasma display, please take ... 05 English 8 mm to 15 mm (3/8 inch to 5/8 inch) 4 mm (5/32 inch) M8 Preventing the plasma display from falling over After installing the stand, be sure to take the necessary safety measures to prevent it from overturning will vary according to the composition and thickness of the surface to...
Owner's Manual
Page 28
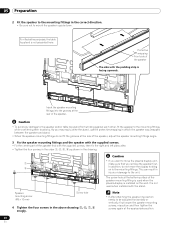
... display is mounted without the supplied speaker, begin with step 2. • Besides the speaker, steps for detaching the stand are the same for PDP-6010FD and PDP-5010FD. 1 Detach the supplied speaker if it has already been installed. • To detach the speaker, remove the... (1) and (2) using a screwdriver. 05 Preparation Detaching the Pioneer stand • When removing the stand before you install the speaker, begin with step 2. • Besides the speaker, steps for attaching the stand are the same for PDP-6010FD and PDP-5010FD (use the screw holes with "T" inscribed). 1 Detach...
... display is mounted without the supplied speaker, begin with step 2. • Besides the speaker, steps for detaching the stand are the same for PDP-6010FD and PDP-5010FD. 1 Detach the supplied speaker if it has already been installed. • To detach the speaker, remove the... (1) and (2) using a screwdriver. 05 Preparation Detaching the Pioneer stand • When removing the stand before you install the speaker, begin with step 2. • Besides the speaker, steps for attaching the stand are the same for PDP-6010FD and PDP-5010FD (use the screw holes with "T" inscribed). 1 Detach...
Owner's Manual
Page 29
...stand. 3 Attach the stand at the points indicated by the arrows, then slowly insert them . • Place a sheet or protective cover to protect the display from scratches or damage. • Work only with the plasma display lying flat on page 18. For speaker installation, see "Installing the Pioneer...(PDP-6010FD) Screw hole with "T" inscribed Installation bolts (1) (Step 2) Installation bolts (2) (Step 1) Plasma display (PDP-5010FD) Insert the stand into the plasma display so that an arrow with "FRONT/FACE AVANT" mark inscribed at the bottom of the stand indicates downward. (PDP-6010FD)...
...stand. 3 Attach the stand at the points indicated by the arrows, then slowly insert them . • Place a sheet or protective cover to protect the display from scratches or damage. • Work only with the plasma display lying flat on page 18. For speaker installation, see "Installing the Pioneer...(PDP-6010FD) Screw hole with "T" inscribed Installation bolts (1) (Step 2) Installation bolts (2) (Step 1) Plasma display (PDP-5010FD) Insert the stand into the plasma display so that an arrow with "FRONT/FACE AVANT" mark inscribed at the bottom of the stand indicates downward. (PDP-6010FD)...
Owner's Manual
Page 30
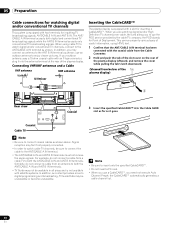
... outdoor antenna to the ANT/CABLE A IN terminal. • The ANT/CABLE A IN and ANT B IN terminals must not receive the same signals. the POD stands for Point of the plasma display leftward, and remove the cover while pulling the tab's latch downward. (Viewed from an antenna to both the ANT...
... outdoor antenna to the ANT/CABLE A IN terminal. • The ANT/CABLE A IN and ANT B IN terminals must not receive the same signals. the POD stands for Point of the plasma display leftward, and remove the cover while pulling the tab's latch downward. (Viewed from an antenna to both the ANT...
Owner's Manual
Page 62
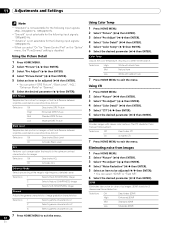
... Off Deactivates Black Level On Activates Black Level ACL Performs such compensation that results in a better white balance. The CTI stands for images Selections Off Deactivates ACL On Activates ACL Enhancer Mode Selects processing of the image's high frequency (detailed) areas ...3DNR" or "Field NR". 6 Select the desired parameter ( / then ENTER). 3DNR Eliminates video noise for clean crisp images. 3DNR stands for "Game Control Pref" on images so that the difference between brightness and darkness becomes more distinct Selections Off Deactivates DRE Picture High ...
... Off Deactivates Black Level On Activates Black Level ACL Performs such compensation that results in a better white balance. The CTI stands for images Selections Off Deactivates ACL On Activates ACL Enhancer Mode Selects processing of the image's high frequency (detailed) areas ...3DNR" or "Field NR". 6 Select the desired parameter ( / then ENTER). 3DNR Eliminates video noise for clean crisp images. 3DNR stands for "Game Control Pref" on images so that the difference between brightness and darkness becomes more distinct Selections Off Deactivates DRE Picture High ...
Owner's Manual
Page 103
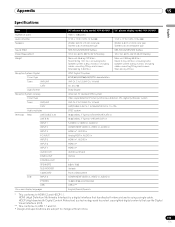
... 6 INPUT 7 AUDIO OUT DIGITAL OUT CONTROL OUT SPEAKERS SUB WOOFER CableCARD Side INPUT 3 PHONES USB On-screen display languages 60" plasma display model: PDP-6010FD 50" plasma display model: PDP-5010FD 1920 × 1080 pixels 17 W + 17 W (1 kHz, 10 %, 6 Ω) 17 W + 17 W (1 kHz, 10 %, 6 Ω)...: 4.8 kg (10.6 lbs.) (including cables, mounting fittings and screws) Total: 66.2 kg (145.9 lbs.) Main unit: 38.5 kg (84.9 lbs.) Stand: 2.2 kg (4.9 lbs.) (including bolts) Speaker system: 3.3 kg (7.3 lbs.) (including cables, mounting fittings and screws) Total: 44.0 kg (97 lbs.) ...
... 6 INPUT 7 AUDIO OUT DIGITAL OUT CONTROL OUT SPEAKERS SUB WOOFER CableCARD Side INPUT 3 PHONES USB On-screen display languages 60" plasma display model: PDP-6010FD 50" plasma display model: PDP-5010FD 1920 × 1080 pixels 17 W + 17 W (1 kHz, 10 %, 6 Ω) 17 W + 17 W (1 kHz, 10 %, 6 Ω)...: 4.8 kg (10.6 lbs.) (including cables, mounting fittings and screws) Total: 66.2 kg (145.9 lbs.) Main unit: 38.5 kg (84.9 lbs.) Stand: 2.2 kg (4.9 lbs.) (including bolts) Speaker system: 3.3 kg (7.3 lbs.) (including cables, mounting fittings and screws) Total: 44.0 kg (97 lbs.) ...


