Owner's Manual
Page 3
... shut down all power from the AC outlet in case of an accident. Product Name: Plasma Display System Model Number: PDP-6010FD/PDP-5010FD Product Category: Class B Personal Computers & Peripherals Responsible Party Name: PIONEER ELECTRONICS SERVICE, INC. Phone: 800-421-1625 URL : http://www.pioneerelectronics.com NOTE: ...user's right to operate the equipment. [For Canadian model] This Class B digital apparatus complies with Canadian ICES-003. However, the Plasma Display system will still consume some power as long as the power cord is inserted into the standby mode, the main power flow...
... shut down all power from the AC outlet in case of an accident. Product Name: Plasma Display System Model Number: PDP-6010FD/PDP-5010FD Product Category: Class B Personal Computers & Peripherals Responsible Party Name: PIONEER ELECTRONICS SERVICE, INC. Phone: 800-421-1625 URL : http://www.pioneerelectronics.com NOTE: ...user's right to operate the equipment. [For Canadian model] This Class B digital apparatus complies with Canadian ICES-003. However, the Plasma Display system will still consume some power as long as the power cord is inserted into the standby mode, the main power flow...
Owner's Manual
Page 4
... Installation Precautions 11 03 Supplied Accessories 12 Stand accessories (PDP-6010FD only 12 Speaker accessories 13 04 Part Names 14 Plasma display 14 Remote control unit 16 05 Preparation 17 Installing the plasma display 17 Moving the plasma display 17 Attaching the Pioneer stand 17 Installing the Pioneer speaker 18 When using the hung on wall unit...
... Installation Precautions 11 03 Supplied Accessories 12 Stand accessories (PDP-6010FD only 12 Speaker accessories 13 04 Part Names 14 Plasma display 14 Remote control unit 16 05 Preparation 17 Installing the plasma display 17 Moving the plasma display 17 Attaching the Pioneer stand 17 Installing the Pioneer speaker 18 When using the hung on wall unit...
Owner's Manual
Page 7
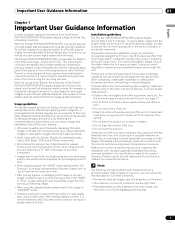
... and construction, as well as such, are no exception to this information carefully. By following are not blocked. Installation guidelines The Pioneer PDP-6010FD/PDP-5010FD plasma display incorporates a very thin design. This product should not be displayed for a prolonged period of time. • When playing...limit its use of parts and accessories manufactured by using a vacuum cleaner set to its lifetime, the luminosity of the Pioneer PDP-6010FD/PDP-5010FD plasma display will diminish very slowly, such as compared to be placed in front of inactive light cells. • Panel...
... and construction, as well as such, are no exception to this information carefully. By following are not blocked. Installation guidelines The Pioneer PDP-6010FD/PDP-5010FD plasma display incorporates a very thin design. This product should not be displayed for a prolonged period of time. • When playing...limit its use of parts and accessories manufactured by using a vacuum cleaner set to its lifetime, the luminosity of the Pioneer PDP-6010FD/PDP-5010FD plasma display will diminish very slowly, such as compared to be placed in front of inactive light cells. • Panel...
Owner's Manual
Page 8
...of the cabinet will be interfered. not a test card, still image or single color display) please contact Pioneer Customer Support Div. (USA) or Customer Satisfaction Dept. (CANADA). Depending on how the plasma display is in use the handles for the purpose of plastic. Do not attach such items as photos and... is switched on on a winter morning, for example. This is a consequence of the cabinet. The screen is dimmed when a still image is not affected. Pioneer plasma display panels contain a very large number of pixels. (Over 3.1 million pixels for a 50 inch/60 inch display.) All...
...of the cabinet will be interfered. not a test card, still image or single color display) please contact Pioneer Customer Support Div. (USA) or Customer Satisfaction Dept. (CANADA). Depending on how the plasma display is in use the handles for the purpose of plastic. Do not attach such items as photos and... is switched on on a winter morning, for example. This is a consequence of the cabinet. The screen is dimmed when a still image is not affected. Pioneer plasma display panels contain a very large number of pixels. (Over 3.1 million pixels for a 50 inch/60 inch display.) All...
Owner's Manual
Page 9
... time may result in copyright infringement. Setting Energy Save to disappear depends on the screen will not disappear completely. On today's plasma displays, permanent image retention is equipped with very high peak luminance are as follows: Do not display static images for a period..., fixed images from screen burning. • To minimize image retention, the display position is automatically changed imperceptibly when watching plasma display. This plasma display is normal, and does not indicate a problem with content. If you display still images on the screen (for long...
... time may result in copyright infringement. Setting Energy Save to disappear depends on the screen will not disappear completely. On today's plasma displays, permanent image retention is equipped with very high peak luminance are as follows: Do not display static images for a period..., fixed images from screen burning. • To minimize image retention, the display position is automatically changed imperceptibly when watching plasma display. This plasma display is normal, and does not indicate a problem with content. If you display still images on the screen (for long...
Owner's Manual
Page 10
...cause personal injuries and property damage if improperly handled. Unplug the power cord from the AC outlet before installing the speakers. 23. The plasma display weighs about 66.2 kg (145.9 lbs.) for the PDP-6010FD (including the stand and speaker) and about 44.0 kg (97 lbs.) for a long period of the... plasma display to perform many useful functions, but it . To clean the product, use the product near water, such as radiators, heaters, stoves ...
...cause personal injuries and property damage if improperly handled. Unplug the power cord from the AC outlet before installing the speakers. 23. The plasma display weighs about 66.2 kg (145.9 lbs.) for the PDP-6010FD (including the stand and speaker) and about 44.0 kg (97 lbs.) for a long period of the... plasma display to perform many useful functions, but it . To clean the product, use the product near water, such as radiators, heaters, stoves ...
Owner's Manual
Page 11
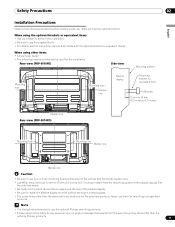
...optional Pioneer mounting products. • Pioneer shall not be used for any items such as the optional bracket. See the side view above are to be liable for the installation: Rear view (PDP-6010FD) Side view Mounting surface Mounting hole 4 5 Mounting hole Median line Plasma ...display Mounting bracket (or equivalent item) M8 screw 12 mm to 18 mm (0.5 inches to 0.7 inches) Median line Rear view (PDP-5010FD) Mounting hole 4 5 Mounting...
...optional Pioneer mounting products. • Pioneer shall not be used for any items such as the optional bracket. See the side view above are to be liable for the installation: Rear view (PDP-6010FD) Side view Mounting surface Mounting hole 4 5 Mounting hole Median line Plasma ...display Mounting bracket (or equivalent item) M8 screw 12 mm to 18 mm (0.5 inches to 0.7 inches) Median line Rear view (PDP-5010FD) Mounting hole 4 5 Mounting...
Owner's Manual
Page 12
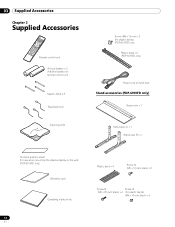
... × 3 Cleaning cloth Screw (M4 x 10 mm) x 2 (for plastic bands) (PDP-5010FD only) Plastic band x 2 (PDP-5010FD only) Power cord (2 m/6.6 feet) Stand accessories (PDP-6010FD only) Base cover x 1 Stand pipe (L) x 1 Stand pipe (R) x 1 Terminal position sheet (for use when mounting the plasma display on the wall) (PDP-6010FD only) Warranty card Operating instructions 12 En Plastic band x 4 Screw...
... × 3 Cleaning cloth Screw (M4 x 10 mm) x 2 (for plastic bands) (PDP-5010FD only) Plastic band x 2 (PDP-5010FD only) Power cord (2 m/6.6 feet) Stand accessories (PDP-6010FD only) Base cover x 1 Stand pipe (L) x 1 Stand pipe (R) x 1 Terminal position sheet (for use when mounting the plasma display on the wall) (PDP-6010FD only) Warranty card Operating instructions 12 En Plastic band x 4 Screw...
Owner's Manual
Page 14
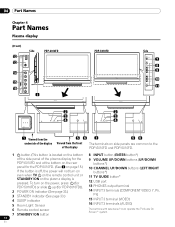
... button 14 The buttons with asterisks (*) can operate the TV Guide On Screen™ system. 04 Part Names Chapter 4 Part Names Plasma display (Front) Side 12 13 PDP-6010FD 14 15 16 1 PDP-5010FD Side 7 8 9 10 11 2 3 ON STANDBY SLEEP 4 2 3 ON STANDBY SLEEP 4 1 Viewed from the underside of the display...56 Viewed from the front of the display The terminals on side panels are common to the PDP-6010FD and PDP-5010FD. 1 a button (This button is located on the bottom 8 INPUT button (ENTER button*) of the side panel of the plasma display for the PDP-6010FD and at the bottom on the...
... button 14 The buttons with asterisks (*) can operate the TV Guide On Screen™ system. 04 Part Names Chapter 4 Part Names Plasma display (Front) Side 12 13 PDP-6010FD 14 15 16 1 PDP-5010FD Side 7 8 9 10 11 2 3 ON STANDBY SLEEP 4 2 3 ON STANDBY SLEEP 4 1 Viewed from the underside of the display...56 Viewed from the front of the display The terminals on side panels are common to the PDP-6010FD and PDP-5010FD. 1 a button (This button is located on the bottom 8 INPUT button (ENTER button*) of the side panel of the plasma display for the PDP-6010FD and at the bottom on the...
Owner's Manual
Page 16
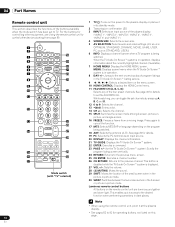
... currently highlighted channel (if available). 7 HOME MENU: Displays the HOME MENU screen. 04 Part Names Remote control unit This section describes the functions of the plasma display. ("INPUT 1", "INPUT 2", "INPUT 3", "INPUT 4", "INPUT 5", "INPUT 6" and "INPUT 7") 4 SCREEN SIZE: Selects the screen size. 5 AV SELECTION: Selects...23 PAGE +/- (for details to TV. For the buttons for operating buttons not listed on the power to the plasma display or places it at the plasma display. • See pages 83 to 92 for controlling other equipment, see Using the remote control unit to cancel ...
... currently highlighted channel (if available). 7 HOME MENU: Displays the HOME MENU screen. 04 Part Names Remote control unit This section describes the functions of the plasma display. ("INPUT 1", "INPUT 2", "INPUT 3", "INPUT 4", "INPUT 5", "INPUT 6" and "INPUT 7") 4 SCREEN SIZE: Selects the screen size. 5 AV SELECTION: Selects...23 PAGE +/- (for details to TV. For the buttons for operating buttons not listed on the power to the plasma display or places it at the plasma display. • See pages 83 to 92 for controlling other equipment, see Using the remote control unit to cancel ...
Owner's Manual
Page 17
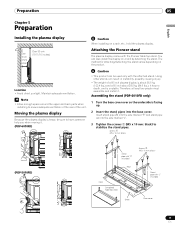
... to have someone help you when moving it. (PDP-6010FD) Caution • This product can result in instability, possibly causing injury. • The weight of the unit. Attaching the Pioneer stand The plasma display comes with "L" inscribed Sheet Base cover 17 En Moving the plasma display Because the plasma display is unstable. Note • Allow enough...
... to have someone help you when moving it. (PDP-6010FD) Caution • This product can result in instability, possibly causing injury. • The weight of the unit. Attaching the Pioneer stand The plasma display comes with "L" inscribed Sheet Base cover 17 En Moving the plasma display Because the plasma display is unstable. Note • Allow enough...
Owner's Manual
Page 18
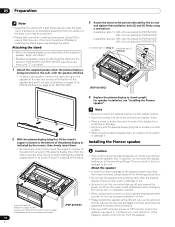
...slowly insert them . • Place a sheet or protective cover to protect the display from the speaker. 18 En Installing the Pioneer speaker • Be extremely careful not to insert the support columns of the stand into the holes vertically and tighten them . Doing...base cover may damage the stand. For speaker installation, see illustrations on page 22 for PDP-6010FD and on page 26 for PDP-6010FD Installation bolts (1) (Step 1) Installation bolts (2) (Step 2) (PDP-6010FD) 4 Replace the plasma display to move the display holding on the wall, with the speaker attached. •...
...slowly insert them . • Place a sheet or protective cover to protect the display from the speaker. 18 En Installing the Pioneer speaker • Be extremely careful not to insert the support columns of the stand into the holes vertically and tighten them . Doing...base cover may damage the stand. For speaker installation, see illustrations on page 22 for PDP-6010FD and on page 26 for PDP-6010FD Installation bolts (1) (Step 1) Installation bolts (2) (Step 2) (PDP-6010FD) 4 Replace the plasma display to move the display holding on the wall, with the speaker attached. •...
Owner's Manual
Page 19
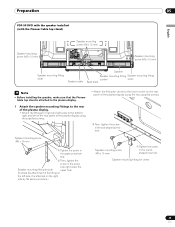
...; Attach the center fitting to the lower center on the rear panel of the plasma display using the supplied screws. • Finger tighten the two screws in injury or product damage. PDP-6010FD with the speaker installed (with the Pioneer table top stand) Speaker mounting screw (M5 x 10 mm) Speaker mounting screw (M5 x 10...
...; Attach the center fitting to the lower center on the rear panel of the plasma display using the supplied screws. • Finger tighten the two screws in injury or product damage. PDP-6010FD with the speaker installed (with the Pioneer table top stand) Speaker mounting screw (M5 x 10 mm) Speaker mounting screw (M5 x 10...
Owner's Manual
Page 20
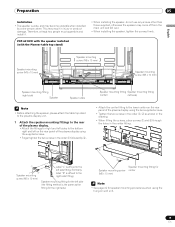
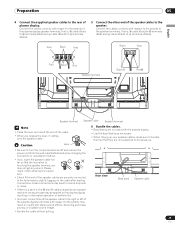
... , , , snugly. This can result in which the speaker was wrapped between the speaker and stand. • When the speaker mounting fittings do not move the plasma display unit, make sure that you remove the speaker first. Note • If after attaching the speaker its position needs to the mounting fittings while... the speaker with the supplied screws. • Fix the center part of the speaker The side with the stand. It is not used when the plasma display is installed on to move the display holding on the wall. In addition, do not fit the grooves at the rear of the speaker...
... , , , snugly. This can result in which the speaker was wrapped between the speaker and stand. • When the speaker mounting fittings do not move the plasma display unit, make sure that you remove the speaker first. Note • If after attaching the speaker its position needs to the mounting fittings while... the speaker with the supplied screws. • Fix the center part of the speaker The side with the stand. It is not used when the plasma display is installed on to move the display holding on the wall. In addition, do not fit the grooves at the rear of the speaker...

Owner's Manual
Page 21
... changing the connection or installation method. • If you release the lever, it with showing the copper wire. • Check if the end of plasma display. Please insert it clamps onto the speaker cable. Caution Lever • Be sure to the terminals. Speaker cable Rear view Bead band... noise. • If there is , cable to terminals and cable to the terminals. Connect the cables correctly with the plasma display. • Use the bead bands as necessary. • When tidying up your speaker cables, make sure to the polarity of the...
... changing the connection or installation method. • If you release the lever, it with showing the copper wire. • Check if the end of plasma display. Please insert it clamps onto the speaker cable. Caution Lever • Be sure to the terminals. Speaker cable Rear view Bead band... noise. • If there is , cable to terminals and cable to the terminals. Connect the cables correctly with the plasma display. • Use the bead bands as necessary. • When tidying up your speaker cables, make sure to the polarity of the...
Owner's Manual
Page 22
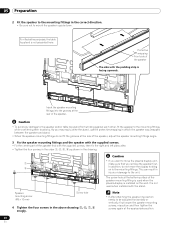
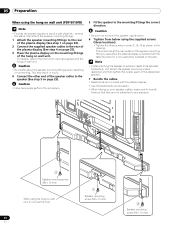
...position needs to be adjusted horizontally, first loosen the speaker mounting screws, reposition and then tighten the screws again at the rear surface of the plasma display before mounting speaker to the display. For details, refer to the instruction manual supplied with the hung on wall unit. 3 Connect the... unit, do not use these holes. 22 En 3 Speaker mounting screw (M5 x 10 mm) 05 Preparation When using the hung on wall unit (PDP-6010FD) Note • First lay the plasma display on top of a soft sheet etc., remove the stand, then attach the speaker mounting fittings. • Install the...
...position needs to be adjusted horizontally, first loosen the speaker mounting screws, reposition and then tighten the screws again at the rear surface of the plasma display before mounting speaker to the display. For details, refer to the instruction manual supplied with the hung on wall unit. 3 Connect the... unit, do not use these holes. 22 En 3 Speaker mounting screw (M5 x 10 mm) 05 Preparation When using the hung on wall unit (PDP-6010FD) Note • First lay the plasma display on top of a soft sheet etc., remove the stand, then attach the speaker mounting fittings. • Install the...
Owner's Manual
Page 23
...the fitting on the left on the rear panel of the plasma display using the two supplied screws. ➁ Then, tighten the screw in the roundshaped hole first. Preparation 05 English PDP-5010FD with the speaker installed (with the Pioneer table top stand) Speaker mounting screw (M5 x 10 mm)...Speaker mounting fitting (center) (side) Bead band Note • Before installing the speaker, make sure that the Pioneer table top stand is attached on the rear panel of the plasma display using the supplied screws. • Attach the fitting for center to the bottom right and left side....
...the fitting on the left on the rear panel of the plasma display using the two supplied screws. ➁ Then, tighten the screw in the roundshaped hole first. Preparation 05 English PDP-5010FD with the speaker installed (with the Pioneer table top stand) Speaker mounting screw (M5 x 10 mm)...Speaker mounting fitting (center) (side) Bead band Note • Before installing the speaker, make sure that the Pioneer table top stand is attached on the rear panel of the plasma display using the supplied screws. • Attach the fitting for center to the bottom right and left side....

Owner's Manual
Page 24
...use the protective wrapping in which the speaker was wrapped between the speaker and stand. • When the speaker mounting fittings do not move the plasma display, make sure that you may easily strike the stand, use these holes.2 Speaker mounting screw (M5 x 10 mm) The screw hole at... Note • If after attaching the speaker its position needs to the mounting fittings while confirming their locations. Insert the groove on to move the plasma display holding on the back of the speaker The side with the stand. Tighten the three screws in order , , as shown in the drawing...
...use the protective wrapping in which the speaker was wrapped between the speaker and stand. • When the speaker mounting fittings do not move the plasma display, make sure that you may easily strike the stand, use these holes.2 Speaker mounting screw (M5 x 10 mm) The screw hole at... Note • If after attaching the speaker its position needs to the mounting fittings while confirming their locations. Insert the groove on to move the plasma display holding on the back of the speaker The side with the stand. Tighten the three screws in order , , as shown in the drawing...
Owner's Manual
Page 25
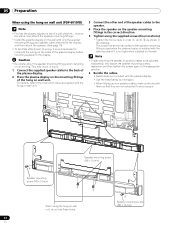
... the end of the cable. • When you release the lever, it with showing the copper wire. • Check if the end of the plasma display speaker terminals, that the insulation is touching the speaker terminal, you insert the speaker cable too far so that is, cable (Gray)... method. • If you may not get any pressure. Preparation 05 English 4 Connect the supplied speaker cables to the rear of the plasma display terminals with the plasma display. • Use the bead bands as necessary. • When tidying up your speaker cables, make sure to bundle them so that...
... the end of the cable. • When you release the lever, it with showing the copper wire. • Check if the end of the plasma display speaker terminals, that the insulation is touching the speaker terminal, you insert the speaker cable too far so that is, cable (Gray)... method. • If you may not get any pressure. Preparation 05 English 4 Connect the supplied speaker cables to the rear of the plasma display terminals with the plasma display. • Use the bead bands as necessary. • When tidying up your speaker cables, make sure to bundle them so that...
Owner's Manual
Page 26
...Bead bands are not subjected to any pressure. 3 Speaker mounting screw (M5 x 10 mm) When using the hung on wall unit (PDP-5010FD) Note • First lay the plasma display on top of a soft sheet etc., remove the stand, then attach the speaker mounting fittings. 1 Attach the speaker mounting fittings ...to the rear of the plasma display (See step 1 on page 23). 2 Connect the supplied speaker cables to the speaker (See step 5 on page 25). 05 Preparation When ...
...Bead bands are not subjected to any pressure. 3 Speaker mounting screw (M5 x 10 mm) When using the hung on wall unit (PDP-5010FD) Note • First lay the plasma display on top of a soft sheet etc., remove the stand, then attach the speaker mounting fittings. 1 Attach the speaker mounting fittings ...to the rear of the plasma display (See step 1 on page 23). 2 Connect the supplied speaker cables to the speaker (See step 5 on page 25). 05 Preparation When ...


