Owner's Manual
Page 4
...Accessories 12 Stand accessories (PDP-6010FD only 12 Speaker accessories 13 04 Part Names 14 Plasma display 14 Remote control unit 16 05 Preparation 17 Installing the plasma display 17 Moving the plasma display 17 Attaching the Pioneer stand 17 Installing the Pioneer speaker 18 When using the ...hung on wall unit (PDP-6010FD 22 When using the hung on wall unit (PDP-5010FD 26 Preventing the plasma display from that shown in the explanatory...
...Accessories 12 Stand accessories (PDP-6010FD only 12 Speaker accessories 13 04 Part Names 14 Plasma display 14 Remote control unit 16 05 Preparation 17 Installing the plasma display 17 Moving the plasma display 17 Attaching the Pioneer stand 17 Installing the Pioneer speaker 18 When using the ...hung on wall unit (PDP-6010FD 22 When using the hung on wall unit (PDP-5010FD 26 Preventing the plasma display from that shown in the explanatory...
Owner's Manual
Page 10
... covers can expose you are not sure of the type of glass. The plasma display weighs about 66.2 kg (145.9 lbs.) for the PDP-6010FD (including the stand and speaker) and about 44.0 kg (97 lbs.) for ventilation. Do not place the product on a wall or ceiling, be moved with the product... with the same characteristics and performance as a bookcase or rack, unless proper ventilation is provided or the manufacturer's instructions are designed for the PDP-5010FD (including the stand and speaker). Unplug the power cord from the AC outlet before the product is damaged.
... covers can expose you are not sure of the type of glass. The plasma display weighs about 66.2 kg (145.9 lbs.) for the PDP-6010FD (including the stand and speaker) and about 44.0 kg (97 lbs.) for ventilation. Do not place the product on a wall or ceiling, be moved with the product... with the same characteristics and performance as a bookcase or rack, unless proper ventilation is provided or the manufacturer's instructions are designed for the PDP-5010FD (including the stand and speaker). Unplug the power cord from the AC outlet before the product is damaged.
Owner's Manual
Page 15
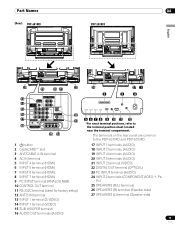
...panel are common to the terminal position sheet located near the terminal compartment. Part Names 04 Parts name (Rear) PDP-6010FD PDP-5010FD English 4 5 4 5 4 5 4 5 26 19 20 21 27 13 4 5 14 15...PDP-6010FD and PDP-5010FD. 17 INPUT 1 terminals (AUDIO) 18 INPUT 2 terminals (AUDIO) 19 INPUT 4 terminals (AUDIO) 20 INPUT 5 terminals (AUDIO) 21 INPUT 2 terminal (VIDEO) 22 DIGITAL OUT terminal (OPTICAL) 23 PC INPUT terminal (AUDIO) 24 INPUT 2 terminals (COMPONENT VIDEO: Y, PB, PR) 25 SPEAKERS (R/L) terminals 26 SPEAKERS (R) terminal (Speaker side) 27 SPEAKERS (L) terminal (Speaker...
...panel are common to the terminal position sheet located near the terminal compartment. Part Names 04 Parts name (Rear) PDP-6010FD PDP-5010FD English 4 5 4 5 4 5 4 5 26 19 20 21 27 13 4 5 14 15...PDP-6010FD and PDP-5010FD. 17 INPUT 1 terminals (AUDIO) 18 INPUT 2 terminals (AUDIO) 19 INPUT 4 terminals (AUDIO) 20 INPUT 5 terminals (AUDIO) 21 INPUT 2 terminal (VIDEO) 22 DIGITAL OUT terminal (OPTICAL) 23 PC INPUT terminal (AUDIO) 24 INPUT 2 terminals (COMPONENT VIDEO: Y, PB, PR) 25 SPEAKERS (R/L) terminals 26 SPEAKERS (R) terminal (Speaker side) 27 SPEAKERS (L) terminal (Speaker...
Owner's Manual
Page 18
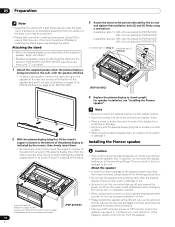
...PDP-6010FD and on a table or similar surface. • When lying the plasma display down, be scratched. • Please take care when installing stand pipes (L) and (R) to ensure that you want to move the display holding on to scratch or damage it out (see "Installing the Pioneer speaker... • Assemble the stand with anything other than the plasma display. For speaker installation, see illustrations on page 22 for PDP-6010FD Installation bolts (1) (Step 1) Installation bolts (2) (Step 2) (PDP-6010FD) 4 Replace the plasma display to turn the connected devices off and remove the...
...PDP-6010FD and on a table or similar surface. • When lying the plasma display down, be scratched. • Please take care when installing stand pipes (L) and (R) to ensure that you want to move the display holding on to scratch or damage it out (see "Installing the Pioneer speaker... • Assemble the stand with anything other than the plasma display. For speaker installation, see illustrations on page 22 for PDP-6010FD Installation bolts (1) (Step 1) Installation bolts (2) (Step 2) (PDP-6010FD) 4 Replace the plasma display to turn the connected devices off and remove the...
Owner's Manual
Page 19
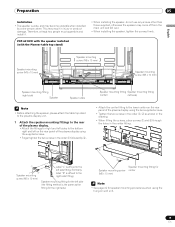
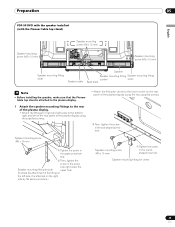
... in the order followed by a one person alone. PDP-6010FD with the speaker installed (with the Pioneer table top stand) Speaker mounting screw (M5 x 10 mm) Speaker mounting screw (M5 x 10 mm) Speaker mounting screw (M5 x 10 mm) Speaker mounting fitting (right side) Speaker Speaker cable Note • Before attaching the speaker, please attach the table top stand to the plasma...
... in the order followed by a one person alone. PDP-6010FD with the speaker installed (with the Pioneer table top stand) Speaker mounting screw (M5 x 10 mm) Speaker mounting screw (M5 x 10 mm) Speaker mounting screw (M5 x 10 mm) Speaker mounting fitting (right side) Speaker Speaker cable Note • Before attaching the speaker, please attach the table top stand to the plasma...
Owner's Manual
Page 20
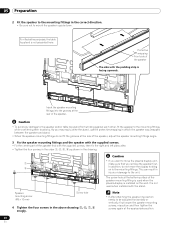
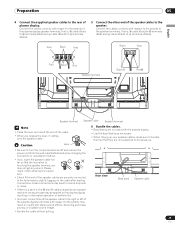
...fix the right and left sides alike. • Tighten the four screws in the order , , , as shown in the drawing. 7 8 4 2 1 5 6 3 Speaker mounting screw (M5 x 10 mm) Screw hole 4 Tighten the four screws in injury or damage to the mounting fittings. Note • If after attaching the...confirming their locations. The screw hole at the rear of the speaker, adjust the speaker mounting fittings angle. 3 Fix the speaker mounting fittings and the speaker with the supplied screws. • Fix the center part of the speaker mounting fitting is used when installed with the padding strip is ...
...fix the right and left sides alike. • Tighten the four screws in the order , , , as shown in the drawing. 7 8 4 2 1 5 6 3 Speaker mounting screw (M5 x 10 mm) Screw hole 4 Tighten the four screws in injury or damage to the mounting fittings. Note • If after attaching the...confirming their locations. The screw hole at the rear of the speaker, adjust the speaker mounting fittings angle. 3 Fix the speaker mounting fittings and the speaker with the supplied screws. • Fix the center part of the speaker mounting fitting is used when installed with the padding strip is ...

Owner's Manual
Page 21
... gray cable to the terminals and the white cable to terminals. Black Gray Red Black Red Black Speaker terminal Red Speaker terminal Speaker cable Speaker terminal Note • Press the lever and insert the end of the cable. • When you release the lever, it with... the plasma display. • Use the bead bands as necessary. • When tidying up your speaker cables, make sure to bundle them so that is, cable to terminals and cable to the terminals. Loose ...
... gray cable to the terminals and the white cable to terminals. Black Gray Red Black Red Black Speaker terminal Red Speaker terminal Speaker cable Speaker terminal Note • Press the lever and insert the end of the cable. • When you release the lever, it with... the plasma display. • Use the bead bands as necessary. • When tidying up your speaker cables, make sure to bundle them so that is, cable to terminals and cable to the terminals. Loose ...
Owner's Manual
Page 22
... plasma display on the mounting fittings of the speaker mounting fitting is used when installed on the wall. Caution • Be careful about the speaker mounting fittings when installing or connecting. 05 Preparation When using the hung on wall unit (PDP-6010FD) Note • First lay the plasma display... on top of a soft sheet etc., remove the stand, then attach the speaker mounting fittings. • Install the plasma display on the wall with only the speaker mounting fittings and speaker cable attached to the display...
... plasma display on the mounting fittings of the speaker mounting fitting is used when installed on the wall. Caution • Be careful about the speaker mounting fittings when installing or connecting. 05 Preparation When using the hung on wall unit (PDP-6010FD) Note • First lay the plasma display... on top of a soft sheet etc., remove the stand, then attach the speaker mounting fittings. • Install the plasma display on the wall with only the speaker mounting fittings and speaker cable attached to the display...
Owner's Manual
Page 23
Preparation 05 English PDP-5010FD with the speaker installed (with the Pioneer table top stand) Speaker mounting screw (M5 x 10 mm) Speaker mounting screw (M5 x 10 mm) 4 5 Speaker mounting screw (M5 x 10 mm) Speaker mounting fitting (side) Speaker cable Speaker Speaker mounting fitting Speaker mounting fitting (center) (side) Bead band Note • Before installing the speaker, make sure that the Pioneer table top stand...
Preparation 05 English PDP-5010FD with the speaker installed (with the Pioneer table top stand) Speaker mounting screw (M5 x 10 mm) Speaker mounting screw (M5 x 10 mm) 4 5 Speaker mounting screw (M5 x 10 mm) Speaker mounting fitting (side) Speaker cable Speaker Speaker mounting fitting Speaker mounting fitting (center) (side) Bead band Note • Before installing the speaker, make sure that the Pioneer table top stand...

Owner's Manual
Page 24
...stand. Insert the groove on to the mounting fittings. As you remove the speaker first. This can result in which the speaker was wrapped between the speaker and stand. • When the speaker mounting fittings do not fit the grooves at the appropriate position. 24 En ... as shown in the correct direction. • Be sure not to mount the speaker upside down. 05 Preparation 2 Fit the speaker to the mounting fittings in the drawing. Speaker mounting screw (M5 x 10 mm) 1 Speaker mounting screw When using the supplied screws (three locations). It is not presented here...
...stand. Insert the groove on to the mounting fittings. As you remove the speaker first. This can result in which the speaker was wrapped between the speaker and stand. • When the speaker mounting fittings do not fit the grooves at the appropriate position. 24 En ... as shown in the correct direction. • Be sure not to mount the speaker upside down. 05 Preparation 2 Fit the speaker to the mounting fittings in the drawing. Speaker mounting screw (M5 x 10 mm) 1 Speaker mounting screw When using the supplied screws (three locations). It is not presented here...
Owner's Manual
Page 25
... slightly tugging on the cable after making connections. Connect the cables correctly with respect to the polarity of the speaker cables to the speaker. Please insert it clamps onto the speaker cable.· Caution Lever • Be sure to turn the connected devices off and remove the power cord...or installation method. • If you release the lever, it with showing the copper wire. • Check if the end of the speaker cables are securely connected to the terminals by an exposed lead wire, excessive load may be applied to the plasma display, resulting in interrupted ...
... slightly tugging on the cable after making connections. Connect the cables correctly with respect to the polarity of the speaker cables to the speaker. Please insert it clamps onto the speaker cable.· Caution Lever • Be sure to turn the connected devices off and remove the power cord...or installation method. • If you release the lever, it with showing the copper wire. • Check if the end of the speaker cables are securely connected to the terminals by an exposed lead wire, excessive load may be applied to the plasma display, resulting in interrupted ...
Owner's Manual
Page 26
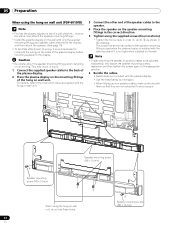
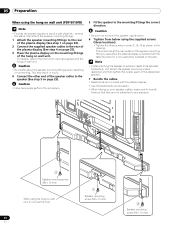
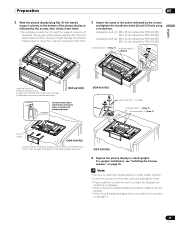
... reposition and then tighten the screws again at the rear surface of the speaker mounting fitting is used when the plasma display is not used when installed on the wall. 05 Preparation When using the hung on wall unit (PDP-5010FD) Note • First lay the plasma display on top of a... soft sheet etc., remove the stand, then attach the speaker mounting fittings. 1 Attach the speaker mounting fittings to the rear of the plasma display (See step 1 on ...
... reposition and then tighten the screws again at the rear surface of the speaker mounting fitting is used when the plasma display is not used when installed on the wall. 05 Preparation When using the hung on wall unit (PDP-5010FD) Note • First lay the plasma display on top of a... soft sheet etc., remove the stand, then attach the speaker mounting fittings. 1 Attach the speaker mounting fittings to the rear of the plasma display (See step 1 on ...
Owner's Manual
Page 28
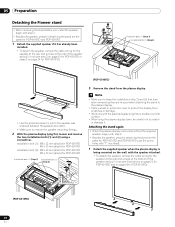
... or damage it. 05 Preparation Detaching the Pioneer stand • When removing the stand before you install the speaker, begin with step 2. • Besides the speaker, steps for attaching the stand are the same for PDP-6010FD and PDP-5010FD (use the screw holes with "T" inscribed). 1 Detach the supplied speaker when the plasma display is being mounted...
... or damage it. 05 Preparation Detaching the Pioneer stand • When removing the stand before you install the speaker, begin with step 2. • Besides the speaker, steps for attaching the stand are the same for PDP-6010FD and PDP-5010FD (use the screw holes with "T" inscribed). 1 Detach the supplied speaker when the plasma display is being mounted...
Owner's Manual
Page 29
...of the stand indicates downward. (PDP-6010FD) Line up the column supports with the bottom of the plasma display, as indicated by the arrows and tighten the installation bolts (2) and (1) firmly using a screwdriver. For speaker installation, see "Installing the Pioneer speaker" on a table or similar ... to the bottom of the plasma display as indicated in the accompanying diagram. (PDP-6010FD) Screw hole with "T" inscribed Installation bolts (1) (Step 2) Installation bolts (2) (Step 1) Plasma display (PDP-5010FD) Insert the stand into the plasma display so that an arrow with "FRONT...
...of the stand indicates downward. (PDP-6010FD) Line up the column supports with the bottom of the plasma display, as indicated by the arrows and tighten the installation bolts (2) and (1) firmly using a screwdriver. For speaker installation, see "Installing the Pioneer speaker" on a table or similar ... to the bottom of the plasma display as indicated in the accompanying diagram. (PDP-6010FD) Screw hole with "T" inscribed Installation bolts (1) (Step 2) Installation bolts (2) (Step 1) Plasma display (PDP-5010FD) Insert the stand into the plasma display so that an arrow with "FRONT...
Owner's Manual
Page 31
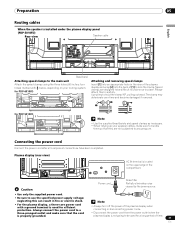
... power supply voltage; Preparation 05 English Routing cables When the speaker is properly grounded. Please attach them so that the cord is installed under the plasma display panel (PDP-5010FD) Rear view Speaker cable 4 5 Bead band Attaching speed clamps to the main... unit Attach the speed clamps using the three holes (60 inches: four holes) marked with a ground terminal is located on the rear of the plasma display and snap [2] into an appropriate hole on the upper edge of [1] to be used for PDP-6010FD...
... power supply voltage; Preparation 05 English Routing cables When the speaker is properly grounded. Please attach them so that the cord is installed under the plasma display panel (PDP-5010FD) Rear view Speaker cable 4 5 Bead band Attaching speed clamps to the main... unit Attach the speed clamps using the three holes (60 inches: four holes) marked with a ground terminal is located on the rear of the plasma display and snap [2] into an appropriate hole on the upper edge of [1] to be used for PDP-6010FD...
Owner's Manual
Page 73
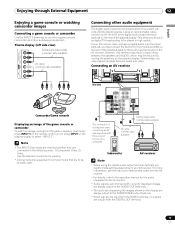
...the audio input terminals on your AV receiver does not have a digital audio input terminal (optical), you may experience delay between the speakers and AUDIO, which may result in audio delay between audio and video. For more information, see the instruction manual that are connected... accompanying the images shown on the rear of the plasma display to select "INPUT 3". However, this method may be reduced by muting the speakers on this system can output Dolby Digital signals. If your AV receiver. Connecting an AV receiver 4 5 Rear view 4 5 Camcorder/Game console...
...the audio input terminals on your AV receiver does not have a digital audio input terminal (optical), you may experience delay between the speakers and AUDIO, which may result in audio delay between audio and video. For more information, see the instruction manual that are connected... accompanying the images shown on the rear of the plasma display to select "INPUT 3". However, this method may be reduced by muting the speakers on this system can output Dolby Digital signals. If your AV receiver. Connecting an AV receiver 4 5 Rear view 4 5 Camcorder/Game console...
Owner's Manual
Page 93
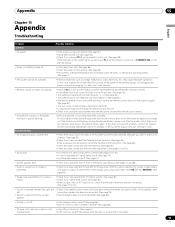
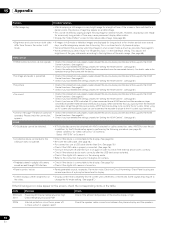
...? If the indicator is still flashing, unplug the plasma display's power cord from only a single • Has the balance been correctly adjusted? (See page 63.) speaker. • Picture is too bright. only audio is deactivated; The picture may cause improper operation. English 15 93 En PICTURE/SOUND • No image and... . • Is the sleep timer set correctly? If this option selected, the screen is output. With this does not solve the problem, contact the nearest Pioneer Authorized Independent Service Company, or the Customer Support Division (see back cover).
...? If the indicator is still flashing, unplug the plasma display's power cord from only a single • Has the balance been correctly adjusted? (See page 63.) speaker. • Picture is too bright. only audio is deactivated; The picture may cause improper operation. English 15 93 En PICTURE/SOUND • No image and... . • Is the sleep timer set correctly? If this option selected, the screen is output. With this does not solve the problem, contact the nearest Pioneer Authorized Independent Service Company, or the Customer Support Division (see back cover).
Owner's Manual
Page 94
...81.) • No sound • Check if the connections are properly made between the plasma display and the speakers. 94 En Internal temperature too high. SD11 Check temperature around PDP. Some signals may require to the AV system. However, displaying a still image for excessively long periods of ..."Auto" for "Brightness Sync." SD05 Internal protection circuit turns power off . Is there a short in the Side Mask setting. Check the speaker cable connections between the plasma display and the device that you enjoy watching images in a full screen mode as much as an after the...
...81.) • No sound • Check if the connections are properly made between the plasma display and the speakers. 94 En Internal temperature too high. SD11 Check temperature around PDP. Some signals may require to the AV system. However, displaying a still image for excessively long periods of ..."Auto" for "Brightness Sync." SD05 Internal protection circuit turns power off . Is there a short in the Side Mask setting. Check the speaker cable connections between the plasma display and the device that you enjoy watching images in a full screen mode as much as an after the...
Owner's Manual
Page 103
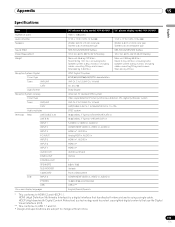
...INPUT 1 INPUT 2 INPUT 4 PC INPUT INPUT 5 INPUT 6 INPUT 7 AUDIO OUT DIGITAL OUT CONTROL OUT SPEAKERS SUB WOOFER CableCARD Side INPUT 3 PHONES USB On-screen display languages 60" plasma display model: PDP-6010FD 50" plasma display model: PDP-5010FD 1920 × 1080 pixels 17 W + 17 W (1 kHz, 10 %, 6 Ω) 17 ... and screws) Total: 66.2 kg (145.9 lbs.) Main unit: 38.5 kg (84.9 lbs.) Stand: 2.2 kg (4.9 lbs.) (including bolts) Speaker system: 3.3 kg (7.3 lbs.) (including cables, mounting fittings and screws) Total: 44.0 kg (97 lbs.) ATSC Digital TV system 8VSB/64QAM/256QAM/...
...INPUT 1 INPUT 2 INPUT 4 PC INPUT INPUT 5 INPUT 6 INPUT 7 AUDIO OUT DIGITAL OUT CONTROL OUT SPEAKERS SUB WOOFER CableCARD Side INPUT 3 PHONES USB On-screen display languages 60" plasma display model: PDP-6010FD 50" plasma display model: PDP-5010FD 1920 × 1080 pixels 17 W + 17 W (1 kHz, 10 %, 6 Ω) 17 ... and screws) Total: 66.2 kg (145.9 lbs.) Main unit: 38.5 kg (84.9 lbs.) Stand: 2.2 kg (4.9 lbs.) (including bolts) Speaker system: 3.3 kg (7.3 lbs.) (including cables, mounting fittings and screws) Total: 44.0 kg (97 lbs.) ATSC Digital TV system 8VSB/64QAM/256QAM/...


