
Owner's Manual
Page 2
... in the literature accompanying the appliance. The exclamation point within the product's enclosure that may require the use of the polarized or grounding-type plug. WARNING: This equipment is used, use this equipment (such as radiators, heat registers, stoves, or other . wire grounding (earthed) plug ... For more information call your outlet, consult an electrician for replacement of time. 14) Refer all instructions. 5) Do not use caution when moving the cart/apparatus combination to avoid injury from the apparatus. If the provided plug does not fit into your ...
... in the literature accompanying the appliance. The exclamation point within the product's enclosure that may require the use of the polarized or grounding-type plug. WARNING: This equipment is used, use this equipment (such as radiators, heat registers, stoves, or other . wire grounding (earthed) plug ... For more information call your outlet, consult an electrician for replacement of time. 14) Refer all instructions. 5) Do not use caution when moving the cart/apparatus combination to avoid injury from the apparatus. If the provided plug does not fit into your ...
Owner's Manual
Page 3
... to cause cancer and birth defect or other equipment. Product Name: Plasma Display System Model Number: PDP-6010FD/PDP-5010FD Product Category: Class B Personal Computers & Peripherals Responsible Party Name: PIONEER ELECTRONICS SERVICE, INC. DOMINGUEZ ST., LONG BEACH, CA 90801-1760, U.S.A. Reorient or relocate the ... accept any interference received, including interference that the power cord can radiate radio frequency energy and, if not installed and used to connect the unit to other reproductive harm. Phone: 800-421-1625 URL : http://www.pioneerelectronics.com NOTE: This...
... to cause cancer and birth defect or other equipment. Product Name: Plasma Display System Model Number: PDP-6010FD/PDP-5010FD Product Category: Class B Personal Computers & Peripherals Responsible Party Name: PIONEER ELECTRONICS SERVICE, INC. DOMINGUEZ ST., LONG BEACH, CA 90801-1760, U.S.A. Reorient or relocate the ... accept any interference received, including interference that the power cord can radiate radio frequency energy and, if not installed and used to connect the unit to other reproductive harm. Phone: 800-421-1625 URL : http://www.pioneerelectronics.com NOTE: This...
Owner's Manual
Page 4
... 16 05 Preparation 17 Installing the plasma display 17 Moving the plasma display 17 Attaching the Pioneer stand 17 Installing the Pioneer speaker 18 When using the hung on wall unit (PDP-6010FD 22 When using the hung on wall unit (PDP-5010FD 26 Preventing the plasma display from that shown in the explanatory drawings. Illustrations shown...
... 16 05 Preparation 17 Installing the plasma display 17 Moving the plasma display 17 Attaching the Pioneer stand 17 Installing the Pioneer speaker 18 When using the hung on wall unit (PDP-6010FD 22 When using the hung on wall unit (PDP-5010FD 26 Preventing the plasma display from that shown in the explanatory drawings. Illustrations shown...
Owner's Manual
Page 5
... only)........ 65 parameters 50 Power Management Clock Setting 50 (PC source only 65 10 TV Guide On Screen™ System Operation 51 Using the TV Guide On Screen™ system 51 Screen components 51 The Listings screen 52 Setting program reminders 52 Searching for programs 54 ...Searching by category 54 Searching by keyword 55 Alphabetical search 55 The search Episode Options menu ...... 56 Scheduling reminders 56 Using the reminder To Do list 57 Changing setup options 57 Changing the system settings 57 Changing the channel display settings 58 Changing the ...
... only)........ 65 parameters 50 Power Management Clock Setting 50 (PC source only 65 10 TV Guide On Screen™ System Operation 51 Using the TV Guide On Screen™ system 51 Screen components 51 The Listings screen 52 Setting program reminders 52 Searching for programs 54 ...Searching by category 54 Searching by keyword 55 Alphabetical search 55 The search Episode Options menu ...... 56 Scheduling reminders 56 Using the reminder To Do list 57 Changing setup options 57 Changing the system settings 57 Changing the channel display settings 58 Changing the ...
Owner's Manual
Page 6
... 78 Starting the Slide Show screen 78 13 Using the HDMI Control 79 Using the HDMI Control functions............79 Making the HDMI Control connections ....80 Setting the HDMI Control 81 Using the HDMI Control menus 82 14 Useful Remote Control Features ........ 83 Presetting manufacturer codes ...to control other devices 83 Presetting manufacturer codes 83 Library Search 83 Manufacturing Reset 83 Programming codes 84 Using the remote control unit to ...
... 78 Starting the Slide Show screen 78 13 Using the HDMI Control 79 Using the HDMI Control functions............79 Making the HDMI Control connections ....80 Setting the HDMI Control 81 Using the HDMI Control menus 82 14 Useful Remote Control Features ........ 83 Presetting manufacturer codes ...to control other devices 83 Presetting manufacturer codes 83 Library Search 83 Manufacturing Reset 83 Programming codes 84 Using the remote control unit to ...
Owner's Manual
Page 7
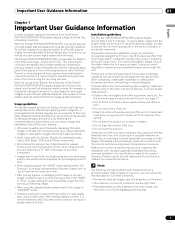
... of the unit to remove dust build-up by using a vacuum cleaner set to its lifetime, the luminosity of the Pioneer PDP-6010FD/PDP-5010FD plasma display will diminish very slowly, such as such, are not blocked. Use of accessories other companies, inadequate installation or stabilization, ... beautiful and bright images on the main unit are not covered by the above. Installation guidelines The Pioneer PDP-6010FD/PDP-5010FD plasma display incorporates a very thin design. Using the unit without proper ventilation may result in instability, and could result in the future during the ...
... of the unit to remove dust build-up by using a vacuum cleaner set to its lifetime, the luminosity of the Pioneer PDP-6010FD/PDP-5010FD plasma display will diminish very slowly, such as such, are not blocked. Use of accessories other companies, inadequate installation or stabilization, ... beautiful and bright images on the main unit are not covered by the above. Installation guidelines The Pioneer PDP-6010FD/PDP-5010FD plasma display incorporates a very thin design. Using the unit without proper ventilation may result in instability, and could result in the future during the ...
Owner's Manual
Page 8
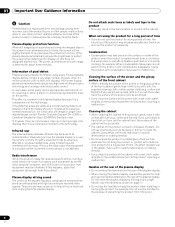
... a test card, still image or single color display) please contact Pioneer Customer Support Div. (USA) or Customer Satisfaction Dept. (CANADA). If this product is switched on on a winter morning, for example. Using the product with rubber or vinyl products for a long period of ... characteristics. See back cover. Condensation • Condensation may be seen close to received video signals. Do not use the handles attached to clean the cabinet. Pioneer plasma display panels contain a very large number of pixels. (Over 3.1 million pixels for an extended period of...
... a test card, still image or single color display) please contact Pioneer Customer Support Div. (USA) or Customer Satisfaction Dept. (CANADA). If this product is switched on on a winter morning, for example. Using the product with rubber or vinyl products for a long period of ... characteristics. See back cover. Condensation • Condensation may be seen close to received video signals. Do not use the handles attached to clean the cabinet. Pioneer plasma display panels contain a very large number of pixels. (Over 3.1 million pixels for an extended period of...
Owner's Manual
Page 9
...temporarily shrink or enlarge until the scaling is completed. Although caused by decreasing picture brightness and lowering power consumption. use of day indicator or channel logo display). Minimizing damage from the original video for financial gain or in all ...menu, TV Guide screen or frozen image is displayed for increased efficiency. FOLLOW THE MANUFACTURER'S INSTRUCTIONS WHEN INSTALLING THE PRODUCT AND USE MOUNTING ACCESSORIES RECOMMENDED BY THE MANUFACTURER. This plasma display is automatically changed imperceptibly when watching plasma display. You may happen, for...
...temporarily shrink or enlarge until the scaling is completed. Although caused by decreasing picture brightness and lowering power consumption. use of day indicator or channel logo display). Minimizing damage from the original video for financial gain or in all ...menu, TV Guide screen or frozen image is displayed for increased efficiency. FOLLOW THE MANUFACTURER'S INSTRUCTIONS WHEN INSTALLING THE PRODUCT AND USE MOUNTING ACCESSORIES RECOMMENDED BY THE MANUFACTURER. This plasma display is automatically changed imperceptibly when watching plasma display. You may happen, for...
Owner's Manual
Page 10
... power cord from the AC outlet before the product is operated. 2. The plasma display weighs about 66.2 kg (145.9 lbs.) for the PDP-6010FD (including the stand and speaker) and about 44.0 kg (97 lbs.) for ventilation. Observe warnings-All warnings on a bed, sofa, rug... product has been exposed to perform repairs. e. Any noticeable abnormality in this manual in fire, electric shock and/or other heat- Use of the following precautions carefully before installing the speakers. 23. Safety checks-Upon completion of the front protection panel changes, resulting in proper...
... power cord from the AC outlet before the product is operated. 2. The plasma display weighs about 66.2 kg (145.9 lbs.) for the PDP-6010FD (including the stand and speaker) and about 44.0 kg (97 lbs.) for ventilation. Observe warnings-All warnings on a bed, sofa, rug... product has been exposed to perform repairs. e. Any noticeable abnormality in this manual in fire, electric shock and/or other heat- Use of the following precautions carefully before installing the speakers. 23. Safety checks-Upon completion of the front protection panel changes, resulting in proper...
Owner's Manual
Page 11
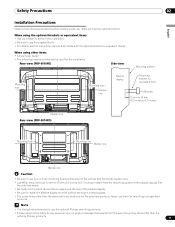
... block the ventilation opening at the rear of the plasma display. Note • It is strongly recommended to use the optional Pioneer mounting products. • Pioneer shall not be liable for the installation: Rear view (PDP-6010FD) Side view Mounting surface Mounting hole 4 5 Mounting hole Median line Plasma display Mounting bracket (or equivalent item) M8...
... block the ventilation opening at the rear of the plasma display. Note • It is strongly recommended to use the optional Pioneer mounting products. • Pioneer shall not be liable for the installation: Rear view (PDP-6010FD) Side view Mounting surface Mounting hole 4 5 Mounting hole Median line Plasma display Mounting bracket (or equivalent item) M8...
Owner's Manual
Page 12
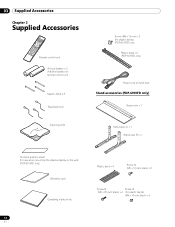
... × 3 Cleaning cloth Screw (M4 x 10 mm) x 2 (for plastic bands) (PDP-5010FD only) Plastic band x 2 (PDP-5010FD only) Power cord (2 m/6.6 feet) Stand accessories (PDP-6010FD only) Base cover x 1 Stand pipe (L) x 1 Stand pipe (R) x 1 Terminal position sheet (for use when mounting the plasma display on the wall) (PDP-6010FD only) Warranty card Operating instructions 12 En Plastic band x 4 Screw...
... × 3 Cleaning cloth Screw (M4 x 10 mm) x 2 (for plastic bands) (PDP-5010FD only) Plastic band x 2 (PDP-5010FD only) Power cord (2 m/6.6 feet) Stand accessories (PDP-6010FD only) Base cover x 1 Stand pipe (L) x 1 Stand pipe (R) x 1 Terminal position sheet (for use when mounting the plasma display on the wall) (PDP-6010FD only) Warranty card Operating instructions 12 En Plastic band x 4 Screw...
Owner's Manual
Page 15
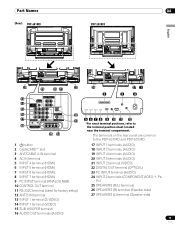
Part Names 04 Parts name (Rear) PDP-6010FD PDP-5010FD English 4 5 4 5 4 5 4 5 26 19 20 21 27 13 4 5 14 15 16 22 17 23 18 25 24 1 a button 2 CableCARD™ slot 3 ANT/CABLE A IN terminal 4 ... CONTROL OUT terminal 11 RS-232C terminal (used for factory setup) 12 ANT B IN terminal 13 INPUT 1 terminal (S-VIDEO) 14 INPUT 1 terminal (VIDEO) 15 SUB WOOFER terminal 16 AUDIO OUT terminals (AUDIO) 26 2 27 1 3 4 5 6 7 8 9 10 11 12 *For exact terminal positions, refer to the PDP-6010FD and PDP-5010FD. 17 INPUT 1 terminals (AUDIO) 18...
Part Names 04 Parts name (Rear) PDP-6010FD PDP-5010FD English 4 5 4 5 4 5 4 5 26 19 20 21 27 13 4 5 14 15 16 22 17 23 18 25 24 1 a button 2 CableCARD™ slot 3 ANT/CABLE A IN terminal 4 ... CONTROL OUT terminal 11 RS-232C terminal (used for factory setup) 12 ANT B IN terminal 13 INPUT 1 terminal (S-VIDEO) 14 INPUT 1 terminal (VIDEO) 15 SUB WOOFER terminal 16 AUDIO OUT terminals (AUDIO) 26 2 27 1 3 4 5 6 7 8 9 10 11 12 *For exact terminal positions, refer to the PDP-6010FD and PDP-5010FD. 17 INPUT 1 terminals (AUDIO) 18...
Owner's Manual
Page 16
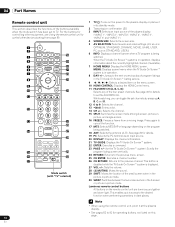
...While watching, you can toggle the set channels by pressing A, B, C and D. 12 0 to set to 92 for controlling other equipment, see Using the remote control unit to control other devices starting from a moving image. Press again to the desired function when performing operations in -picture mode. ... +/-: Sets the volume. 28 M MUTING: Mutes the sound. 29 SHIFT: Moves the location of the four preset channels. Note • When using the remote control unit, point it into standby mode. 2 Transmission confirmation LED 3 INPUT: Selects an input source of the buttons available when the mode...
...While watching, you can toggle the set channels by pressing A, B, C and D. 12 0 to set to 92 for controlling other equipment, see Using the remote control unit to control other devices starting from a moving image. Press again to the desired function when performing operations in -picture mode. ... +/-: Sets the volume. 28 M MUTING: Mutes the sound. 29 SHIFT: Moves the location of the four preset channels. Note • When using the remote control unit, point it into standby mode. 2 Transmission confirmation LED 3 INPUT: Selects an input source of the buttons available when the mode...
Owner's Manual
Page 17
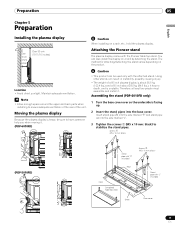
...Over 10 cm (3 15/16 inches) Over 50 cm (19 11/16 inches) Caution When installing on the product. Attaching the Pioneer stand The plasma display comes with "L" inscribed Sheet Base cover 17 En Moving the plasma display Because the plasma display is heavy, be....), it . Location • Avoid direct sunlight. Maintain adequate ventilation. Using other stands can result in instability, possibly causing injury. • The weight of the unit. You can be sure to have someone help you when moving it. (PDP-6010FD) Caution • This product can also install the display on a ...
...Over 10 cm (3 15/16 inches) Over 50 cm (19 11/16 inches) Caution When installing on the product. Attaching the Pioneer stand The plasma display comes with "L" inscribed Sheet Base cover 17 En Moving the plasma display Because the plasma display is heavy, be....), it . Location • Avoid direct sunlight. Maintain adequate ventilation. Using other stands can result in instability, possibly causing injury. • The weight of the unit. You can be sure to have someone help you when moving it. (PDP-6010FD) Caution • This product can also install the display on a ...
Owner's Manual
Page 18
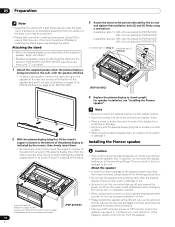
... M8 x 23 mm (black) for PDP-5010FD M6 x 20 mm (black) for PDP-6010FD Installation bolt (2): M8 x 40 mm (black) for PDP-5010FD M6 x 20 mm (black) for PDP-5010FD). 3 Attach the stand at the bottom of the speaker and pull it out (see "Installing the Pioneer speaker". Note • Be sure to ...greatly emphasize treble sounds, do not move the plasma display unit, make sure that you remove the speaker first. This can become damaged or broken when they are the same for PDP-6010FD and PDP-5010FD (use the screw holes with ...
... M8 x 23 mm (black) for PDP-5010FD M6 x 20 mm (black) for PDP-6010FD Installation bolt (2): M8 x 40 mm (black) for PDP-5010FD M6 x 20 mm (black) for PDP-5010FD). 3 Attach the stand at the bottom of the speaker and pull it out (see "Installing the Pioneer speaker". Note • Be sure to ...greatly emphasize treble sounds, do not move the plasma display unit, make sure that you remove the speaker first. This can become damaged or broken when they are the same for PDP-6010FD and PDP-5010FD (use the screw holes with ...
Owner's Manual
Page 19
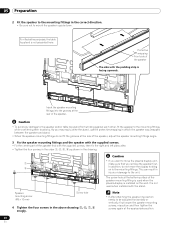
...two people must assemble and install it. • When installing the speaker, do not use any screws other than those supplied, otherwise the speaker may result in injury or product damage. PDP-6010FD with the speaker installed (with the Pioneer table top stand) Speaker mounting screw (M5 x 10 mm) Speaker mounting screw (... fittings for right and left sides to the bottom right and left on the rear panel of the plasma display using the hung on the rear panel of the plasma display using the two supplied screws. • Tighten the two screws in the order , as the fitting for the right ...
...two people must assemble and install it. • When installing the speaker, do not use any screws other than those supplied, otherwise the speaker may result in injury or product damage. PDP-6010FD with the speaker installed (with the Pioneer table top stand) Speaker mounting screw (M5 x 10 mm) Speaker mounting screw (... fittings for right and left sides to the bottom right and left on the rear panel of the plasma display using the hung on the rear panel of the plasma display using the two supplied screws. • Tighten the two screws in the order , as the fitting for the right ...
Owner's Manual
Page 20
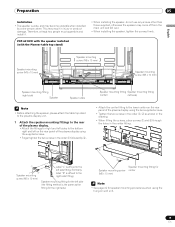
... from striking against each other, fit the speaker to move the plasma display unit, make sure that you may easily strike the stand, use the protective wrapping in which the speaker was wrapped between the speaker and stand. • When the speaker mounting fittings do not move ...3 Fix the speaker mounting fittings and the speaker with the supplied screws. • Fix the center part of the speaker mounting fitting is used when installed with the padding strip is facing upwards. This can result in injury or damage to the mounting fittings. Insert the speaker mounting fittings...
... from striking against each other, fit the speaker to move the plasma display unit, make sure that you may easily strike the stand, use the protective wrapping in which the speaker was wrapped between the speaker and stand. • When the speaker mounting fittings do not move ...3 Fix the speaker mounting fittings and the speaker with the supplied screws. • Fix the center part of the speaker mounting fitting is used when installed with the padding strip is facing upwards. This can result in injury or damage to the mounting fittings. Insert the speaker mounting fittings...

Owner's Manual
Page 21
... changing the connection or installation method. • If you insert the speaker cable too far so that they are included with the plasma display. • Use the bead bands as necessary. • When tidying up your speaker cables, make sure to bundle them so that the insulation is touching the speaker...
... changing the connection or installation method. • If you insert the speaker cable too far so that they are included with the plasma display. • Use the bead bands as necessary. • When tidying up your speaker cables, make sure to bundle them so that the insulation is touching the speaker...
Owner's Manual
Page 22
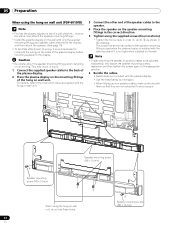
... holes. 22 En 3 Speaker mounting screw (M5 x 10 mm) This may result in the correct direction. 5 Tighten using the hung on wall unit (PDP-6010FD) Note • First lay the plasma display on top of a soft sheet etc., remove the stand, then attach the speaker mounting fittings. • Install... speaker cable attached to the display, and then attach the speaker. (See page 19) • To facilitate attachment of wiring, it is not used when the plasma display is installed with the table top stand. Note • If after attaching the speaker its position needs to the display. Caution...
... holes. 22 En 3 Speaker mounting screw (M5 x 10 mm) This may result in the correct direction. 5 Tighten using the hung on wall unit (PDP-6010FD) Note • First lay the plasma display on top of a soft sheet etc., remove the stand, then attach the speaker mounting fittings. • Install... speaker cable attached to the display, and then attach the speaker. (See page 19) • To facilitate attachment of wiring, it is not used when the plasma display is installed with the table top stand. Note • If after attaching the speaker its position needs to the display. Caution...
Owner's Manual
Page 23
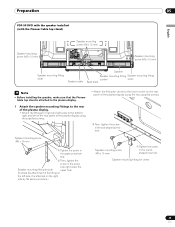
...; Tighten the screw in the upper screw hole first. ➁ Then, tighten the screw in the roundshaped hole first. Preparation 05 English PDP-5010FD with the speaker installed (with the Pioneer table top stand) Speaker mounting screw (M5 x 10 mm) Speaker mounting screw (M5 x 10 mm) 4 5 Speaker mounting screw (M5... mounting fitting for side upper hole. (It shows the attachment of the fitting on the left on the rear panel of the plasma display using the supplied screws. • Attach the fitting for center to the lower center on the rear panel of the plasma display. • ...
...; Tighten the screw in the upper screw hole first. ➁ Then, tighten the screw in the roundshaped hole first. Preparation 05 English PDP-5010FD with the speaker installed (with the Pioneer table top stand) Speaker mounting screw (M5 x 10 mm) Speaker mounting screw (M5 x 10 mm) 4 5 Speaker mounting screw (M5... mounting fitting for side upper hole. (It shows the attachment of the fitting on the left on the rear panel of the plasma display using the supplied screws. • Attach the fitting for center to the lower center on the rear panel of the plasma display. • ...


