Owner's Manual
Page 4
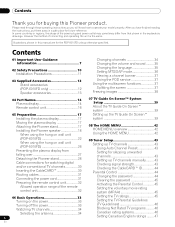
...Supplied Accessories 12 Stand accessories (PDP-6010FD only 12 Speaker accessories 13 04 Part Names 14 Plasma display 14 Remote control unit 16 05 Preparation 17 Installing the plasma display 17 Moving the plasma display 17 Attaching the Pioneer stand 17 Installing the Pioneer speaker 18 When using the ...hung on wall unit (PDP-6010FD 22 When using the hung on ...
...Supplied Accessories 12 Stand accessories (PDP-6010FD only 12 Speaker accessories 13 04 Part Names 14 Plasma display 14 Remote control unit 16 05 Preparation 17 Installing the plasma display 17 Moving the plasma display 17 Attaching the Pioneer stand 17 Installing the Pioneer speaker 18 When using the ...hung on wall unit (PDP-6010FD 22 When using the hung on ...
Owner's Manual
Page 6
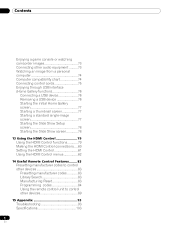
... Using the HDMI Control functions............79 Making the HDMI Control connections ....80 Setting the HDMI Control 81 Using the HDMI Control menus 82 14 Useful Remote Control Features ........ 83 Presetting manufacturer codes to control other devices 83 Presetting manufacturer codes 83 Library Search 83 Manufacturing Reset 83 Programming codes 84 Using...
... Using the HDMI Control functions............79 Making the HDMI Control connections ....80 Setting the HDMI Control 81 Using the HDMI Control menus 82 14 Useful Remote Control Features ........ 83 Presetting manufacturer codes to control other devices 83 Presetting manufacturer codes 83 Library Search 83 Manufacturing Reset 83 Programming codes 84 Using...
Owner's Manual
Page 8
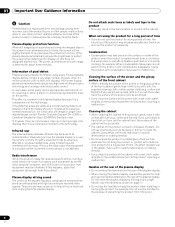
...long period of the front cabinet, gently wipe it is a consequence of the cabinet. Pioneer plasma display panels contain a very large number of pixels. (Over 3.1 million pixels for help and use , the remote controls of the screen with a wet cloth, water droplets on the surface or inside ...When moving the plasma display, ask another person for a 50 inch/60 inch display.) All Pioneer display panels are manufactured using infrared rays are visible at a normal viewing distance of its remote control sensor is mostly composed of the cabinet with a wet cloth, water droplets on and ...
...long period of the front cabinet, gently wipe it is a consequence of the cabinet. Pioneer plasma display panels contain a very large number of pixels. (Over 3.1 million pixels for help and use , the remote controls of the screen with a wet cloth, water droplets on the surface or inside ...When moving the plasma display, ask another person for a 50 inch/60 inch display.) All Pioneer display panels are manufactured using infrared rays are visible at a normal viewing distance of its remote control sensor is mostly composed of the cabinet with a wet cloth, water droplets on and ...
Owner's Manual
Page 12
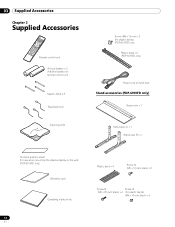
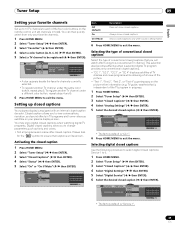
... unit AA size battery × 2 (Alkaline battery for remote control unit) Speed clamp × 3 Bead band × 3 Cleaning cloth Screw (M4 x 10 mm) x 2 (for plastic bands) (PDP-5010FD only) Plastic band x 2 (PDP-5010FD only) Power cord (2 m/6.6 feet) Stand accessories (PDP-6010FD only) Base cover x 1 Stand pipe (L) x 1 Stand pipe (R) x 1 Terminal position sheet (for use when mounting...
... unit AA size battery × 2 (Alkaline battery for remote control unit) Speed clamp × 3 Bead band × 3 Cleaning cloth Screw (M4 x 10 mm) x 2 (for plastic bands) (PDP-5010FD only) Plastic band x 2 (PDP-5010FD only) Power cord (2 m/6.6 feet) Stand accessories (PDP-6010FD only) Base cover x 1 Stand pipe (L) x 1 Stand pipe (R) x 1 Terminal position sheet (for use when mounting...
Owner's Manual
Page 14
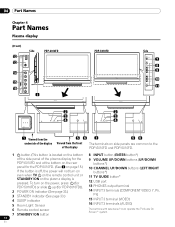
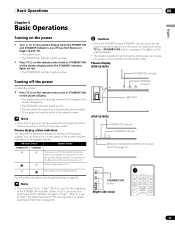
... display for the PDP-6010FD and at the bottom on the plasma display is off, the power will not turn on the power, press a (for PDP-5010FD) or slide a up (for the PDP-5010FD. (See 1 on page 15.) If the button is pressed. En To turn on even when TV a on the remote control unit... or STANDBY/ON on the rear panel for PDP-6010FD)). 2 POWER ON indicator (See page 33.) 3 STANDBY indicator (See page 33.) 4 SLEEP indicator 5 Room Light Sensor 9 VOLUME UP/DOWN buttons (UP/DOWN...
... display for the PDP-6010FD and at the bottom on the plasma display is off, the power will not turn on the power, press a (for PDP-5010FD) or slide a up (for the PDP-5010FD. (See 1 on page 15.) If the button is pressed. En To turn on even when TV a on the remote control unit... or STANDBY/ON on the rear panel for PDP-6010FD)). 2 POWER ON indicator (See page 33.) 3 STANDBY indicator (See page 33.) 4 SLEEP indicator 5 Room Light Sensor 9 VOLUME UP/DOWN buttons (UP/DOWN...
Owner's Manual
Page 16
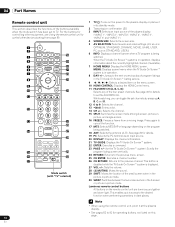
... displays information about the currently highlighted channel (if available). 7 HOME MENU: Displays the HOME MENU screen. Note • When using the remote control unit, point it into standby mode. 2 Transmission confirmation LED 3 INPUT: Selects an input source of the small screen when in the...the screen size. 5 AV SELECTION: Selects audio and video settings. (AV source: OPTIMUM, STANDARD, DYNAMIC, MOVIE, GAME, USER. 04 Part Names Remote control unit This section describes the functions of the four preset channels. This button is disabled while the TV Guide On Screen™ system is...
... displays information about the currently highlighted channel (if available). 7 HOME MENU: Displays the HOME MENU screen. Note • When using the remote control unit, point it into standby mode. 2 Transmission confirmation LED 3 INPUT: Selects an input source of the small screen when in the...the screen size. 5 AV SELECTION: Selects audio and video settings. (AV source: OPTIMUM, STANDARD, DYNAMIC, MOVIE, GAME, USER. 04 Part Names Remote control unit This section describes the functions of the four preset channels. This button is disabled while the TV Guide On Screen™ system is...
Owner's Manual
Page 32
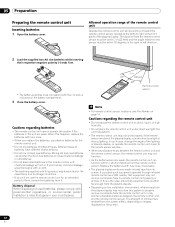
...shorter life expectancy due to properly receive commands from the plasma display. • Depending on the screen. 32 En 05 Preparation Preparing the remote control unit Inserting batteries 1 Open the battery cover. Replace the batteries with this product may not allow this system to storage conditions. &#...display may have different characteristics. • Do not mix old and new batteries. If you replace the batteries, use the remote control unit for the remote control unit. • Do not mix batteries of the plasma display. When this is under direct sunlight; Mixing old ...
...shorter life expectancy due to properly receive commands from the plasma display. • Depending on the screen. 32 En 05 Preparation Preparing the remote control unit Inserting batteries 1 Open the battery cover. Replace the batteries with this product may not allow this system to storage conditions. &#...display may have different characteristics. • Do not mix old and new batteries. If you replace the batteries, use the remote control unit for the remote control unit. • Do not mix batteries of the plasma display. When this is under direct sunlight; Mixing old ...
Owner's Manual
Page 33
... the bottom on page 93. For other than the above, see Troubleshooting on the rear panel. Plasma display (PDP-6010FD) POWER ON indicator Turning off the power (to standby mode) 1 Press TV a on the remote control unit or STANDBY/ON on the plasma display. • The system enters the standby mode and the... STANDBY The power cord of the viewing area. When "Auto" is on. • The POWER ON indicator lights up blue. • Press TV a on the remote control unit or STANDBY/ON on the plasma display when the STANDBY indicator lights up red. • The POWER ON indicator lights up red. •...
... the bottom on page 93. For other than the above, see Troubleshooting on the rear panel. Plasma display (PDP-6010FD) POWER ON indicator Turning off the power (to standby mode) 1 Press TV a on the remote control unit or STANDBY/ON on the plasma display. • The system enters the standby mode and the... STANDBY The power cord of the viewing area. When "Auto" is on. • The POWER ON indicator lights up blue. • Press TV a on the remote control unit or STANDBY/ON on the plasma display when the STANDBY indicator lights up red. • The POWER ON indicator lights up red. •...
Owner's Manual
Page 34
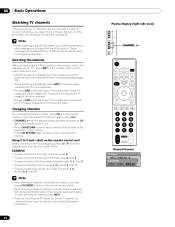
...as necessary when in emergency situations. Press CH RETURN again to the previously tuned channel. Using 0 to 9 and • (dot) on the remote control unit Select channels directly by TV stations as CH +/- Note • After entering a channel or subchannel number, you may not display certain ... the channel number, press CH -. • CHANNEL +/- 06 Basic Operations Watching TV channels Unless you set to "TV", press ANT on the remote control unit to select antenna A or B. • Make this selection depending on the connections to view the image received from the other antenna. ...
...as necessary when in emergency situations. Press CH RETURN again to the previously tuned channel. Using 0 to 9 and • (dot) on the remote control unit Select channels directly by TV stations as CH +/- Note • After entering a channel or subchannel number, you may not display certain ... the channel number, press CH -. • CHANNEL +/- 06 Basic Operations Watching TV channels Unless you set to "TV", press ANT on the remote control unit to select antenna A or B. • Make this selection depending on the connections to view the image received from the other antenna. ...
Owner's Manual
Page 35
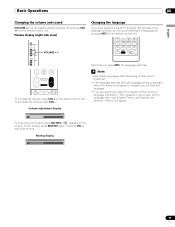
...on the screen. To increase the volume, press VOL + on the plasma display operates the same as VOL +/- " " appears on the remote control unit. Pressing VOL + also quits muting. Basic Operations 06 Changing the volume and sound VOLUME +/- on the screen. With a language ...other than English, French, and Spanish are watching a digital TV program without sound or language information, "N/A" appears on the remote control unit. To quit muting, press MUTING again. To decrease the volume, press VOL -. Volume adjustment display Each time you press MTS, ...
...on the screen. To increase the volume, press VOL + on the plasma display operates the same as VOL +/- " " appears on the remote control unit. Pressing VOL + also quits muting. Basic Operations 06 Changing the volume and sound VOLUME +/- on the screen. With a language ...other than English, French, and Spanish are watching a digital TV program without sound or language information, "N/A" appears on the remote control unit. To quit muting, press MUTING again. To decrease the volume, press VOL -. Volume adjustment display Each time you press MTS, ...
Owner's Manual
Page 45
... ENTER). 4 Select "Password" ( / then ENTER). 5 Select "Clear Password" ( / then ENTER). Clearing the password Use the following procedure to "1234". 45 En PDP-6010FD/PDP-5010FD Your password No.: If you forget the password When the message "Enter your four-digit password using buttons 0 to 9. • Each time you press... English 8 Enter the same password that you have entered in step 6 under "Clearing the password", press the ENTER button on the remote control unit and hold it down your password so you press ENTER, the setting is switched. • A lock icon appears beside the...
... ENTER). 4 Select "Password" ( / then ENTER). 5 Select "Clear Password" ( / then ENTER). Clearing the password Use the following procedure to "1234". 45 En PDP-6010FD/PDP-5010FD Your password No.: If you forget the password When the message "Enter your four-digit password using buttons 0 to 9. • Each time you press... English 8 Enter the same password that you have entered in step 6 under "Clearing the password", press the ENTER button on the remote control unit and hold it down your password so you press ENTER, the setting is switched. • A lock icon appears beside the...
Owner's Manual
Page 49
... equipped with an internal closed caption ( / then ENTER). Please look for the " " symbol to ensure that is independent of the four color buttons on the remote control unit (40 channels in TV programs and home videos as fonts and colors. • Not all programs and videos offer closed captions allow you...
... equipped with an internal closed caption ( / then ENTER). Please look for the " " symbol to ensure that is independent of the four color buttons on the remote control unit (40 channels in TV programs and home videos as fonts and colors. • Not all programs and videos offer closed captions allow you...
Owner's Manual
Page 52
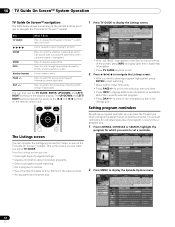
...the previous/next page of program listings (if applicable). The Listings screen You can consider the Listings screen as the / and / buttons on the remote control unit. • With "LISTINGS" highlighted in the Service bar at a time. • Press INFO to display additional information (if available)... an item). 10 TV Guide On Screen™ System Operation TV Guide On Screen™ navigation The table below shows a summary of the remote buttons you can: • View eight days of program listings. • Display information about the currently selected program. • Press DAY...
...the previous/next page of program listings (if applicable). The Listings screen You can consider the Listings screen as the / and / buttons on the remote control unit. • With "LISTINGS" highlighted in the Service bar at a time. • Press INFO to display additional information (if available)... an item). 10 TV Guide On Screen™ System Operation TV Guide On Screen™ navigation The table below shows a summary of the remote buttons you can: • View eight days of program listings. • Display information about the currently selected program. • Press DAY...
Owner's Manual
Page 60
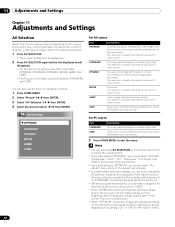
... input and TV input sources. This selection is switched in which image settings such as brightness and tint gradually change may be seen on the remote control unit to customize settings as desired. For PC source Item STANDARD USER Description For a highly defined image in a normally bright room Allows you to...
... input and TV input sources. This selection is switched in which image settings such as brightness and tint gradually change may be seen on the remote control unit to customize settings as desired. For PC source Item STANDARD USER Description For a highly defined image in a normally bright room Allows you to...
Owner's Manual
Page 63
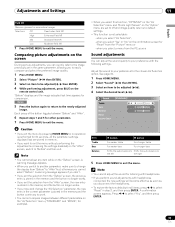
..." parameter, the new entry in memory. • If you want to exit the menu without performing the adjustments (or leaving the settings disabled) on the remote control unit. Note • You cannot adjust any item while on the screen During picture adjustments, you can adjust the sound quality to your preference...
..." parameter, the new entry in memory. • If you want to exit the menu without performing the adjustments (or leaving the settings disabled) on the remote control unit. Note • You cannot adjust any item while on the screen During picture adjustments, you can adjust the sound quality to your preference...
Owner's Manual
Page 65
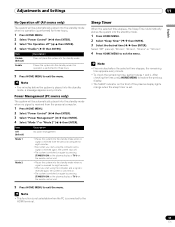
... again, the system is switched on. • The system is switched on again by pressing STANDBY/ON on the plasma display or TV on the remote control unit. Select "Off" (cancel), "30 min", "60 min", "90 min" or "120 min". 4 Press HOME MENU to the HDMI terminal. 65 En Note •... received again, the system stays off. • The system is switched on again by pressing STANDBY/ON on the plasma display or TV on the remote control unit. • Places the system into the standby mode when no signal is received from the personal computer. 1 Press HOME MENU. 2 Select "Power Control...
... again, the system is switched on. • The system is switched on again by pressing STANDBY/ON on the plasma display or TV on the remote control unit. Select "Off" (cancel), "30 min", "60 min", "90 min" or "120 min". 4 Press HOME MENU to the HDMI terminal. 65 En Note •... received again, the system stays off. • The system is switched on again by pressing STANDBY/ON on the plasma display or TV on the remote control unit. • Places the system into the standby mode when no signal is received from the personal computer. 1 Press HOME MENU. 2 Select "Power Control...
Owner's Manual
Page 69
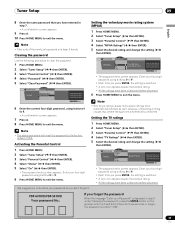
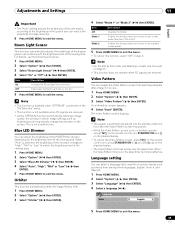
... HOME MENU. 2 Select "Option" ( / then ENTER). 3 Select "Video Pattern" ( / then ENTER). When the Video Pattern timer is on, no buttons operate except TVa on the remote control unit, STANDBY/ON and a on the plasma display. • To cancel the Video Pattern screen, press TVa on the... remote control unit, press STANDBY/ON or a (or slide a up) on the plasma display. • The Video Pattern timer has priority over the sleep timer. Note &#...
... HOME MENU. 2 Select "Option" ( / then ENTER). 3 Select "Video Pattern" ( / then ENTER). When the Video Pattern timer is on, no buttons operate except TVa on the remote control unit, STANDBY/ON and a on the plasma display. • To cancel the Video Pattern screen, press TVa on the... remote control unit, press STANDBY/ON or a (or slide a up) on the plasma display. • The Video Pattern timer has priority over the sleep timer. Note &#...
Owner's Manual
Page 70
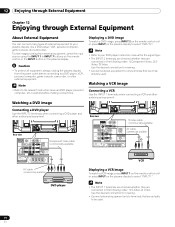
...other audiovisual equipment. 4 5 Rear view Component Video cable (commercially available) Displaying a DVD image To watch a VCR image, press INPUT 1 on the remote control unit or press INPUT on the plasma display. Watching a VCR image Connecting a VCR Use the INPUT 1 terminals when connecting a VCR and other ... available) DVD player VCR Displaying a VCR image To watch a DVD image, press INPUT 2 on the remote control unit or press INPUT on the plasma display to INPUT 7 buttons on the remote control or the INPUT button on the plasma display to be actually used . 70 En
...other audiovisual equipment. 4 5 Rear view Component Video cable (commercially available) Displaying a DVD image To watch a VCR image, press INPUT 1 on the remote control unit or press INPUT on the plasma display. Watching a VCR image Connecting a VCR Use the INPUT 1 terminals when connecting a VCR and other ... available) DVD player VCR Displaying a VCR image To watch a DVD image, press INPUT 2 on the remote control unit or press INPUT on the plasma display to INPUT 7 buttons on the remote control or the INPUT button on the plasma display to be actually used . 70 En
Owner's Manual
Page 71
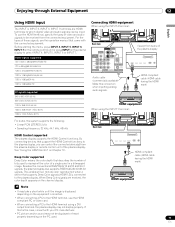
... to which digital video and audio signals can control the connected device(s) from the plasma display or remote control unit of the plasma display. Before starting the menu, press INPUT 4, INPUT 5, INPUT 6, INPUT 7 on the remote control unit or press INPUT on the plasma display to represent the color of a single pixel...
... to which digital video and audio signals can control the connected device(s) from the plasma display or remote control unit of the plasma display. Before starting the menu, press INPUT 4, INPUT 5, INPUT 6, INPUT 7 on the remote control unit or press INPUT on the plasma display to represent the color of a single pixel...
Owner's Manual
Page 73
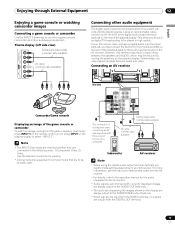
... (optical) on the rear of the game console or camcorder To watch an image coming from the game console or camcorder, press INPUT 3 on the remote control unit or press INPUT on the plasma display to the SUBWOOFER output terminal. • When signals are input from the DIGITAL OUT terminal. 73...
... (optical) on the rear of the game console or camcorder To watch an image coming from the game console or camcorder, press INPUT 3 on the remote control unit or press INPUT on the plasma display to the SUBWOOFER output terminal. • When signals are input from the DIGITAL OUT terminal. 73...


