Owner's Manual
Page 5
... Blue LED Dimmer 69 Orbiter 69 Video Pattern 69 Language setting 69 Displaying setup progress 59 12 Enjoying through External 11 Adjustments and Settings 60 AV Selection 60 Basic picture adjustments 61 Advanced picture adjustments 61 Equipment 70 About External Equipment 70 Watching a DVD image 70 Watching a VCR image 70 Using HDMI...
... Blue LED Dimmer 69 Orbiter 69 Video Pattern 69 Language setting 69 Displaying setup progress 59 12 Enjoying through External 11 Adjustments and Settings 60 AV Selection 60 Basic picture adjustments 61 Advanced picture adjustments 61 Equipment 70 About External Equipment 70 Watching a DVD image 70 Watching a VCR image 70 Using HDMI...
Owner's Manual
Page 8
...this product meets the required specifications, it emits a small amount of noise. Pioneer plasma display panels contain a very large number of pixels. (Over 3.1 million pixels for a 50 inch/60 inch display.) All Pioneer display panels are manufactured using pixels. Depending on a winter morning, for example... defective pixels are interfered with by holding only a single handle. not a test card, still image or single color display) please contact Pioneer Customer Support Div. (USA) or Customer Satisfaction Dept. (CANADA). See back cover. If, however, they can be permanently switched off...
...this product meets the required specifications, it emits a small amount of noise. Pioneer plasma display panels contain a very large number of pixels. (Over 3.1 million pixels for a 50 inch/60 inch display.) All Pioneer display panels are manufactured using pixels. Depending on a winter morning, for example... defective pixels are interfered with by holding only a single handle. not a test card, still image or single color display) please contact Pioneer Customer Support Div. (USA) or Customer Satisfaction Dept. (CANADA). See back cover. If, however, they can be permanently switched off...
Owner's Manual
Page 17
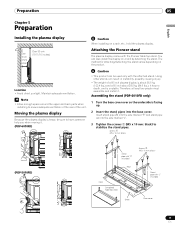
...3 Tighten the screws (M5 x 10 mm: black) to ensure adequate ventilation of the rear of a 60 inch plasma display is about 55.5 kg (122.4 lbs.) and a 50 inch about 38.5 kg (84...sunlight. Maintain adequate ventilation. Therefore, at least two people must assemble and install it . (PDP-6010FD) Caution • This product can also install the display on a rack by detaching the stand... used only with "L" inscribed Sheet Base cover 17 En Attaching the Pioneer stand The plasma display comes with the Pioneer table top stand. Preparation 05 English Chapter 5 Preparation Installing the plasma...
...3 Tighten the screws (M5 x 10 mm: black) to ensure adequate ventilation of the rear of a 60 inch plasma display is about 55.5 kg (122.4 lbs.) and a 50 inch about 38.5 kg (84...sunlight. Maintain adequate ventilation. Therefore, at least two people must assemble and install it . (PDP-6010FD) Caution • This product can also install the display on a rack by detaching the stand... used only with "L" inscribed Sheet Base cover 17 En Attaching the Pioneer stand The plasma display comes with the Pioneer table top stand. Preparation 05 English Chapter 5 Preparation Installing the plasma...
Owner's Manual
Page 31
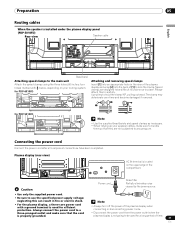
.... for a long period of the compartment. Speed clamps are not subjected to the main unit Attach the speed clamps using the three holes (60 inches: four holes) marked with a ground terminal is located on the upper edge of time. 31 En Caution • Use only the ... cord Connect the power cord after all component connections have been completed. Plasma display (rear view) 4 5 AC IN terminal is used for PDP-6010FD 4 5 Attaching and removing speed clamps Insert [1] into an appropriate hole on your speaker cables, make sure that they are designed to be used ...
.... for a long period of the compartment. Speed clamps are not subjected to the main unit Attach the speed clamps using the three holes (60 inches: four holes) marked with a ground terminal is located on the upper edge of time. 31 En Caution • Use only the ... cord Connect the power cord after all component connections have been completed. Plasma display (rear view) 4 5 AC IN terminal is used for PDP-6010FD 4 5 Attaching and removing speed clamps Insert [1] into an appropriate hole on your speaker cables, make sure that they are designed to be used ...
Owner's Manual
Page 42
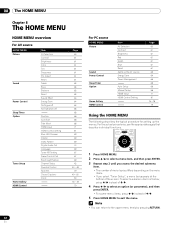
... Orbiter Video Pattern Digital Audio Out Language Tuner NR Setting Game Control Pref Room Light Sensor Channel Setup Parental Control Favorites Closed Captions Clock Page 60 61 61 61 61 61 61 61 63 63 63 63 64 64 64 65 65 66 68 68 71 81 69 69 69 74... Contrast Brightness Red Green Blue Reset Same as the AV source Energy Save Power Management Auto Setup Manual Setup HDMI Input HDMI Control Setting Page 60 61 61 61 61 61 61 63 64 65 65 66 66 71 81 76 - 78 79 Using the HOME MENU The following describes the...
... Orbiter Video Pattern Digital Audio Out Language Tuner NR Setting Game Control Pref Room Light Sensor Channel Setup Parental Control Favorites Closed Captions Clock Page 60 61 61 61 61 61 61 61 63 63 63 63 64 64 64 65 65 66 68 68 71 81 69 69 69 74... Contrast Brightness Red Green Blue Reset Same as the AV source Energy Save Power Management Auto Setup Manual Setup HDMI Input HDMI Control Setting Page 60 61 61 61 61 61 61 63 64 65 65 66 66 71 81 76 - 78 79 Using the HOME MENU The following describes the...
Owner's Manual
Page 48
.... You need not press ENTER first; Please Input Your Password. • The above password entry screen will also be shown during 2screen, picture-in approximately 60 seconds after no settings are entered. 6 Press HOME MENU to appear again. After the screen disappears, pressing ENTER causes it to exit the menu. Enter...
.... You need not press ENTER first; Please Input Your Password. • The above password entry screen will also be shown during 2screen, picture-in approximately 60 seconds after no settings are entered. 6 Press HOME MENU to appear again. After the screen disappears, pressing ENTER causes it to exit the menu. Enter...
Owner's Manual
Page 60
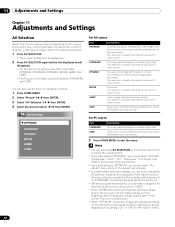
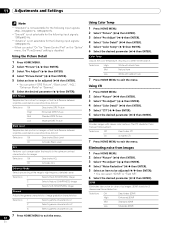
... select "Pro Adjust"; You can also use the menu to customize settings as well, regardless of its setting ("On" or "Off") for the "Option" menu. 60 En This mode does not allow manual image quality adjustment. For a very sharp image with the brightness level of the viewing area. This selection is...
... select "Pro Adjust"; You can also use the menu to customize settings as well, regardless of its setting ("On" or "Off") for the "Option" menu. 60 En This mode does not allow manual image quality adjustment. For a very sharp image with the brightness level of the viewing area. This selection is...
Owner's Manual
Page 62
...Black Level Emphasizes dark portion on the "Option" menu, the "PureCinema" setting is not selectable for the following input signals: 1080p@60 Hz. • "Advance" is disabled. 11 Adjustments and Settings Note • "Standard" is not selectable for the following input signals: 480p,... 720p@60 Hz, 1080p@60 Hz. • "Smooth" is not selectable for the following input signals: 1080p@60 Hz. • When you select "On" for 3dimensional Noise Reduction. The CTI stands for images Selections...
...Black Level Emphasizes dark portion on the "Option" menu, the "PureCinema" setting is not selectable for the following input signals: 1080p@60 Hz. • "Advance" is disabled. 11 Adjustments and Settings Note • "Standard" is not selectable for the following input signals: 480p,... 720p@60 Hz, 1080p@60 Hz. • "Smooth" is not selectable for the following input signals: 1080p@60 Hz. • When you select "On" for 3dimensional Noise Reduction. The CTI stands for images Selections...
Owner's Manual
Page 63
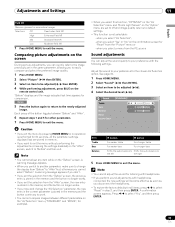
... adjustment, press BLUE on the "Before" screen. Press / to exit the menu. "Before" displays and the image adjusted last time appears for 60 seconds, all items, press / to your preference with headphones connected, the new settings will become effective as soon as you select "AV Selection", ...To restore the factory defaults for all the parameter settings displayed last are stored in the same parameter, allowing you cannot select "Before". See page 60. 1 Press HOME MENU. 2 Select "Sound" ( / then ENTER). 3 Select an item to exit the menu without performing the adjustments (or...
... adjustment, press BLUE on the "Before" screen. Press / to exit the menu. "Before" displays and the image adjusted last time appears for 60 seconds, all items, press / to your preference with headphones connected, the new settings will become effective as soon as you select "AV Selection", ...To restore the factory defaults for all the parameter settings displayed last are stored in the same parameter, allowing you cannot select "Before". See page 60. 1 Press HOME MENU. 2 Select "Sound" ( / then ENTER). 3 Select an item to exit the menu without performing the adjustments (or...
Owner's Manual
Page 65
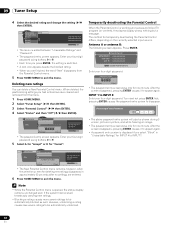
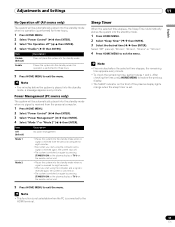
... selectable when the PC is received from the personal computer for three hours 5 Press HOME MENU to exit the menu. Select "Off" (cancel), "30 min", "60 min", "90 min" or "120 min". 4 Press HOME MENU to the HDMI terminal. 65 En Note • Five minutes before the selected time elapses, the...
... selectable when the PC is received from the personal computer for three hours 5 Press HOME MENU to exit the menu. Select "Off" (cancel), "30 min", "60 min", "90 min" or "120 min". 4 Press HOME MENU to the HDMI terminal. 65 En Note • Five minutes before the selected time elapses, the...
Owner's Manual
Page 71
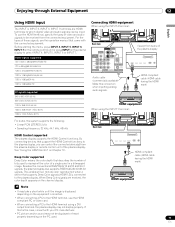
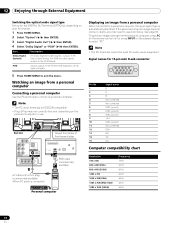
... (1440) x [email protected] Hz/60 Hz 720 x [email protected] Hz/60 Hz 1280 x [email protected] Hz/60 Hz 1920 x [email protected] Hz/60 Hz 1920 x 1080p@24 Hz 1920 x 1080p@60 Hz PC signals supported 640 x 480 (VGA) 60 Hz 800 x 600 (SVGA) 60 Hz 1024 x 768 (XGA) 60 Hz 1360 x 768 (Wide - By... the remote control unit or press INPUT on the equipment connected. • When connecting a PC to select INPUT 4, INPUT 5, INPUT 6 or INPUT 7. XGA) 60 Hz 1280 x 1024 (SXGA) 60 Hz For audio, the system supports the following: • Linear PCM (STEREO 2ch) • Sampling frequency: 32 kHz, 44.1 kHz, 48 kHz Connecting...
... (1440) x [email protected] Hz/60 Hz 720 x [email protected] Hz/60 Hz 1280 x [email protected] Hz/60 Hz 1920 x [email protected] Hz/60 Hz 1920 x 1080p@24 Hz 1920 x 1080p@60 Hz PC signals supported 640 x 480 (VGA) 60 Hz 800 x 600 (SVGA) 60 Hz 1024 x 768 (XGA) 60 Hz 1360 x 768 (Wide - By... the remote control unit or press INPUT on the equipment connected. • When connecting a PC to select INPUT 4, INPUT 5, INPUT 6 or INPUT 7. XGA) 60 Hz 1280 x 1024 (SXGA) 60 Hz For audio, the system supports the following: • Linear PCM (STEREO 2ch) • Sampling frequency: 32 kHz, 44.1 kHz, 48 kHz Connecting...
Owner's Manual
Page 74
... x 400 640 x 480 (VGA) 800 x 600 (SVGA) 1280 x 720 1024 x 768 (XGA) 1360 x 768 (Wide-XGA) 1280 x 1024 (SXGA) Frequency 70 Hz 60 Hz 60 Hz 60 Hz 60 Hz 60 Hz 60 Hz 74 En PCM Always outputs in the PCM format regardless of the types of the plasma display RGB cable (commercially available) AV...
... x 400 640 x 480 (VGA) 800 x 600 (SVGA) 1280 x 720 1024 x 768 (XGA) 1360 x 768 (Wide-XGA) 1280 x 1024 (SXGA) Frequency 70 Hz 60 Hz 60 Hz 60 Hz 60 Hz 60 Hz 60 Hz 74 En PCM Always outputs in the PCM format regardless of the types of the plasma display RGB cable (commercially available) AV...
Owner's Manual
Page 78
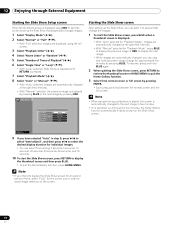
... to restore the thumbnail screen or HOME MENU to quit the Home Gallery function. 3 Select from among 3 seconds, 5 seconds, 10 seconds, 20 seconds, 30 seconds, 60 seconds, and 90 seconds. 10 To start the Slide Show screen, press RETURN to display the thumbnail screen and then press BLUE. • To quit...
... to restore the thumbnail screen or HOME MENU to quit the Home Gallery function. 3 Select from among 3 seconds, 5 seconds, 10 seconds, 20 seconds, 30 seconds, 60 seconds, and 90 seconds. 10 To start the Slide Show screen, press RETURN to display the thumbnail screen and then press BLUE. • To quit...
Owner's Manual
Page 103
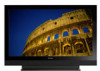
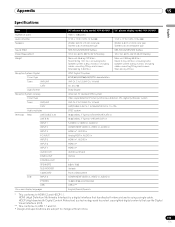
... INPUT INPUT 5 INPUT 6 INPUT 7 AUDIO OUT DIGITAL OUT CONTROL OUT SPEAKERS SUB WOOFER CableCARD Side INPUT 3 PHONES USB On-screen display languages 60" plasma display model: PDP-6010FD 50" plasma display model: PDP-5010FD 1920 × 1080 pixels 17 W + 17 W (1 kHz, 10 %, 6 Ω) 17 W + 17 W (1 kHz, 10 %, 6 Ω) Woofer: 4.8 cm x 13 cm cone type...
... INPUT INPUT 5 INPUT 6 INPUT 7 AUDIO OUT DIGITAL OUT CONTROL OUT SPEAKERS SUB WOOFER CableCARD Side INPUT 3 PHONES USB On-screen display languages 60" plasma display model: PDP-6010FD 50" plasma display model: PDP-5010FD 1920 × 1080 pixels 17 W + 17 W (1 kHz, 10 %, 6 Ω) 17 W + 17 W (1 kHz, 10 %, 6 Ω) Woofer: 4.8 cm x 13 cm cone type...


