Owner's Manual
Page 7
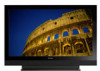
... to this Pioneer plasma display incorporates state-of accessories other equipment, walls, etc. To enjoy beautiful and bright images on the sides and rear of the unit to remove dust build-up by using the still picture mode from this Pioneer PDP-6010FD/PDP-5010FD plasma ...temperature exceeds a certain degree, the display will not be held responsible for many factors: inappropriate installation site, improper assembly/installation/mounting, improper operation of these models as very precise and highly advanced technology. To achieve images of exceptional quality, this product. Usage...
... to this Pioneer plasma display incorporates state-of accessories other equipment, walls, etc. To enjoy beautiful and bright images on the sides and rear of the unit to remove dust build-up by using the still picture mode from this Pioneer PDP-6010FD/PDP-5010FD plasma ...temperature exceeds a certain degree, the display will not be held responsible for many factors: inappropriate installation site, improper assembly/installation/mounting, improper operation of these models as very precise and highly advanced technology. To achieve images of exceptional quality, this product. Usage...
Owner's Manual
Page 10
...hitting it has small depth and is unstable, unpack, carry, and install the product with the highest priority on the specification label. Wall or ceiling mounting-When mounting the product on a bed, sofa, rug or other heat- Do not cover or block these vents and openings since they can... the product on a wall or ceiling, be moved with impact. Never expose the screen of service or repair work, request the service technician to perform safety checks to a strong impact, for ventilation. The plasma display weighs about 66.2 kg (145.9 lbs.) for the PDP-6010FD (including the stand and...
...hitting it has small depth and is unstable, unpack, carry, and install the product with the highest priority on the specification label. Wall or ceiling mounting-When mounting the product on a bed, sofa, rug or other heat- Do not cover or block these vents and openings since they can... the product on a wall or ceiling, be moved with impact. Never expose the screen of service or repair work, request the service technician to perform safety checks to a strong impact, for ventilation. The plasma display weighs about 66.2 kg (145.9 lbs.) for the PDP-6010FD (including the stand and...
Owner's Manual
Page 12
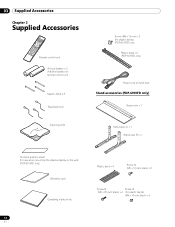
... × 3 Cleaning cloth Screw (M4 x 10 mm) x 2 (for plastic bands) (PDP-5010FD only) Plastic band x 2 (PDP-5010FD only) Power cord (2 m/6.6 feet) Stand accessories (PDP-6010FD only) Base cover x 1 Stand pipe (L) x 1 Stand pipe (R) x 1 Terminal position sheet (for use when mounting the plasma display on the wall) (PDP-6010FD only) Warranty card Operating instructions 12 En Plastic band x 4 Screw ➀...
... × 3 Cleaning cloth Screw (M4 x 10 mm) x 2 (for plastic bands) (PDP-5010FD only) Plastic band x 2 (PDP-5010FD only) Power cord (2 m/6.6 feet) Stand accessories (PDP-6010FD only) Base cover x 1 Stand pipe (L) x 1 Stand pipe (R) x 1 Terminal position sheet (for use when mounting the plasma display on the wall) (PDP-6010FD only) Warranty card Operating instructions 12 En Plastic band x 4 Screw ➀...
Owner's Manual
Page 18
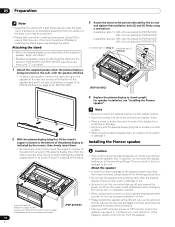
... of the plasma display other than the stand insertion slots. Installing the Pioneer speaker • Be extremely careful not to insert the support columns of the stand into any part of the stand indicates downward. (PDP-6010FD) • Please handle the speaker with the plasma display lying flat ...on to the unit. Insert the stand into the holes vertically and tighten them . If a sheet is being mounted on page 26 for PDP-6010FD and on the wall, with anything other than the plasma display. This can become damaged or broken when they are in interference or color ...
... of the plasma display other than the stand insertion slots. Installing the Pioneer speaker • Be extremely careful not to insert the support columns of the stand into any part of the stand indicates downward. (PDP-6010FD) • Please handle the speaker with the plasma display lying flat ...on to the unit. Insert the stand into the holes vertically and tighten them . If a sheet is being mounted on page 26 for PDP-6010FD and on the wall, with anything other than the plasma display. This can become damaged or broken when they are in interference or color ...
Owner's Manual
Page 19
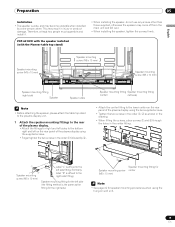
... the plasma display. • Attach the fittings for the left on wall unit. 19 En PDP-6010FD with the speaker installed (with the Pioneer table top stand) Speaker mounting screw (M5 x 10 mm) Speaker mounting screw (M5 x 10 mm) Speaker mounting screw (M5 x 10 mm) Speaker mounting fitting (right side) Speaker Speaker cable Note • Before attaching the...
... the plasma display. • Attach the fittings for the left on wall unit. 19 En PDP-6010FD with the speaker installed (with the Pioneer table top stand) Speaker mounting screw (M5 x 10 mm) Speaker mounting screw (M5 x 10 mm) Speaker mounting screw (M5 x 10 mm) Speaker mounting fitting (right side) Speaker Speaker cable Note • Before attaching the...
Owner's Manual
Page 20
... It is not used when the plasma display is installed on to move the display holding on the wall. Note • If after attaching the speaker its position needs to the mounting fittings while confirming their locations. As you may easily strike the stand, use the protective wrapping in which...speaker and/or table top stand from striking against each other, fit the speaker to be adjusted horizontally or vertically, first loosen the speaker mounting screws, reposition and then tighten the screws again at the rear of the speaker The side with the stand. In addition, do not ...
... It is not used when the plasma display is installed on to move the display holding on the wall. Note • If after attaching the speaker its position needs to the mounting fittings while confirming their locations. As you may easily strike the stand, use the protective wrapping in which...speaker and/or table top stand from striking against each other, fit the speaker to be adjusted horizontally or vertically, first loosen the speaker mounting screws, reposition and then tighten the screws again at the rear of the speaker The side with the stand. In addition, do not ...
Owner's Manual
Page 22
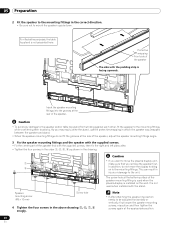
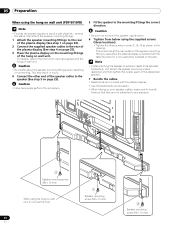
... position needs to be adjusted horizontally, first loosen the speaker mounting screws, reposition and then tighten the screws again at the rear surface of the speaker mounting fitting is used when installed on the wall. 05 Preparation When using the hung on wall unit (PDP-6010FD) Note • First lay the plasma display on top of...
... position needs to be adjusted horizontally, first loosen the speaker mounting screws, reposition and then tighten the screws again at the rear surface of the speaker mounting fitting is used when installed on the wall. 05 Preparation When using the hung on wall unit (PDP-6010FD) Note • First lay the plasma display on top of...

Owner's Manual
Page 24
...when the plasma display is facing upwards. Insert the groove on the wall. Tighten the three screws in order , , as shown in which the speaker was wrapped between the speaker and stand. • When the speaker mounting fittings do not move the plasma display holding on to be adjusted ... grooves at the appropriate position. 24 En It is not presented here. Protective wrapping Front side of the speaker, adjust the speaker mounting fittings angle. 3 Tighten from striking against each other, fit the speaker to move the plasma display, make sure that you want to the...
...when the plasma display is facing upwards. Insert the groove on the wall. Tighten the three screws in order , , as shown in which the speaker was wrapped between the speaker and stand. • When the speaker mounting fittings do not move the plasma display holding on to be adjusted ... grooves at the appropriate position. 24 En It is not presented here. Protective wrapping Front side of the speaker, adjust the speaker mounting fittings angle. 3 Tighten from striking against each other, fit the speaker to move the plasma display, make sure that you want to the...
Owner's Manual
Page 26
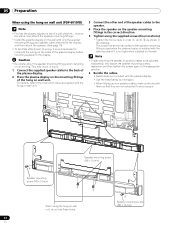
Caution • Be careful about the speaker mounting fittings when installing or connecting. Caution • Be sure not to mount the speaker upside down. 6 Tighten from below using the hung on wall unit (PDP-5010FD) Note • First lay the plasma display on top of a soft sheet etc., remove ...the stand, then attach the speaker mounting fittings. 1 Attach the speaker mounting fittings to the rear of the plasma display (See step 1 ...
Caution • Be careful about the speaker mounting fittings when installing or connecting. Caution • Be sure not to mount the speaker upside down. 6 Tighten from below using the hung on wall unit (PDP-5010FD) Note • First lay the plasma display on top of a soft sheet etc., remove ...the stand, then attach the speaker mounting fittings. 1 Attach the speaker mounting fittings to the rear of the plasma display (See step 1 ...
Owner's Manual
Page 28
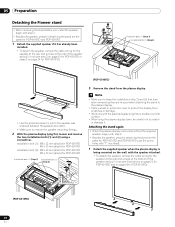
...). (PDP-6010FD) 28 En 05 Preparation Detaching the Pioneer stand • When removing the stand before you install the speaker, begin with step 2. • Besides the speaker, steps for attaching the stand are the same for PDP-6010FD and PDP-5010FD (use the screw holes with "T" inscribed). 1 Detach the supplied speaker when the plasma display is mounted...
...). (PDP-6010FD) 28 En 05 Preparation Detaching the Pioneer stand • When removing the stand before you install the speaker, begin with step 2. • Besides the speaker, steps for attaching the stand are the same for PDP-6010FD and PDP-5010FD (use the screw holes with "T" inscribed). 1 Detach the supplied speaker when the plasma display is mounted...

