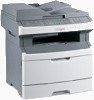

Universal Driver
Page 19
...from the tray assigned to the paper that can be launched as part of Fax numbers that also specify which paper source the printer should use . Installing Fax Only similarly installs the Fax and Fax Settings tabs, but is not available on each page of paper, such as ... Assign a form defining the paper size and margins to fax options only. Use Account Tracking if: • Many departments in your printer supports fax. Installing fax adds the Fax tab to the Printing Preferences dialog and the Fax Settings tab to the source directory. The printer automatically prints from...
...from the tray assigned to the paper that can be launched as part of Fax numbers that also specify which paper source the printer should use . Installing Fax Only similarly installs the Fax and Fax Settings tabs, but is not available on each page of paper, such as ... Assign a form defining the paper size and margins to fax options only. Use Account Tracking if: • Many departments in your printer supports fax. Installing fax adds the Fax tab to the Printing Preferences dialog and the Fax Settings tab to the source directory. The printer automatically prints from...
Universal Print Driver Version 2.0 White Paper
Page 19
... amount of cyan, magenta, yellow, and black toner used in the printed document. Match the colors in the Fax Settings section of the Fax tab. Fax Settings include: • Fax number(s)-These are correct, and helps to prevent faxes from the phone book. • Dialing prefix-This is sent. Note: The Color Matching options are available only...
... amount of cyan, magenta, yellow, and black toner used in the printed document. Match the colors in the Fax Settings section of the Fax tab. Fax Settings include: • Fax number(s)-These are correct, and helps to prevent faxes from the phone book. • Dialing prefix-This is sent. Note: The Color Matching options are available only...

User's Guide
Page 3
... pages...65 Canceling a print job...66 Copying...68 Making copies...68 Copying photos...69 Copying on specialty media...69 Customizing copy settings...70 Pausing the current print job to make copies 75 Placing an overlay message on each page 75 Canceling a copy job...... e-mail shortcut using the Embedded Web Server 78 E-mailing a document...78 Canceling an e-mail...80 Faxing...81 Getting the printer ready to fax...81 Sending a fax...93 Creating shortcuts...96 Using shortcuts and the address book...97 Customizing fax settings...98 Canceling an outgoing fax...100 Understanding fax options...101
... pages...65 Canceling a print job...66 Copying...68 Making copies...68 Copying photos...69 Copying on specialty media...69 Customizing copy settings...70 Pausing the current print job to make copies 75 Placing an overlay message on each page 75 Canceling a copy job...... e-mail shortcut using the Embedded Web Server 78 E-mailing a document...78 Canceling an e-mail...80 Faxing...81 Getting the printer ready to fax...81 Sending a fax...93 Creating shortcuts...96 Using shortcuts and the address book...97 Customizing fax settings...98 Canceling an outgoing fax...100 Understanding fax options...101
User's Guide
Page 15
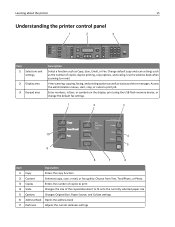
...printing, copy options, and scaling. View scanning, copying, faxing, and printing options as well as Copy, Scan, Email, or Fax. Enter numbers, letters, or symbols on the display, print using the USB flash memory device, or change the default fax settings. 1 2 3 10 4 5 9 8 7 6... Item Description 1 Copy Enters the copy function 2 Content Enhances copy, scan, e‑mail, or fax quality. Learning about the printer 15 Understanding the printer control panel 1 ...
...printing, copy options, and scaling. View scanning, copying, faxing, and printing options as well as Copy, Scan, Email, or Fax. Enter numbers, letters, or symbols on the display, print using the USB flash memory device, or change the default fax settings. 1 2 3 10 4 5 9 8 7 6... Item Description 1 Copy Enters the copy function 2 Content Enhances copy, scan, e‑mail, or fax quality. Learning about the printer 15 Understanding the printer control panel 1 ...

User's Guide
Page 82
...will move to the next space. 4 After entering the Station Number, press . The display changes to set up the printer, see the following table. a Press the button on all outgoing faxes. 6 Click inside the Station Name box, and then enter the name to be successfully attached to ... then print a network setup page and locate the address in the TCP/IP section. 2 Click Settings. 3 Click Fax Settings. 4 Click Analog Fax Setup. 5 Click inside the Station Number box, and then enter the printer fax number. 7 Click Submit. The first time you press the button again, one of your DSL ...
...will move to the next space. 4 After entering the Station Number, press . The display changes to set up the printer, see the following table. a Press the button on all outgoing faxes. 6 Click inside the Station Name box, and then enter the name to be successfully attached to ... then print a network setup page and locate the address in the TCP/IP section. 2 Click Settings. 3 Click Fax Settings. 4 Click Analog Fax Setup. 5 Click inside the Station Number box, and then enter the printer fax number. 7 Click Submit. The first time you press the button again, one of your DSL ...

User's Guide
Page 84
... may be available from your PBX system. Connecting to a distinctive ring service A distinctive ring service may have multiple telephone numbers on using the fax with a PBX system, see the documentation that came with the printer to the printer LINE port . 2 Connect the other end of the ...DSL filter cable to an active telephone wall jack. 1 3 2 Connecting to a PBX or ISDN system If you use . b Press the arrow buttons until Fax Settings appears, and then press . This service allows you to have to connect to a specific port. • When using a PBX system, dial the outside line...
... may be available from your PBX system. Connecting to a distinctive ring service A distinctive ring service may have multiple telephone numbers on using the fax with a PBX system, see the documentation that came with the printer to the printer LINE port . 2 Connect the other end of the ...DSL filter cable to an active telephone wall jack. 1 3 2 Connecting to a PBX or ISDN system If you use . b Press the arrow buttons until Fax Settings appears, and then press . This service allows you to have to connect to a specific port. • When using a PBX system, dial the outside line...

User's Guide
Page 92
...computer modem LINE port to be printed on outgoing faxes: 1 Type the printer IP address into the address field of your Web browser. Setting the outgoing fax name and number To have the designated fax name and fax number printed on all outgoing faxes. 6 Click inside the Station Name box, ... network setup page and locate the address in the TCP/IP section. 2 Click Settings. 3 Click Fax Settings. 4 Click Analog Fax Setup. 5 Click inside the Station Number box, and then enter the printer fax number. 7 Click Submit. Setting the date and time If the date or time that is incorrect, then you ...
...computer modem LINE port to be printed on outgoing faxes: 1 Type the printer IP address into the address field of your Web browser. Setting the outgoing fax name and number To have the designated fax name and fax number printed on all outgoing faxes. 6 Click inside the Station Name box, ... network setup page and locate the address in the TCP/IP section. 2 Click Settings. 3 Click Fax Settings. 4 Click Analog Fax Setup. 5 Click inside the Station Number box, and then enter the printer fax number. 7 Click Submit. Setting the date and time If the date or time that is incorrect, then you ...

User's Guide
Page 98
...magazine clippings) into the ADF. Making a fax lighter or darker 1 Load an original document faceup, short edge first into the ADF or facedown on the scanner glass. Customizing fax settings Changing the fax resolution Adjusting the resolution setting changes the quality of the paper (duplexing)... 1 From the printer control panel, press the Fax button. 2 Press the Duplex/2‑Sided button. 3 Press...
...magazine clippings) into the ADF. Making a fax lighter or darker 1 Load an original document faceup, short edge first into the ADF or facedown on the scanner glass. Customizing fax settings Changing the fax resolution Adjusting the resolution setting changes the quality of the paper (duplexing)... 1 From the printer control panel, press the Fax button. 2 Press the Duplex/2‑Sided button. 3 Press...

User's Guide
Page 99
... page and locate the address in the TCP/IP section. 2 Click Settings. 3 Click Fax Settings. 4 Click Analog Fax Setup. 5 Click inside the Fax Forwarding box, and then select one of your Web browser. Note: If you print and forward received faxes to list, select Fax. Sending a fax at a scheduled time 1 Load an original document faceup, short edge first...
... page and locate the address in the TCP/IP section. 2 Click Settings. 3 Click Fax Settings. 4 Click Analog Fax Setup. 5 Click inside the Fax Forwarding box, and then select one of your Web browser. Note: If you print and forward received faxes to list, select Fax. Sending a fax at a scheduled time 1 Load an original document faceup, short edge first...
User's Guide
Page 100
..., and then Cancel Job appears. 2 Press to resume scanning the fax. to cancel the job. The printer clears all incoming faxes that was selected in the TCP/IP section. 2 Click Settings. 3 Click Fax Settings. 4 Click Analog Fax Setup. 5 Click the Block No Name Fax option. Blocking junk faxes 1 Type the printer IP address into the address field of...
..., and then Cancel Job appears. 2 Press to resume scanning the fax. to cancel the job. The printer clears all incoming faxes that was selected in the TCP/IP section. 2 Click Settings. 3 Click Fax Settings. 4 Click Analog Fax Setup. 5 Click the Block No Name Fax option. Blocking junk faxes 1 Type the printer IP address into the address field of...
User's Guide
Page 108
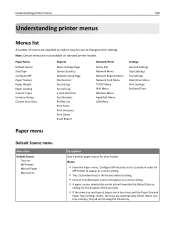
... Asset Report Network/Ports Active NIC Network Menu Network Reports Menu Network Card Menu TCP/IP Menu IPv6 Menu Wireless Menu AppleTalk Menu USB Menu Settings General Settings Copy Settings Fax Settings Flash Drive Menu Print Settings Set Date/Time Paper menu Default Source menu Menu item Default Source Tray MP Feeder Manual Paper Manual Env Description...
... Asset Report Network/Ports Active NIC Network Menu Network Reports Menu Network Card Menu TCP/IP Menu IPv6 Menu Wireless Menu AppleTalk Menu USB Menu Settings General Settings Copy Settings Fax Settings Flash Drive Menu Print Settings Set Date/Time Paper menu Default Source menu Menu item Default Source Tray MP Feeder Manual Paper Manual Env Description...
User's Guide
Page 127
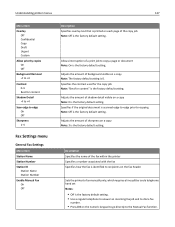
.... • Press # 0 on the numeric keypad to go directly to edge On Off Sharpness 1-5 Fax Settings menu General Fax Settings Menu item Station Name Station Number Station ID Station Name Station Number Enable Manual Fax On Off Description Specifies overlay text that is printed on each page of shadow detail visible on a copy Note: 3 is...
.... • Press # 0 on the numeric keypad to go directly to edge On Off Sharpness 1-5 Fax Settings menu General Fax Settings Menu item Station Name Station Number Station ID Station Name Station Number Enable Manual Fax On Off Description Specifies overlay text that is printed on each page of shadow detail visible on a copy Note: 3 is...

User's Guide
Page 177
... properly. Invalid Engine Code You need to clear. Try one or more of the following : • Press the arrow buttons until fax is in the Settings menu under General Fax Settings or Analog Fax Setup. Note: Engine code may be done in Hex Trace mode. If the message appears again, then contact your system support...
... properly. Invalid Engine Code You need to clear. Try one or more of the following : • Press the arrow buttons until fax is in the Settings menu under General Fax Settings or Analog Fax Setup. Note: Engine code may be done in Hex Trace mode. If the message appears again, then contact your system support...

User's Guide
Page 196
... the phone line rings before sending or receiving a fax. CHECK THE RING COUNT DELAY SETTINGS The ring count delay sets the number of the following: CHECK TO SEE IF THE PAPER TRAY IS EMPTY Load paper in the TCP/IP section. 2 Click Settings. 3 Click Fax Settings. 4 Click Analog Fax Setup. 5 In the Rings to obtain the keypad...
... the phone line rings before sending or receiving a fax. CHECK THE RING COUNT DELAY SETTINGS The ring count delay sets the number of the following: CHECK TO SEE IF THE PAPER TRAY IS EMPTY Load paper in the TCP/IP section. 2 Click Settings. 3 Click Fax Settings. 4 Click Analog Fax Setup. 5 In the Rings to obtain the keypad...

User's Guide
Page 197
... setup page and locate the IP address in the TCP/IP section. 2 Click Settings. 3 Click Fax Settings. Note: If you do not know the IP address of the telephone line connection. • Increase the fax scan resolution, if possible. Troubleshooting 197 THE TONER MAY BE LOW 88 Cartridge low...in the upper left corner. Can receive but not send faxes These are possible solutions. Received fax has poor print quality These are possible solutions. MAKE SURE THE FAX TRANSMISSION SPEED IS NOT SET TOO HIGH Decrease the incoming fax transmission speed: 1 Type the printer IP address into the ...
... setup page and locate the IP address in the TCP/IP section. 2 Click Settings. 3 Click Fax Settings. Note: If you do not know the IP address of the telephone line connection. • Increase the fax scan resolution, if possible. Troubleshooting 197 THE TONER MAY BE LOW 88 Cartridge low...in the upper left corner. Can receive but not send faxes These are possible solutions. Received fax has poor print quality These are possible solutions. MAKE SURE THE FAX TRANSMISSION SPEED IS NOT SET TOO HIGH Decrease the incoming fax transmission speed: 1 Type the printer IP address into the ...
User's Guide
Page 230
... line 83 connecting to a PBX or ISDN 84 fax connections answering machine 85 computer modem 90 regional adapters 86 telephone 85 Fax failed 177 fax ports 22 fax quality, improving 102 Fax Settings menu 127 Fax Station Name not set up 177 Fax Station Number not set up 177 fax troubleshooting blocking junk faxes 100 caller ID is not shown 194 can...
... line 83 connecting to a PBX or ISDN 84 fax connections answering machine 85 computer modem 90 regional adapters 86 telephone 85 Fax failed 177 fax ports 22 fax quality, improving 102 Fax Settings menu 127 Fax Station Name not set up 177 Fax Station Number not set up 177 fax troubleshooting blocking junk faxes 100 caller ID is not shown 194 can...

User's Guide
Page 231
...flash drive 59 Flash Drive menu 132 flash memory card installing 19 troubleshooting 199 font sample list printing 65 Formatting Flash 177 forwarding faxes 99 G green settings Eco‑Mode 35 Power Saver 36 Quiet Mode 37 H Hex Trace 177 I Image menu 143 information, finding 8 installation wireless... Memory full, cannot send faxes 178 menu settings loading on multiple printers 159 menu settings page printing 24 menus Active NIC 116 AppleTalk 120 Configure MP 111 Copy Settings 125 Custom Scan Sizes 114 Custom Types 113 Default Source 108 diagram of 108 Fax Settings 127 Finishing 136 Flash Drive...
...flash drive 59 Flash Drive menu 132 flash memory card installing 19 troubleshooting 199 font sample list printing 65 Formatting Flash 177 forwarding faxes 99 G green settings Eco‑Mode 35 Power Saver 36 Quiet Mode 37 H Hex Trace 177 I Image menu 143 information, finding 8 installation wireless... Memory full, cannot send faxes 178 menu settings loading on multiple printers 159 menu settings page printing 24 menus Active NIC 116 AppleTalk 120 Configure MP 111 Copy Settings 125 Custom Scan Sizes 114 Custom Types 113 Default Source 108 diagram of 108 Fax Settings 127 Finishing 136 Flash Drive...

Service Manual
Page 87
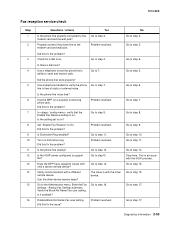
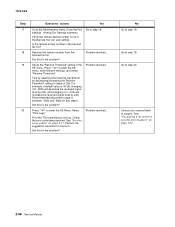
...Is the MFP on a properly functioning phone jack. Did the fax transmit? See "Service error codes" on page 2-17. Go to step 9. 9 Enable Behind a PABX under fax settings Problem fixed. Stop here. 7013-XXX Fax transmission service check Note: Before performing this service check, verify ...that cannot receive a fax. Go to step 6. Can it send a fax? 14 Press **411 to step 10. Disable Behind a PABX...
...Is the MFP on a properly functioning phone jack. Did the fax transmit? See "Service error codes" on page 2-17. Go to step 9. 9 Enable Behind a PABX under fax settings Problem fixed. Stop here. 7013-XXX Fax transmission service check Note: Before performing this service check, verify ...that cannot receive a fax. Go to step 6. Can it send a fax? 14 Press **411 to step 10. Disable Behind a PABX...
Service Manual
Page 89
... menu. Is the phone line noise-free? Is the phone line analog? Go to 7. Analog Fax Settings submenu. No Go to step 3. Go to step 2. Go to step 10. Go to step 6. Diagnostics information 2-55 7013-XXX Fax reception service check Step 1 2 3 4 5 6 7 8 9 10 11 12 13 14...step 9. Did this fix the problem? Go to send and receive calls. Problem resolved. Verify communications with only a certain remote device? Enter the Fax settings - Go to step 15. Go to step 6. Turn on . Did this fix the problem? Go to step 13. Problem resolved. Problem ...
... menu. Is the phone line noise-free? Is the phone line analog? Go to 7. Analog Fax Settings submenu. No Go to step 3. Go to step 2. Go to step 10. Go to step 6. Diagnostics information 2-55 7013-XXX Fax reception service check Step 1 2 3 4 5 6 7 8 9 10 11 12 13 14...step 9. Did this fix the problem? Go to send and receive calls. Problem resolved. Verify communications with only a certain remote device? Enter the Fax settings - Go to step 15. Go to step 6. Turn on . Did this fix the problem? Go to step 13. Problem resolved. Problem ...
Service Manual
Page 90
...For example, if default value is between -33db and -48db (in the SE menu. Go to step 19. See "Escalating a fax issue to step 18. Analog Fax Settings submenu. Problem resolved. Test by adjusting the received signal level by 2db. See "Service error codes" on page 2-57. 2-56 ... the T30 transmission/ job log. Go to enter the SE Menu. Check the error code being reported. Problem resolved. Enter the Fax settings - Press **411 to step 19. Adjust the "Receive Threshold" setting in 2db steps). Contact your second-level of 2db. Did this fix the problem?
...For example, if default value is between -33db and -48db (in the SE menu. Go to step 19. See "Escalating a fax issue to step 18. Analog Fax Settings submenu. Problem resolved. Test by adjusting the received signal level by 2db. See "Service error codes" on page 2-57. 2-56 ... the T30 transmission/ job log. Go to enter the SE Menu. Check the error code being reported. Problem resolved. Enter the Fax settings - Press **411 to step 19. Adjust the "Receive Threshold" setting in 2db steps). Contact your second-level of 2db. Did this fix the problem?


