Technical Reference
Page 19
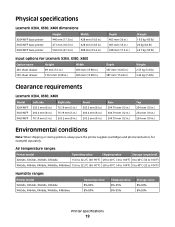
...19.5 kg (43 lb) 20 kg (44 lb) 22.7 kg (50 lb) Weight 2.55 kg (5.6 lb) 3.23 kg (7.2 lb) Clearance requirements Lexmark X264, X360, X460 Model X264 MFP X360 MFP X460 MFP Left side 203.2 mm (8 in.) 203.2 mm (8 in.) 76.19 mm (3 in.) Right side 76.19 mm (3 in...in.) 254 mm (10 in.) 254 mm (10 in.) Environmental conditions Note: When shipping or storing printers, always pack the printer supplies (cartridges and photoconductors, for example) separately. Air temperature ranges Printer model Operating value Shipping value Storage (unpacked) X264dn, X363dn, X364dn, X364dw 15.6 to 32.2°C (...
...19.5 kg (43 lb) 20 kg (44 lb) 22.7 kg (50 lb) Weight 2.55 kg (5.6 lb) 3.23 kg (7.2 lb) Clearance requirements Lexmark X264, X360, X460 Model X264 MFP X360 MFP X460 MFP Left side 203.2 mm (8 in.) 203.2 mm (8 in.) 76.19 mm (3 in.) Right side 76.19 mm (3 in...in.) 254 mm (10 in.) 254 mm (10 in.) Environmental conditions Note: When shipping or storing printers, always pack the printer supplies (cartridges and photoconductors, for example) separately. Air temperature ranges Printer model Operating value Shipping value Storage (unpacked) X264dn, X363dn, X364dn, X364dw 15.6 to 32.2°C (...
Technical Reference
Page 61
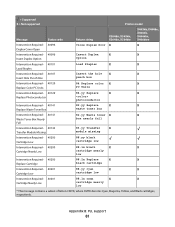
... X X Insert Hole Punch Box punch box Intervention Required - 40129 84 Replace color X X Replace Color PC Units PC Units Intervention Required - 40129 84.yy Replace X X Replace Photoconductor photoconductor Intervention Required - 40141 82.yy Replace X X Replace Waste Toner Box waste toner box Intervention Required - 40141 82.yy Waste toner X X Waste Toner Box Nearly box...
... X X Insert Hole Punch Box punch box Intervention Required - 40129 84 Replace color X X Replace Color PC Units PC Units Intervention Required - 40129 84.yy Replace X X Replace Photoconductor photoconductor Intervention Required - 40141 82.yy Replace X X Replace Waste Toner Box waste toner box Intervention Required - 40141 82.yy Waste toner X X Waste Toner Box Nearly box...

Technical Reference
Page 62
... Intervention Required - 40204 PC Kit Life Warning 84 PC kit life warning Intervention Required - 40204 84.yy X X Photoconductor Low photoconductor low Intervention Required - 40204 84 Photoconductor X X Photoconductor Low low Intervention Required - 40204 84.yy [color] X X Photoconductor Nearly Low photoconductor nearly low * This message contains a subset of letters CMYK, where CMYK denotes Cyan, Magenta, Yellow, and Black...
... Intervention Required - 40204 PC Kit Life Warning 84 PC kit life warning Intervention Required - 40204 84.yy X X Photoconductor Low photoconductor low Intervention Required - 40204 84 Photoconductor X X Photoconductor Low low Intervention Required - 40204 84.yy [color] X X Photoconductor Nearly Low photoconductor nearly low * This message contains a subset of letters CMYK, where CMYK denotes Cyan, Magenta, Yellow, and Black...

Technical Reference
Page 63
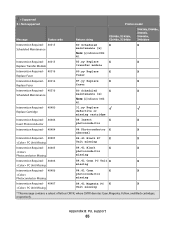
... Intervention Required - 40303 88 Replace yellow X X Replace Toner toner Intervention Required - 40304 Replace PC Kit 84 Replace PC Kit Intervention Required - 40304 84 Replace X X Replace Photoconductor photoconductor Intervention Required - 40305 84 Replace black X X 84 Replace Black PC Unit PC Unit Intervention Required - 40309 32.yy black X X Cartridge Part Number Unsupported cartridge part...
... Intervention Required - 40303 88 Replace yellow X X Replace Toner toner Intervention Required - 40304 Replace PC Kit 84 Replace PC Kit Intervention Required - 40304 84 Replace X X Replace Photoconductor photoconductor Intervention Required - 40305 84 Replace black X X 84 Replace Black PC Unit PC Unit Intervention Required - 40309 32.yy black X X Cartridge Part Number Unsupported cartridge part...
Technical Reference
Page 65
... 31.yy Replace defective or missing cartridge Intervention Required - 40404 84 Insert X X Insert Photoconductor photoconductor Intervention Required - 40404 84 Photoconductor X X abnormal Intervention Required - 40405 84.41 Black PC X X PC Unit Missing Unit missing Intervention Required - 40405 84.41 Black X X Photoconductor Missing photoconductor missing Intervention Required - 40406 84.41 Cyan PC Unit X X PC Unit Missing missing...
... 31.yy Replace defective or missing cartridge Intervention Required - 40404 84 Insert X X Insert Photoconductor photoconductor Intervention Required - 40404 84 Photoconductor X X abnormal Intervention Required - 40405 84.41 Black PC X X PC Unit Missing Unit missing Intervention Required - 40405 84.41 Black X X Photoconductor Missing photoconductor missing Intervention Required - 40406 84.41 Cyan PC Unit X X PC Unit Missing missing...
Technical Reference
Page 66
..., X363dn, X364dn, X364dw X463de, X464de, X466de, X466dte, X466dwe Intervention Required - 40407 84.41 Magenta X X Photoconductor Missing photoconductor missing Intervention Required - 40408 84.41 Yellow PC X X PC Unit Missing Unit missing Intervention Required - 40408 84.41 Yellow X X Photoconductor Missing photoconductor missing Intervention Required - 40409 30.yy Black toner X X Toner Cartridge Missing cartridge missing Intervention Required...
..., X363dn, X364dn, X364dw X463de, X464de, X466de, X466dte, X466dwe Intervention Required - 40407 84.41 Magenta X X Photoconductor Missing photoconductor missing Intervention Required - 40408 84.41 Yellow PC X X PC Unit Missing Unit missing Intervention Required - 40408 84.41 Yellow X X Photoconductor Missing photoconductor missing Intervention Required - 40409 30.yy Black toner X X Toner Cartridge Missing cartridge missing Intervention Required...

Technical Reference
Page 68
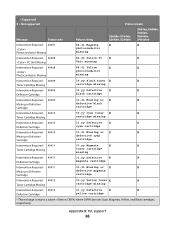
..., X364dw X466dwe Remove paper from X X bin Remove paper X X from Remove paper from standard output bin Remove X X Paper Remove Paper X X Output Bin Remove Paper X X Standard Bin Photoconductor X X exposure warning Check X X orientation or guides Check X X Paper Guide Paper changes X X needed Change X Appendix B: PJL support 68 Check Orientation or Guides 4100x Intervention Required - Remove...
..., X364dw X466dwe Remove paper from X X bin Remove paper X X from Remove paper from standard output bin Remove X X Paper Remove Paper X X Output Bin Remove Paper X X Standard Bin Photoconductor X X exposure warning Check X X orientation or guides Check X X Paper Guide Paper changes X X needed Change X Appendix B: PJL support 68 Check Orientation or Guides 4100x Intervention Required - Remove...

Card Stock & Label Guide
Page 23
... requires a stiffer backing material to prevent damage when the sheet is adequate so labels stay attached to the paper path guides, drive rollers, charge roller, photoconductor drum, transfer roller, and detack fingers, use zone coating. Contact your adhesive manufacturer or forms supplier for 100 milliseconds to 25 psi. Topcoats must be...
... requires a stiffer backing material to prevent damage when the sheet is adequate so labels stay attached to the paper path guides, drive rollers, charge roller, photoconductor drum, transfer roller, and detack fingers, use zone coating. Contact your adhesive manufacturer or forms supplier for 100 milliseconds to 25 psi. Topcoats must be...
Maintenance Guide
Page 2
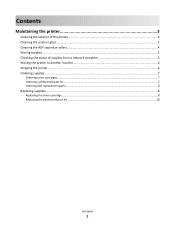
Contents Maintaining the printer 3 Cleaning the exterior of the printer...3 Cleaning the scanner glass...3 Cleaning the ADF separator rollers...4 Storing supplies...5 Checking the status of supplies from a network computer 5 Moving the printer to another location...6 Shipping the printer...6 Ordering supplies...7 Ordering toner cartridges...7 Ordering a photoconductor kit...7 Ordering ADF replacement parts...8 Replacing supplies...8 Replacing the toner cartridge...8 Replacing the photoconductor kit...10 Contents 2
Contents Maintaining the printer 3 Cleaning the exterior of the printer...3 Cleaning the scanner glass...3 Cleaning the ADF separator rollers...4 Storing supplies...5 Checking the status of supplies from a network computer 5 Moving the printer to another location...6 Shipping the printer...6 Ordering supplies...7 Ordering toner cartridges...7 Ordering a photoconductor kit...7 Ordering ADF replacement parts...8 Replacing supplies...8 Replacing the toner cartridge...8 Replacing the photoconductor kit...10 Contents 2

Maintenance Guide
Page 7
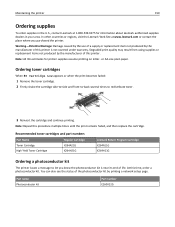
...then replace the cartridge. Note: Repeat this time, order a photoconductor kit. You can also see the status of the photoconductor kit by the manufacturer of this printer. In other countries or regions, visit the Lexmark Web Site at 1-800-539-6275 for printer supplies assume ...toner cartridges and part numbers Part Name Toner Cartridge High Yield Toner Cartridge Regular Cartridge X264A21G X264H21G Lexmark Return Program Cartridge X264A11G X264H11G Ordering a photoconductor kit The printer issues a message to redistribute toner. 3 Reinsert the cartridge and continue printing.
...then replace the cartridge. Note: Repeat this time, order a photoconductor kit. You can also see the status of the photoconductor kit by the manufacturer of this printer. In other countries or regions, visit the Lexmark Web Site at 1-800-539-6275 for printer supplies assume ...toner cartridges and part numbers Part Name Toner Cartridge High Yield Toner Cartridge Regular Cartridge X264A21G X264H21G Lexmark Return Program Cartridge X264A11G X264H11G Ordering a photoconductor kit The printer issues a message to redistribute toner. 3 Reinsert the cartridge and continue printing.

Maintenance Guide
Page 9
2 Press the button on the base of the photoconductor kit, and then pull the toner cartridge out using the handle. 3 Unpack the new toner cartridge. 4 Shake the cartridge in all directions to distribute the toner. Maintaining the printer 9
2 Press the button on the base of the photoconductor kit, and then pull the toner cartridge out using the handle. 3 Unpack the new toner cartridge. 4 Shake the cartridge in all directions to distribute the toner. Maintaining the printer 9

Maintenance Guide
Page 10
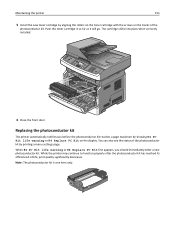
... printer automatically notifies you should immediately order a new photoconductor kit. While the printer may continue to function properly after the photoconductor kit has reached its official end-of the photoconductor kit. You can also see the status of the photoconductor kit by aligning the rollers on the toner cartridge ... toner cartridge by printing a menu settings page. When 84 PC Kit life warning or 84 Replace PC Kit first appears, you before the photoconductor kit reaches a page maximum by showing 84 PC Kit life warning or 84 Replace PC Kit on the tracks of -life, print quality...
... printer automatically notifies you should immediately order a new photoconductor kit. While the printer may continue to function properly after the photoconductor kit has reached its official end-of the photoconductor kit. You can also see the status of the photoconductor kit by aligning the rollers on the toner cartridge ... toner cartridge by printing a menu settings page. When 84 PC Kit life warning or 84 Replace PC Kit first appears, you before the photoconductor kit reaches a page maximum by showing 84 PC Kit life warning or 84 Replace PC Kit on the tracks of -life, print quality...

Maintenance Guide
Page 11
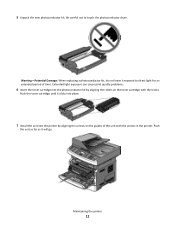
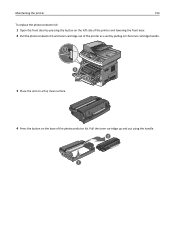
To replace the photoconductor kit: 1 Open the front door by pressing the button on the left side of the printer and lowering the front door. 2 Pull the photoconductor kit and toner cartridge out of the printer as a unit by pulling on the toner cartridge handle. 3 Place the unit on a flat, clean surface. 4 Press the button on the base of the photoconductor kit. Maintaining the printer 11 Pull the toner cartridge up and out using the handle.
To replace the photoconductor kit: 1 Open the front door by pressing the button on the left side of the printer and lowering the front door. 2 Pull the photoconductor kit and toner cartridge out of the printer as a unit by pulling on the toner cartridge handle. 3 Place the unit on a flat, clean surface. 4 Press the button on the base of the photoconductor kit. Maintaining the printer 11 Pull the toner cartridge up and out using the handle.
Maintenance Guide
Page 12
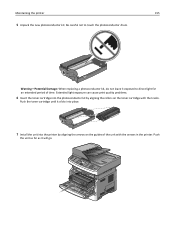
... the printer by aligning the rollers on the guides of time. Push the toner cartridge until it clicks into place. 7 Install the unit into the photoconductor kit by aligning the arrows on the toner cartridge with the arrows in the printer. Warning-Potential Damage: When replacing... a photoconductor kit, do not leave it will go. Push the unit as far as it exposed to touch the photoconductor drum. Be careful not to direct light for an extended period of the unit with the...
... the printer by aligning the rollers on the guides of time. Push the toner cartridge until it clicks into place. 7 Install the unit into the photoconductor kit by aligning the arrows on the toner cartridge with the arrows in the printer. Warning-Potential Damage: When replacing... a photoconductor kit, do not leave it will go. Push the unit as far as it exposed to touch the photoconductor drum. Be careful not to direct light for an extended period of the unit with the...
Maintenance Guide
Page 13
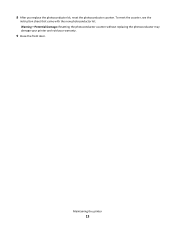
Maintaining the printer 13 Warning-Potential Damage: Resetting the photoconductor counter without replacing the photoconductor may damage your printer and void your warranty. 9 Close the front door. To reset the counter, see the instruction sheet that came with the new photoconductor kit. 8 After you replace the photoconductor kit, reset the photoconductor counter.
Maintaining the printer 13 Warning-Potential Damage: Resetting the photoconductor counter without replacing the photoconductor may damage your printer and void your warranty. 9 Close the front door. To reset the counter, see the instruction sheet that came with the new photoconductor kit. 8 After you replace the photoconductor kit, reset the photoconductor counter.
User's Guide
Page 150
...let you purchased the printer. Note: All life estimates for information about Lexmark authorized supplies dealers in the U.S., contact Lexmark at www.lexmark.com or contact the place where you know the photoconductor kit is not covered under warranty. Warning-Potential Damage: Damage caused by... and part numbers Part Name Regular Cartridge Toner Cartridge High Yield Toner Cartridge X264A21G X264H21G Lexmark Return Program Cartridge X264A11G X264H11G Ordering a photoconductor kit The printer issues a message to redistribute toner. 3 Reinsert the cartridge and continue printing.
...let you purchased the printer. Note: All life estimates for information about Lexmark authorized supplies dealers in the U.S., contact Lexmark at www.lexmark.com or contact the place where you know the photoconductor kit is not covered under warranty. Warning-Potential Damage: Damage caused by... and part numbers Part Name Regular Cartridge Toner Cartridge High Yield Toner Cartridge X264A21G X264H21G Lexmark Return Program Cartridge X264A11G X264H11G Ordering a photoconductor kit The printer issues a message to redistribute toner. 3 Reinsert the cartridge and continue printing.

User's Guide
Page 152
Maintaining the printer 152 2 Press the button on the base of the photoconductor kit, and then pull the toner cartridge out using the handle. 1 2 3 Unpack the new toner cartridge. 4 Shake the cartridge in all directions to distribute the toner.
Maintaining the printer 152 2 Press the button on the base of the photoconductor kit, and then pull the toner cartridge out using the handle. 1 2 3 Unpack the new toner cartridge. 4 Shake the cartridge in all directions to distribute the toner.
User's Guide
Page 153
... one item only. Maintaining the printer 153 5 Install the new toner cartridge by printing a menu settings page. You can also see the status of the photoconductor kit by aligning the rollers on the toner cartridge with the arrows on the display. Push the toner cartridge in as far as it will... go. When 84 PC Kit life warning or 84 Replace PC Kit first appears, you before the photoconductor kit reaches a page maximum by showing 84 PC Kit life warning or 84 Replace PC Kit on the tracks of ‑life, print quality significantly...
... one item only. Maintaining the printer 153 5 Install the new toner cartridge by printing a menu settings page. You can also see the status of the photoconductor kit by aligning the rollers on the toner cartridge with the arrows on the display. Push the toner cartridge in as far as it will... go. When 84 PC Kit life warning or 84 Replace PC Kit first appears, you before the photoconductor kit reaches a page maximum by showing 84 PC Kit life warning or 84 Replace PC Kit on the tracks of ‑life, print quality significantly...
User's Guide
Page 154
Maintaining the printer 154 To replace the photoconductor kit: 1 Open the front door by pressing the button on the left side of the printer and lowering the front door. 2 Pull the photoconductor kit and toner cartridge out of the printer as a unit by pulling on the toner cartridge handle. 1 2 3 3 Place the unit on a flat, clean surface. 4 Press the button on the base of the photoconductor kit. Pull the toner cartridge up and out using the handle. 2 1
Maintaining the printer 154 To replace the photoconductor kit: 1 Open the front door by pressing the button on the left side of the printer and lowering the front door. 2 Pull the photoconductor kit and toner cartridge out of the printer as a unit by pulling on the toner cartridge handle. 1 2 3 3 Place the unit on a flat, clean surface. 4 Press the button on the base of the photoconductor kit. Pull the toner cartridge up and out using the handle. 2 1
User's Guide
Page 155
...the toner cartridge into the printer by aligning the rollers on the guides of time. Warning-Potential Damage: When replacing a photoconductor kit, do not leave it exposed to touch the photoconductor drum. Be careful not to direct light for an extended period of the unit with the tracks. Push the toner ...cartridge until it will go. Push the unit as far as it clicks into place. 7 Install the unit into the photoconductor kit by aligning the arrows on the toner cartridge with the arrows in the printer. Maintaining the printer 155 5 Unpack the new...
...the toner cartridge into the printer by aligning the rollers on the guides of time. Warning-Potential Damage: When replacing a photoconductor kit, do not leave it exposed to touch the photoconductor drum. Be careful not to direct light for an extended period of the unit with the tracks. Push the toner ...cartridge until it will go. Push the unit as far as it clicks into place. 7 Install the unit into the photoconductor kit by aligning the arrows on the toner cartridge with the arrows in the printer. Maintaining the printer 155 5 Unpack the new...


