Technical Reference
Page 57
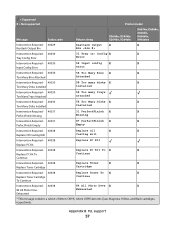
... Intervention Required - 40037 87 PerfectFinish X X PerfectFinish Empty Empty Intervention Required - 40038 Replace Oil X X Replace Oil Coating Roll Coating Roll Intervention Required - 40038 Replace PC Kit Replace PC Kit Intervention Required - 40038 Replace PC Kit To X X Replace PC Kit To Continue Continue Intervention Required - 40038 Replace Toner X X Replace Toner Cartridge Cartridge Intervention Required - 40038 Replace Toner To X X Replace Toner Cartridge Continue To Continue Intervention Required - 40038 84 All Photo...
... Intervention Required - 40037 87 PerfectFinish X X PerfectFinish Empty Empty Intervention Required - 40038 Replace Oil X X Replace Oil Coating Roll Coating Roll Intervention Required - 40038 Replace PC Kit Replace PC Kit Intervention Required - 40038 Replace PC Kit To X X Replace PC Kit To Continue Continue Intervention Required - 40038 Replace Toner X X Replace Toner Cartridge Cartridge Intervention Required - 40038 Replace Toner To X X Replace Toner Cartridge Continue To Continue Intervention Required - 40038 84 All Photo...

Technical Reference
Page 62
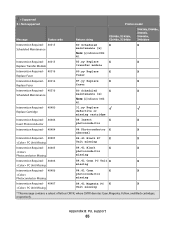
...magenta X X Cartridge Nearly Low cartridge nearly low Intervention Required - 40202 88.2x Replace X X Replace Cartridge magenta cartridge Intervention Required - 40203 88.yy yellow X X Cartridge Low ...Replace X X Replace Cartridge yellow cartridge Black PC Unit Life 40204 84 Black pc unit X X Warning life warning Intervention Required - 40204 84 unsupported X X Unsupported PC Unit [color] pc unit Intervention Required - 40204 84.yy Color PC X X Color PC Units Life Unit Life warning Warning Intervention Required - 40204 PC Kit Life Warning 84 PC kit...
...magenta X X Cartridge Nearly Low cartridge nearly low Intervention Required - 40202 88.2x Replace X X Replace Cartridge magenta cartridge Intervention Required - 40203 88.yy yellow X X Cartridge Low ...Replace X X Replace Cartridge yellow cartridge Black PC Unit Life 40204 84 Black pc unit X X Warning life warning Intervention Required - 40204 84 unsupported X X Unsupported PC Unit [color] pc unit Intervention Required - 40204 84.yy Color PC X X Color PC Units Life Unit Life warning Warning Intervention Required - 40204 PC Kit Life Warning 84 PC kit...

Technical Reference
Page 63
... Intervention Required - 40300 88 Replace black X X Replace Toner toner Intervention Required - 40301 88 Replace cyan X X Replace Toner toner Intervention Required - 40302 88 Replace magenta X X Replace Toner toner Intervention Required - 40303 88 Replace yellow X X Replace Toner toner Intervention Required - 40304 Replace PC Kit 84 Replace PC Kit Intervention Required - 40304 84 Replace X X Replace Photoconductor photoconductor Intervention Required - 40305 84 Replace black X X 84 Replace Black PC Unit PC Unit Intervention Required - 40309...
... Intervention Required - 40300 88 Replace black X X Replace Toner toner Intervention Required - 40301 88 Replace cyan X X Replace Toner toner Intervention Required - 40302 88 Replace magenta X X Replace Toner toner Intervention Required - 40303 88 Replace yellow X X Replace Toner toner Intervention Required - 40304 Replace PC Kit 84 Replace PC Kit Intervention Required - 40304 84 Replace X X Replace Photoconductor photoconductor Intervention Required - 40305 84 Replace black X X 84 Replace Black PC Unit PC Unit Intervention Required - 40309...
Technical Reference
Page 65
... Required - 40316 80 Scheduled X X Scheduled Maintenance maintenance [x] Note: [x] indicates 100k kit. Intervention Required - 40400 Replace Cartridge 31.yy Replace defective or missing cartridge Intervention Required - 40404 84 Insert X X Insert Photoconductor photoconductor Intervention Required - 40404 84 Photoconductor X X abnormal Intervention Required - 40405 84.41 Black PC X X PC Unit Missing Unit missing Intervention Required - 40405 84.41 Black...
... Required - 40316 80 Scheduled X X Scheduled Maintenance maintenance [x] Note: [x] indicates 100k kit. Intervention Required - 40400 Replace Cartridge 31.yy Replace defective or missing cartridge Intervention Required - 40404 84 Insert X X Insert Photoconductor photoconductor Intervention Required - 40404 84 Photoconductor X X abnormal Intervention Required - 40405 84.41 Black PC X X PC Unit Missing Unit missing Intervention Required - 40405 84.41 Black...

Maintenance Guide
Page 10
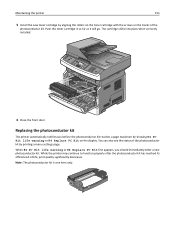
... item only. Push the toner cartridge in as far as it will go. When 84 PC Kit life warning or 84 Replace PC Kit first appears, you before the photoconductor kit reaches a page maximum by showing 84 PC Kit life warning or 84 Replace PC Kit on the tracks of -life, print quality significantly decreases. While the printer may continue to...
... item only. Push the toner cartridge in as far as it will go. When 84 PC Kit life warning or 84 Replace PC Kit first appears, you before the photoconductor kit reaches a page maximum by showing 84 PC Kit life warning or 84 Replace PC Kit on the tracks of -life, print quality significantly decreases. While the printer may continue to...
User's Guide
Page 153
... toner cartridge in as far as it will go. When 84 PC Kit life warning or 84 Replace PC Kit first appears, you before the photoconductor kit reaches a page maximum by showing 84 PC Kit life warning or 84 Replace PC Kit on the tracks of the photoconductor kit. Note: The photoconductor kit is one item only. While the printer may continue to...
... toner cartridge in as far as it will go. When 84 PC Kit life warning or 84 Replace PC Kit first appears, you before the photoconductor kit reaches a page maximum by showing 84 PC Kit life warning or 84 Replace PC Kit on the tracks of the photoconductor kit. Note: The photoconductor kit is one item only. While the printer may continue to...
User's Guide
Page 183
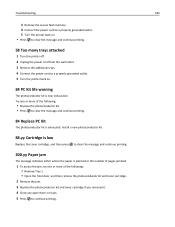
... jam The message indicates either where the paper is exhausted. Try one or more of the following: • Replace the photoconductor kit. • Press to clear the message and continue printing. 84 Replace PC Kit The photoconductor kit is jammed or the number of pages jammed. 1 To access the jam, try one or more of the...
... jam The message indicates either where the paper is exhausted. Try one or more of the following: • Replace the photoconductor kit. • Press to clear the message and continue printing. 84 Replace PC Kit The photoconductor kit is jammed or the number of pages jammed. 1 To access the jam, try one or more of the...
User's Guide
Page 229
... Paper jam 185 290-292 ADF Scanning Jams 186 293 Paper Missing 186 293.02 Flatbed Cover Open 186 294 ADF Jam 186 31.yy Replace defective or missing cartridge 180 34 Short paper 180 35 Insufficient memory to support Resource Save feature 181 37 Insufficient memory for Flash Memory Defragment... drawer installing 21 56 Standard USB port disabled 182 58 Too many flash options installed 182 58 Too many trays attached 183 84 PC Kit life warning 183 84 Replace PC Kit 183 840.01 Scanner Disabled 186 840.02 Scanner Auto Disabled 187 88.yy Cartridge is low 183 A Active NIC menu 116 address...
... Paper jam 185 290-292 ADF Scanning Jams 186 293 Paper Missing 186 293.02 Flatbed Cover Open 186 294 ADF Jam 186 31.yy Replace defective or missing cartridge 180 34 Short paper 180 35 Insufficient memory to support Resource Save feature 181 37 Insufficient memory for Flash Memory Defragment... drawer installing 21 56 Standard USB port disabled 182 58 Too many flash options installed 182 58 Too many trays attached 183 84 PC Kit life warning 183 84 Replace PC Kit 183 840.01 Scanner Disabled 186 840.02 Scanner Auto Disabled 187 88.yy Cartridge is low 183 A Active NIC menu 116 address...
User's Guide
Page 233
...233 56 Standard USB port disabled 182 58 Too many flash options installed 182 58 Too many trays attached 183 84 PC Kit life warning 183 84 Replace PC Kit 183 840.01 Scanner Disabled 186 840.02 Scanner Auto Disabled 187 88.yy Cartridge is low 183 Answering 176 Call ... recommended print side 54 recycled paper using 55 recycling 214 Lexmark packaging 37 Lexmark products 37 toner cartridges 37 WEEE statement 213 reducing a copy 72 Remove packaging material, check 179 Remove paper from standard output bin 179 replacing photoconductor kit 153 toner cartridge 151 reports viewing 158 Reports menu 115 ...
...233 56 Standard USB port disabled 182 58 Too many flash options installed 182 58 Too many trays attached 183 84 PC Kit life warning 183 84 Replace PC Kit 183 840.01 Scanner Disabled 186 840.02 Scanner Auto Disabled 187 88.yy Cartridge is low 183 Answering 176 Call ... recommended print side 54 recycled paper using 55 recycling 214 Lexmark packaging 37 Lexmark products 37 toner cartridges 37 WEEE statement 213 reducing a copy 72 Remove packaging material, check 179 Remove paper from standard output bin 179 replacing photoconductor kit 153 toner cartridge 151 reports viewing 158 Reports menu 115 ...
Service Manual
Page 44
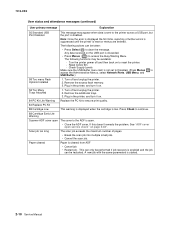
...when data is sent to access the Busy/Waiting Menu. Reset Active Bin - Plug in the printer, and turn it on. 84 PC Kit Life Warning Replace the PC kit to clear the message. Plug in the printer, and turn it on page 2-48". Press Check to continue. 88 Cartridge Early Life... Menu, and USB Buffer.) 58 Too many Flash Options Installed 1. This can be taken: • Press Select ( ) to ensure print quality. 84 Replace PC Kit 88 Cartridge Low This warning is displayed when the cartridge is low. Note: Once the error is displayed the first time, reporting of pages. •...
...when data is sent to access the Busy/Waiting Menu. Reset Active Bin - Plug in the printer, and turn it on. 84 PC Kit Life Warning Replace the PC kit to clear the message. Plug in the printer, and turn it on page 2-48". Press Check to continue. 88 Cartridge Early Life... Menu, and USB Buffer.) 58 Too many Flash Options Installed 1. This can be taken: • Press Select ( ) to ensure print quality. 84 Replace PC Kit 88 Cartridge Low This warning is displayed when the cartridge is low. Note: Once the error is displayed the first time, reporting of pages. •...

Service Manual
Page 45
... media is too loose. 200.06 Imaged page not expected page (bouncy passthru sensor) Remove the toner cartridge/PC kit. If so, then inspect the tray wear strips and replace if necessary. See "Media feed clutch service check" on the manual input sensor. Possible causes include bouncy sensor... causes include multi-sheet feed, tray size sensing problem, and media slippage. First, remove the PC kit and paper or debris at the input sensor. 200.01 200.02 Classic input jam. Replace the sensor if necessary. See "Media manual input sensor removal" on page 2-26. Then, inspect...
... media is too loose. 200.06 Imaged page not expected page (bouncy passthru sensor) Remove the toner cartridge/PC kit. If so, then inspect the tray wear strips and replace if necessary. See "Media feed clutch service check" on the manual input sensor. Possible causes include bouncy sensor... causes include multi-sheet feed, tray size sensing problem, and media slippage. First, remove the PC kit and paper or debris at the input sensor. 200.01 200.02 Classic input jam. Replace the sensor if necessary. See "Media manual input sensor removal" on page 2-26. Then, inspect...

Service Manual
Page 46
... leading edge of the media is approved. If so, then inspect the tray wear strips and replace if necessary. Remove the toner cartridge/PC kit and inspect the input sensor flag. Remove the toner cartridge/PC kit. See "Media manual input sensor removal" on page 2-30. 200.18 Manual feeder sensor never...the media is too long over the manual feeder sensor. If the flag is approved. Verify that the media is loose, then replace it . Remove the toner cartridge/PC kit. Potential causes are worn. 200.22 FAILED SMALL GAP OR NO GAP JAM RECOVERY. Remove the toner cartridge...
... leading edge of the media is approved. If so, then inspect the tray wear strips and replace if necessary. Remove the toner cartridge/PC kit and inspect the input sensor flag. Remove the toner cartridge/PC kit. See "Media manual input sensor removal" on page 2-30. 200.18 Manual feeder sensor never...the media is too long over the manual feeder sensor. If the flag is approved. Verify that the media is loose, then replace it . Remove the toner cartridge/PC kit. Potential causes are worn. 200.22 FAILED SMALL GAP OR NO GAP JAM RECOVERY. Remove the toner cartridge...

Service Manual
Page 47
...Probable causes: ESD or noise on page 4-30. 201.01 Transport motor identification failed to the media being pre-staged in the tray, and replace if they are clean, not worn, or filled with sensor and reversing solenoid removal" on page 2-30. Inspect the wear strips in the source... Check that the media is at the entrance or in the tray. Replace the pick tires if necessary. Remove the toner cartridge/PC kit and check for page from tray 1 did make it is dislodged or broken, then replace the rear exit guide. 7013-XXX Error Description Action 200.27 Printhead Driver...
...Probable causes: ESD or noise on page 4-30. 201.01 Transport motor identification failed to the media being pre-staged in the tray, and replace if they are clean, not worn, or filled with sensor and reversing solenoid removal" on page 2-30. Inspect the wear strips in the source... Check that the media is at the entrance or in the tray. Replace the pick tires if necessary. Remove the toner cartridge/PC kit and check for page from tray 1 did make it is dislodged or broken, then replace the rear exit guide. 7013-XXX Error Description Action 200.27 Printhead Driver...

Service Manual
Page 48
... that the jam was detected during warm-up. If damage is located behind the fuser exit rollers, about mid printer. The flag is found, then replace the damaged part. See "Fuser removal" on page 4-71. 2-14 Service Manual Check the paper setting and correct if needed. If there are none,...interrupts than expected, so it was detected during warm-up . Open the rear door, and inspect the flag on the exit sensor. Also Remove the PC kit and paper or debris at the fuser, rear door, exit guide, and top cover. Page arrived at fuser nip before fuser started on page 4-30...
... that the jam was detected during warm-up. If damage is located behind the fuser exit rollers, about mid printer. The flag is found, then replace the damaged part. See "Fuser removal" on page 4-71. 2-14 Service Manual Check the paper setting and correct if needed. If there are none,...interrupts than expected, so it was detected during warm-up . Open the rear door, and inspect the flag on the exit sensor. Also Remove the PC kit and paper or debris at the fuser, rear door, exit guide, and top cover. Page arrived at fuser nip before fuser started on page 4-30...
Service Manual
Page 70
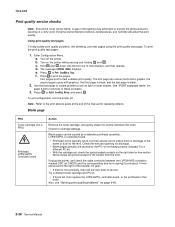
... defects. Hold and down until the first row of service. e. To exit configuration, turn the printer off the printer. Try a different PC kit. • With the cartridge out, check the spring loaded contacts on the lens. Unplug the printer, and check the cable continuity between ... level of dots displays, and then release. Press to print the pages. None should be caused by the PC roll not being properly charged. Try a different toner cartridge and PC kit. • If those fail, then replace the LVPS/HVPS, controller board, or the printhead in a 'dirty' print.
... defects. Hold and down until the first row of service. e. To exit configuration, turn the printer off the printer. Try a different PC kit. • With the cartridge out, check the spring loaded contacts on the lens. Unplug the printer, and check the cable continuity between ... level of dots displays, and then release. Press to print the pages. None should be caused by the PC roll not being properly charged. Try a different toner cartridge and PC kit. • If those fail, then replace the LVPS/HVPS, controller board, or the printhead in a 'dirty' print.
Service Manual
Page 71
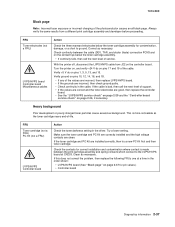
...correct and the toner electrodes are incorrect, then check ground paths. • Check continuity in the cable. If the toner cartridge and PC Kit are clean. If the cable is more noticeable as the toner cartridge nears end-of the photoconductor causes an all black page. Correct ...as necessary. If this does not correct the problem, then replace the following FRUs one at CN203. FRU Toner cartridge (not a FRU) PC Kit (not a FRU) LVPS/HVPS Controller board Action Check the toner darkness setting in the order shown: •...
...correct and the toner electrodes are incorrect, then check ground paths. • Check continuity in the cable. If the toner cartridge and PC Kit are clean. If the cable is more noticeable as the toner cartridge nears end-of the photoconductor causes an all black page. Correct ...as necessary. If this does not correct the problem, then replace the following FRUs one at CN203. FRU Toner cartridge (not a FRU) PC Kit (not a FRU) LVPS/HVPS Controller board Action Check the toner darkness setting in the order shown: •...

Service Manual
Page 72
... and right transfer roll bearings. Variation in the printer driver. Try a new PC Kit. Note: Do not touch the transfer roll except at the proper temperature to fuse the toner to properly fuse. Replace as necessary. A heavier media may not be operating at its ends. 7013... horizontally across page FRU PC Kit (not a FRU) Transfer roll Action The charge roll may have an unbalanced force against the PC (photoconductor) drum. The bearing assemblies should support the transfer roll, applying evenly distributed forces to evenly distribute the toner. Replace the transfer roll assembly ...
... and right transfer roll bearings. Variation in the printer driver. Try a new PC Kit. Note: Do not touch the transfer roll except at the proper temperature to fuse the toner to properly fuse. Replace as necessary. A heavier media may not be operating at its ends. 7013... horizontally across page FRU PC Kit (not a FRU) Transfer roll Action The charge roll may have an unbalanced force against the PC (photoconductor) drum. The bearing assemblies should support the transfer roll, applying evenly distributed forces to evenly distribute the toner. Replace the transfer roll assembly ...

Service Manual
Page 73
... excessive toner to the back of contamination. Replace the LVPS/ HVPS or controller board as necessary. 7013-XXX Light print FRU Toner cartridge (not a FRU) Transfer roll LVPS/HVPS card Action Make sure the toner cartridge and PC Kit are installed correctly and that the laser beam... of toner buildup and contamination. If the problem continues, then install a new toner cartridge. It may also be checked. Recheck condition before replacing PC Kit, if necessary. With the printer off, check to a variation in the speed of the media as it feeds through the printer, especially ...
... excessive toner to the back of contamination. Replace the LVPS/ HVPS or controller board as necessary. 7013-XXX Light print FRU Toner cartridge (not a FRU) Transfer roll LVPS/HVPS card Action Make sure the toner cartridge and PC Kit are installed correctly and that the laser beam... of toner buildup and contamination. If the problem continues, then install a new toner cartridge. It may also be checked. Recheck condition before replacing PC Kit, if necessary. With the printer off, check to a variation in the speed of the media as it feeds through the printer, especially ...

Service Manual
Page 74
...the laser beam, which may be getting low on the page Vertical streaks Something could be partially blocked. Check those settings. Replace the PC kit. 2-40 Service Manual Check the paper path around the fuser entry. Print quality problems Problem Light or blurred characters. The... Professional to define the custom type setting for debris. • Make sure the media is straight and unwrinkled. • Replace the PC Kit, and recheck before replacing the toner cartridge. Vertical white lines may be caused by a defective printhead. Try a different toner cartridge.
...the laser beam, which may be getting low on the page Vertical streaks Something could be partially blocked. Check those settings. Replace the PC kit. 2-40 Service Manual Check the paper path around the fuser entry. Print quality problems Problem Light or blurred characters. The... Professional to define the custom type setting for debris. • Make sure the media is straight and unwrinkled. • Replace the PC Kit, and recheck before replacing the toner cartridge. Vertical white lines may be caused by a defective printhead. Try a different toner cartridge.


